Features of the design and arrangement of the stove on the UAZ Bukhanka
Despite the fact that Bukhanka is a fairly old car that has been on the market for several decades, starting in the 60s of the last century, the car still has many components. Moreover, each system requires appropriate care, timely maintenance and repair as necessary. Among the important components whose role becomes most noticeable in winter is the heater. It cannot be said that the stove on Bukhanka is somehow modern or highly efficient. Many complain about its low level of effectiveness. Moreover, this applies to the rear and front stoves to the same extent. Therefore, equipment is changed quite often. But it would not be amiss to study the structure and design of the Bukhanka oven equipment, as well as study the connection diagram of the electrical component, since the installation itself does not cause much difficulty.
Why the stove on a UAZ Bukhanka car may not heat up and how to fix it
Winter is considered the most difficult period for operating any car. The famous UAZ Bukhanka is no exception. And so that winter does not bring its unpleasant surprises, you should prepare for it in advance. Since the stove equipment will be largely responsible for comfort during this period, you should deal with the faulty stove, eliminate all problems and prevent their possible occurrence in the winter. The basis for comfortable and warm trips in the UAZ Bukhanka is a working heater. But the owners of this unique car, which already boldly claims to be a rarity in many cases, note the poor performance of the standard equipment. The stove breaks down every now and then, works poorly, blows cold air, although the driver turns it on in heating mode. It is necessary to understand the reasons why the stove does not heat and, if necessary, choose a new heater, installing it on the Loaf, if the old one can no longer be repaired or restored.
Purpose and design
Before getting acquainted with the diagram of the UAZ Bukhanki stove, you should study the main functions and design features of this equipment. It is important to note that in the case of the Loaf, a pair of ovens is used, which are divided into a back and a front. Since most motorists drive alone or only with a front passenger, they pay most attention to the front system. As for the rear equipment, it is preferable to replace it with an autonomous heater, which copes with its tasks much more efficiently. The task of the heater on the Bukhanka is no different from the heaters on any other car. That is, here the system exists to maintain optimal temperature inside the vehicle. It is responsible for heating mainly in winter, and also works as a ventilation system, supplying air under the set due to the operation of fans and a motor. Currently, most Loaves are operated with the NAMI heating system, which is characterized by increased productivity and decent efficiency indicators. Structurally, there are 3 main components of furnace equipment. The loaf heater consists of:
- radiator;
- fan;
- a device designed to distribute air flows.
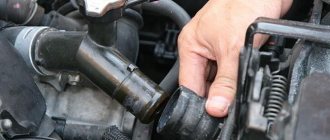
The heater faucet deserves special attention, allowing you to turn on and off the circulation of coolant through the furnace equipment, thereby switching from the heat supply mode to normal blowing of the interior with a fan. The stove system can operate in 2 modes:
- intake and supply of fresh air;
- recycling.
In the second mode, the temperature inside the cabin increases. To achieve an increase in temperature, it is necessary to close the air intakes, and then open the damper or heater tap. If the motorist only needs fresh air, then the manipulations are carried out in the reverse order. You need to turn off the stove tap and open the air intakes.
The corresponding control unit is responsible for controlling the furnace system. The adjustment is entrusted to the stove tap, which can become acidic, jam and leak. In this regard, it often has to be changed. Moreover, it is not uncommon that instead of a conventional automotive faucet designed for the UAZ Bukhanka, motorists use plumbing equipment assembled according to a special design using adapters. In practice, it works better, longer and more efficiently than a standard crane.
Disadvantages of the system
The standard system has only one plus - it works. The owners cannot say that it is impeccably reliable. It's all about the quality of spare parts. But all the other advantages that this system has can be safely written off as disadvantages. The 402nd motor has a too low-speed fan - its number of revolutions is strictly limited by the pump. To have enough of them, you need a large radiator. In winter, you have to close this radiator to prevent the engine from freezing. There are also problems with the operation of the heater. Without additional artificial pumping of antifreeze, there is no need to wait for heat.
All these problems can be solved by modernizing the cooling system 402 of the UAZ “Loaf” engine (replacing the radiator with a multi-section one, installing a second stove, and so on). Many owners modify it, increasing its efficiency.
So, we found out how the cooling system of the UAZ “Loaf” with the engine of the 409th and 402nd models works. The device is very simple, but the reliability of the system leaves much to be desired, as the owners say.
Typical faults
The stove used in the heating system of the UAZ Bukhanka car is characterized by several breakdowns that owners often have to deal with. The result of malfunctions is the failure of the furnace equipment, that is, the stove ceases to perform its assigned functions. Heating stops, which leads to corresponding unpleasant situations during the winter period of operation of the Loaf. There are several main reasons why the stove on the Loaf may not heat:
- damage has appeared in the channels intended for the passage of heated or still cold air flows;
- antifreeze leaked;
- the stove tap is out of order;
- the system is dirty, which causes a decrease in temperature when heating the interior;
- a leak has formed in the heater tap;
- The valve intended for the engine of the heating system of the Bukhanka has burnt out.
If the system is completely out of order, it is not always rational or financially feasible to repair it. When the Bukhanka stove has served for a long time, and at the same time it works frankly poorly, the most correct solution would be to completely replace it.
Installing a thermostat on a UAZ
The thermostat is an important part of the engine cooling system. Since UAZ SUVs are quite heavy frame vehicles, their engines are almost always loaded, hence the risk of overheating. It is important that the cooling system works perfectly.
The thermostat is designed to distribute coolant (antifreeze or antifreeze) over the so-called cooling “circuits”. There are only two of them: a small circuit and a large circuit. From the moment the car is started until the liquid warms up to a certain temperature (80-90 degrees), a small circle operates. The large circle turns on after this temperature, this is the “opening” temperature of the thermostat. In a large circle, the coolant flows through a large cooling radiator, which is located in the front of the car.
Maybe repairs are possible? Unfortunately no, definitely change them, since they cannot be repaired. There may be several reasons why you may need to replace the UAZ thermostat:
- It may get stuck in the closed position when only the small circuit is operating.
- In the open position, when a large circle is running, the machine takes a very long time to warm up.
- An intermediate option when the thermostat is stuck in the half-open or half-closed position.
- A problem is possible, as a result of which the valve opening temperature may decrease by several degrees, which again will lead to “underheating” of the machine to operating temperature in winter.
This is how they usually check the actual valve opening temperature
From the factory, UAZ vehicles are equipped with thermostats whose opening temperature is too low (82-84 degrees). Since there is a belt-driven fan installed from the factory to cool the engine, it always runs when the engine is running. Because of this, in winter it is difficult to warm up the car completely, so it is necessary to set the valve to a higher temperature. In summer the situation is reversed - it is necessary to install a valve with a lower opening temperature. The problem can be radically solved only by replacing the original fan with an electric one; it is even better to install 2 electric fans at once.
There were a lot of engines installed on UAZ, so the location of the thermostat may be slightly different for everyone. For example, on engines ZMZ 402 (UAZ loaf), 410, 417 it is located almost at the highest point, so to replace it you will have to drain just a little bit of liquid.
Equipment replacement
If you decide to replace the heater yourself, you should first familiarize yourself with the UAZ Bukhanka stove diagram to connect the electrical component. It is not difficult to install the equipment itself, securing it in the conventional engine compartment located inside the car. But even here you should adhere to certain rules and recommendations. The process will be considered using the example of using NAMI equipment, which has better performance and also boasts the presence of a cabin filter, which is not present in the standard Bukhanka heater.
- The first step is to drain the antifreeze from the system and also disconnect all existing wiring. To make it easier to reassemble and connect, you can write down all your steps or mark the wires, pipes and hoses;
- You need to disconnect the console from the shield, then remove the heating unit, remove the air intake flap, remove the seal and thoroughly clean all existing open recesses;
- Take measurements under the air filter, placing its housing against the surface. Next, make several mounting holes. Just don't use a drill with a diameter larger than 3.2 millimeters;
- At the installation site, apply a layer of high-quality automotive universal sealant that is resistant to moisture and sudden temperature changes. Make the layer large enough. Install the filter housing and secure it. The filter itself can already be inserted into its mounting slot;
- A new heater is being installed in the interior. It is fixed with studs, nuts and an M6 bolt. Secure everything as securely as possible;
- Then the console is installed, the entire structure is mounted on self-tapping screws;
- Then you can start connecting the control rod and fixing it;
- Connect all pipes through which antifreeze passes. For reliability, it is recommended to tighten them with clamps;
- Don’t forget about the channels that allow you to blow on the windows, avoiding them from fogging when the car is used in conditions of high humidity or precipitation. Every car should have windshield defrost. Be it a latest generation Mercedes or the good old Bukhanochka produced by UAZ;
- The installation is completed by connecting the electrical component. There is a connection diagram here that is worth considering separately.
In reality, there is nothing particularly difficult about changing the standard heating system on Bukhanka and installing more efficient and productive equipment in place of the old stove.
Advantages of an autonomous heater
Some install an autonomous heater or hair dryer, which compares favorably with a standard stove and the use of both front and rear heaters in a Bukhanka, where an additional pump will be required to improve heat transfer. But the choice is up to the car owner, who will decide for himself which path to take. An additional autonomous interior heater for UAZ Bukhanka has several main advantages:
- For a gasoline Loaf, there is no need to strongly heat the power plant, since such engines start without any problems even in severely frosty conditions. In this component, gasoline is noticeably superior to diesel;
- Using an additional heater in combination with a furnace fan, which allows the heating of the interior to work, requires the consumption of a significantly larger amount of electrical energy and the fuel itself. At the same time, the efficiency of the heating itself turns out to be noticeably lower;
- Autonomous heaters have a longer service life, maintaining the required level of heat in the cabin at all times. This is relevant for those who plan to use Bukhanka as a place to spend the night;
- Autonomous stoves or hair dryers can be installed in any convenient place in the car. There is no need to look for additional space in the engine compartment, or think about powering the furnace fan separately or together with the additional heater, without starting the ignition.
The presence of an additional autonomous heater can sometimes allow you to completely abandon the standard heating system. It all depends on the operating conditions of the Loaf, as well as the installation and placement of the equipment itself.
Placement and installation
If we talk about location, there are quite a lot of options. This is influenced by the specific layout of each car owner’s Loaf. But practice clearly shows that most often additional heaters are installed behind the driver, in the corner. Although some mount the equipment in the center or in the luggage compartment. Think over this issue in advance so that later there will be no difficulties with the operation of additional equipment. By installing the stove behind the driver's seat, you do not have to extend fuel lines and electrical wiring over a long distance. This eliminates overheating and reduces the level of fire hazard. It is recommended to install an additional podium under the stand-alone hair dryer to raise it slightly above the floor level. This way the heater will be able to work more efficiently and better heat the space of the Loaf entrusted to it. The exhaust is made standard, as specified in the instructions.
The system's exhaust pipe is best tied to the standard exhaust system of your car. This will prevent damage to the tube when the machine is immersed in water, mud, snow and puddles during operation. Although this is not the final placement option, you can come up with your own alternatives. In this case, the control panel for the autonomous hair dryer-heater can be moved to the rear of the hood. This way, passengers will be able to reach the regulator without any problems, and the driver himself will have relatively convenient access to it. In this situation, the only remaining action is to install the air ducts from the new heater. Here you can choose accommodation at your own discretion.
Design:
The heater includes the following elements:
- Radiator.
- Fan.
- Special device for air distribution.
There are two main operating modes:
- When fresh air comes in.
- When recirculating flows.
The second mode implies increased temperature in the cabin. To do this, you need to close the air intake and then open the damper. In the first mode, the actions are performed in the reverse order.
A special unit controls the entire system. A tap is used for adjustment. A new design based on increased flow circulation and the use of fluid in the radiator allows the interior to warm up faster.
It is important to remember about glass blowing . Otherwise, this will lead to icing or fogging. The driver and passengers will feel discomfort.
If moisture gets in, it is removed through the air intake. A docking device is used here.
Shall we update?
How to replace a used stove with your own hands? What will you need for this? Everything can be done using the following algorithm.
- We drain all the antifreeze and disconnect all wiring.
- Disconnect the console from the shield. We remove the heating unit, the air intake hatch, remove the seal, and then clean the recesses.
- We try on the air filter, drill holes no more than 3.2 mm in diameter.
- Apply a large layer of sealant to the installation site. We install the housing and fix it. We return the filters from the cabin to their place.
- We install a new heater in the cabin, securing it with studs and M-6 nuts. We fix the node, then install the block console. We fix the entire structure with self-tapping screws.
- Next, we connect the control rod and secure it. We connect the pipes containing the antifreeze to the unit and secure them with special clamps. Then we install blowing channels for the glass.
- Finally, we connect the electrics, fill the system and check how it works. If problems occur, the entire system must be rechecked.
Reworking the front heater of a UAZ
I already told you how I prepared my UAZ for moving from the south to Siberia and promised that I would continue to talk about modifying it with my own hands, so here it is.
Operating the machine in winter revealed a problem. If the temperature outside is below 30 Celsius, then the front heater stops heating and blowing the windows - there are 2 “embrasures” left on the windshield, the side ones are completely covered with ice from the inside, despite the fact that the car is well insulated. An Internet search showed that the problem is not new, there are many solutions (and results). But because I was “made” in the USSR, I have a technical education, a technical mindset and, it seems, not crooked hands, I went my own way. So the problem with the stove is poor heating (quick cooling) and low air flow rate in the stove; a radical decision had to be made.
I “put” this thought in my head and waited until I got my hands on something that would be useful to me. And so a neighbor (who keeps a stall of contract spare parts next to the service station where I work) brought it. It was a stove (more precisely, as it turned out, half of it - a motor housing with a stove motor and with dampers) from Toyota (I don’t know which one) with the inscription ST-215 on it and the work began. The UAZ stove was removed and disassembled, everything was laid out on the floor.
The UAZ stove was disassembled in half (according to the factory connection), the radiator was removed and given to a specially trained person for soldering and inspection))). The new stove fit like the original one instead of the rear (removed half) of the original one, but there was no room left for the radiator. It was decided to move it forward - grinding, peeling, bending, etc. it worked out))). We attach the radiator to used timing belts, naturally everything is through rubber (we put it between metal everywhere).
Schematic diagram of the UAZ Bukhanka heating system
The embodied schematic diagram of the UAZ Bukhanka heating system attracts great attention from the owners of this car when upgrading the car’s interior. After all, all car owners know that the interior of this off-road car in terms of comfort is very far from its foreign counterparts, although this model was designed from the very beginning for use by intelligence services, and what can you expect for such an inexpensive price.
Suggested options for tuning the UAZ Bukhanka interior
As already indicated, the UAZ 452 car was created to meet the high requirements of special transport for the Ministry of Emergency Situations, military and medical services. True, this fact is not at all considered a statement that the performance of this car can be considered impeccable. That is why, when tuning the interior of the Loaf, not only the heating system is modernized, but also many other parts and components.
First of all, when finalizing the decoration inside the UAZ Bukhanka, most car owners replace standard hard seats with more modern and soft versions, since the main seats can shake out the soul when driving, which is especially typical for off-road driving. Moreover, some craftsmen even integrate chairs with heating and electric drive, for which the existing electrical equipment connection diagram is adjusted.
At another step, attention is paid to soundproofing the interior of the UAZ 452 and fixing the components of the dashboard, but before fastening the components, the heating system of the Bukhanka is modernized, which will be discussed further. In terms of theme, the interior can be lined with leather, the dashboard can be decorated with wood inserts or wood-look details.
Often, various auxiliary accessories appear in the interior of the UAZ Bukhanka, including shelves, glove compartments and ashtrays. The steering wheel is often replaced with a modern imported version with soft leather upholstery or other material.
Of course, there are other options for modifying the interior of this car, which depends on the imagination of the car owner, but one of the main nuances of tuning the interior is still the upgraded circuit of the Bukhanka heating system, since the standard heater simply cannot cope with its immediate tasks.
How Bukhanka's heating system can be modernized
When the schematic diagram of the UAZ Bukhanka heating system is being finalized, the following points must be taken into account.
The heating device of the heater must be located below the level of coolant present in the cooling system, so that this substance is pumped through it much more efficiently and is always present in it. To do this, it is necessary to make the cooling system closed by integrating a weather valve in the cap of the expansion tank. In this case, in the latter, the coolant level must always be higher than the installed heater.
The air needs to be aggravated by a less noisy centrifugal fan, which should be located along the air flow to the heating device. This approach will further reduce the noise parameter.
The air flow through the heating device must pass only due to the pressure generated by the fan, and not using kinetic energy. In this case, the fan nozzle should not blow directly into the radiator honeycomb, since the air will pass unevenly through the heating device.
The temperature of the discharge air should be changed by a damper that mixes cold and hot air flows, and not by a tap. When using a faucet, the temperature will greatly depend on the operating mode of the power unit, and the damper can be used to adjust the ratio of the two air flows.
The driver and passenger of the UAZ 452 will feel more comfortable when a higher temperature develops in the legs and lumbar region, and cooler air should be at face level to eliminate drowsiness. To do this, the heating system circuit must be built in such a way that hot air is forcedly supplied to the feet and glass, and cooler air must flow to the face, which can be done by additional selection of cold air masses between the heating device and the fan, and also using an adjustable mixing damper air flows.
One of the options for upgrading the Bukhanka heating system is usually the following sequence of actions, which consists in integrating a pair of snails onto an ordinary stove body:
- one snail is taken from the Bukhanka salon stove, the body of the second must be taken from MTZ-82, and the fan and motor are installed from another UAZ stove;
- it is necessary to insert a turbine from the Volga into the snail, since the standard one is considered very small and does not inspire confidence;
- then hoses are connected to the volute, for which a plate with a pair of holes is simply made, which is the least difficult solution;
- after this, you need to take traditional sewer expanders with a dimension of 50 * 45, which are attached to the plate. Their fastening is also very ordinary. You need to take plugs from the 50 pipes and make holes in them to form a ring with a side. Then the entire system is placed on the plate;
- To rotate the outlet, you need to put a pair of rubber rings on it, which can be taken from tractor hydraulics. Then the entire system is applied to the cochlea, and as a result it is necessary to obtain a similar performance with the second cochlea. One thing to keep in mind is the integration of diffusers;
- The work ends by fastening the snail to the plate using bolts, rivets and welding, after which the product is painted. It must be remembered that the stove body cannot be removed without draining the antifreeze in advance and without disconnecting the hoses from the heater.
UAZ loaf cooling system diagram
- fan and radiator
- Water pump
- Thermostat
- water jacket and pipes
- temperature sensor
- Conclusion
- Engine cooling system diagram
- Lada Kalina 8-valve engine cooling system: diagram
- Lada Granta engine cooling system
- Cooling system ZMZ 402
Almost all motorists know that the car has an engine cooling system. UAZ Bukhanka or 452 is equipped with a simple design of the power unit, and based on this, the rest of the units have simple design features.
Purpose of the cooling set
The UAZ Bukhanka engine cooling system is designed to cool the engine during operation. Thus, the cooling elements remove the generated heat from the cylinder block and head using coolant and cool it in the radiator.
During operation, the car's power unit heats up to prohibitive temperatures and if there is no cooling, the engine parts will simply overheat and become deformed. Despite the fact that such situations also occur in the presence of a combination of coolant, in the case when it is not in working order or one of the serious elements has failed.
The operating temperature of the engine on a UAZ Bukhanka is 80-100 degrees Celsius. It is precisely in this interval that the thermostat opens to a huge cooling circle.
Because this car does not have an electric fan, but a forced cooling system, additional cooling of the radiator is always turned on.
The power unit may overheat if one of the cooling elements fails. First, there will be a mild stage, during which the engine will simply boil.
But there can also be serious consequences, such as deformation and bending of the cylinder head. At this stage, the situation can be corrected by simply grinding the surface of the block head.
At the middle stage, engine elements can become deformed. This includes the valve mechanism.
Then the block head will need major repairs, and this will cost the owner of the vehicle a lot of money.
The difficult stage is when the piston is destroyed somewhat due to the strong effect of heat. But, and this is not the worst thing that can happen, because if the coolant gets into the car’s cylinders, the engine will be hit by a water hammer, in which case a major overhaul is not always helpful.
Coolant system diagram
The cooling system of the UAZ engine is quite simple; it is of a closed type with forced circulation of coolant. The “coolant” circulates in a circle from the radiator, passing the water thermostat and pump into the cooling jacket, and then returns.
Let's look at the cooling scheme of the power unit on UAZs, and in particular on the engine marked 452:
Cooling element
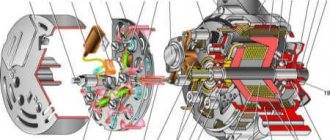
The main elements of the cooling system of the power unit of the UAZ Bukhanka 452nd engine are all recognizable details: radiator, fan, water pump, thermostat, pipes, temperature sensor and water jacket. In addition, part of the design is a heater.
So, let’s look at what the main engine cooling elements are, their structure and operation, and also repairs and modifications.
fan and radiator
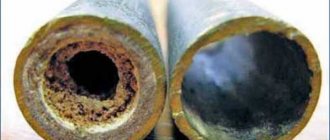
UAZ vehicles will be able to install 3-row bronze or aluminum radiators, which provide great cooling of the liquid. Because the operation of the elements is quite long, the cooling process of the power unit is not always the way it should be.
In this case, this is due to clogging of the channels in the element. Usually, simple cleaning does not help, and increased wear creates cracks in the tubes, which the owners actively solder, not wanting to take new parts.
The main purpose of the radiator is to cool the liquid that circulates from the engine using the wind flow.
The cooling fan on the Bukhanka is a forced one, mounted on a pulley and works invariably while the crankshaft is spinning. Many motorists are upgrading this system and installing electric fans, which are usually turned on by the driver himself in accordance with the temperature readings on the dashboard.
Water pump
The UAZ pump has a mechanical drive. The main purpose of the element is to ensure uninterrupted circulation of coolant throughout the entire system. So, the water pump supplies fluid flow to the radiator for cooling and back.
A malfunction of this element can lead to loss of cooling and overheating of the engine.
Thermostat
The main design element is the thermostat. It supplies fluid circulation and is a switch between the small and large circles in the aggregate.
To warm up the vehicle, the element is kept closed. When it reaches 80 degrees Celsius, it begins to open, allowing fluid to circulate through the radiator.
The main malfunction can be considered jamming of the element, which can lead to overheating of the engine, because, as experience shows, the thermostat jams on a small circle, and accordingly there will be no fluid flow and additional cooling through the radiator.
water jacket and pipes
Pipes are a means of transporting fluid collectively from its elements and the engine to the radiator and back. The malfunction of these elements leads to a loss of “cooling”, which, in turn, lowers the overall coolant level, and this is a direct path to overheating.
The water jacket is the design highlight of the block and cylinder head. It is through these holes that the coolant flows, which takes away heat for cooling.
Over a long period of operation, especially on water, corrosion can form in the walls, which will lead to loss and leakage of fluid.
temperature sensor
The temperature sensor on Bukhanka is not what most motorists are used to seeing. This is an old type element that does not include an electric fan, because a forced combination is installed here, and temperature indicators are installed on the dashboard.
Conclusion
As you can see, the cooling system for the UAZ Bukhanka (452) engine is quite simple. It is easily repaired, and broken parts can be changed without much difficulty.
This unit consists of components - radiator, fan, water pump, thermostat, pipes, temperature sensor and water jacket.
The coolant sensor is fundamentally different from modern ones, because it does not turn on the fan, but the “coolant” temperature.
UAZ loaf: the hood is open, we observe the engine
Similar articles selected for you:
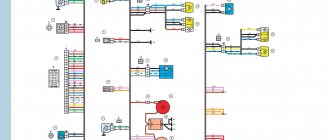
Verified wiring diagram for UAZ 452: Loaf Loaf friend, comrade and Tablet
The UAZ-452 has received a variety of affectionate nicknames over the years of operation: “Loaf” and “Loaf” - for its external resemblance to a bread brick, “Tablet” - for reliable service in medical organizations. It is noteworthy that its design and individual systems - transmission, body or wiring diagram of the UAZ 452 turned out to be quite durable. Perhaps this was the only car in those years capable of reaching the most remote places for humanitarian purposes.
The famous Bukhanka has become a multi-purpose vehicle for rural areas
Meet UAZ 452
The car was a cargo-passenger version of an off-road vehicle with a 4x4 wheel arrangement. The Ulyanovsk Automobile Plant mastered production of the model back in 1965.
You can evaluate its capabilities by watching the following video:
The UAZ 452 is capable of transporting cargo weighing up to 700 kg in the back. In addition, it can tow a trailer weighing 850 kg. The vehicle became very popular not only in Russian off-road conditions, but was also successfully used in large cities in various capacities (pictured in the article).
In particular:
- Like a traffic police car;
- As a fire engine;
- Ambulance car;
- Grocery store;
- Utility vehicle, etc.
The famous Barefoot on the basis of UAZ 452 - a road train in the Izmailovo Central Park of Culture and Culture
Electronic components
The electrical wiring of the UAZ 452 was a simple single-wire circuit.
Structurally, it had the following solutions:
- The role of the second wire was played by the metal body and the components and assemblies attached to it;
- All electronic components and actuators had a “-” displayed on the housing. The cost of such a solution justified the imperfection of the scheme.
For reference: The instructions provided for regular checking of contacts. When oxidized, they should have been cleaned with sandpaper.
Power unit
The engine compartment is located directly inside the car, as this is due to its design.
Access to components and assemblies is also provided from the passenger compartment by removing the cover, which:
- Provided protection for the driver and passengers from the penetration of exhaust gases;
- Protected from dust and dirt;
- Served as an additional heating element (passive - from heating).
The high engine layout contributes to the vehicle's cross-country ability in off-road conditions
The previously used engine from Pobeda was replaced with a more modern engine from the 21st Volga. This was facilitated by the launch of a production line at the Zavolzhsky Motor Plant in 1964.
Note! Despite some skepticism regarding the inconvenience of servicing a cabover car with your own hands, years of operation have proven that there are no difficulties.
Passive vehicle safety
The design of the "Baton" with a cabover layout also initially raised a number of questions regarding safety. However, a series of crash tests conducted back in 1971 at the Dmitrov test site proved that in most emergency situations the driver and passengers of the UAZ 452 have a chance to avoid injury.
A striking example of comprehensive testing of “Tablets”
Which stove to choose
This is one of the fundamental questions when performing such tuning. The fact is that there is enough space on the UAZ to perform many different manipulations, so, for example, if the stove you like from a foreign car does not fit on the UAZ due to a mismatch in size or connection methods of the pipes, the problem as a whole can be solved. On other cars, such opportunities are an order of magnitude smaller due to the highly compact arrangement of components and assemblies both in the engine compartment and under the dashboard.
Since the domestic automobile industry is focused primarily on the products of the Volzhsky Automobile Plant, it is not surprising that many are trying to adapt the heater from the VAZ. But there are some nuances here. A classic stove is clearly not suitable here; a Chevrolet Niva stove, which demonstrates good performance characteristics, is unacceptable due to the difference between the exit angles of the pipe fittings - it is almost impossible to put hoses on them. So the most realistic way to install a stove on a UAZ from a VAZ is to use the Kalina heater, although in this case a considerable number of alterations will be required.
A Volga stove won’t fit into a UAZ either, but many car owners install a Volga impeller instead of the original one, along with an additional motor, and claim that the interior is truly tropical. Whether this is true or not, this option for modernizing the heating system can be called half-hearted, and it will not satisfy everyone.
Features of electrical equipment
For designers, a more difficult process in those years was to find high-quality components to equip the ignition and lighting systems.
This can be clearly seen from the filling of the cabin:
- vehicle system controls;
- control devices.
Due to a shortage of controls, the UAZ received rather “variegated” elements
External lighting
Everything that could be obtained was used to ensure uninterrupted supplies to the factory conveyor.
In particular:
- from the predecessor of the Bukhanka, the GAZ-69, the factory workers borrowed a foot-operated light switch;
- From GAZ-24 headlights, etc.
The design of the GAZ-69 switch was successfully used on the 452
Ignition system
Since the Volgov engine was installed on Loaves and Bukhanki, the UAZ 452 wiring for the ignition system was almost completely copied from it.
The simplicity of the design made it easy to maintain the car away from garage conditions