Connection points for car alarms on Lada Granta, the cheapest equipment
Ignition switch: +12 – brown ign1 – blue/black starter – red
Instrument panel: turns – blue and blue/black handbrake – brown/blue (diode breaks)
Driver's threshold: driver's limit switch - red/green, we connect the rest of the doors to it
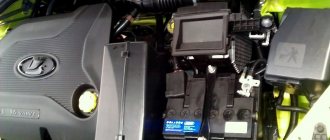
Under the hood: Tahoe - white/black on the ignition module, the hood tip is in its normal place
Trunk limit switch – we install the connector on the trunk (the limit switch is already in the lock).
central locking .
Car alarm connection points for Lada Granta 2012
Ignition switch: + 12V - pink IGN_1 - blue Start - red
Left threshold: Turns - blue and blue/black Fuel pump - gray Driver's limit switch - red/green Handbrake - brown/blue
Tidy: Driver's limit switch - red/green Handbrake - brown/blue
Central locking - install an electric drive in the driver's door, if there is no electric drive in the door Trunk - white/black; harness in the trunk (install a diode) Tachometer - brown/red; In the configuration, the standard can be taken on the electric power steering unit
If the car has painted bumpers (standard equipment), then there is no need to install an additional activator; we connect pins 2 and 7 on the door lock using a power circuit. The locks on the doors are Kalinovsky, the activator is built inside, but the wires are not routed.
There is only a driver's door switch. The rest need to be installed and connected to the driver's limit switch, i.e. to red/green in the threshold. The limit switches are the same as the engine compartment on the Priora. The limit switches will have to be taken with a connector and wiring.
Selecting an alarm kit
All complexes are divided into 3 large categories:
- Budget option - sound, light and blocking types;
- Mid-price segment models – have feedback and autostart functions;
- Premium – have a connection with a satellite, which makes it possible to control the location of the car via a PC, tablet or phone.
In general, installing a budget version is impractical, since Vesta already has one from the factory. Premium class alarms are usually purchased for long-lasting and prestigious cars. This means that the most likely option will be an alarm from the middle price category, the representatives of which are worth considering in more detail.
Kan shina Lada Granta Lux
I decided to connect to the can-bus in order to observe the engine information on the monitor. I'm tired of scrolling around the key on the windshield wiper handle. Yes, and I want to use the existing potential of MMS. I took the connection instructions from 3Deon www.drive2.ru/l/3567087/. I took the instructions “How to make a mini-ISO connector yourself” from alexbah2904 www.drive2.ru/l/5554551/. Many thanks to them for the information! And to all those who share useful tips and personal experiences!
The most expensive and only necessary purchase for this connection is a mini-ISO connector (price around 400 rubles). The cost of this connector is a maximum of 50 kopecks! I decided to follow the example of alexbah2904, I found a suitable plug from my computer
Recommendations
Comments 14
You have kan shina, but you don’t have lin.
Alarm starline A-93 I have all the options working.
Is your equipment standard?
And connected via canbus? Is there a wired or regular connection? Apparently, as many masters as there are so many opinions and implementations. The master told me through the cable bus that nothing would come out of the standard configuration. Here Starline promised keyless immo bypass for grants, as I understand it, just through the canbus. I wish I could file it down
My immo is not activated. Dealers offer to supply M-21.
There is a CAN bus there, but normally options that are not needed by the alarm system are connected through it. Therefore, even if you connect the signaling to it, nothing will change. But in the luxury, the handbrake is already supplied via CAN, which is necessary for alarms with auto start.
The connector is located under the glove compartment on the left.
Who says what? Some say that the signaling can (and should) be connected via CAN (such as Starline A63/93), and some that it doesn’t make sense. H.z. who to listen to.
Even on the 2012 grant standard can tire.
You have a Kan tire.
Why then does the installer say that it doesn’t exist? For what purpose? Strange.
There is a bus, but not everything works on it. Alarm installer? If so, then he’s partly right, you can’t connect the signaling system via the canbus since there is no body electronics unit (only in the luxury) that controls the locks, ESP, etc.
Dear customers, in order to avoid errors when sending a green mini ISO 6 pin adapter with a CAN bus to standard MMCs, in the “Comment” line, indicate for connecting the CAN bus, rear view camera video, amplifier or subwoofer, your car model, year of manufacture .
THE DIFFERENCE between the Multimedia system with navigation MMC VAZ 2190-30 DATSUN standard touchscreen from the Multimedia system with navigation MMC VAZ 2190-50 standard touchBACK mounting points and when turned on displays on the displays of MMS 2190-30 DATSUN , for MMS 2190-50 GRANTA
MMC 2190 Lada Granta, Vesta, DATSUN, MMC 2192 Kalina 2, Priora 2 has the ability to connect to the car’s CAN bus, which means that the MMC can read and output data from the “brains” (on-board computer information) using an analyzer program signals from control units. When transmitting information from control units, the signals are amplified by the transceiver (transceiver) to the required level. That is, support for the MMC CAN bus makes it possible to display information about the functioning of control systems, as well as information about various errors directly on the MMC monitor (similar to OBD-II adapters) with the subsequent ability to eliminate them.
Do you want to monitor important information about engine operation, speed, fuel remaining, distance traveled, etc. on the MMC monitor, connect a green mini ISO 6 pin adapter with a CAN bus.
If you have the Standard equipment and do not have any units (temperature sensor in the cabin and outside, oil temperature sensor in the box, if manual, etc.), then you should not wait for a miracle; this indication will not appear.
It is very convenient for those who need information about the distance traveled per day and time to fill out travel sheets, this data can be easily transferred to an SD card or USB, they are saved in an Excel file.
The green mini ISO 6 pin adapter is connected to the standard frame MMC 2190 Lada Granta, Vesta, DATSUN, MMC 2192 Kalina 2, Priora 2, and the CAN bus is connected to the diagnostic block in the feet on the front passenger side.
The CAN bus provides connection to any devices that can simultaneously receive and transmit digital information (duplex system). The bus itself is a twisted pair cable.
Vehicle systems and control units not only have different load resistances, but also data transfer rates. All this can interfere with the processing of different types of signals. To solve this technical problem, a converter is used to communicate between the buses. Such a converter is usually called a gateway interface. The interface is also used to input and output diagnostic information, the request of which is realized via the “K” wire (K-line) connected to the interface or to a special CAN bus diagnostic cable.
The OBD connector (OBD - On-board diagnostics) is simply a standard and convenient way to connect an external device to the CAN bus. To correctly read the data, a suitable OBD-II protocol is used.
It is better to save the file in MMS memory or on a flash drive. If you disconnect the battery terminals, the application will have to be installed again.
Other articles of the product and its analogues in catalogues: miniISO6 pinZ.
Lada Vesta / Lada Vesta, Lada Granta / Lada Granta, Lada Datsun / DATSUN ON - DO, MI - DO, Kalina 2 / K alina 2, Priora 2 / P riora 2.
Any breakdown is not the end of the world, but a completely solvable problem!
How to connect the Volga signal
Standard sound signals of LADA cars consume no more than 5A, and Volga horns consume 7A each. In this regard, to connect them it is necessary to use a 4-pin relay. The Volga signal connection diagram is universal for all cars:
Before starting work, it is recommended to disconnect the negative terminal from the battery. All wires are laid in corrugation. We place the relay in a place protected from moisture and dirt. The whole process is also shown in the video:
About the guarantee. If you independently modify the car in terms of electrical components, there is a possibility of refusing warranty service for the car. Therefore, the installation of signals from Volga should be carried out at a service center, where after connection they will be ready to provide a document confirming the quality of work. You can also contact an authorized dealer for such modifications.
Are you satisfied with the operation of the standard sound signal on the LADA model? Are you ready to install a Volga horn? Let us remind you that we previously looked at other methods that can make operating a car more comfortable. For example, installing a gas tank cap bracket or how to make a flip-flop ignition key.
The Lada Vesta has two beeps. One signal is a warning signal, and the other is an alarm signal.
To replace or repair signals, you need to prepare the car for work.
Raise the hood and disconnect the negative terminal from the battery using a 10mm wrench.
In order to remove the signal signal, you need to remove the bumper, as described in the article “Removing and installing bumpers on a Lada Vesta car.”
After this, disconnect block 1, Figure 1, of the front wiring harness from sound signal device 2.
Using a 13mm socket, unscrew nut 3 securing the sound warning device to the car body and remove the sound warning device.
Install the sound signal device in the reverse order of removal.
The tightening torque of nut 3, Figure 1, fastening the sound signal device is 20…30 Nm (2…3 kgf.m).
After repairing or replacing the signal, we install the front bumper.
Connection points for car alarms on Lada Granta, the cheapest equipment
Ignition switch: +12 – brown ign1 – blue/black starter – red
Instrument panel: turns – blue and blue/black handbrake – brown/blue (diode breaks)
Driver's threshold: driver's limit switch - red/green, we connect the rest of the doors to it
Under the hood: Tahoe - white/black on the ignition module, the hood tip is in its normal place
Trunk limit switch – we install the connector on the trunk (the limit switch is already in the lock).
central locking .
Car alarm connection points for Lada Granta 2012
Ignition switch: + 12V - pink IGN_1 - blue Start - red
Left threshold: Turns - blue and blue/black Fuel pump - gray Driver's limit switch - red/green Handbrake - brown/blue
Tidy: Driver's limit switch - red/green Handbrake - brown/blue
Central locking - install an electric drive in the driver's door, if there is no electric drive in the door Trunk - white/black; harness in the trunk (install a diode) Tachometer - brown/red; In the configuration, the standard can be taken on the electric power steering unit
If the car has painted bumpers (standard equipment), then there is no need to install an additional activator; we connect pins 2 and 7 on the door lock using a power circuit. The locks on the doors are Kalinovsky, the activator is built inside, but the wires are not routed.
There is only a driver's door switch. The rest need to be installed and connected to the driver's limit switch, i.e. to red/green in the threshold. The limit switches are the same as the engine compartment on the Priora. The limit switches will have to be taken with a connector and wiring.
Tips from the professionals
- When installing the system on the Lada Vesta, fastening the wires together at any connection points, you should use exclusively terminals specially designed for this purpose. Conventional windings will not allow you to achieve reliable and safe contact. Remember that safety comes first.
- Do not experiment or change the design and circuit of your alarm. First of all, this will entail the immediate removal of your device from the warranty, and also - this may cause breakdowns and malfunctions in the future.
- Before working on the main attachment points, make sure you have all the necessary tools to complete the job.
Using these basic rules, you can install any simple protection system on your Lada.
If you understand absolutely nothing about electrics, then it is better to contact a car service center, where specially trained people will do everything for you, it will be much safer and more efficient. source