Main reasons for refusal
The main reason why such an important device breaks down and needs to be replaced. This is mechanical wear of the handbrake. As you know, the basis of the system is a small cable that transmits forces from the lever to the mechanism. In fact, it turns on this node.
The operating conditions of the cable are quite complex. the constant load from the force transmitted by the driver through the handbrake lever into the system can sooner or later disable the device.
However, the cable breaks extremely rarely. Most often the cables simply come off. Or the tips secured in the drum are rubbed with very long wheel bolts. Needs renovation. In addition, the parking brake may not work due to wear on the rear drum brakes (as well as worn shims, depending on the design).
See:
As a result, the node ceases to perform its assigned functions. steering is not trivial. The parking brake needs to be replaced and subsequently adjusted. But not everything is so simple. In some cases, the device may be damaged in the event of emergency braking of the car. as a result, it requires repair or replacement.
Often the metal is not completely rubbed out, but the steel fibers are stretched and movement in the shell is very difficult. But regardless of the reason why the parking brake fails, why won't it hold. The purpose of this article. understand how to solve the problem.
Repair manual
To carry out repairs quickly, you will need the help of a partner. This will save significant time that will need to be spent on repairs.
Further point by point:
- Step one. remove the VAZ 2110 from the parking brake (the parking brake is lowered all the way to the floor. The system for holding the vehicle in place must be turned off);
- Step two. remove the wheel brake drum;
- Step three. Getting equalizer is quite difficult. The technician will need to remove the muffler from the suspension cushion and remove the resonator from the rear cushion. We lower the pipe to release the exhaust gases;
- Step four. To do this, you need to crawl under the VAZ 2110. There is an adjusting nut and a lock nut. We unscrew them and remove the equalizer from the rod;
- Step five. Remove the cable end from the control element;
- Step six. The VAZ 2110 body has a bracket in which the end of the cable sheath is installed;
- Step seven. The manufacturer fixed the cable using brackets. they should be bent at the sides;
- Step eight. Remove the rear brake shoe and disconnect the handbrake cable handle;
- Step nine. We move on to the rear axle beams and loosen the nuts with which the manufacturer installed the handbrake. Remove the cable from the device holder.
Replacing the handbrake cable on a VAZ-2112
Initially, you need to perform the following operations:
- Lower the lever all the way down.
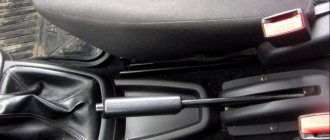
We put the handbrake at the very bottom. Do not pay attention to the scuffs of the console; we conducted an experiment with non-standard armrests. The photo shows the editorial car - Remove the brake drum from the wheel that will be replaced.
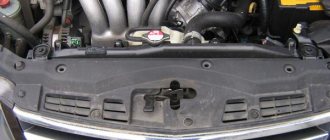
Got to the brake drum - Remove the muffler from the cushions.
- Lower the exhaust system down.
- Unscrew the nuts on the handbrake rod.
- Remove the equalizers from the rod hinges.
We installed cables from a VAZ-2109, so the equalizers also had to be changed - Remove the end of the cable being replaced.
- Remove the cable from the casing, which is installed on the body.
- Bend back the brackets that secure the cable to the body.
- Remove the brake pad from the wheel and disconnect the cable from the mechanism.
- Remove the cable from the drum.
- Loosen the nut that tightens the cable on the rear beam.
- Remove the cable from the holder, bracket and spike.
After carrying out this work, everything is installed in place in the reverse order of disassembly. The cables should be arranged crosswise.
The new cable is inserted into the drum. All that remains is to put it on the block and put the wheel back together.
REPLACING THE HANDBRAKE ROD VAZ 2110 2111 2112
HANDBRAKE ADJUSTMENT VAZ 2110
2111 2112.
In fact, this stage can be called halfway through. The car owner should now install the new handbrake cable using the above steps (you need to do it in reverse).
The main design feature of the VAZ 2110 is that the cables in the bracket are installed crosswise.
See:
In addition, after installing the product in place and reassembling the VAZ 2110 in the reverse order, the parking brake system will need adjustment to restore traction. This is important for the further comfortable operation of the machine.
Replacing the handbrake cable yourself on a VAZ 2110
The handbrake is the colloquial name for the parking brake. It is available in any car - the VAZ 2110 is no exception. It is the handbrake that is used when parking for a long time (more than 5 minutes). You also cannot do without it when stopping on sloping surfaces. And of course, in an emergency (for example, when conventional brakes fail), it is the parking brake that allows you to quickly and effectively stop a moving car.
Design and operation of the VAZ 2110 parking brake
The parking brake consists of two parts:
- Braking mechanisms.
- Brake drive - it is with its help that the driver of the VAZ 2110, acting on the handbrake lever, transmits force to the brake mechanisms. This lever is located to the driver's right in the space between the seats. The design of the handbrake has a ratcheting mechanism (it makes characteristic clicks when used) - with its help the lever is fixed in the working position. In addition, there is a special button on the lever - it turns on the illuminated icon of the activated parking brake on the dashboard.
Next, the lever, with the help of three cables - the front one (the return spring is located on it) and two rear ones (they are connected to the wheel brake mechanisms) exerts a direct effect on the braking devices directly on the rear wheels of the car.
The rear wheels of the VAZ 2110 are equipped with a drum-type brake mechanism. One of the rear brake cables, connected to a special lever, acts on the brake pad. It moves towards the brake drum. As a result, the wheel stops and braking occurs.
Indications for replacing the brake cable on a VAZ 2110
During operation, even if there are no complaints, after every 30 thousand kilometers it is necessary to carry out a full inspection of the parking brake system.
In this case, the following phenomena may be noticed:
- Clear signs of wear at the brake cable ends.
- Some of the steel threads that make up the cable are damaged.
- The movement of the cable in the sheath is difficult, even after abundant lubrication
- The ratchet mechanism of the brake lever, when used, makes more than 6-8 clicks.
- When using the handbrake, there is no braking as such - the car moves on its own on a slope or when pushed on level ground.
Any of the listed phenomena is a reason to immediately change the parking brake cables of the VAZ 2110.
The procedure for replacing parking brake cables on a VAZ 2110
Required tools and equipment:
- Overpass or inspection hole.
- Wheel chocks (brake shoes).
- Reliable supports for the car body.
- Two jacks.
- Two mounts.
- Large screwdriver (with a slot of at least 10 mm).
- One open-end wrench No. 10.
- One open-end wrench No. 13.
- One socket wrench No. 13.
Basic steps when replacing the parking brake cable of a VAZ 2110:
- Place the car on an overpass or over an inspection hole in the garage. Here, secure the front wheels with brake shoes.
- Raise the rear part of the car up using two jacks and secure this position with reliable supports.
- Having lowered the handbrake lever all the way down, remove the rear drums and pads in sequence. All of them are carefully inspected for wear. It should not exceed 30% of the ideal condition (speaking of brake pads, you need to clarify that they look at their thickness. It should not be less than 65% of the thickness of new pads)
- Clear access to the equalizer by removing the muffler.
- Dismantle the equalizer itself by unscrewing the nut and locking nut securing it to the brake cable.
- Release the cable from the fastenings on the bottom of the car.
- Remove the brake pads and release the lever associated with them (here it is recommended to use a large screwdriver) - disconnect the ends of the rear brake cables from it.
- Carefully remove the brake cable from the brake shield. It is better to perform this and the previous operation with an assistant, as it is easy to injure your hands after loosening the lock nut.
- All places where the brake cable passes and fastens must be thoroughly cleaned from dirt and rust with a wire brush.
- Treat all fastening parts and cable passages with a rust converter. In its absence, 6% acetic acid is often recommended (not to be confused with table vinegar!). All these actions must be carried out wearing rubber gloves and special glasses to protect the eyes from accidental splashes of hazardous substances.
- The new brake cable is inserted into the brake shield. Then attach it using lugs to the lever connected to the brake pads.
- Secure all the parts in their proper places.
- Check the brake functionality - after driving a short distance, apply the brakes. After this, measure (by hand) the temperature of the brake drums. It should not be higher than the temperature of other parts. If heating is observed, then you need to readjust the degree of tension of the brake cable.
adjustment
Adjustment. these are a few simple steps:
- The car is placed on a jack so that the rear wheels can be easily turned by hand;
- The repaired handle is brought to the locking position;
- Armed with two keys on "13" and find the parking brake adjusting bolt and nut;
- Tighten the tension adjustment nut. We pull until the wheels are completely locked;
- Tighten the locknut;
- Check the quality of the repaired device
Adjusting the travel of the handbrake cable on a VAZ-2110
The lever should tighten the cable tightly with 2-4 clicks.
- The pads are put in place and the wheels are put on. They should initially rotate freely when the lever is released.
- Then you should drive 1-2 kilometers by car. In this case, you need to brake several times.
- Then you should try the drum by hand. It shouldn't be hot. When it gets hotter, the cable needs to be released a little.
- Repeat the entire procedure until the drum stops heating.
modernization
Many modern owners modernize their cars and install so-called steering wheels here. As a lyrical digression, we note that in this case it is necessary to replace the rear brakes with disc brakes.
Very major design changes are required, such as installing a hydraulic system on the parking brake. No cables are used here. The parking brake lever is connected to the master cylinder.
After the driver lifts the lever , the brake fluid in the system presses on the cylinders. Hydraulic systems are most often found on sports cars. After all, such a brake holds up much better.
The main advantages of the hydraulic system are:
- Full confidence that the hydraulic hand brake will work;
- There is no need to pull the cable.
How to remove the parking brake lever of a VAZ 2110
Removing the parking brake lever on a VAZ 2110 car is performed to disassemble it and repair failed elements or replace them with new ones, as well as when carrying out various works in which the presence of the lever will interfere with the progress of their implementation. Prepare a standard set of tools, drive the car into a viewing hole or overpass, turn off the power (disconnecting the minus terminal from the battery) and perform the following sequence of actions:
- In the car interior, remove the decorative upper and lower panels of the floor tunnel lining.
- Next, we move under the car and remove the equalizer bar for the handbrake cables by unscrewing the lock nut and the adjusting nut.
- We take out the protective cover from the hole in the floor and remove it from the rod.
- We move into the cabin again and use a Phillips screwdriver to unscrew the screw securing the bracket for the parking light warning lamp switch. Also note that this screw secures the ground wire.
- Next, unscrew the four bolts securing the parking brake lever.
- We put the bracket with the lamp switch aside.
- By removing the rod from the hole in the floor.
- To replace the rod, unbend the antennae of the locking pin and remove it, then the washer and the rod itself. If necessary, if signs of severe wear or damage are detected, replace the plastic bushing.
- Reassemble and install in the reverse order.
Related materials:
- Other
- Engine
- Steering
- Electrical equipment
- Transmission
- Brake system
- Suspension
- Tuning
- VAZ 2110
- Other
- Engine
- Steering
- Electrical equipment
- Transmission
- Brake system
- Suspension
- Tuning
- VAZ 2114
- Electrical equipment
- Engine
- Brake system
- Other
- Steering
- Transmission
- Suspension
- Tuning
- Lada Priora
- Steering
- Engine
- Suspension
- Electrical equipment
- Tuning
- Brake system
- Transmission
- Video publications
- VAZ tuning photo stream
- Operation and repair manuals
How to repair the parking brake lever on a VAZ 2110
1. The first step is to remove the upper and lower linings of the floor tunnel.
2. At the bottom of the car, unscrew the locknut and the parking brake adjusting nut and remove the equalizer from the rod.
3. Take the protective cover out of the hole and remove it from the rod.
4. Inside the passenger compartment, unscrew the screw of the front fastening of the brake warning lamp switch bracket. The ground wire is also secured under this screw.
5. Unscrew the 4 bolts securing the parking brake lever.
6. Remove the bracket with the switch to the side.
7. Remove the parking brake lever, removing the rod from the hole.
8. If it is necessary to replace the rod, then you need to remove the cotter pin and the washer.
9. Now the rod can be removed from the axle.
10. Also, if the plastic bushing is worn out, it needs to be replaced. Reinstall the parking brake lever in the reverse order. After installation it needs to be adjusted.
Handbrake repair video:
Sources
- https://www.autosecret.net/tormoznaya-sistema-vaz-2170-2171-2172/609-zamena-trosa-privoda-stojanochnogo-tormoza
- https://carfrance.ru/kak-podtyanut-i-otregulirovat-ruchnik-na-vaz-2112-svoimi-rukami-video/
- https://remont2110.ru/kak-otremontirovat-rychag-stoyanochnogo-tormoza-na-vaz-2110.html
How to tighten the handbrake on a VAZ 2110? Replacing and adjusting the cable
Despite the fact that the hand (parking) brake is rarely used, VAZ 2110 owners quite often have problems with this unit - lack of reverse traction, weakening of the cable or breakage of the lever. Having discovered that the handbrake is not working properly, it is necessary to begin repairs immediately, since the safety of all road users depends on this unit. Most often the problem can be solved by adjusting the torso, but in some cases replacement will be necessary. This material describes in detail how to tighten and change this element of the brake system. Readers will also learn how malfunctions manifest themselves and what to do about them.
Replacing hand brake cables on a VAZ 2110
Cables tend to stretch, unravel, rust and get stuck in places where they come into contact with other elements. If such a situation occurs, then they need to be replaced. Replacing the hand brake cable of a VAZ 2110 is a procedure that will take you several hours of time, since to complete the work you need to remove the rear wheels and disassemble the drums. So let's get started:
- Before installation, lubricate the new cables with transmission or any other oil.
- Unscrew the adjusting and locking nuts, thereby disconnecting the distributor.
- Remove the rear wheels, then remove the brake drums.
- Remove the cables from the brake housing.
Install the parking brake cables in reverse order.
We will change the VAZ 2110 handbrake cable ourselves
Quite often, owners of the domestic VAZ 2110 car encounter a problem. failure in the parking brake and lack of reverse traction on the lever. In fact, in this article we will take a detailed look at how to repair and tune this important device while stopping at the main reasons why the system is not holding up or working.
Purpose and location of the parking brake
The location of the handbrake is known to every VAZ 2110 driver - there is a lever installed between the front row seats, when pressed, braking occurs. The metal cable is a mechanical drive in this unit. By lowering the lever, the driver provides tension on the cable, which presses the rear brake pads to the wheel discs. Breakage of the lever is extremely rare, since the main load falls on the metal cable, as a result, after some time it loses the required tension.
The operation and maintenance manual for the VAZ 2110 states that at least once every six months it is necessary to carry out diagnostics of the brake system, including the parking brake. The traffic regulations have requirements for this unit - it must hold the car at a slope of 25 degrees. If the metal cable is not damaged, and the adjustment does not bring results, then the problem is in the rear brakes - this requires a full diagnosis from specialists.
Malfunctions and their symptoms
Determining that a cable needs adjustment or replacement is quite simple. Signs of a faulty mechanism appear as follows:
- The handbrake is pressed effortlessly - the cable is loose, you need to tighten it.
- The mechanism does not respond to pressing the lever - the drive is torn or flew out, or the reason may be the wear of the rear pads.
- If the handbrake is stuck, the drive is damaged and needs to be replaced.
Important! The parking brake needs to be checked at least once every 30 thousand kilometers. The handbrake must always be applied.
Having taken out the main element, you can visually determine its condition. Replacement is required in the following cases:
- Up to 2% are damaged or torn.
- The cable moves with difficulty even after applying lubricant.
- The drive tips have grooves.
Replacing the handbrake cable on VAZ 2109 and 2110. We can do without a service station
Rolling down a hill or replacing the handbrake cable on a VAZ 2109 and 2110 in a garage. The topic is quite relevant in view of the fact that the degree of fixation of the handbrake has always been of interest to every driver. Whatever one may say, this is an additional guarantee of safety both on the highway and in the parking lot. In some cases, emergency situations occur due to the fact that most drivers neglect the rules for using the handbrake, or deliberately bring it to a faulty state. Let's look at how to use it correctly and what is needed for this below.
Operating principle and replacement algorithm
Replacing the handbrake cable on a VAZ 2109 and 2110 can be done on your own within half an hour, unless of course you are lazy and go to a car service center for repairs. To do this we need the following equipment and tools:
Provided that we have all this ready, we can begin the repairs . So,
- It is necessary to have an overpass or inspection hole, since without them we will not be able to get under the bottom of the car;
For those who do not fully understand, the handbrake in all cars is located between the two front seats. It can be covered with various drawers - glove compartments, but this is not important. The main purpose is to fix the parking of a car without outside help, even when neutral is turned on and the road is downhill under the wheels, which is a ratio of no more than 1/4.
Replacing the cable
For work you will need a 10mm open end wrench, WD-40 lubricant, a set of screwdrivers, a 13mm open end wrench and a socket wrench. An inspection hole and a jack must be present in the garage or box. Replacing the cable is carried out as follows:
- The VAZ 2110 must be removed from the parking brake - to do this, lower the handbrake all the way to the floor. It is necessary to ensure that the restraint system of the VAZ 2110 is activated;
Remove the muffler from the suspension cushions and the resonator from the rear cushion
Remove the end of the cable sheath from the bracket on the body
After removing the rear brake pad, disconnect the cable end from the lever
Replacement
There is one important condition - you will need an assistant. His task will be to pull the cable tightly, which will allow the equalizer to be installed correctly.
The sequence of work to replace the cable is as follows:
- Lower the handbrake lever as far as possible;
- Remove the brake disc from the wheel where the element is being replaced;
- Remove the muffler from the suspension cushions and the resonator from the rear suspension;
- Lower the exhaust system down;
- Remove the adjusting nut and locknut;
- Remove the equalizer;
- Now remove the cable ends from the equalizer;
- Remove the tip of the equalizer shell from the bracket, which is located on the car body;
- Bend back the brackets that secure the cable;
- Remove the rear brake pad and remove the cable end from the lever;
- Slightly loosen the nut that secures the cable holder to the rear axle;
- Remove the cable from the holder, then from the bracket, and then pull it out through the brake spike;
- Place a new cable in its new location and perform the assembly procedure, following the reverse order of the indicated processes;
- Make sure that the cables in the bracket are positioned crosswise;
- After completing the installation of the new element, adjust the handbrake.
As you can see, the task does have certain nuances, but it is not difficult at all if you have some experience and rely on the VAZ 2110 operating manual. As a rule, everything is spelled out there.
It wouldn’t hurt to supplement your skills and knowledge with video tutorials or consultation with a friend from a service station. But if you are not confident in your own abilities, you should not risk replacing the handbrake cable yourself. It is better to spend more money, but entrust the work to specialists.
The handbrake, or parking brake, is present in every car and is a necessary element of the safety system. There are times when it does not fulfill its function completely or partially. In any case, this malfunction must be eliminated as quickly as possible.
Adjustment
Tightening a cable is much easier than replacing it. The VAZ 2110 must be placed on a jack. The handbrake must be locked, after which you should find the adjusting bolt and nut - the work is done using two “13” keys.
Twist the nut until the cable is taut
The nut must be tightened until the rear wheelset stops moving. Next, you need to tighten the locknut. After this, you need to return the car to its original position, unlock it and check its operation.
Changing the parking brake cable on a VAZ-2110 with your own hands
To carry out the test, follow a few simple steps:
- Find a slope that has about 25 degrees;
- Turn the handbrake to the required position;
- If the car starts to roll, the handbrake does not hold, adjustment is required;
- If there is no such slope nearby, the check is carried out in a garage;
- Place the car on a flat surface, raise the handbrake handle all the way;
- Approach from behind and try to push the car with maximum force;
- If the car begins to move, the RT requires adjustment;
- Check the operation of the handbrake at 2 clicks on newer versions of the VAZ 2109 and not reaching 5 clicks on versions before 1995. If the handbrake is working at full strength, the cable will be tightened. It will also need to be adjusted.
Operating a car with a tightened PT cable is also dangerous, as this leads to overheating and wear of the rear brake pads.
Adjustment
To adjust the PT cable you will need a pit, overpass or lift. Next we proceed according to the following algorithm.
- Raise the handbrake handle 2-3 clicks from the passenger compartment.
- Get under the car and loosen the locking nut of the parking brake cable equalizer. Before doing this, it is better to treat the nut with a wire brush to remove all dirt.
- Then act according to the circumstances. If the cable is overtightened, it must be loosened by appropriate manipulation of the nut. If the cable holds too weakly, the nut must be tightened more tightly.
- If tensioning the cable does not produce any result, then the element is already at the limit of its capabilities. Therefore, the only solution to this situation is replacement.
- When adjusting the degree of tension, be sure to evaluate the adjustment of the cable along the PT lever. As you remember, normally it is 3-8 clicks for more recent versions of the VAZ 2109, or 5-7 clicks for nines that were produced before 1995.
- Check the freedom of rotation of the rear wheels. If you overtighten the cable, the wheels will spin with difficulty and not as freely as they should.
- After making the adjustment, tighten the locking nut back and check the operation of the handbrake again by driving up a slope or pushing the machine with the PT on.
If the adjustment did not give a positive result, the cable turned out to be worn out, overtightened and does not allow adjusting the operation of the RT, you will have to change it, thereby repairing the handbrake.
Replacement
In some cases, heavy movement of the cable in the sheath is due to lack of lubrication. To eliminate this defect, fill the shell with transmission or engine oil. Pour until grease flows out of the opposite end of the cable casing. Remember to move the cable while adding lubricant.
Cable replacement procedure
But lubrication is more of a temporary measure. If signs of cable wear are detected, it is better to replace it with a new one. This is done as follows.
- Loosen the tension on the PT cable locking nut.
- Unscrew the equalizer adjusting nut, which will loosen the handbrake drive cables.
- Raise the rear of your VAZ 2109 using a jack, then remove the brake drum and brake pad.
- Unscrew the drive cable end from the drive arm.
- Disconnect the fastening nut, and then remove the PT cable holder on the rear suspension beam of the vehicle.
- Remove the shell bushing from the hole in the brake shield.
- Pass the end of the PT cable through the hole in the brake shield.
- Remove the PT cable from all holders on the body of your car.
- Disconnect the end of the PT cable from the equalizer.
- Push the cable end out of the bracket to remove the cable.
- Install a new, tested cable, proceeding in the reverse order.
- Do not forget to adjust the cable tension and the performance of the restored RT at the final stage of assembling the unit.
Self-replacement of the hand brake cable on a VAZ 2110
Replacing the hand brake cable of a VAZ 2110 is a pressing problem for all owners of this vehicle model and not only that. The parking brake plays an important role in the operation of the car. For this reason, its frequent use leads to rapid wear. Knowing how to change a handbrake cable with your own hands or how to tighten the handbrake will save you the cost of car repairs.
Adjustment video:
Handbrake
If the handbrake malfunctions, it is recommended to perform an adjustment . And if it does not help, then repairs are carried out by replacing the faulty cable. On a car like the VAZ 2110, adjusting the cable is as simple as replacing it. If this malfunction is ignored, the car may move on its own, or you, on the contrary, will not be able to move.
You don’t have to go to a car service center to solve your problem. If you have some experience, understand the essence of the handbrake, and also apply the data from the repair and operation manual for the VAZ 2110, you can do everything yourself.
Possible causes of failure and phased replacement
Before starting repairs (replacement), it is recommended to find out the reason why the handbrake does not work. The fact is that in case of some breakdowns, when the handbrake does not work, its complete replacement may not be necessary.
The main and most common root cause why the working mechanism fails is wear of the brake unit.
A cable extends from the handbrake lever, which stretches to a mechanism that activates the brake assembly. Despite the fact that the cable is constantly subjected to heavy loads, its rupture is extremely rare. Often the cable jumps off or wear (grinding) of the tips in the drum occurs. Brake pad wear or drum brake wear may also occur.
The steel fibers of the parking brake can stretch during intensive use, which makes it difficult for them to move in the shell, and the device fails.
Replacing the handbrake cable on a VAZ 2110 is not difficult, but for convenience it is better to call an assistant.
Next you should do the following:
- The vehicle must be released from the parking brake. To do this, you need to lower the handbrake to the floor to the maximum (all the way).
- Remove the wheel brake drum.
- Removing the muffler and resonator from the rear cushions.
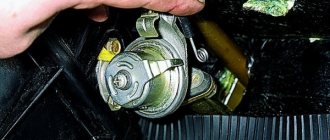
- Removing the equalizer. After the exhaust pipe is moved to the side, you need to crawl under the car and unscrew the adjusting nut and locknut. After unscrewing, the equalizer can be removed from the rod. You need to clean the handbrake rod of the VAZ 2110 with a brush.
- Removing the cable end from the control.
- The handbrake cable is attached to the car using special brackets. They need to be bent.
- Removing the rear brake pads and disconnecting the cable end.
- There are nuts on the rear axle beam that secure the handbrake. They need to be loosened and the cable pulled out of the device holder.
Handbrake tightening for VAZ 2110
During the operation of the vehicle, due to wear of the rear brake pads and pulling of the drive cables, it periodically becomes necessary to adjust the travel of the parking brake lever (handbrake).
In this article we will talk about how you can tighten the handbrake on a VAZ-2110. This method can also be used when adjusting the handbrake on other front-wheel drive cars of domestic production.
It is also noteworthy that on the VAZ-2110 you can very easily both tighten the handbrake and replace it. If this element of the vehicle malfunctions, it is possible that the car will move on its own. The consequences of this may be very different.
This is one of the main reasons why it is necessary to periodically check the functionality of the handbrake, and if necessary, tighten it. But this does not mean at all that for this you will need to go to a car service, since you can do this yourself.
How to understand that the handbrake needs to be tightened?
It is quite easy to determine that the handbrake needs adjustment, although this is a mandatory procedure every 30 thousand km of vehicle mileage.
To do this, you need to stop on an area with a slight slope, put on the handbrake and switch to neutral gear. If the car rolls down, the parking brake does not work.
This problem can be solved by replacing the handbrake rod, but as a rule, a simple adjustment is enough.
How to tighten the handbrake on a VAZ-2110
A clear example of tightening the handbrake cable is presented in the video review, but if something is not clear to you, you can read the detailed instructions.
It is advisable to tighten the parking brake on an inspection hole, lift or overpass, since in this case it will be much easier for you to get to the necessary mechanisms.
Can the VAZ-2110 handbrake be tightened as follows?
- We place the car on an overpass (or lift it with a jack, or drive into a ditch);
- Check the position of the brake lever (it should be the lowest);
- Using the first key, loosen the lock nut, and at the same time with this second key, tighten the adjusting nut;
- We tighten the adjusting nut until the handbrake cable is stretched;
Note! When tightening the adjusting nut, I recommend holding the rod with pliers.
- Next, we need to make sure that the full stroke of the lever is from 2 to 4 clicks;
- After checking the working stroke, tighten the equalizer locknut, holding the adjusting nut with another wrench;
- Release the handbrake lever down, and then turn the rear wheels with your hands. They should rotate evenly and without jamming;
Note! If during the adjustment process the handbrake drive cable still fails to be tensioned, we replace this part.
After completing the adjustment process, we once again check the quality of the work done. This can be done as follows: we drive onto a section of road with a slope of about 25%, stop there, and put the car on the handbrake. If in neutral gear the handbrake holds the car securely, then you have successfully completed the job.
What to do if the adjustment did not help?
In some cases, a simple pull-up may not be enough. As a rule, this can happen when the handbrake cable breaks. Although this phenomenon is quite rare, it still happens, especially on older machines.
In some cases, the cable may break on new models if the car is subjected to too much use.
In addition, the cable must be replaced;
- When its tips are loosened;
- When stretching the cable threads, since the cable will soon break;
- If the cable moves quite heavily in its sheath (even after lubrication);
As in the case of tightening the cable, when replacing it, it is also not necessary to go to a car service center, since you can also do this yourself. Although it is worth noting the fact that this work may take you much longer, even with simple adjustments.
Note! Some conditions must still be observed when replacing the cable. First of all, the driver will need an assistant who will tension the cable, which will allow the equalizer to be installed correctly.
THIS IS INTERESTING: How to remove the stove VAZ 2109 high panel
How to replace the handbrake cable on a VAZ-2110
- We install the car on an overpass or inspection hole;
- Lower the handbrake all the way down;
- We loosen the lock nut 1 of the tension device, while holding the adjusting nut 2 from turning with another key. After this, tighten the adjusting nut 2 until the parking brake cable is tensioned;
- We check the full working stroke of the parking brake lever (should be 2-4 clicks);
- After checking the working stroke, tighten the equalizer locknut, while holding the adjusting nut with a second wrench;
- Lower the parking brake lever all the way down and turn the rear wheels with your hands. They should rotate evenly and without jamming;
After installing the parts, we must adjust the handbrake.
As you can now see for yourself, in order to tighten the handbrake cable or replace it, it is not at all necessary to go to a car service center; almost every motorist can do it with his own hands.
Source: https://remont-avto.uef.ru/podtjazhka-ruchnika-vaz-2110/
Adjusting the parking brake
After the replacement has been made, the hand brake needs to be adjusted. It is recommended to carry it out with the operating manual for the vehicle at hand.
The handbrake on the VAZ 2110 has a lever travel of 2-4 clicks when adjusted, and in working condition - from 2 to 8 clicks.
The car must be placed on jacks so that the wheels can rotate freely. The handbrake is set to the locked position. To adjust the bolt and nut, you will need a 13mm wrench. The nut must be tightened until the wheels are completely locked, and then the locknut must be tightened.
When the repair has been made and the handbrake has been adjusted, you need to check it in operation on the road. You need to find a slope whose length will be at least 4 m and 1 m in height (1:4). On this slope, the car is put on the parking brake, and the car should not stand at speed. If everything is done correctly, then the car should not move (roll down the slope), because the handbrake is holding. If it doesn't hold, the handbrake needs to be tightened.
Next, it is recommended to check the operation of the entire brake system. You need to drive a short distance and then use the brake several times. After stopping the car, the drum is immediately checked. Its temperature should not differ from the ambient temperature. Otherwise, if the drums get hot, you need to loosen the cable tension a little. After the modification is done, you need to wait about an hour (cooling time) and repeat the test.
How to tighten the handbrake of a VAZ 2110 - Auto repair
The handbrake, or in common parlance “handbrake”, is a “permanent brake” and is used when parking a car, parking on a slope, and is also used by masters to perform complex tricks. The parking brake blocks any spontaneous movement of the vehicle.
The handbrake is activated using the handbrake lever, which is mounted on the dashboard along with the gearbox.
The handbrake is an important and irreplaceable thing, but still not all drivers use it. The fact is that the car can be put in gear, and then it will not roll away anywhere. But if the slope is very steep, then the gearbox is no longer able to help, and in general, many novice drivers cannot imagine normal driving without a handbrake.
Handbrake diagram (photo of handbrake)
Hand brake device:
- Drive lever.
- Lever pawl pull.
- Traction spring.
- Lever button.
- Front cable axle.
- Bolt M6x14.
- Spring washer 6.
- Drive traction.
- Lock washer 6.
- Protective cover.
- Cable equalizer.
- Washer 8.
- Nut M8.
- M8 nut is low.
- Lever axis.
- Washer 10.
- Cotter pin 2x20.
- Lever right.
- Left lever.
- Right expansion bar.
- Left expansion bar.
- Nut M6.
- Lock washer 6.
- Cable clamp.
If the handbrake does not hold, then it needs to be tightened. The process of adjusting the handbrake is not very complicated, but it does require some equipment and suitable conditions.
THIS IS INTERESTING: Replacing the UAZ Patriot pump
So, before you learn how to adjust the handbrake, you should know the following: the working stroke of the parking brake should be 2-4 clicks, but the handbrake stroke of 8 clicks is not excluded - here you already need to adjust the parking brake stroke.
How to tighten the handbrake
- We park the car on an overpass or inspection hole. (You can also place the rear of the car on a curb or use a jack).
- We put the car in 1st gear.
- We put the car on the handbrake and count the number of clicks. If there are less than 2 clicks, then you need to lengthen the drive, if there are more than 6, then reduce it accordingly.
- Lower the handbrake all the way.
- Take 2 keys to “13”.
- We climb under the car.
- We remove the rubber holders of the muffler and manifold for convenience.
- We find the cable equalizer (number 11 in the diagram).
- Use one key to unscrew the lock nut, and use the other to secure the nut from turning.
- We adjust the stroke of the lever: when screwing it in, the stroke decreases, when unscrewing it increases. (remember that the lever stroke should be from 2 to 6 clicks).
- We hang the rear wheels of the car on a jack and check the rotation of the wheels. The brake pads should not interfere with the rotation of the wheels, and when the handbrake is raised, the wheels should stop firmly.
- Tighten the nut with a counter nut.
You will have to tighten the handbrake quite often due to the design of the handbrake.
You will also have to adjust the handbrake when replacing the cable, repairing the handbrake, replacing brake pads (How to replace rear brake pads?) and replacing the rear brake cylinder.
It should be noted that the parking brake must be held on an uphill slope of at least 23%.
Source: https://555-shop.ru/vaz/kak-podtyanut-ruchnik-vaz-2110.html
Post navigation
Useful information about the VAZ 2110 car: 8 valve injector
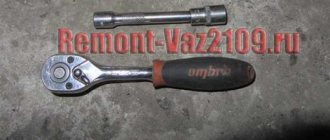
Hello, in this article you will learn how to replace the handbrake cable on a VAZ 2110, 2111, 2112. If you notice that the handbrake no longer holds the car on a slight slope of the road and adjusting the handbrake did not solve this problem, then it is necessary to replace the parking brake cable. The average price is from 200 rubles and above. From the tools we need a wrench for 10 and two wrenches for 13.
So, let's begin. First of all, we remove the car from the handbrake. Then remove the brake drum and unhook the cable from the brake shoe.
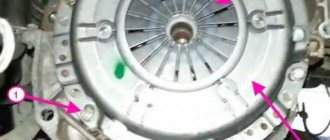
In order to get to the cable fastenings, it is necessary to remove the resonator and muffler from the rubber cushions
The next step is to unscrew the lock nut (1) and the adjusting nut (2) of the hand brake and remove the equalizer (4) from the rod (3). Unhook the end of the cable
Then unscrew the cable fastenings from the brackets from the car body
Now you need to remove the rear brake pad and unhook the end of the cable from the brake shield and remove it
We install the cable in the reverse order of removal, it is necessary to take into account the location of the cables - crosswise. After that, we adjust the cable tension.
Handbrake diagram for VAZ-2112
For clarity, here is a diagram of a hand brake
1 - button that fixes the handbrake lever; 2 — hand brake lever; 3 — protective cover; 4 — handbrake rod; 5 — cable equalizer; 6 — adjusting nut; 7 - lock nut; 8 - cable; 9 — protective sheath of the cable.
In this scheme we need element number 6. It is he, and only him!
What is required for adjustment?
In order to adjust the handbrake you need a platform or lift. If there are no such devices, then you can simply hang the rear wheels on the “goats”. They can be installed under the car using a jack. It’s also worth taking two “13” keys and pliers.
- The car is installed on an overpass or “goats”.
The lever position is set to the lowest possible position.
We put the handbrake at the very bottom. Do not pay attention to the scuffs of the console; we conducted an experiment with non-standard armrests. The iron fastenings of the armrest are visible. The photo shows the editorial car
Use a wrench to loosen the locknut.
- The second wrench holds the adjusting nut.
- The adjusting nut should be tightened until the cable is tensioned. It must be remembered that the rod should be held with pliers when tensioning the cable.
- After this, you should make sure that the full stroke of the handbrake lever is no more than 4 and no less than 2 clicks.
- When the stroke check is completed, the locknut is tightened. The adjustment is held with another key.
- If necessary, change the mechanism to a new one.
- After releasing the adjusted lever down, you should spin the rear wheels. When the lever is in its lowest position, the wheels should spin freely.
Tighten the adjusting nut
Everything is rusty, we changed the adjustment mechanism
If you cannot tighten the cable, then it should be replaced with a new one.
Adjusting the handbrake after tensioning
After adjusting the brakes, you need to check them again. To do this, the car should be placed on a road with a slope of at least 23%. The car should be in neutral gear in this area and with the handbrake pulled up. If the handbrake brakes hold the car in this area, then the handbrake is adjusted correctly.
What to do when adjustment does not work
There are also cases when the above actions are not enough to adjust the handbrake. This can happen, for example, when the handbrake cable is broken. This happens on the VAZ-2112, although rarely. In such situations, the cable must be replaced. The cable also needs to be replaced when:
- The tips are loose.
- The cable itself begins to stretch, which will lead to its breakage during operation.
HAIKU! The old cable is very worn out! For comparison, old and new handbrake cables
Physical wear (scuffs and cracks) of the handbrake cables.
Heavy wear on the handbrake cable
This replacement procedure does not require contacting a service station. Although this will require some time and skills from the driver, such work can be done independently.
It should also be remembered that when replacing the cable, certain conditions must be observed. To do this, the driver will need an assistant who will pull the cable.
Why do you tighten the handbrake?
The cable acts here as a drive. If the driver pulls the handbrake lever, then at the same time he uses the cable, which spreads the pads in the rear wheel.
If the handbrake is faulty, you just need to tighten the cable or replace it with a new one. On a VAZ-2112 it’s quite easy to do this with your own hands.
Need for adjustment
You can determine that the parking brake needs adjustment when checking. It is recommended to do it every 30,000 kilometers. This procedure should be done even if the handbrake seems to be working well.
The device must also be checked in cases where it does not work. For example, a car moves when the brake lever is applied.
During the operation of the vehicle, due to wear of the rear brake pads and pulling of the drive cables, it periodically becomes necessary to adjust the travel of the parking brake lever (handbrake).
In this article we will talk about how you can tighten the handbrake on a VAZ-2110. This method can also be used when adjusting the handbrake on other front-wheel drive cars of domestic production.