Tightening torques for the front wheel bearing on a VAZ (LADA)
| No. | Automobile model | Force, N•m | Hub nut diameter/thread size |
| A | B | IN | G |
| 1 | VAZ 2101 - 2107, OKA | 196 – 199 | M18x1.5 |
| 2 | NIVA VAZ 21213 and 21214 | 196 – 199 | |
| 3 | Kalina, Granta, Priora, Largus, Vesta | 226–247 | M20x1.5 |
| 4 | VAZ 2108, VAZ 2109 - 2110, 2111 - 2115 | 226–247 |
Instructions for self-tightening wheel bearings.
- Place the vehicle in gear or parking brake. Place something under the wheels, such as wheel chocks. This is necessary to prevent the car from flying off the jack.
- Take the balloon from the kit in the trunk (if there is one) and loosen the bolts securing the wheel. The vehicle must not be raised.
- Prepare a place to install the jack (from the kit). It should be firm and even. You can place boards under the jack if necessary. Raise the wheel until it no longer touches the ground. Place a block of wood under the lever just in case. Suddenly the jack is unreliable.
- Unscrew the bolts completely and remove the wheel.
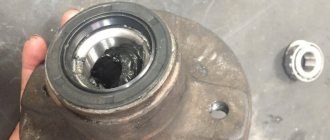
Removing the hub cap
Unscrew the old nut
You need to tighten the nut
- Fill the cap with new lubricant and reinstall. Remember that if the wheel bearings are adjusted incorrectly, the wheel alignment changes, as a result of which the vehicle's handling deteriorates, fuel consumption increases, and tires wear out quickly and unevenly.
The described process can be clearly seen in the following video:
Remember to check the bearings periodically. This ensures your safety on the roads. Best regards, PodshipnikTsentr.RU team
Tightening torques for the front wheel bearing on Ford
| A | B | IN | G |
| 1 | Focus 1 | 45 (further tighten another 90 degrees) | M18x1.5 |
| 2 | Focus 2 | ||
| 3 | Focus 3 | ||
| 4 | Mondeo | 35 (then tighten another 90 degrees) | |
| 5 | Fusion | 35 (then tighten another 90 degrees) | |
| 6 | Transit | 53 | M20x1.5 |
Tightening torques for the front wheel bearing on Opel
| A | B | IN | G |
| 1 | Astra H | 150 (then unscrew 45˚ and tighten to 250 Nm) | M22x1.5 |
| 2 | Astra G | ||
| 3 | Astra J |
egoST
I drive a Ford Focus ST in Moscow
The engineers did a great job - 15 devices in 1 case.
An entire car on-board computer with FULL HD footage. We are pleased with the clear rear view camera and GPS navigator with 32 satellites.
Adjusting the wheel bearing on a VAZ 2107
If the bearing is slightly worn, you can tighten the adjusting nut and eliminate the play. To do this you will need a jack, a wrench, pliers, a hammer and a screwdriver.
You can correctly tighten the front wheel bearing of a VAZ 2107 as follows:
- lift the car with a jack, hanging the wheel;
- Use a screwdriver and hammer to remove the protective plug from the hub bearing;
- tighten the adjusting nut so that the wheel stops rotating by hand;
- gradually loosen the nut until the wheel rotates freely, but does not play;
- bend the side of the nut with a chisel or screwdriver so that it cannot unscrew spontaneously;
- put the protective plug in place;
- lower and remove the jack.
If play and noise cannot be eliminated in this way, the bearing must be replaced.
How to tighten the hub nut to the correct torque
To tighten threaded connections, where it is recommended to maintain a certain torque, use special torque wrenches . Inside the tool there is a dynamometer with a scale or a special device with a limiter, which is activated when the required tightening force is reached. Keys also come with value intervals, for example 5-25 (minimum 5 N•m, maximum 25 N•m).
The threaded connection is tightened until the arrow shows the required value or the limiter operates. There are also expensive and exact analogues - with an electronic display, but for the operation and repair of passenger cars a mechanical version is suitable.
The photo shows the main types of such keys.
- With preset torque, not adjustable.
- With preset torque value, adjustable.
- With tightening force indicator.
- With digital display of applied torque.
How to use the torque wrench scale:
How to use a torque wrench:
Matiz replacement of front wheel bearing/hub/steering knuckle/brake disc
— Wear-to-failure, in other words, the regulated service life expires; — Moisture, and similarly dirt inside due to damage to the seals; — Drying or other leakage of lubricant, missing lubricant, wear from friction; — Improper repair of the front suspension, also called a bad previous shift; — Malfunction of adjacent parts of the front suspension on the Daewoo Matiz.
Preliminary operations when repairing the hub assembly:
- Place the car on a level surface, provide lighting;
- Engage first gear, release the handbrake;
- Install wheel chocks under the rear chassis;
- Clean the wheel or mechanism being repaired from dirt;
- Familiarize yourself with the structure and location of wheel roller bearings in the mechanism, and with the part numbers:
- Prepare a set of tools according to the list:
— A set of keys and sockets with a ratchet; — Pipe for extending the key; — Vise — Jack; — Screwdriver, pliers; — A mandrel or socket head with an outer diameter of 37-40 mm. - Hammer, chisel. — A torque wrench for tightening the hub nut to the required torque.
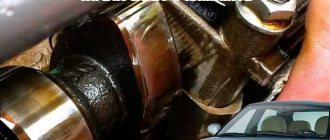
- First, loosen the wheel bolts, then remove the hub locknut.
- Later, we lift the car with a jack, install a support under the body, for the safety of work.
- We immediately move on to dismantling the brake caliper. Find the two caliper mounting bolts and unscrew them.
- Now we disconnect the brake hose, which is held on a special mount at the rack.
Read:
How to tighten a hub nut without a torque wrench
Many car enthusiasts, when repairing their car, consider it not advisable to purchase torque wrenches or other specialized devices (pullers, etc.). There is a good way to tighten the fastener to the required torque without using a torque gauge.
The following equipment will be required:
- Ratchet with a head for a lock nut;
- Pipe for extending the ratchet to create the required “shoulder”;
- Roulette;
- Marker;
- A load that can be hung on the “shoulder” (for example, a 32 kg weight).
The essence of the method is to calculate the moment using the formula from elementary physics classes:
P is the applied force, N; l is the distance from the hub to the point of application of force - the “shoulder”, m. The ready-made formula for our case will be as follows:
P1 = (M2•100)/(M1•10) ( • 10 (or • 9.8) - translated into Newtons), where
P1 is the distance at which the sinker is attached to the “shoulder” relative to the torsion point, cm; M1—cargo mass, kg; M2—required torque, N•m.
Calculation example for a Ford Focus 2 car
P1 = (M2•100)/(M1•10) (•10 (or •9.8) = (45•100)/(32•10) = 4500/320 = 14 cm.
Conclusion: to ensure a tightening torque of 45 N•m, a sinker weighing 32 kg will be required, located on the pipe at a distance of 14 cm.
- First screw on the locknut and tighten it slightly.
- We mark a distance of 14 cm, where the rod should hang;
- We hold the ratchet with one hand and hang the sinker with the other, thereby tightening the fastening;
- The operation continues until the fasteners stop tightening under weight, which means that we have achieved the required force. Accuracy +/- 5%.
Wheel bearing torque
- VAZ, NIVA: from 19.6 to 24.6;
- brand Ford models Focus, Fusion, Mondeo, Transit: from 45 to 53;
- all Chevrolet models: 18.9 – 19.5 or 25.0 – 30.1;
- Renault models Duster, Megan, Sandero, Logan: 175 and 280;
- Opel various models: 150.
To carry out preventive and repair work, it is customary to use a torque wrench. This practice exists in service stations. A device with a scale is built into the design of the key. Knowing the required indicator, you can easily tighten the nut. The main thing is not to overdo it, as you can break the thread on the fastener.
Depending on the modification of the key, various limiters are installed:
- unregulated;
- with adjustment;
- with tightening indicator;
- with installed digital display.
Depending on the type of torque wrench selected, the wheel bearings are adjusted.
Owners often ask the question: is it possible to tighten wheel bearings without actually having a torque wrench. It cannot be prohibited, but it is not recommended either. Because you can't calculate the effort. The consequences of such tightening are obvious: backlash and premature failure.
Now you know how to adjust the wheel bearing yourself. Despite the simplicity of the actions and the design of the mechanism, it is recommended to service your technical device in specialized auto repair shops in order to avoid negative consequences and damage to adjacent parts.
Before carrying out preventive measures, do not forget to purchase only high-quality and original components recommended or approved by the manufacturer. This will increase the service life of the equipment and reduce the number of breakdowns to a minimum.
Or when dismantling the gearbox, many drivers have to unscrew and tighten the hub nut
wheels. But this is not as simple as it seems from the outside, and the nut must be tightened to a certain torque, otherwise there is a risk of the bearing turning on the hub and subsequent . In addition, most of the keys sold in stores are not designed for the high tightening torque that the hub nut requires. In this short article we will look at the importance of this seemingly simple operation, and how to do it without a torque wrench.
In the 80s of the last century, tapered roller bearings were finally abandoned, and even on our domestic cars (front-wheel drive) double-row ball (or roller) bearings (or single-row with a thrust shoulder) began to be installed. And finally, there is no need for precise adjustment of tapered bearings, in which for many, adjusting the required clearance was not an easy task.
Indeed, in modern non-tapered bearings, the axial clearance is set by the bearing manufacturer (read about bearings and their markings) and no adjustments are required when assembling the unit. But many people do not attach importance to the correct tightening of such bearings, or rather the hub nuts, but in vain.
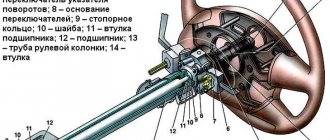
1 - halves of the inner race of the bearing, 2 - outer race of the bearing, 3 - balls, 4 - bearing cage, 5 - CV joint tip (trunnion), 6 - washer, 7 - nut.
For example, let’s take the hub unit, common on our front-wheel drive cars (VAZ 2108), with a double-row ball bearing (its marking is 6-256907E2S17), shown in the figure on the left. If you tighten the hub nut 7 on the thread of the end of the CV joint, then the halves of the inner race of the bearing will close completely and further convergence of the ball raceways will be impossible. And in this clamped state, the axial clearance in the bearing will be approximately 0.06 - 0.08 mm.
This means that hub nut 7 must hold the halves of the inner race of the bearing long enough (and provide the required clearance of 0.06 - 0.08 mm), that is, throughout the entire service life of the bearing. This means that the nut should not allow the distance between the halves of the cage to increase and the required clearance to be violated. And the more correct the tightening torque of this nut, prescribed by the factory, the longer the required clearance in the bearing will be ensured.
Hub nut - required tightening torques
.
The required tightening torque for the hub nut is prescribed not by the bearing manufacturer, but by the car manufacturer, and this torque differs slightly for different cars (for example, for a VAZ 2108, the torque is 225.6 - 247 N m, that is, 23 - 25 kgf m). Therefore, it is advisable to clarify it in the factory recommendation of your car.
It is interesting that recommendations for the tightening torque of the same bearing may differ slightly from different car factories. This most likely depends on the different strength of the metal of the hubs, axles, nuts or threads on the shank of the CV joint. And only the manufacturer of the machine knows this strength of the metal from which everything is made.
For example, as I already said, the tightening torque of the wheel bearing on a VAZ2108 car, its factory recommends 23 - 25 kgf m, and for the same bearing the AZLK plant (for Moskvich) prescribes only 14 - 16 kgf m, and the Moskvich plant does not allow in any way case exceed this value.
And such a bearing can be tightened even stronger, because this is what they do on VAZs, and even the smaller bearing for the Oka car (marking 6-256706У1С17) is even tightened stronger, with a torque of 19 - 23 kgf m. Most likely, the material of the Moskvich hub , or the threads of the CV joint shank on Moskvich are weaker than on VAZ cars. Although the same M20x1.5 thread is cut on the wheel studs and nuts of a ZIL truck, and they are tightened to a torque of as much as 60 kgf m, and nothing.
Well, for “Tavria” (1102) its tightening torque of the same bearing (as on the eight and forty-first Moskvich) is 15 - 20 kgf m.
One more important point should be taken into account: when operating the car, the torque of the nut tightened at the factory may gradually loosen, and when the bearing life still allows you to drive and drive. The tightening torque gradually weakens due to changes in the structure of the metal, and if the tightening weakens, then the clearance in the bearing becomes larger. And even a slight increase in this gap of 0.06 - 0.08 mm (between the balls and their tracks) quite significantly reduces the bearing life, especially when traveling on our bad roads.
This means that it is useful to tighten the hub nuts after about 20,000 km (or check their tightness), just as they tighten the bolts after a certain mileage. In this case, it is useful to unscrew the hub nut one turn and tighten it again. Then we jack up the car and rotate the wheel forward and backward several times, and then lower the car onto the asphalt and tighten the nut to the required torque.
As I already said at the beginning of the article, most torque wrenches on sale are not designed for a torque of 25 kgf m, and some car owners do not have any torque wrench at all. And the ratchet cranks of most tool sets are also not designed for such a moment. Their ratchet can break at any time from such force (if you lengthen the lever using a pipe), and you can injure yourself. Of course, there is a high-quality ratchet tool designed for such force, but it is very expensive and not everyone has it. And of course they won’t “catch” the required moment.
There are two options for tightening the hub nut correctly and to the required torque, and they can be quite inexpensive. The first option is to weld a powerful lever to the socket head, and I will write about the required length of this lever a little lower.
By the way, on sale you can find, instead of a head, a powerful tubular (socket) wrench, and the thickness of the pipe wall of such a wrench is quite decent. This wrench has holes for a powerful wrench or pry bar. But you can, using the adapter shown in the figure on the left, attach a pipe of any length to such a wrench.
The second option is to look for a ready-made truck key on sale, and such a key (for example 30-32 or 27-30) can easily withstand a tightening torque of up to 30 kgf m. It can be purchased in specialized stores for Kamaz, GAZ, Ural, ZIL trucks , or imported heavy vehicles.
The length of the lever can be lengthened using a pipe, but sometimes it is enough to step on the lever with all your weight. Moreover, the required tightening torque is easy to calculate. If the length of your key or a lever welded to the socket head is 40 centimeters, and the weight of a person who weighs 70 kilograms presses on it, then the tightening torque will be 28 kgf m. But usually drivers put a meter-long pipe on the key and press with the entire weight (sometimes in 90 - 100 kg), this is approximately twice as much as necessary.
Once the nuts are tightened, there is no need to lock them with a washer (or cotter pin), as was previously the case on older machines with tapered bearings, since the nuts have locking bands. Or there are self-locking crimp nuts, or their soft bands, which are pressed into the groove of the axle.
I hope this article will help new drivers to properly tighten the hub nut (or hubs) and significantly extend the life of your wheel hub bearing, good luck to everyone.