What are the benefits of fender liners?
During the use of a car, its body is exposed to the harmful effects of dirt and water, to which in winter are also added chemicals generously scattered by road workers along the highways. All this is in constant contact not only with the paintwork, but also directly with the metal. A small amount of salt from a winter road is enough for corrosion to begin to progress. Thanks to the presence of fender liners (you can also find another name for them - lockers), the rate of corrosion formation can be noticeably reduced. Moreover, the installation of such elements improves sound insulation properties, protects arches from snow deposits, and increases comfort while traveling.
Selection and installation of fender liners on the front and rear wheel arches
The front wheel arches are somewhat easier to install plastic wheel arches. The fact is that there are many possibilities for conveniently securing the protection without screws. Firstly, the fender liner is inserted into the grooves and, provided the quality of protection is normal, may not be fixed at all by additional fasteners. Secondly, there is often a fairly large plane of the front bumper, which allows you to tighten the screws without the risk of corrosion. You can also mount the fender liner to the mudguard and tighten two self-tapping screws in the area of the pillar inside the wheel arch - the metal is well protected there and is rarely attacked by corrosion. Rear fender liners are much more difficult to install:
- first you need to try on the fender liners themselves in order to cut out unnecessary parts, if any, in the plastic protection;
- then you should prepare the surface, thoroughly clean the metal under the arch and examine it for the presence of corrosion;
- all problems should be eliminated immediately and preserved in mastic and other anti-corrosion materials;
- Next comes the direct installation of the fender liner, which is an important part of the process for preserving the metal parts of the arch;
- you should screw the screw into the plastic bumper, but refrain from screwing into the metal parts of the body;
- if there are special clips for mounting fender liners, you can use them, otherwise, installation should be carried out using a minimum number of fasteners;
- a good and correctly installed fender liner will not fall off during operation, even when installed with a small number of screws.
Are fender liners really necessary?
Modern technologies have made it possible to significantly improve the quality of painting of body elements, which has increased their corrosion resistance.
It should be noted that the bodies of foreign cars have always been distinguished by better anti-corrosion treatment; moreover, some models contained galvanized elements that could absorb corrosive effects. Naturally, the cost of such cars turned out to be higher, so the use of this on budget models is not entirely justified. However, you shouldn’t go immediately to buy lockers, since most manufacturers have stated warranty periods against rust reaching 5-7 years. An important point in achieving such deadlines is not so much the use of special treatment compounds, but the use of a multi-stage body protection system: First, phosphating is carried out; - then applying primer; — then paint in several layers, accompanied by varnish and sanding; — the bottom is treated with a special compound; — cavities in the bottom, sills, and wings are protected with a special compound.
Thus, the body of most modern cars can easily resist corrosion for at least 6 years, after which some simply buy a new car. If you are one of the latter, you can refrain from installing fender liners. If you plan to drive your car for a long time and not have serious problems with the condition of the body, it is still better to think about purchasing lockers.
Many of my readers often ask me - what are fender liners for a car and is it necessary to install them at all? One of my readers wrote that he traveled all over the city looking for fender liners, supposedly his grandfather told him that it was necessary to install them. So should I bet it or not? Let's think together...
First, a little definition.
Lockers
–
protective covers that are installed in the wheel arches of cars, thereby protecting the body “under the wings”, and the “wings” themselves from dirt, dust, snow and salt in winter. Thus, the service life of body elements increases
.
It's essentially a piece of plastic folded under your body that "seals" the top of the fender. Installed on all four wheels, two front and two rear. They are usually screwed on with self-tapping screws.
Previously (about 10 - 15 years ago), fender liners were very common. Because the main vehicle fleet was our domestic cars - such as VAZ 2105, 2107, 2106, 2109, 21099, etc. Their bodies were poorly protected from corrosion (VAZ 2105 and 2107 suffered especially, the wings were very rotten), and therefore, immediately after the showroom, many stopped at third-party stations, where they were treated with anti-corrosion compounds and fitted with fender liners. Thus, it was possible to increase the service life of body elements, namely the wings, by 2–3 times. And if you repeat the anti-corrosion treatment approximately once every 3-4 years, then the metal practically does not suffer at all.
The main detrimental effect was in winter, when a salt-sand mixture began to be poured onto the roads. It got under the wings of cars and decomposed what was said inside them. Sometimes to through holes. There were no contactless car washes at that time, and therefore it was problematic to wash off this mixture (from difficult places). YES, and I was reluctant to do it myself in the cold.
Therefore, our Russian motorists of those years (and these are our grandfathers and fathers) had something firmly imprinted in their brains - they need to install wheel arch liners! This way the metal body will last longer!
But what about foreign cars, all our SOLARIS, KIA RIO, and let’s say our PRIORs?
Ford Focus Fan
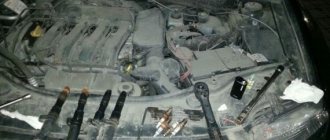
I had to remove the Ford Focus 2 fender liner (although the same principle applies to other Focus models) in order to remove the washer reservoir on my Focus. The frost hit, and I forgot about the water poured into the washer. It was necessary to defrost the tank and, as it turned out later, seal it - it burst at the top.
Ford Focus 2 fender liners are usually attached with self-tapping screws under the sprocket. So I armed myself with a set of sprockets and a double-blade screwdriver. Naturally, we jack up the car and remove the wheel. Let's look at where and what the fender liner is screwed to.
The fender liners of all Focuses are attached according to the same principle
Let's start from the bumper and in order to the mudguard. My car does not have protection for the under-engine compartment, so I just have to “untie” it from the side member and bumper.
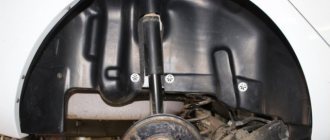
And so, the front part... 6 screws (marked in red). The yellow circle indicates the place where the lower protection is attached to the fender liner. Be careful not to lose the metal clip at the very bottom of the bumper mount.
When buying a car, check if all the screws are in place. It often happens that the fender liner barely holds on...
This paperclip, popularly known as a “clothespin”, is used to attach the front fender liners of the Ford Focus 2 to the front bumper skirt.
Where the fender liner is screwed to the metal (spar), there are clips for self-tapping screws.
On used cars, these clips are often torn off and the self-tapping screw does not hold in them. Stock up on new ones
And a metal self-tapping screw is screwed into them under an asterisk.
The washer on the screw is very important, for obvious reasons. It often happens that the plastic clips into which the self-tapping screw is screwed are very worn out and the self-tapping screw turns in them and does not hold. You can simply find a screw with a larger diameter and screw it in place of the old one.
Where the fender liner is screwed to the plastic there are steel clips
Metal clothespins or paper clips are also often torn off; buy new ones before work.
In the middle of the Ford Focus fender liner it is screwed on, at least like mine, with three self-tapping screws, they are circled. Although there is a hole for the fourth screw to the right of the shock absorber (by the way, KYB Kayab), at the top.
Make sure that the fender liner is attached at all fastening points. At high speed or when ice freezes and dirt gets wrapped up, it may fall off
And here, in fact, is the tool we use – the asterisk.
Do not overtighten the self-tapping screw while tightening; you will tear off the plastic clip. As a result, you will have to either change the clip or change the screw to a larger one in diameter
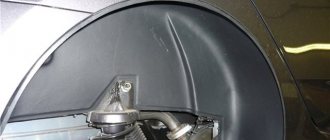
Here the mudguard and fender liner are fastened with two self-tapping screws, at the very top and at the very bottom (green and red circles). Pay attention to the green circle! There is also a metal clip there and it is not visible, unlike the bottom one... Don’t lose it. The front mudguards are attached to the fender itself on a Ford Focus 2 only with two metal clips with hexagon screws in yellow squares. Otherwise, neither the fender liner nor the mudguard are attached to the wing.
Clamps marked with yellow squares almost always rust on older cars. If you are planning to change the mudguards, periodically and generously lubricate them with WD or brake fluid for several days in advance. Otherwise, you simply will not unscrew the screws.
In the photo above, this place is circled in red, also follow the paper clip.
At this point, the wing loses its paint-and-paint layer at the bottom due to humidity and dirt and will rust. Thoroughly clean and dry these areas and treat with appropriate products.
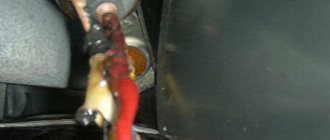
And at the very bottom, under the threshold, on a Ford Focus, the fender liner and mudguard are fastened with a through screw, screwed into another paper clip. That, in turn, stands on the rear lower ear of the fender liner, which can only be seen by removing the fender liner.
When tightening this self-tapping screw, you will have to focus on the connection between the fender liner and the mudguard blindly. It is better to use an awl for leveling
That's all. I think it won't be difficult to put the fender liner in place. Installing the Ford Focus 2 fender liner is done in the reverse order.
Monitor the integrity of this protection
Make sure that the protection fits tightly everywhere so that there are no gaps. Mainly above the wing edge. The edge of the fender liner should be pressed tightly against the wing.
Follow the paint layer along the edge of the wing
Price of fender liner Ford Focus 2 (front)
Original - 3000 rubles
Non-original, Taiwan - 1500 rubles.
I bought a Chinese Ford Focus 2 fender liner for half the price, for the same quality. You can watch a detailed video on how to remove the front fender liner of a Ford Focus 2.
Related posts:
Ford Focus: how to remove the Ford emblem on the Focus radiator grille
How to remove a door on a Ford Focus 2: Photo, Video
How to remove the fuel tank + on a Ford Focus 2
Do I need to install fender liners?
Now technology has really stepped forward. Both in terms of painting the car body and in terms of protecting it from corrosion. It should be noted that foreign cars have always been well treated against corrosion; previously there were such options as galvanized inserts in the body, which absorbed all the corrosion (increasing service life). Of course, the price for such a car was more expensive, and therefore this is not used on all foreign cars, especially on budget (or popular) ones.
But don't immediately run to the store. Almost any manufacturer now provides a rust-proof guarantee for five to seven years. And the point here is new anti-corrosion compounds.
The car body now undergoes many degrees of so-called protection from the effects of external factors and aggressive environments.
They can be listed point by point:
1) Phosphating.
2) Primer.
3) Several layers of paint (more varnish and sanding)
4) Applying a special composition to the bottom of the car
5) Protection of the cavities of the wings, sills and bottom with a special compound. Typically these are mixtures of polyvinyl chloride (or other PVC compounds), as well as bitumen and wax. This composition protects the body very effectively.
So guys, to sum it up, the body of your foreign car, and even modern domestic cars, will most likely withstand 6-7 years without any corrosion. And then, usually the car is replaced with a new one. So those who have been driving a car for 3 to 5 years may not even think about installing fender liners.
What if the car has been in use for more than 6 years?
Here, guys, it is better to install fender liners, the point here is this - the composition of polyvinyl chloride, bitumen or wax, wears out over time, sometimes even falls off. Therefore, the metal is left alone with the harmful environment. Again, sand and salt on the roads act as an abrasive compound that wears off not only the protective compound, but also paint and even primer from the bottom. Therefore, metal left without protection very quickly rusts and then rots. So they will come in handy here, as they will not allow sand and salt to wear off this composition and will save you from any external influence.
And in general, after six to seven years of operation of the car, it is necessary to carry out preventative maintenance on the body, it is advisable to once again apply a protective composition to the bottom and under the wings of the car. Install protective fender liners, treat hard-to-reach cavities, etc. This way, you will extend the life of the car body by several more years.
Installing fender liners as sound insulation
It should be noted that many people do not care about protection. By installing fender liners, they provide additional sound insulation. As a rule, a special compound is applied over it, which makes the wheel arches almost silent. A vibroplast (special material) is also installed on top to dampen excess vibrations. What this gives is that you can’t hear any stones, or the howling of the wind in the arches at speed, or the noise of rubber.
RESULT
If you are renting a car for 3 to 5 years, especially if it is a foreign car (even a budget one), then it is not necessary to install fender liners on it; you don’t even have to bother. If you are taking a used car (from five years old) or with the intention of driving it for 10 years, then you definitely need to somehow secure the body, and installing fender liners is a very good solution. They will also come in handy for those who struggle for silence in the cabin, especially in unpaved cities.
Arches are susceptible to rotting, like any part - so they need to be protected. To do this, install fender liners (lockers). For Priora cars they come without screws and with screws that are screwed into the perimeter of the wing.
For Priora, special plastic covers are installed from the factory, which cover the metal of the wheel arches from the environment. These parts rarely need to be changed for reasons of practicality. Often, car owners are looking for analog fender liners on a Priora, preferably without self-tapping screws, which will provide a larger coverage area for the metal arches. The price for these parts is from 300 rubles to 3000.
This is not just a decorative overlay. It has a practical purpose, and can even break. Like any plastic element, in frosty weather it becomes too fragile, so the time for its replacement is only approaching. The standard Priora fender liners are quite high-quality elements and are well designed functionally.
Making liquid fenders with your own hands
Branded products have a certain, not always justified cost. You can achieve almost the same effect for a lower price. To make an anti-corrosion agent at home, you need to follow a few simple steps. The car should be placed on a lift, overpass or pit. If all this is not available, then a high jack will help. Then the wheels and mudguards are removed, of course, if there are any. The wheel arches should be washed very thoroughly and allowed to dry perfectly. A heated garage is best for this. If other mixtures were previously applied to the surface, it is better to remove them, because do-it-yourself liquid fender liners may not “lay down” properly. It is recommended to close the brake discs.
Now apply the first layer of anti-corrosion compound to the surfaces of the arches. Once it's completely dry, it's time to apply a second one. Bitumen mastic is perfect for this. Make sure that it is applied to the surface as evenly as possible. Once the second coat has completely dried, you can begin the final coat. It is best to use a product with anti-corrosion rubber. It’s even better if the application is done by spraying the composition over the surface. This will fill microcracks in the mastic. The last stage requires waiting. The main rule here is no rush. Let all three layers dry completely. After completing the work, arches that are treated in this way will be no worse protected than if you used liquid fender liners in cans.
Why install fender liners (lockers)
Each body has several areas that are more susceptible to corrosion than others. Wheel arches suffer serious damage because they come into close contact with raindrops and snow throughout the year. Therefore, they need to be protected - corrosion without arch protection will develop at a rapid speed.
Lockers on Priora are considered the most common and effective solution. They are made of plastic. It tolerates snow and water more easily than metal, so the parts become the optimal solution. Trying to protect the body from the early appearance of rust, you should use a simple and at the same time effective method.
Even at the factory, the VAZ-2170 body is intensively treated with an anti-corrosion layer, along with other areas susceptible to rust formation. In combination with protective covers for wheel arches, it is necessary to constantly provide protection against rapid “aging” of the metal, but modern realities do not allow even the most robust cars to work without rust.
Not only snow and raindrops will clog inside, but also reagents. All this causes a serious blow to the primer, and therefore corrosion often occurs even under plastic casings. The anti-corrosion layer should be renewed so that under the new locker the metal will last for a long time without rust.
Basic faults
Wing flaps are replaced before they become faulty. The idea of replacing them comes to car owners who want to preserve the appearance of their favorite car for a long time. But, nevertheless, damage to the wing flaps on a car can also manifest itself:
- The plastic does not fit tightly enough to the wheel arch. The reason for this is a loose fastening. The result is an unpleasant sound near the wheel and dirt that is driven inside, lingering for a long time, creating a favorable environment for the formation of rust.
- Crack in the shield. Snow and water will also pass through it.
- Mechanical damage. Appears after a strong blow. This effect can be achieved by hitting the frozen plastic too hard, kicking snow off the wheel arch.
Manufacturers and prices of analogues
Among all analogues, the Novline fender liners on the Priora stand out. They can be with or without sound insulation:
- With Shumka: Left front – NLS.52.16.001, right – NLS.52.16.002. Left rear – NLS.52.16.003, right – NLS.52.16.004. About 800-900 rubles per piece.
- Without sound insulation: rear – NKK16.004, NLL52.16.003, front – NLL52.16.002, NLL52.16.001. About 350-400 rubles per unit.
In addition to protective covers for wheel arches, Novline offers an analogue with sound insulation:
- rear left fender liner - 99999-2170-11082, 950 rubles;
- rear right - 99999-2170-21082, 950 rubles;
- front left - 99999-2170-31082, 770 rubles;
- front right fender liner - 99999-2170-41082, 770 rub.
My opinion is the following: Of course, practicality should be present, but thick lockers on Priora and Ten cars do not look very nice, even collective farm!
Installing the front fender liner Hyundai Solaris
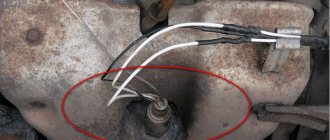
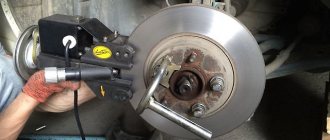
We remove the wheel arch liners for replacement and anti-corrosion treatment of the body, to remove the front wheel speed sensor (ABS sensor) and access to the components located behind them. We show the removal operations on the mudguard and left wheel fender liner. We remove the right front wheel arch liner in the same way. To make work easier, remove the front wheel.
To remove the mudguard...
...using a Phillips screwdriver, unscrew the piston retainer for the lower mudguard mounting...
Using a Phillips screwdriver or a 10mm wrench, unscrew the bolt securing the mudguard and fender liner.
Using a Phillips screwdriver, unscrew the two self-tapping screws, which at the same time serve as clamps for the piston fastenings of the mudguard and fender liner...
...and remove the mudguard. To remove the fender liner, remove the mudguard...
...we remove the two clamps at the places where the mudguard is attached.
Using a 14mm wrench, unscrew the rear fender liner mounting nut in the front wheel arch.
Use a Phillips screwdriver to unscrew the piston retainer for the rear fender liner fastening...
Using a 14mm wrench, unscrew the nut of the upper rear fastening of the fender liner in the front wheel arch.
Use a Phillips screwdriver to unscrew the locking piston of the front fender liner fastening...
Similarly, remove the piston of the upper front fastening of the fender liner in the front wheel arch.
We also remove the two pistons for the lower front fastening of the fender liner to the front bumper...
Install the left front wheel arch liner in the reverse order.
source