Replacing the heater valve VAZ 2105
Heater valve VAZ 2105
Replacing the heater tap with a VAZ 2105 and other improvements are aimed only at maximizing the operation of the stove. As mentioned above, this replacement is carried out due to the improvement and modernization of the operation of the stove (a ceramic version can be installed) or if the old faucet begins to leak. A leaking faucet can bring a lot of trouble to the car owner. Therefore, eliminating the leak will be the only correct solution, and this can only be done by replacing the tap.
Advice. We purchase a heater stove faucet in a store, preferably with two pipes. It is worth noting that the choice of faucets today is huge. Still, experts and experienced drivers advise buying a ceramic faucet. It has a better package than the regular one. It has a lot of parts.
You will need:
- Rubber rings.
- Fastening nuts.
- Washers.
- Aluminium case.
- Ceramic filling and much more.
Ceramic faucets last much longer than regular metal ones. They practically do not stick like regular ones. We begin the replacement, armed with a jack, spanners and wrenches, sockets and an extension cord. We lift the car onto the inspection hole, which will greatly facilitate the work process. Let's get started:
- take some container and place it under the engine;
- unscrew the plug on the block and then drain the coolant;
- after this we remove the container, but not far, since it will still be needed;
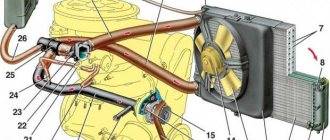
- we find the pipes that go from the engine to the heater tap;
Pipes going from the engine to the tap
- loosen the pipe clamps;
- take a metal brush and clean the threaded connections of the two studs.
Advice. To avoid problems with loosening the nuts, it is recommended to moisten the connections with brake fluid. After all, studs are not ordinary bolts, but parts whose heads are buried in the plastic body of the faucet. The fastening nuts on the heads are self-locking and have plastic rings that are difficult to unscrew. Well, if you add corrosion to this, then everything becomes clear.
Let's continue:
- remove the pipes while the threaded connections are acidifying (remember that you need to place a container under the pipes, since liquid flows from there);
- go to the salon;
- remove the side panel of the torpedo;
- then we find the pipe clamps;
- take a socket wrench with a cardan and unscrew the clamps;
- remove the pipes and replace them with new ones;
- after removing all the pipes, we climb under the car again;
- we find the nuts securing the heater valve;
- use a 10mm wrench to unscrew them;
- we return to the salon;
- pull the tap towards you;
- remove the spring clip;
- disconnect the control cable from the crane;
- We install a new heater valve, first connecting the cable and attaching the valve to the body.
That's all! The new heater valve is installed. The rest of the assembly is carried out in reverse order.
How to remove the heater radiator of a VAZ 2105 video - online series house on the outskirts all seasons
Description of the video. Replacing the interior heater radiator of the VAZ 2105 stove - all steps are sequential. Construction Construction 2nd year. Furnace radiator VAZ 2107, replacement. Features of the VAZ-2107 stove. Ways to modernize it and... VAZ 2107 Replacing the heater radiator! — YouTube. Solder the heating radiator, stove, VAZ 2105. VAZ classic stove. Drive repair. VAZ 2106-03. how to remove and replace the ventilation deflector of the VAZ stove, the stove grilles on the dashboard 2106. 3-row copper stove in the VAZ 2104 + modification. March 24, 2020 The VAZ 2114 heater consists of a heater (radiator), pipes and How to remove, replace the heater radiator (heater) and the VAZ faucet. 22 Jan 2013 The radiator of the VAZ 2107 stove has pipes: inlet and outlet. improvements to this device with photos and videos are available on the Internet. seal fastenings, which must subsequently be removed. Tuning the VAZ 2106 panel with your own hands Today we will do tuning the VAZ 2106 panel, namely.
Replacing a VAZ heater valve - Let's all go. Then carefully remove the radiator from its seat. At this point, the repair work to remove the heater radiator on the VAZ 2105 has been completed. How to remove the radiator trim of a VAZ 2121 Niva. Before you start replacing the heater radiator of a VAZ 2113, 2114 or 2115, you need to drain the coolant and also remove the instrument panel. Replacing the VAZ 2107 heater radiator: video instructions. Good afternoon, car enthusiasts. How to remove the heater radiator on a VAZ 2105 is a fairly common occurrence. We have selected for you the best video on the topic of repair. Replacing the VAZ 2114 heater radiator: instructions. Removing and replacing the heater radiator on VAZ 2101, 2102,…. Replacing the VAZ 2107 heater radiator: how to remove and replace.
Replacing the heater radiator of VAZ 2113, 2114 and 2115 with your own…. Removal and repair of the VAZ heater radiator Replacing the heater radiator 2101-2107 - YouTube. How to replace the heater radiator on a VAZ 2105 video.
GT Replacing the faucet of the VAZ-2107 classic stove. Helpful advice: - smear the lower quadrant of the nut securing the faucet to the heater radiator with a small amount of sealant. 5 Dec 2014 Your browser does not currently recognize any of the video formats available. Click here to visit our frequently asked questions about HTML5. How to replace the heater radiator on a VAZ with your own hands.
17 Feb 2020 Detailed instructions for replacing the heater radiator on a VAZ 2101, 2102, 2103, 2104, 2105, 2106, 2107 with your own hands (+ video). You can change the heater valve at the same time, because you still have to remove it. Video. Questions/answers. Autonorms. VAZ (Lada) 2107 1982 - 2013. Tell us the sequence of removing the radiator of the VAZ 21054 heater, please. VAZ 2106: do-it-yourself tuning. Radiator VAZ-2110: Tips for selection, repair and operation Panel VAZ-2110: how to improve. 1 Replacement of the VAZ 2105 heater valve. 2 Radiator and heater fan. 3 Replacing the VAZ 2105 heater. 3.1 What the stove consists of. remove the pipes and replace them with new ones; After removing all the pipes, we climb under the car again and remove the seal (it is recommended to watch a detailed video before removing). VAZ 2105 Removing the dashboard and replacing the heater valve. Avtomobilist.org - Club of car lovers. January 15, 2014 replacement of the VAZ 2106 stove, replacement without problems. Fuck you posting how you already installed it, you post a video of how the installation took place in the evening in an awkward position, there’s nothing to film, it’s simple. Replacing the interior heater radiator of the VAZ 2105 stove - all steps are sequential. VAZ 2107 Replacing the heater radiator! How I changed the radiator of a VAZ stove. How to remove the dashboard of a VAZ.
Stove VAZ 2105 Video! — www.fassen.net-Video surfing. How to remove the stove on a VAZ 2107 video - Removing the stove on a VAZ.
https://youtube.com/watch?v=-RmYerKHnm0
How to remove the stove VAZ 2105
In order to remove the heater from a VAZ-2105 car, it is necessary to disconnect the ground wire from the car’s battery.
Remove the instrument panel, glove box body and radio mounting panel (for more details, see the “Instrument Panel” chapter).
Move the heater valve control lever all the way to the right and drain the liquid from the engine cooling system
Loosen the clamps 7 (Figure 1) and disconnect the rubber hoses 8 for draining and supplying fluid from the heater pipes.
Unscrew the two bolts securing the seal 9 on the heater radiator pipes inside the engine compartment and remove the seal.
Remove the trim of the heater control levers, unscrew the bolts securing the bracket 2, loosen the bolts of the brackets securing the shells of flexible rods 5 on the bracket, disconnect the rods and remove the bracket.
Unscrew the screws and remove air duct 1 for internal ventilation.
Overcoming the resistance of the latches of the nozzle housings 10 for heating the side windows, remove the right and left nozzles.
Unscrew the nut securing the right air duct 4 for the heated side window. Release the latches of the damper housing 12 and remove the air duct.
Remove the left air duct in the same way.
Remove the four spring clips and fan shroud assembly.
Remove the four nuts securing the radiator casing, disconnect the ground wire under one of the nuts on the left side, remove the radiator casing and air duct 6 for heated windshield.
Installing the heater on the car must be done in reverse order.
It is necessary to pay attention to the correct installation of the sealing gasket between the radiator casing and the car body
When assembling and installing the heater, you need to adjust the heater control (see “Adjusting the heater control”).
After installing the heater on the car and connecting the hoses, fill the engine cooling system with coolant and check the tightness of the hose connections.
Disassembly and assembly of the heater
Remove two spring clips 13 (Figure 2) and remove the fan from casing 3.
Unscrew the impeller fastening nut 11 and remove it from the electric motor 12.
Unscrew the nuts securing the brackets and remove the air distribution cover 16 of the fan casing 2.
Having pressed the latches of the damper housings of the 15 air ducts for heating the side windows from inside the casing, remove the housings assembled with the dampers and disconnect the rods from the damper levers.
Slightly unscrew the bolts securing the brackets that clamp the shells of the flexible rods of the crane drives and the damper of the windshield heating air duct, and remove the rods.
Having unscrewed the nut of the bracket securing the inlet and outlet pipes 9, remove the bracket and remove the radiator 8 from the casing 5. Having unscrewed the fastening nuts, disconnect the outlet pipe and valve 10 with the inlet pipe from the radiator.
Loosen the bolt securing the shell of the flexible rod of the air supply cover 6 and remove the rod. Unscrew the fastening nuts, remove the air supply cover bracket and remove the cover.
Reassemble the heater in reverse order. When assembling, be sure to ensure that the sealing gaskets are installed correctly. When installing flexible rods, it is necessary to maintain the installation dimensions of 5±2 mm (as shown in Figure 3) of the ends of the rod shells behind the brackets for their fastening on the tap, radiator casing and fan guide casing.
Adjusting the heater control system
Remove the trim on the heater control levers.
Place the valve levers and air intake covers in the fully closed position, and the windshield heated air duct flaps in the fully open position and check the distance between bracket 3 (Figure 3) and the control levers, which should be 5 mm. If this value does not correspond, it is necessary to adjust the heater control.
Remove the instrument panel (see chapter “Instrument panel”).
Slightly unscrew the bolts of brackets 2 and secure the shells of all three rods on bracket 3 so that the control levers do not reach the end of the bracket by 5 mm when the tap and air supply cover are fully closed, and the windshield heating air duct flaps are fully open.
Install the instrument panel and the trim of the heater control levers.
Replacing the electric motor of the heating system of a VAZ 2107
For work you will need: wrenches “8” and “10”, screwdrivers, pliers.
Removing the electric motor
Replacing the VAZ 2107 heater fan electric motor begins with removing it from the car. So:
- The side dampers of the air ducts are closed by placing the lower lever of the heater control unit in its extreme right position.
- The dashboard is removed.
- The storage shelf and glove compartment body are removed.
- The radio panel is removed.
- The red and blue-black wires are disconnected from the block of wires that provide switching of operating modes of the heating system fan.
- The bolt securing the flexible rod that controls the damper, installed behind the instrument panel, is loosened, and the rod is disconnected.
- The tip of the flexible rod is removed from the axis of the lever to drive the damper.
- Use a socket wrench to unscrew the nut holding the furnace radiator casing and the ground tip of the fan wire, which is located behind the central air duct.
- The tip of the ground wire is removed from the studs.
- The nut holding the right air duct is unscrewed.
- The same is done for the left air duct.
- Using a slotted screwdriver, the four holders installed along the perimeter of the air ducts are pressed out, which are then disconnected from the furnace radiator casing.
- The fan casings and the guide together with the fan are removed.
- The rubber seal is removed from the housing, and the wires are passed into the inside of the casing.
- The tip of the red wire that goes to the heater fan is disconnected from the plug on the additional resistor.
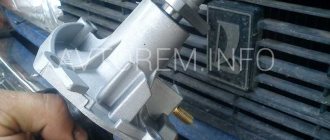
- The heater fan shroud is disconnected as shown in the photo.
Heater fan shroud
- Use a slotted screwdriver to move the lock washer and remove it from the fan shaft.
- The adjusting washers are removed.
- The fan impeller is removed from the electric motor shaft.
- The two spring clips that secure the heater fan motor to the guide housing are disconnected.
- The electric motor and two rubber pads are pulled out.
Replacing the electric motor of the heater fan VAZ 2107
Installing a new electric motor
After the electric motor of the heater fan on the VAZ 2107 has been replaced, all previously removed parts are installed in the reverse order . Instructions for removing and installing the electric motor of a VAZ 2107 car are clearly visible in the video. With its help, you can easily perform all operations yourself. In this case, the price of the work will be much lower than for repairs in a car service workshop.
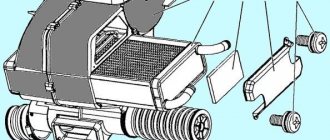
Heater device VAZ 2105
The layout of the heating system of the VAZ classic is by and large standard, but there are still a number of features. The car interior is heated according to a well-known scheme - with outside air, which is heated in a heater radiator connected to the cooling system. In the “five”, outside air is taken in through grilles located on the hood near the windshield. This air duct is isolated from the engine compartment in order to prevent smoky air from entering the cabin from the engine compartment. When it hits the reflector, the outside air is separated from the water (which is important in rainy weather), changes direction and moves towards the stove radiator. The amount of air supplied for heating can be adjusted using a lever that controls the position of the air distribution cover.
The heater radiator is included in the cooling system circuit after the power unit, so the antifreeze entering the radiator is very hot. The outside cold air entering the walls of the heater radiator tubes heats up, cooling the antifreeze, and enters the fan already hot. The fan speed can be controlled via a three-position switch located in the cabin. The fan directs hot air to the air duct nozzles to heat the windshield, side windows, driver/passenger footwells and the upper part of the cabin.
A special feature of the VAZ-2105 heating system is the presence of exhaust ventilation. Air from the cabin is removed through decorative grilles installed on the rear side panels. To prevent outside air from penetrating into the cabin through the decorative grilles during strong crosswinds, a valve is built into the corresponding air duct that allows air flow in only one direction.
According to the manufacturer, in severe frost (exceeding minus 25ºС), the heater is able to warm the air in the cabin to 25ºС, and in the foot area - up to 30 degrees. In reality, such indicators are only achieved on a new car - over time, the radiator and air ducts become clogged, and heating efficiency drops sharply. Therefore, when the first signs of such deterioration appear, it is necessary to find out the cause of the phenomenon and take measures to eliminate the problems.
DAAZ
Second place, after Ozon, was occupied by DAAZ. This VAZ 2107 carburetor, unlike its “colleagues,” had an economizer device that provided forced idling. This difference did not have a significant impact and did not make this mechanism special.
Since “DAAZ” is a modification of “Ozone”, it also has options with the index 1107010 and 1107010 - 20. It is impossible to immediately say which carburetor is better to install on the Lada 2107. To do this, you need to decide what exactly you want to get from this device.
Disassembling, cleaning and assembling the VAZ 2107 “DAAZ” carburetor is one of the simplest tasks compared to cleaning other models. Although the layout of the unit is no different from the others, its design was somewhat simpler.
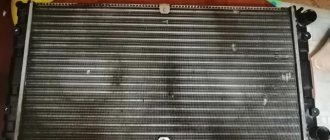
Selecting a new heater radiator
Buying a stove radiator today is not at all a problem. Automotive markets and spare parts stores are overflowing with such products, but making the right choice is not always easy. It's all about the manufacturer and price.
The cheapest radiator from an unknown manufacturer, also made from an unknown alloy, will cost you a maximum of 500 rubles. Naturally, no one will give a guarantee for several years of its productive operation. At the same time, you can buy a high-quality heat exchanger made of copper-brass alloy with a guarantee, at a price of about 3,000 rubles.
There are also compromise options that involve fairly high-quality products from well-known manufacturers at reasonable prices. Below is a table indicating the models of VAZ 2107 heater radiators from trusted manufacturers.
Signs of a malfunction of the VAZ 2107 heater radiator
Replacing the thermostat VAZ 2107
Malfunction of the heater radiator VAZ 2107
manifests itself in 2 variants:
stoves
stoves If with a warm engine and an open heater valve from the stove
cold or barely warm air comes out, the reason here is a clogged heater radiator. Most often, the radiator becomes clogged when the car owner tries to fix a leak in the engine cooling system by adding various “miracle additives” to the antifreeze, designed to combat small coolant leaks. Yes, such additives can clog a leak, but they also clog thin radiator tubes. The radiator can also become clogged due to rust or poor-quality coolant. In this case, it is useless to try to pour in other additives designed to clean the cooling system. The radiator must be removed and tried to be washed or replaced.
INDEPENDENT REPLACEMENT OF HEATER IN VAZ 2106
Parts of the interior heater of the VAZ 2106
Heater parts:
- 1 — air distributor cover.
- 2 — fan housing.
- 3 – additional resistor.
- 4 — fan impeller casing.
- 5 — heater radiator housing.
- 6 – housing cover gasket.
- 7 — air supply hatch cover.
- 8 – clamping bracket for fastening pipes.
- 9 – spring holder for fastening the fan casing.
- 10 – radiator gasket.
- 11 — heater radiator.
- 12- heating tap.
- 13 – fan impeller.
- 14 – electric fan motor.
- 15 — spring bracket for mounting the electric motor.
- 16 – rubber cushion of the electric motor.
- 17 — bracket for fastening the air distributor cover.
Radiator and heater fan
You should know that in order to always keep the interior of a five-wheeler warm and cozy, especially on winter days, you need to be able to increase the amount of heat supplied. Which part is directly responsible for supplying warm air? Of course, the radiator. But there is a problem - at the top five the fan is so loud that it makes you laugh. It is very small and simply not capable of creating the required flow. What to do? First, let's compare the fans on the VAZ 2105 and the VAZ 2108. The first motor consumes 4.5 A current and has a rotation speed of 3000 rpm, and the second one 14 A, but spins 4100 rpm. This already says something. It is recommended to replace the fan with another one.
Replacing the heater fan VAZ 2105
Replacing the heater fan on a VAZ 2105 is carried out as follows:
- the lower part of the stove is removed (this is a simple casing, on top of which a regular electric fan is installed);
- the old fan is removed;
- we cut off one of the aerodynamic ridges that supply air to the legs of the driver and passenger (this is done due to the fact that the fan motor of the VAZ 2108 is much longer);
- the impeller is also removed, which will not allow the fan from the VAZ 2108 to sit in place;
- Instead, a homemade one is installed.
Advice. In order not to remove the impeller, but to leave everything as is, you can use another fan. A standard five-bladed fan for classics, which has a motor several times more powerful, is suitable. And its weight is much lighter, and the rotor of the new motor rotates stronger than even that of the VAZ 2108.
- increase the diameter of the impeller hole;
- we insert a new shaft there (we do this very carefully so as not to break the impeller);
- connect the fan and check its operation;
- adjust the resistor and assemble everything in reverse order.
Advice. It is recommended to replace the resistor on the five by installing the eight version. The new resistor must ensure quiet operation of the fan. The fan switch should also be replaced.
Basically, people start using a radiator stove when cold weather sets in, that is, in the autumn-winter period, when you want warmth, but instead you get a stream of cold air or a puddle under your feet.
True, it’s rare, but sometimes it happens that you have to remember about it even in warm weather. This happens because a leak appears in the radiator heater and a puddle of antifreeze or water forms under your feet, depending on what you used for the cooling system. Let's look at several reasons why a radiator heater may become faulty: 1. A leak may appear due to a rusted heater radiator or due to a rusted metal pipe, that is, the heater tap. If the faucet is rusty, you can simply replace it. And if a copper radiator is rusty, then it can be repaired, but if the radiator is made of aluminum, then it is easier to buy a new one and install it instead of the old one, since it cannot be repaired. 2. If, when you turn on the heater, instead of a hot stream of air, you get a cold stream of air, this means that there is a problem in the air circulation in the car, which was caused by a broken or clogged tap. If the tap simply does not open, then it is recommended to replace it.
To replace the radiator heater, we will need the following tools: 1. Phillips and regular screwdriver. 2. Socket and socket wrench in three sizes: 7,8 and 10. 3. Three rubber gaskets. 4. Coolant about one liter. 5. Silicone based sealant.
We begin to replace the radiator heater in the car: 1. It is not necessary to drain the coolant from the unit, since the losses will not be large, but if you want, you can drain it. 2. In the engine compartment, using a screwdriver, we begin to unscrew both clamps on the pipes from the radiator, and then tighten the hoses.
3. Using a screwdriver, we begin to unscrew the fasteners from the rubber seal and remove it.
4. We sit in the car and remove the panel from the radio.
5. Using a size 7 wrench or a screwdriver, we begin to unscrew the fasteners on which the cable from the crane drive is attached, and disconnect the cable from the crane.
6. Again, take a screwdriver and begin to unscrew the spring-shaped brackets located on the fan casing.
7. As soon as the springs are removed, we first lower the casing down and then move it to the left side, since it is impossible to remove the casing itself due to the power wires from the electric motor. 8. Remove the radiator from the stove from the casing itself.
Next, we carry out a thorough inspection of the components of the stove: the radiator, metal pipes and the tap itself. There should be no traces of rust or leaks on metal tubes. Also, if the valve does not open or close and there are also visible signs of leakage or leakage of coolant, then it is recommended to replace it with a new one. If only the radiator itself is faulty, and everything else is in good condition, then you can remove the metal tubes and valve from the old radiator and attach it to the new radiator. Do not forget to replace all rubber gaskets during repairs. When installing the gaskets, be sure to lubricate them with sealant, and only then begin to tightly screw the outlet pipe and tap to the radiator. Also, using sealant, be sure to lubricate the radiator tubes when you attach rubber hoses to them, through which coolant will be supplied.
The radiator heater is assembled in the reverse order. When the stove is assembled, do not forget to add antifreeze to the radiator, if necessary, then start the car and check the tightness of the connections of the hoses and pipes. Tags: classic, 2107, stove
Operating procedure
Before you begin removing the radiator, you need to prepare the necessary tools. Namely:
- Two keys - 7 and 10;
- Screwdrivers (phillips and flathead);
- Rags;
- Two new rubber gaskets;
- Four liters of coolant.
Before starting work, place a rag on the floor mats. It will protect them from getting antifreeze or antifreeze while the stove radiator is being replaced.
First of all, clear access to the heater casing. This must be done by removing the bottom and shelf of the glove compartment, and also by disassembling the radio panel. Once the casing is released, it must be removed. Now, the stove radiator itself has opened in front of you.
All the work that needs to be done from inside the car is completed, let's move on to the engine compartment. On VAZ 2105 and 2107, there are two pipes from the cooling system to the heater radiator. On each of them there are clamps. They need to be released and the pipes disconnected from the stove. Also, carefully inspect the clamps for corrosion. If these hot spots are found, the clamps will need replacement. Otherwise, the source of corrosion may transfer to the thread, and you will not be able to loosen this part.
Once the clamps are removed, you will need to remove the diaphragm. It is attached with two 7mm bolts to the heater radiator. The last thing that holds the stove in place is the heater control cable. Let's remove the loop from it, and that's it, the radiator can be removed.
You need to remove it carefully without damaging the tubes. Otherwise, after reinstallation, they will leak and will need to be replaced. To disconnect them from the radiator, take a 10mm wrench and unscrew all the fasteners (there should be four of them).
Now, through the hole on which the pipes were attached, you can inspect the part from the inside and determine whether it needs replacement, or whether cleaning can be done.
Replacing the heater radiator on a VAZ-2101, VAZ-2102, VAZ-2106, VAZ-2107 car
Motorists often remember about the heater radiator only when the autumn-winter period begins. No, there are times when they remember him earlier. For example, the unexpected appearance of antifreeze or water (depending on what is poured into the cooling system) under the feet of the driver or front passenger. The reason for this phenomenon is a leak in the car's heating system. But, most often, the driver learns about the malfunction of the heater radiator only when cold weather sets in. When you want warmth and comfort in the car interior. You pull the heater switch knob towards “heat”, turn on the fan and suddenly, instead of a warm flow of air from the air ducts, you get a flow of cool air or another option – the formation of a puddle of antifreeze in the car’s interior. And as a result, a spoiled mood and a cool, uncomfortable environment in the car.
But, everything can be fixed (for any car) and quite in a short period of time (this is said about the VAZ-2101 and VAZ-2102 ). In principle, replacing the heater radiator and other troubleshooting of the heating system on other Zhiguli - VAZ-2105, VAZ-2106, VAZ-2107 - is not much different, a little more fiddling with the radio panel (bar), but this article will describe the process repair of the heating system and replacement of the heater radiator on the VAZ-2101, VAZ-2102.
Causes of heating system malfunction:
- The cause of an antifreeze leak in the car interior may be a rusted heater radiator or a metal pipe or heater tap . The exact cause can be determined by visual inspection. If the whole “trouble” lies, for example, in the stove tap or pipe, then they can be replaced without disassembling the radiator casing and the “Bar” panels. If the culprit of the coolant leak is the radiator itself, then there are two options for solving the problem. First, if you have a copper radiator (an old model), it can be repaired - cleaned, soldered, tinned, etc. The main thing is to find a specialist - a radiator technician. The second option is that you have an aluminum heater radiator . Everything is simpler here, it is better to replace it with a new one, it cannot be repaired.
- When the heater is turned on, cold air continues to blow from the air ducts. The reason is a violation of the circulation of coolant in the car system, due to the fault of a non-working heater tap (it is constantly closed) or the radiator itself is “clogged”. If the faucet is jammed, it should be replaced, but point “1” of this article will help us choose the right solution for the radiator (see above).
The reasons have been sorted out. Now about the main thing - how to change the heater radiator on a VAZ-2101, VAZ-2102, VAZ-2105, VAZ-2106, VAZ-2107?
The tool required for this is a pair of screwdrivers (Phillips and regular), socket and open-end wrenches for “7”, “8”, “10”. You also need to buy rubber gaskets (three pieces), a liter of coolant, and silicone sealant.
Next, point by point, is the process of replacing the heater radiator on a VAZ-2101, VAZ-2102, VAZ-2105, VAZ-2106, VAZ-2107 .
- If you wish, you can drain the coolant from the engine block, but you don’t have to drain it, the losses will be insignificant. Moreover, you have 1 liter of coolant in stock.
- From the engine compartment, unscrew the two clamps on the radiator pipes and tighten the hoses (photo 1).
- Unscrew the fasteners of the rubber seal and remove it (photo 2 and photo 3).
- Inside the car, remove the radio panel photo 4 (in my case it is screwed on with two self-tapping screws).
- Using a key “7” or a screwdriver, unscrew the fasteners of the heater tap drive cable (photo 5) and disconnect the cable from the tap.
- We find four spring clips on the fan casing (photo 6) and remove them using a screwdriver.
- We lower the casing down and move it to the left. To remove the casing completely or move it further you will not be given the power wires for the electric motor.
- Pull the heater radiator out of the casing (photo 7).
Next, we carefully inspect the radiator, metal pipes and heater tap. Metal tubes must be free of obvious signs of severe corrosion and leakage (in my case I had to replace the tube, the reason is clearly visible in photo 8). The stove tap should be replaced if the tap handle is jammed (does not open or close) or signs of coolant leakage are visible. If you had to change the heater radiator itself, then the tap and tube from the old radiator should be twisted to the new radiator. Don't forget to install new gaskets (photo 9). Having lubricated the gaskets with silicone sealant, tightly (without fanaticism, otherwise you can crush the gasket or break the thread) screw the outlet pipe and tap to the radiator (photo 10). We also lubricate the radiator tubes with silicone sealant when connecting the rubber coolant supply hoses to them.
We carry out assembly in reverse order. After assembly, add antifreeze to the radiator (if necessary), start the car and check the tightness of the connections of the hoses and pipes.
Main malfunctions of the VAZ-2105 heating system
Let's consider the main reasons that cause the inoperability or decrease in the efficiency of the “five” heating system:
- Often the cause of deterioration in interior heating is a decrease in the level of antifreeze in the cooling system. If the car has been in use for a long time, this phenomenon can be considered quite natural, but if the level drops sharply, it is necessary to look for the reasons. If a leak is detected, it should be eliminated, coolant should be added and the air lock should be eliminated by pushing through the hoses with the power unit running;
- a malfunction of the thermostat, which is responsible for the possibility of coolant circulation through a large or small circuit, can also cause the inability to reach the required temperature regime, as well as a breakdown of the heater tap;
- A common cause of poor heating efficiency is a clogged stove radiator. The fault can be localized by touch while the power unit is running: in the place where the radiator honeycombs are heavily clogged, there will be a noticeable temperature difference;
- Finally, problems may arise due to the heater fan not working or not working at full strength.
Repair and replacement of the heater radiator on a VAZ-2101, VAZ-2102 car
The stove (heater) radiator is a car part that most motorists only remember in the fall, or even worse, in the winter. Of course, there are times when they remember about it in the warm season, for example, when water or antifreeze (depending on what you prefer) suddenly appears under the feet of the car owner or in front of the passenger sitting in front. This factor indicates that there is a leak in the car's heating system. However, the classic case of finding out about a malfunction of the stove radiator occurs precisely at the onset of cold weather. It is when it is already quite cold, and the desire to warm up becomes a vital necessity. Many “frantically” try to turn the regulator in the direction of increasing heat, so much so that they “cut” new divisions on its scale. However, apart from a cold stream of air from the air duct, or, alternatively, a puddle of water under your feet, nothing appears. A familiar situation, isn't it?
The problem, although unpleasant, is not critical, everything can be fixed quite quickly, at the moment, I mean, Zhiguli cars of the VAZ-2101 and VAZ-2102 models. In theory, replacing a radiator heater or troubleshooting the heating system, in other models for example - VAZ-2105, VAZ-2106, VAZ-2107 - is not much different, there is a little more work with the radio panel (Bar). But, despite this, in this article I will describe in detail the process of repairing the heating system, as well as replacing the heater radiator on a VAZ-2101, VAZ-2102 car.
Causes of heating system malfunctions:
The cause of antifreeze leakage may be a rusted radiator or stove, as well as a metal pipe or stove tap. The true cause can only be determined by visual inspection. In the case when the entire “root of evil” lies, for example, in the pipe or faucet of the stove, then they can be replaced, even without the need to disassemble the radiator casing and the “Bar” panel. However, if, nevertheless, the radiator is “to blame” for the coolant leak, there are two options for solving the problem. The first option, when your car is equipped with a copper radiator (old type), it makes sense to try to repair it (wash, clean, solder, tin), the most important thing is to find a radiator specialist.
The second solution to the problem is that your car has an aluminum heater radiator. For those who like to patch something up, fix it, etc., I’ll tell you straight, it will be easier to replace it with a new one, since in most cases it cannot be repaired.
If the first option is excluded, and you continue to puzzle over the solution to the problem, here is the second option for a possible heater malfunction. Most likely, the circulation of fluid in the car's cooling system is disrupted due to a faulty heater valve. Either the tap is closed, or the radiator itself is clogged. In the case of a jammed tap, it must be replaced.
How to remove and replace the heater motor on VAZ-2107, 2105 and 2104
So, dear friends, today we will tell you in an accessible language how to get to the heater motor on a VAZ-2107 in order to replace it or repair it, depending on what forced you to take it out. Let us immediately note that if the heater motor on your seven began to squeal when cold, or squeal, then this will only get worse, the motors from the factory are bushed, lubrication will not lead to anything, it may return you silence for a short time, but not for long, so in this case only replacement. And ideally, replacing the heater with a bearing motor - it certainly won’t squeal. So, first we will need to remove the beard on our seven. First, we remove the gear shift knob, it will interfere with us, and we remove the radio from the shaft and disconnect the connectors. It’s different for everyone, some may not even have a radio.
First, let’s unscrew the shelf, everything is simple here, the action is in three photos:
To further remove the beard, we need to remove the panel with the clock and cigarette lighter, pry it off from the right or left side with a flat screwdriver and pull it out of the latches:
Then, we disconnect the wires from the clock, the cigarette lighter (for ease of assembly, I would advise marking them), remove the socket to the side and gain access to two nuts, here it will be convenient to use a 10 mm socket wrench
We unscrew the nuts, do not lose the washers, look down where the buttons are. There is a decorative plug on the side that looks at the rear passengers; we pry it off with a screwdriver, and under it we see two screws screwed into the tunnel:
We unscrew them, disconnect the pads from the buttons, the panel no longer holds anything. We move it to the side and gain access to the stove body:
Now, we disconnect the side air ducts and carefully remove them from the latches with a flat screwdriver (the photo shows how they snap into place):
We are interested in the lower and middle parts of the body of the stove 2107, in order to remove them you need to get close to the metal latches, there are only four of them - two on each side, here they are:
It can be problematic to snap them off with your hands, we recommend using a screwdriver, like in this picture:
After the latches are removed (be careful when removing, they may “shoot” and fly away in an unknown direction), the lower part of the stove body can be easily pulled out by hand:
Here we see our motor. The motor itself is held in the lower part of the case, also on two metal latches; we snap them off and disconnect the terminals
and remove our motor from the stove body:
That's all, assembly is carried out in the reverse order, about 40 minutes are spent on everything. By analogy, the heater motor is replaced on the VAZ-2105 and VAZ-2104, the only difference is in the beard itself and its fastenings. A little later we will tell you about the nuances of replacing the heater motor in these and other VAZ models. Good luck on the roads and don’t let your car break down. We will be glad to see you in our VAZ classics club on the forum.
VAZ 2105 — Replacing the heater tap
The reason for replacing the heater valve is mainly a coolant leak from the valve itself. They also change the heater tap in cases where there is no leakage of antifreeze, antifreeze or water, but the tap is not working properly, that is, it does not completely block the opening of the liquid entering the heater radiator. A coolant leak is immediately noticeable to the passenger sitting in the front seat, as all the liquid first flows into the Vaz 2105 onto the shelf under the glove compartment, then onto the floor mat.
What is required to replace the heater valve in a VAZ 2105 car
- new valve (for reliability, car owners recommend a ceramic ball valve)
- rubber gaskets, 2 pieces
- automotive sealant, for example, Avtosil
- 10 socket wrench and open-end wrench
- a small Phillips screwdriver for removing the glove compartment door and the shelf underneath it
- wrench size 7 to loosen the fastening of the cable for opening and closing the faucet
Many people recommend draining the coolant completely from the cooling system first. I didn’t drain it, since the fluid supply pipes to the car’s interior and to the stove are located horizontally no lower than the radiator cap.
Reasons for replacing the stove on a VAZ 2107
Many car problems occur with the arrival of cold weather, and this especially applies to cars from the domestic auto industry. One of the main problems is the inefficient operation of the heating system, as a result of which the windshield and side windows are poorly heated. VAZ 2107 owners quite often encounter a situation where in winter the car’s interior simply does not warm up. In this case, there is no need to talk about any comfort for passengers and the driver. To understand the reasons and eliminate a possible malfunction, you first need to understand the design of the “seven” heater.
The main elements of the VAZ 2107 stove are:
- radiator;
- tap;
- fan;
- control cables;
- air ducts
As the vehicle is used, certain malfunctions may occur with the stove, which reduce the efficiency of the unit or make its operation completely impossible. There are not many signs of major problems and they boil down to the following:
- heater leak;
- lack of heat or weak air heating.
As for the service life of the stove, it is inappropriate to give any figures. It all depends on the quality of the parts, the coolant used, as well as the frequency of operation of the car.
VAZ 2105 - replacing the heater radiator
September 27, 2013
The radiator of the heating stove of the VAZ 2105 car is removed in case of leakage for subsequent replacement with a new one, or for preventive cleaning, as well as when performing other repairs in which its presence will interfere with the progress of its implementation. Prepare a standard set of tools, also prepare two new rubber gaskets for the heater valve and two clamps for securing the pipes. If you have everything you need, do the following:
- It is recommended to place a rag or other material under the pipes inside the car, since removing them may leak a small amount of coolant.
- We drain the cooling system into a previously prepared container.
- In the engine compartment, use a screwdriver to loosen the clamps securing the inlet and outlet pipes.
- Then we remove the pipes. When removed, a small amount of coolant may leak out of them if you did not drain the system.
- Now you need to remove the pipe seal; to do this, use a screwdriver to unscrew the two screws that secure it to the partition of the body of the engine compartment and the car interior.
- Next, we move into the car interior and remove the decorative casing of the heater fan.
- Also disconnect the fan drive rod.
- Then carefully remove the radiator from its seat.
At this point, the repair work to remove the heater radiator on the VAZ 2105 has been completed. Replace it, and then perform the installation in the reverse order. If you plan to install the old one, then it is first recommended to check it for leaks; to do this, we plug the inlet hole and connect a compressor with compressed air to the outlet pipe. By pumping up pressure in it and lowering it into a container of water, we determine the presence of depressurization by the presence of air bubbles and, if necessary, either eliminate the defect or replace it with a new one. When assembling, do not forget to change the rubber sealing gaskets.
How to remove the heater radiator on a VAZ 2104
First, you need to drain the coolant by unscrewing the plug, which is located on the left side of the engine “in the direction of the car” at the bottom of the block.
For clarity, some images use the interior view of the seventh Lada model
First place a clean container of at least 10 liters under the bottom of the engine. It is better to choose something like a basin as a container, or do it as shown in the figure.
Many car enthusiasts bypass the procedure for draining antifreeze, relying on their reaction and strong nerves. But believe me, it’s better to spend 10 minutes on this to continue working comfortably. Moreover, there are often always cracked cooling system pipes near the pump or radiator, which are best replaced immediately if you don’t want to get your hands dirty again in a couple of months.
Important: If antifreeze or antifreeze has a brown or dark brown tint, it is better to replace the liquid.
After the coolant has been drained, loosen the clamps and disconnect the inlet and outlet pipes of the stove.
Assembly
Assembling the VAZ 2107 heater occurs in the reverse order. First, we screw the pipes to the radiator and thread the part into the hole between the body and the engine. We put on the loop of the stove control cable and install the diaphragm. We connect the pipes, and be sure to tighten their edges with clamps.
When repairing or replacing this mechanism, it is recommended to replace all gaskets in order to increase their service life. The final step is to reinstall the radio panel and assemble the glove compartment. Replacement of the VAZ 2107 radiator is completed. Now, start the engine, warm it up for 5-10 minutes, and turn on the heater. First, do not forget to open the faucet, which is located under the dashboard, on the passenger side. If warm air is blowing from the vents, then the problem is solved, but if not, then it is better to contact a specialist.