From time to time, any car owner needs to paint his car with a raptor. Regardless of what kind of painting is required, and it can be partial or complete, such work is done strictly according to the rules. A carelessly executed coating very soon makes itself felt with chips, scratches and a very sloppy appearance of the car.
The main function of the raptor is to protect the car body from rust , mechanical damage and ultraviolet radiation. For tourism enthusiasts and truck drivers, this issue is especially relevant, because on off-road routes the car is constantly exposed to gravel, water and more. Raptor, like wax, creates a special polyurethane coating that makes the car virtually invulnerable. It is worth noting that the appearance of the body after such treatment acquires a matte, bumpy surface, which some find not very aesthetically pleasing. If you make a choice in favor of the reliability of the car, such a drawback is easier to accept.
The main stages of painting a car in a car service
Painting a car with raptor is an expensive service . By contacting qualified specialists, you can be sure that such camouflage for your car will last a long time. To save money, many people prefer to paint it themselves, but the raptor is very finicky to use and requires considerable skill. The result of painting depends 99% on the careful preparation of the car for processing.
The first most important stage includes mandatory thorough cleaning and disassembly of the machine . All attachments must be dismantled, and the varnish coating is removed from the surface of the body using a grinder. At the second stage, all damaged parts of the body panel are removed, sanded and treated with sealant. Next, all painted surfaces must be primed; for this, the surface is degreased with silicone or gasoline and completely dried.
The last stage is painting with strict adherence to application technology. Raptor has a grainy structure, which makes it difficult to apply an even layer of paint. To make work easier, the S2041 tinner is added to the composition and, for reliability, it is painted in two layers.
Do not replace the tinner with a simple solvent , as this may destroy the protective properties of the raptor.
Usually the paint is matched to the factory finish, but you can change the type and color of the paint depending on your personal preferences. The shelf life of the prepared mixture is only three hours; later it will be unusable. Painting always starts from the roof of the car at a distance of half a meter, the second layer is applied an hour later to the dry surface. Impatient motorists can use their vehicles within a week after treatment, but car service specialists advise waiting approximately 20 days , during which time the raptor is completely polymerized.
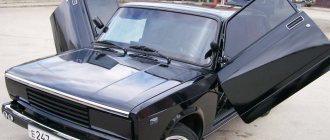
Why use Raptor as an SUV paint job?
Off-road vehicles often fall victim to difficult road conditions. You need to understand that in most cases this is a fairly important factor in the destruction of the car body. If you read reviews from service station employees, you will find out that every second vehicle with high cross-country ability has a damaged body after three years of active use. Therefore, using an excellent paint job, for example, with the help of Raptor, is not only a change of color and image, but also obtaining important advantages:
- after such protection, the car can be used in a variety of conditions, using the most interesting features without restrictions on body damage;
- friction with the ground and sand, the ejection of gravel from under the wheels, encounters with various small objects at high speed - polymer paint does not care about all this;
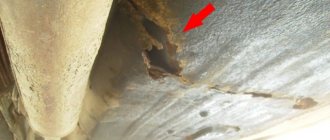
- urethane coating fights corrosion on the car body, but only if the car was properly prepared before repainting and all rust was removed;
- Raptor can also be used partially for painting sills, wheel arches and other parts that are most susceptible to the mechanical influences of various factors.
It is worth noting that many owners of expensive SUVs previously had to sacrifice high-quality visual characteristics in order to receive complete body protection from corrosion and destruction. Today, you can forget about chips, scratches, and other minor problems with superior performance urethane paint.
Advantages and disadvantages of using raptor
The feasibility of painting a car with raptor is undeniable; let’s look at the main advantages of this procedure:
- Having a protective layer in the form of a raptor, the car becomes resistant to impacts , cuts, tears and various abrasive damage.
- The susceptibility of the case to all kinds of atmospheric influences, such as water, ozone, oxygen, ultraviolet, is lost.
- Bulk substances like sand do not stick to the surface.
- This coating does not prohibit mechanical treatment of the car and is easy to clean.
- Vibration and noise levels are reduced.
There are not many disadvantages of using a raptor, but to some they seem quite significant:
- If you decide to paint your car with raptor, you will have to put up with a matte finish, which looks far from aesthetically pleasing .
- Despite all the reliability that such a coating guarantees, you cannot be sure of the durability of the result; it all depends on the professionalism of the person who performed the work. This leads to the next minus.
- In order not to make a mistake or be disappointed, the work should be ordered from high-class specialists , but this is very expensive.
Protective body coating "Raptor" and rules for its application
The “Raptor” protective coating for a car body is made on the basis of polyurethane foam and after application forms a protective film, which has several positive aspects when compared with ordinary car paint.
They are:
- High degree of strength;
- Friction resistance;
- Resistant to most chemical elements;
- Easy cleaning;
- No fading when exposed to sunlight;
- Ensuring reliable protection of the body surface from corrosion.
But there are some disadvantages, among which are:
- You should not apply varnish over the coating, otherwise it will always be matte;
- The appearance of the surface resembles shagreen leather, which does not always look good in terms of aesthetics;
- If the painting technology has not been fully followed, chips may appear on the surface.
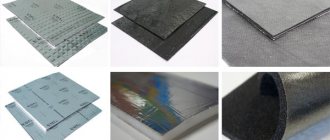
Packaging and equipment. Raptor is sold in special packaging, which includes 4 containers with the main working material, each with a capacity of 0.75 liters, and one container with a volume of 1 liter with a hardener. The kit also includes a specially calibrated anti-gravel gun, without which working with this material is simply impossible.
Bottles with this coating adapt to the pistol. The kit also includes instructions that contain all the required recommendations for its use.
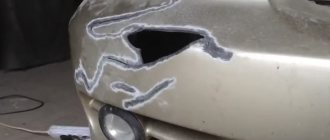
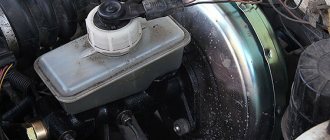
Preparation. Painting a car with Raptor will not cause any difficulties for the average car owner, but will require some minor preparation work. If painting is planned over the entire surface of the body, it is necessary to remove all attached parts, namely bumpers, headlights, turn signals, side mirrors, etc.
The surface to be painted should be thoroughly cleaned to remove any corrosion and peeling paint.
Painting process. After the preparation work is completed, you can proceed directly to the painting itself. According to the information given in the instructions, it is necessary to combine the base material with the hardener in a ratio of 3:1. There is a special mark in the paint can indicating at what point the hardener should be added to obtain the mixture in an amount of exactly 250 grams.
The jar needs to be closed and its contents mixed for several seconds, which will allow the paint and hardener to combine well. Several hardener options are offered, with different hardening times, which suggests the possibility of selecting the required drying time. To reduce the appearance of structure on the painted surface, a special thinner should be added to the composition in an amount of 10%.
The cylinder is inserted into the gun with a hose from the compressor connected to it. Next, the first layer of paint is applied evenly. You need to start painting from the roof of the car using even movements, maintaining a distance of 40-50 cm from the gun to the surface to be painted, and ensuring that the layer is laid without overflowing.
When a layer of increased thickness is obtained, its mechanical strength decreases. In order for the first layer to dry, it will take from 30 to 60 minutes and a temperature of at least 20 degrees. After which you can apply the second layer.
Bottom line. After all layers of paint have been applied, it will need to cure. The use of the machine can be started within 12 hours, without causing high loads on the coating. When applying, ensure compliance with safety regulations and personal protection, as the material is very flammable.
- Exactly those feelings. Experience with Bridgestone Turanza T005 tires.
See all photo news >>
OPEN
Preparation and application to old coating and metal. Painting a car with Raptor is not a complicated process and can be done by a car enthusiast, but it requires careful preliminary preparation. If painting will be carried out over the entire body of the car, then initially you need to remove all the attached parts from the body: bumpers, headlights, turns, mirrors, and so on. Contaminants, traces of rust, places of peeling paint are removed from the body using chemicals and cleaning materials.
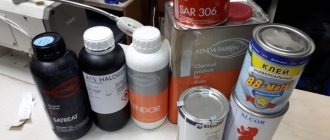
Raptor is not applied to bare metal, plastic or glossy surfaces; abrasive preparation is required! We prepare the body for painting with P180 sandpaper, this abrasive will remove the gloss. The surface to be painted with Raptor should be matte. If necessary, the body is straightened and puttied in places of dents, the putty is treated with abrasive from P80 to P180. It is recommended to apply 1-2 layers of U-POL ACID#8 etching primer (sold in a can or aerosol) to areas of the body with exposed metal.
U-POL ACID#8 primer has adhesion to bare metal, aluminum, galvanized and galvanized steel. The putty can also be overcoated in one coat with ACID #8 etch primer without sanding after 20 minutes. apply Raptor. Hard-to-reach places where it is not possible to create a risk with P180 abrasive can be treated in 1-2 layers with a special composition GRIP#4 U-POL (aerosol) - an adhesion enhancer. The GRIP#4 U-POL composition is applied to a glossy surface and creates a sticky film that perfectly holds any coating after 20 minutes. apply paint or Raptor.
Parts sanded with P180 abrasive should be cleaned of grinding dust and degreased with anti-silicone cleaner (degreaser) S2001 U-Pol. All parts of the car that remain on the body and will not be painted should be covered with protective material with film or paper, using masking tape as fastening. After this we prepare Raptor for application.
The instructions for use of Raptor say that it has excellent adhesion to painted surfaces, so the painting procedure can be carried out even outdoors, without fear of the sun, wind and dust. However, it is better to carry out painting indoors in the absence of dust, on a clean and grease-free body.
Painting plastic parts
Raptor is not applied to bare plastic, only through the plastic primer PLAST X2 Adhesive primer! Plastic parts without paint coating are degreased and applied with red scotch-brite, then degreased again and applied with 1-2 layers of primer Plast X2 U-POL (aerosol). Only after this, after 20 minutes, can you apply the Raptor primer. If the plastic parts are coated with paint, then we matt the old coating using a P180 abrasive sponge or red Scotch-Brite, and prime the areas sanded down to the plastic with Plast X2 U-POL aerosol. Afterwards, let the primer dry for 20 minutes and apply Raptor.
Application technology Raptor (black version BLACK) After all the preparatory work, you can proceed to painting the body. The instructions for use recommend mixing the material with the hardener in a ratio of 3:1. In the jar where Raptor is located, there is a mark at which you should add hardener - it will be exactly 250 grams. You can also use measuring cups for dosing. Close the jar and shake the contents for a few minutes to mix the Raptor and the hardener.
Preparatory work before painting
The preparatory stage is very important. The final result depends on the quality of the work performed.
First, you need to remove unnecessary parts from the car: handles, wipers, mirrors, bumpers, etc. Anything that cannot be removed and is not involved in painting must be sealed with paper and masking tape (discs are also included here) . This must be done carefully, because the paint is almost impossible to remove once it has dried.
Next, you should prepare the surface itself directly for painting.
This is done as follows:
- The surface of the machine is thoroughly cleaned of paint and varnish. Since it is almost impossible to remove paint from a car manually, you should use a special grinder with a fine abrasive;
- the compressor blows out all the dirt and dust that has formed after cleaning;
- treatment is carried out with white spirit or anti-silicone;
- all minor defects (chips, scratches) are removed with special putty;
- after the surface has dried, the car needs to be blown well again;
- The surfaces to be painted are treated with a special primer for metal.
At this point, the preparatory work can be considered complete.