Do-it-yourself headlight tuning for VAZ 2109
Almost every car owner wants to make his car unique. And it doesn’t matter whether we are talking about a Maybach or a VAZ 2109, 21099. With the help of tuning a VAZ 2109, you can make almost any car exclusive. Next, we’ll look at the elements of headlight tuning specifically for VAZ 2109 and 21099, and how you can do it yourself.
It should be noted that tuning both front and rear headlights is not as complicated a process as it might seem at first glance. The main thing you need is your imagination and the necessary materials.
How to choose the right headlights for a VAZ 2109?
The selection criteria are the same for any optics. And it doesn’t matter whether you buy xenon, diode, VAZ 2109 or brake lights in general. So, what to look for when buying?
First of all, you need to evaluate the appearance of the product. Whatever the shape of the headlight, in any case its parts should not creak or dangle. Pay special attention to the quality of the sealant. It must be applied to the entire contour of the glass. If the sealant is only partially present, the product is defective. Also, leaking cracks can cause short circuits or frequent fogging of the headlight glass from the inside.
In addition, evaluate the glass surface of the product. It doesn’t matter if it’s a brake light or head optics, its glass must be intact and without scratches. If there are minor deformations, you have the right to ask the seller for a discount. But under no circumstances purchase a product with cracked glass. This headlight is no longer suitable for use.
Alternative optics
Besides the fact that alternative optics on a VAZ 2109 or 21099 are beautiful, such headlights are much more reliable than standard lighting fixtures.
Why do the headlights fog up from the inside and thereby spoil the appearance of the car? The fact is that glass allows moisture to pass through, as a result of which the contacts oxidize, and the lamp may simply burn out. Even if this does not happen, the glass will fog up, resulting in poor visibility on the road. Replacing the glass won't do anything. The result, if there is one, will only last for a short time.
Based on this, we can say that tuning the rear lights on a VAZ 2114 or 2109 and 21099, or the front lights, is more of a necessity than just an external change.
Alternative optics for VAZ 2109
About standard lamps
The rated power of headlight lamps, which are installed on VAZ cars of the “ninth” family, is about 60 watts. The service life of such optics can be 10 years or more, depending on the intensity of use and loads. However, if the headlight was not made by the manufacturer, but is a copy/counterfeit, it will not last more than a few weeks.
Therefore, if you choose standard headlights, you need to focus only on the original manufacturer. As for alternative optics, they are not produced on an industrial scale, and here we can only rely on the integrity of the manufacturer. But we’ll talk about how to choose and install high-quality front and rear lights on a VAZ 2109 a little later. In the meantime, about the features and distinctive features of tuned lamps.
Types of lamps
For rear and front lights, two types of lamps can be used:
As practice shows, LED lamps are most often chosen for rear lights. This is due to the fact that such lighting devices are much cheaper, but at the same time durable and economical.
In addition, we can highlight the following advantages of LED lights specifically for VAZ 2109, 21099:
- service life - at least 10 years;
- ergonomics;
- energy saving;
- response is 3 times faster than xenon.
Against the backdrop of all this, such headlights provide the optimal amount of light for the car. If you don’t want to change the rear or front headlights, you can tune the ones you already have. It should be noted that, unlike the front lights, the rear lights on the VAZ 2109 or 21099 can even be painted from the inside. It’s quite easy to make this a reality with your own hands.
Rear LED headlights
Painting nuances that should be taken into account
- Start work only on a well-washed and clean bumper.
- When degreasing the bumper, two types of wipes are used (wet and dry).
- If self-painting work is carried out with a bumper of Asian origin, it must be degreased more thoroughly and rubbed well.
- Do not use a hair dryer or other heating equipment to dry paint.
- When working with acrylic varnish, you need to follow the instructions that come with it, therefore, before you paint the bumper yourself, you need to carefully read all the instructions for the putty, primer, and paint as well.
- If smudges or shagreen marks form when painting, it is worth sanding with wet, waterproof sandpaper and treating the desired area with polish.
As you can see, painting a bumper yourself, adhering to the correct technology, is not so easy, since not everyone has a compressor, a spray gun and a good garage. But if this is for yourself, where the quality requirements can be even lower, then in an ordinary garage, having bought a can of paint and primer, it is quite possible for anyone to do a local bumper painting.
Preparatory stage before painting
In order for the paint on the headlights to last for a long time, a preparatory stage should be carried out. The algorithm of actions is as follows:
- headlights are dismantled and disassembled;
- the additional turn signal reflector is removed;
- Using fine sandpaper or a special substance, chrome is removed from the surface of the lantern;
- primer is applied.
Please note that the primer must dry for at least one hour. The substance should be applied to the headlight of a VAZ 2109 or 21099 in 2-3 layers. Otherwise, the paint will simply peel off during use.
Preparing headlights for painting
How to change the glass on a VAZ 2109 headlight
VAZ 2109: replacing the headlight housing in the house
As a rule, on a VAZ 2109, headlight glass replacement is performed quite often. The cause could be any small thing that gets into the headlights, and then leads to damage to the entire glass. Replacing glass in headlight is so simple that any car enthusiast can handle it.
Replacing glass on a VAZ 2109 headlight
When you're driving on the highway, a stone bounces off the car ahead and hits your headlight. The glass is broken and there is a replacement. This often happens because the road surface is made of asphalt concrete. Over time, it is knocked out, the detritus remains without the binding bitumen. There is also destruction of the headlight housing. If necessary, the headlights are turned on and should be wiped with a damp cloth and brush. But in any case, you cannot wipe the heated glass without also cooling it with snow or sprinkled with water.
Note: work on replacing the headlight glass must be carried out indoors at a temperature of 20 ° C.
Replacing glass on a VAZ 2109 headlight
Required materials and components:
- headlight glass, which can be purchased from a car dealer;
- sealed glass adhesive, white;
- solvent. for degreasing the surface.
It also requires a set of tools and auxiliary materials.
Painting process
The paint must be applied in at least 4-5 layers. It takes at least one hour to dry completely. After this, you can assemble the entire rear light.
At the final stage, you need to be especially careful when applying the sealant. The old one is completely removed. After this, the surface of the rear light is degreased and a new sealant of the appropriate color is applied.
If this protective substance is applied incorrectly, the taillight of the VAZ 2109 (21099) will fog up, which will lead to more serious consequences. In general, doing this yourself is very simple.
Choosing fog lights
Fog lamps on the VAZ-2109 are represented by models from several manufacturers. The highest quality and brightest are fog lights from Osram and Philips. Such headlights provide increased light output, have a long service life and are considered the best.
If you want to focus not so much on the brightness of your fog lights, but on their long-term service, feel free to choose the Philips EcoVision model. This model has an ideal price-quality ratio and is rightfully called the optimal choice in the class of fog lights for the VAZ-2109. Chinese fog lights have one advantage - low cost, but their build quality leaves much to be desired.
Remember that when choosing headlights for your car, you are responsible not only for your safety on the road, but also for the health and lives of other road users.
Removal of the front headlight units on a VAZ 2109 car is carried out either for their complete replacement or repair in case of failure, or for carrying out other repairs in which their presence will interfere with the progress of its implementation. To perform dismantling work, prepare a standard set of tools and perform the following sequence of actions:
- First of all, you need to de-energize the car by disconnecting the minus terminal from the battery.
- Next, disconnect the blocks with power wires from the headlight and turn signal unit.
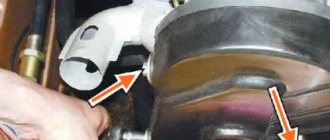
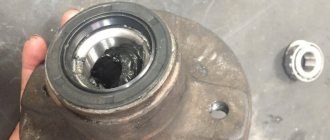
- Press the clamps and remove the headlight hydraulic corrector.
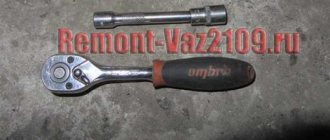
- Now you can remove the block itself. To do this, use a socket wrench to unscrew two fastening nuts on each side, and then remove the block together with the turn signal housing.
And at the final stage, all that remains is to disconnect the turn signal housing from the headlight unit by unscrewing the two screws that secure it.
At this point, the repair work to remove the headlight unit on the VAZ 2109 has been completed. Replace or repair it, then install it in the reverse order.
https://youtube.com/watch?v=DsguSuVT8aI
Film tinting
If painting does not suit you, you can use tuning using film.
Here it is necessary to note the main rule: the better the quality of the film, the better the result. Therefore, in this case, savings are inappropriate.
Film can be applied to lanterns both outside and inside. But if you plan to cover the front of the headlight, you should understand that the film deteriorates much faster.
Film tinting of headlights
Reasons for choosing alternative optics
Today, more and more car enthusiasts prefer unusual alternative options to standard headlights. There are many reasons for this decision. The most basic:
- alternative optics are developed taking into account increasing the aesthetic value of the car. If the alternative headlights looked less attractive than the base kit, there simply wouldn't be a need for them;
- alternative headlights are a great way to emphasize your individuality by adding a unique design to your car;
- The basic headlights are not always completely satisfactory for the car owner. In this case, replacing optics is dictated not only by the desire to stand out, but also by the need to replace a low-quality item with better quality headlights.
Standard headlights on the VAZ-2109 do not always meet all requirements. Due to unreliable sealant, moisture can get inside, the glass becomes covered with condensation and becomes cloudy. If oxidation of the headlight contacts occurs, it goes out. Changing just the glass is time-consuming and unprofitable - if the glass is not reliably insulated, any ingress of water will lead to a short circuit and damage the headlight. The only option left is to completely replace the base headlights with alternative ones.
The process of pasting headlights
The algorithm is as follows:
- the headlights are carefully dismantled and disassembled;
- The reflector is removed using an abrasive material or a special liquid.
It is recommended to cover the glass with masking tape to avoid scratching it during work. To make it easier to level the film around the edges, you can use a spatula that is not too sharp. It's a little more difficult to apply film to the taillights. The gluing process itself is the same. Only the preparatory stage is somewhat different:
- the battery is turned off;
- the wires that lead to the lighting fixture are disconnected;
- The flashlight itself is disassembled.
Only after this can the procedure described above be carried out.
Pasting car headlights
In general, tuning a VAZ 2109 (21099) with your own hands is a simple process that almost anyone can do. But it also has several negative sides:
- significant deterioration of lighting;
- tinting is prohibited by law and is punishable by administrative penalties;
- possible problems during technical inspection.
Therefore, when doing such tuning with your own hands, you should understand and take into account these nuances. With the correct selection of materials and compliance with technical requirements, tuning, which was done by yourself, will not only add beauty to your car, but will also provide it with greater practicality.
REPLACEMENT OF HEADLIGHT GLASS FOR VAZ 2108-09-99/VAZ 2114-15/VAZ 2105-07-04/IZH ODA/OKA
LINK TO GUY'S CHANNEL: GLASS REPLACEMENT
LIGHTS ON.
The note. If the glass is slightly larger, this gap is necessary for an expansion joint. Just like temperature differences, metal and glass operate in different ranges.
Replacing headlight glass with a vase 2109
To fix the glass with adhesives, you must apply a load. This can be done using the rubber band from the automatic care kit. It's necessary:
- Secure with a hook above the body of the machine.
- With a slight stretch, the second end hooks onto the bottom of the machine frame.
- The rope should be pressed tightly against the glass because you can place a wooden block under the headrest.
- Leave the glued parts for one day.
Step-by-step tuning of VAZ-2109 headlights
Are you the owner of a VAZ-2109 and want to perform headlight tuning yourself? You will learn further how to do this. It is clear that any car owner wants to make his car special so that it is different and stands out among other cars, and it does not matter at all what brand of car we are talking about. And it is thanks to tuning that you can make your car unique. Now let's look at the nuances and elements of tuning VAZ-2109 headlights with our own hands.
If the appearance of the car is really important, then it is best to start tuning with optics. Headlights can fog up from the inside, which can also ruin the appearance of the car. This happens because the glass allows moisture to pass through, causing the contacts to oxidize and the lamp easily burns out.
Even if we take into account that this may not happen, in any case, due to fogging of the headlights, visibility on the road deteriorates, which increases the risk of an accident, therefore, tuned headlights are not just an external change, but also a necessity. For headlights and taillights, only two types of lamps are used:
In practice, LED lamps are most often chosen for taillights. And all because these devices are cheaper than xenon ones, but at the same time they are quite economical and quite durable. Here are the most basic advantages of LED lights for the VAZ-2109:
- Energy saving.
- Service life is about ten years.
- 2 times faster response than xenon.
But xenon lamps can only shine with high beam or only with low beam. In order for them to fully illuminate both the high beams and the low beams, you need to install bi-xenon there, and this is already quite expensive. If you prefer to drive at night, then, of course, it is better to install xenon lenses; they are mounted in different groups of sockets for car lamps.
To install such lenses, you will need to remove the outer glass, and then install the lens. But if you drive more often during daylight hours, then it is still better to install LED ones with an increased service life and good light. After listing all this, it seems that such headlights are the best option for a car, since they provide a sufficient amount of light. However, if you don’t want to change the front or rear lights, then it’s better to tune the ones you’re already using. If you still decide to change, then you need to be extremely careful so as not to fall for any kind of defect. A good-looking headlight does not mean high-quality work. The good news is that the rear lights on the VAZ-2109, unlike the front ones, can even be painted inside. Bringing this idea to life is quite simple.
Replacing VAZ 2109 headlights with lenses
Lenses for VAZ 2109 headlights
So, there will be a lot of benefits from such a replacement. This tuning will improve the light output and make it better quality. The VAZ 2109 will turn into a real foreign car, because the appearance of the car will become much more attractive. In addition, in a VAZ 2109 with converted optics, you can travel the longest distances without fear of night movements.
Tools
Let's prepare the necessary tools for the job:
- Bulgarian.
- Good drill.
- Terminal manifold.
- Antenna plugs in the amount of 2 pieces.
- Bulbs for such optics.
- A set of screwdrivers and pliers.
Lenses for headlights VAZ 2109
Replacement algorithm
So:
- We remove the old headlights.
- We also remove the protection of the lights.
- Using a drill, drill the 3 holes necessary to install the lensed headlights.
- We try on the new lamp in place, and then use the necessary bolts and nuts to fix it and secure it firmly.
During the replacement process, it is also recommended to use step-by-step instructions with photos and video materials. The price for such an operation among specialists today is very high. This forces many motorists to learn to do everything themselves.
Now let's talk more about the process itself.
The important thing is that ordinary paint, which is sold in cans, is not suitable for this, because the entire space inside gets very hot, which is why the paint can easily slide off. For painting you need to use only special paint intended for this purpose. This substance must resist high heat as effectively as possible. The price of such a can is about 500 rubles. In order for the paint to serve you for a long time, you will need to prepare for painting in stages:
- the headlights need to be dismantled and then disassembled;
- then you should remove the additional reflector for the turn signal;
- remove chrome from the lamp with fine sandpaper;
- apply primer.
The primer must dry well; this will require waiting at least an hour. Special paint must be applied to the headlight in 2-3 layers, otherwise the paint may simply peel off. After this, it will take time again for the paint to dry completely, this will take about one hour.
Once the paint has dried well, you can completely assemble the rear optics. You need to approach the application of sealant with special responsibility. The old sealant must be completely removed, then the tail light must be degreased and the new sealant must be applied directly. This must be done carefully, since if the sealant is applied incorrectly, the headlight may fog up, which can lead to serious consequences.
It's also a good idea to install a set of strip LEDs or apply tint instead of painting. There is no need to save on film, since in this case the quality of the film is of great importance. It can be applied both from the inside and outside, but if you paste it on the outside, it is clear that the film will deteriorate faster.
In general, tuning headlights is not a particularly complicated process, but if you are afraid of making any mistakes, of course, you can buy tuning devices. However, the tuning process itself is interesting; every car enthusiast would like to do everything himself, putting his soul into this matter.
Replacement
Replacing glass on a VAZ 2109 headlight
When driving along the highway, a stone that bounces off the car in front hits the headlight. The glass is broken and needs to be replaced. This happens often because the road surface is made of asphalt concrete. Over time, it is knocked out, and the crushed stone is left without binding bitumen. The headlight glass also breaks down if it is not properly cared for. If the headlights are on, they should be wiped with a damp cloth or brush if necessary. But under no circumstances should you wipe heated glass that has not yet cooled down with snow or spray it with water.
Note: work on replacing the headlight glass must be carried out indoors at a temperature of +20 0 C.
Replacing headlight glass on a VAZ 2109
Required materials and components:
- glass for the headlight, which can be bought at a car store;
- hermetic adhesive for glass, white;
- solvent – for degreasing the surface.
A set of tools and auxiliary materials are also required.
Without removing the headlight
Replacing headlight glass on a VAZ 2109
In summer, this work can be done outside without removing the headlights:
- Choose an asphalt or concrete site, in a place where there is no wind.
- Water the area with water, this must be done in order to prevent the ingress of dust and sand during cleaning and applying glue.
- To perform the work, you must wear cotton gloves. This hand protection prevents injury when removing broken fragments.
Note. Remaining glass must be removed carefully.
- To make the work easier, try to gently hit the glass with a hammer.
- Clean off any remaining debris.
- Use a screwdriver to remove any remaining old glue around the perimeter of the headlight.
- Moisten a rag with a solvent and degrease the reflector.
- Also wipe the inside surface of the glass with solvent.
- Afterwards, clean the place of the sticker in the headlight housing again (see Repairing a VAZ headlight with your own hands).
- Gradually, carefully squeeze the glue out of the tube.
- Apply a thin layer along the rim of the headlight, along the inner edge of the glass.
- Wait 3 minutes.
- After this, press the glass against the headlight, try to glue it in the middle.
Note. If the glass is slightly larger, this gap is necessary for an expansion joint. Since when there are temperature changes, metal and glass operate in different ranges.
Replacing headlight glass on a VAZ 2109
Modernization of headlights
Car repairers believe that tuned headlights are more reliable than those installed at factories. Rework options:
- replacing standard optics with xenon;
- use of LEDs;
- covering lighting structures with tinted products.
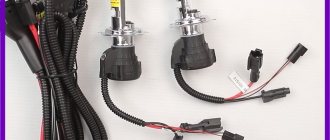
Replacing lamps
Factory bulbs installed in a car do not last long. LED lamps have the following advantages over a conventional incandescent lamp:
- service life of at least 5 years;
- ergonomics;
- low power consumption;
- fast response.
At night, it is very important to have a good view of the road. Changing the optics often improves the light performance of devices. Xenon lamps are more powerful than diodes, but LED lamps are easy to maintain and have a low cost. Do not forget that unregulated xenon lamps emit a very powerful luminous flux. This can lead to a traffic accident, as the oncoming driver may be temporarily blinded by the bright light.
Painting
A common method of auto tuning is darkening the optics with a special varnish or painting. To complete the work you will need a can of black paint. Only materials with high temperature ratings are allowed. Regular paint will come off as a result of heating, and no tinting effect will remain.
The work is carried out in stages:
- The headlight is removed from the car.
- The optics are completely disassembled.
- Using a curved screwdriver, unscrew the screws that hold the headlight mask.
- The turn signal reflector is removed.
- The chrome paint is being cleaned off.
- Apply primer for plastic in three layers.
- After the primer has completely dried, paint is applied (auto mechanics recommend applying paint in 5 layers.)
- The structure is being assembled.
- The headlight glass is cleaned of old compounds.
- The glass is washed, wiped dry and treated with a degreaser.
- Black sealant is applied along the edges.
- The device is assembled and installed on the car.
- The connection is made to the circuit through the fuse block.
If there is incomplete contact between the glass and the optics box, air may get inside, causing the headlights to fog up.
Film tinting
An inexpensive way to change the optics of a VAZ 2109 is to use a tint film. The result depends on the quality of the materials used. Good tint films have high light transmittance. This is an important indicator on which the lives of all road users depend. It is allowed to apply the film to the inner and outer surfaces of the headlight.
Applying a tinting film to the external surface is possible without removing the optics from the car. To do this, you need to prepare the surface: remove dust, dirt, the surface must be clean and dry. A notch is made and a piece of the required size is cut out. Soap and water are applied to the glass. The protective layer is removed from the film and applied to the headlight. The air is expelled. The surface is carefully wiped with a rag to remove any remaining liquid. This method is fast and simple. Even a car enthusiast who does not have special skills and knowledge can perform it.
When removing the headlight, it is recommended to handle the glass with care. It is allowed to seal it with masking tape to prevent scratching.
The tinting film is easy to remove. But tuning VAZ 2109 headlights with film has its downsides:
- peeling of the material after some time;
- reducing the brightness of the emitted light;
- violation of traffic rules, which may result in a fine;
- Difficulties in passing technical inspection.
Taillight tuning ideas
To highlight the car and make it unique and unique, that is, tuned, you can use several tips. You can use alternative optics.
These lights are much more reliable and beautiful than regular headlights. Among other things, tuning the rear lights can protect the VAZ 21099 from some problems. You can resort to modernization, and then the glass will not fog up and the contacts will not oxidize.
In addition, the rear lights on a VAZ can be painted from the inside. Of course, you need to use a special mixture, because the usual one becomes deformed when heated. In order for it to last as long as possible, the headlights must be disassembled and the additional turn signal reflector removed. Then, using sandpaper, remove the chrome from the lamp and then apply a primer to the surface.
The primer should dry for about 1 hour, in addition, the mixture must be applied in several layers. The dye must also be applied in several layers, and wait about an hour until it dries completely. After completing the work, you can assemble the lantern. When applying sealant of an identical color, the old one must be removed and then the surface of the lantern must be degreased. If the procedure is carried out incorrectly, it will create new problems.
In addition, you can resort to the following methods of independent tuning:
- LED headlight covers. This element looks quite beautiful and unusual. In addition, overlays can be used to decorate not only the rear headlights, but also the fog lights and turn signals. Some even decorate the rims on wheels or the inside of the interior with them, if working with the headlights is no longer possible.
- Diode rings. Also a very popular option. When designing such a decoration, it is best to use high-quality materials and not slack in the work, then the effect will be excellent. Ready-made rings or tape are used for the product.
Photo gallery "Modernization of rear lights"
In the photo below you can find out how to upgrade the lights.
Every car enthusiast wants his equipment to become noticeable and original. You can upgrade any car, regardless of year and model. “Nine” is a popular car of the last century, produced by the Russian automobile industry. One of the reconstruction options is tuning the headlights on the VAZ 2109. The headlights on the VAZ 21099 and the headlights on the VAZ 2108 are the same.
- replacing standard optics with xenon;
- use of LEDs;
- covering lighting structures with tinted products.
Replacing lamps
Factory bulbs installed in a car do not last long. LED lamps have the following advantages over a conventional incandescent lamp:
- service life of at least 5 years;
- ergonomics;
- low power consumption;
- fast response.
At night, it is very important to have a good view of the road. Changing the optics often improves the light performance of devices. Xenon lamps are more powerful than diodes, but LED lamps are easy to maintain and have a low cost. Do not forget that unregulated xenon lamps emit a very powerful luminous flux. This can lead to a traffic accident, as the oncoming driver may be temporarily blinded by the bright light.
Painting
A common method of auto tuning is darkening the optics with a special varnish or painting. To complete the work you will need a can of black paint. Only materials with high temperature ratings are allowed. Regular paint will come off as a result of heating, and no tinting effect will remain.
The work is carried out in stages:
- The headlight is removed from the car.
- The optics are completely disassembled.
- Using a curved screwdriver, unscrew the screws that hold the headlight mask.
- The turn signal reflector is removed.
- The chrome paint is being cleaned off.
- Apply primer for plastic in three layers.
- After the primer has completely dried, paint is applied (auto mechanics recommend applying paint in 5 layers.)
- The structure is being assembled.
- The headlight glass is cleaned of old compounds.
- The glass is washed, wiped dry and treated with a degreaser.
- Black sealant is applied along the edges.
- The device is assembled and installed on the car.
- The connection is made to the circuit through the fuse block.
If there is incomplete contact between the glass and the optics box, air may get inside, causing the headlights to fog up.
Film tinting
An inexpensive way to change the optics of a VAZ 2109 is to use a tint film. The result depends on the quality of the materials used. Good tint films have high light transmittance. This is an important indicator on which the lives of all road users depend. It is allowed to apply the film to the inner and outer surfaces of the headlight.
Applying a tinting film to the external surface is possible without removing the optics from the car. To do this, you need to prepare the surface: remove dust, dirt, the surface must be clean and dry. A notch is made and a piece of the required size is cut out. Soap and water are applied to the glass. The protective layer is removed from the film and applied to the headlight. The air is expelled. The surface is carefully wiped with a rag to remove any remaining liquid. This method is fast and simple. Even a car enthusiast who does not have special skills and knowledge can perform it.
The tinting film is easy to remove. But tuning VAZ 2109 headlights with film has its downsides:
- peeling of the material after some time;
- reducing the brightness of the emitted light;
- violation of traffic rules, which may result in a fine;
- Difficulties in passing technical inspection.
Rear foot improvement
Tuning the rear lights of the VAZ 2109 is simple. You can do this operation yourself or contact a specialized auto center. Modernization of rear stops is often necessary even for factory optics: contacts oxidize, lamps burn out. Several reconstruction options are possible:
- Using LED overlays. LED strips can create a unique pattern and make a car stand out in traffic.
- Application of diode rings. LED strips will allow you to define the hind feet and make them more expressive.
- Tinting. You can tune car headlights using film or paint. It is worth paying attention to the characteristics of the material: it must withstand high temperatures.
Changing the appearance of a car is an interesting activity. There are many types of tuning known. It is important to always remember that a car is a highly dangerous vehicle. The driver should always have a good view and lighting in the dark.
The superiority of diodes over xenon
But this is not the only advantage. There are many other advantages. For example, LED headlights are easy to install and do not take up much space. Such headlights work on a VAZ 2109 for about 10-15 years. Long service life is a distinctive feature of LED lamps. The headlights themselves operate 3-5 times faster than similar xenon and halogen ones. Of course, the most important thing is saving energy. This optics consumes almost no electricity, while the switched-on xenon can drain the battery in just a couple of hours when the generator is turned off (that’s why daytime ones are made from LED strips).
Experts predict that in the future diodes will completely displace classic “halogen” and the same xenon from the automotive industry. And the point is not only in the mass of advantages, but also in the costs of their production.
Communities › LED Tuning › Blog › Lada 2109: Lens replacement + led headlight tuning Pro Sport
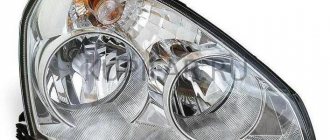
Salute to the people)) So many things have happened with these headlights that I don’t even know where to start)) Well, in general, these headlights are from the same car for which I made the tidy and buttons, who forgot to look HERE. I received Pro Sport headlights and the task was to replace the stock lens that is on the low beam on the Galaxy G5 while maintaining all the functionality of the headlight + install AG on the lenses + replace the light. turn signals to brighter ones. I combined some photos into one photo because I would have to make 2 parts)) These are the headlights:
The substrate was painted white gloss before I did it. We need this module with a lens:
I took it off, then washed it off the dirt and disassembled it down to the last screw:
Then I somehow wanted to compare the physical dimensions of the lenses in order to understand the complexity of the future work, and here I was a little kidding, so to speak))
How can I fit it in, huh?!) This is the first thing I thought about) After much thought and fitting, I began to adjust the old lens to the new one. We cut out/grind off everything that is not needed and modify the old reflector so that the new lens fits there:
Then on the other side:
So, I think she sat down. We fix the lens on the back side and try on the lamp, everything is ok:
By the way, in the photo you can actually see the size of the lens, what was there and which one was shoved in))
Now the top part. Before and after modification:
Trying it on with a new lens:
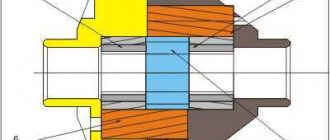
And then I realized that there was no way to tighten it because the base of the new lens was larger, even though I had filed it down! We need some kind of “adapter” that would combine the upper and lower parts into a single whole. For a long time I walked around the markets looking for a pipe of the required diameter, but I didn’t find anything! As a result, a plastic pipe turned up on which they wrap the film, hurray! In reality, my joy knew no bounds since I was already tired of this search)) But with all this, the pipe was 8 or 10 mm thick and it was necessary to grind out the inside so that a pipe with a wall thickness of 3-4 mm remained and at the same time it put on the lens body! After some brainstorming, I realized that I couldn’t cut it out myself so neatly and evenly – I needed a turner. Several turners did not take up the work, but I did find one smart guy and he helped me in this matter. I cut the pipe to the size I needed and ground out the inner liner so that it fits on the top and bottom of the old lens body. These are the “adapters”:
And I further refined them locally and combined the 2 parts into a single whole:
This is victory! I was extremely glad that things had finally moved forward)) Then I sanded everything, degreased it and filled it with epoxy resin inside and out in 3-4 layers - it holds up perfectly! For now I put the lenses aside and started making AG. I measured everything, did it and installed it in its new rightful place:
It shines very brightly, it’s impossible to take a photo in working condition - the photo shows a solid spot of light)) Once we install it on the car, I’ll try to take a photo during the day and post it here) The whole thing was assembled and is supported by a good layer of epoxy. Next I did the turn signals. I unpacked the headlight and we see 13 dead lights on the board from which there is almost no brightness))
I took the dimensions, made a board of the same size and soldered the lights with all my heart - 51 pieces)
In reality, it was very bright at night, the whole room was illuminated with yellow-orange light, during the day I took it outside and the result was also clearly visible!) Well, the turn signals and AG are in place, the tests have passed... it’s time to assemble the headlight. I painted the new lens housing matt black, just for beauty’s sake, and then, when installing it in place, I discovered another problem! Due to the increase in the size of the lens housing drain, the adjustment mechanism does not fit into place and there is still no way to adjust the lens itself! Damn, another “spike in the wheels” again! Having thought everything over, I went to my already familiar turner and ordered extended adjusting screws for tilting the lens and spacer tubes to extend the seat of the adjusting mechanism to the headlight itself. Time passed and I received everything, I was pleased with the quality - it was not in vain that I waited)) Here in the photo you can clearly see the difference between the adjusting screws and what simple tubes are needed for + new extended fastening screws:
And then the victory music sounded - the headlight was “defeated”)) Everything was assembled and still worked)) I really struggled with it for a long time to achieve a good result! As a result, we have a bi-xenon lens + AG in place where there used to be a mono lens that did not shine at all with some dull AG on 2 LEDs. Everything is hermetically and firmly assembled while maintaining the ability to adjust the lens + the turn signals have been replaced, which are clearly visible not only at night, but also during the day)) This is what the headlight looks like after all the modifications:
It is impossible to take a normal photo of the eyes in working condition, as they are very bright and blinding. In the future I will take a video/photo of the headlights on the car and post it here, it will be better visible there) Thank you for your attention))
Rear lights of VAZ 2108, 2109, 21099 cars, device
On VAZ 2108, 2109, 21099 cars and their modifications, the rear lights (rear combination lights) include the following lamps: turn indicators, side lights, fog lights, reversing lights, brake lights and a red reflector.
Installation of rear lights of VAZ 2108, 2109, 21099 cars
Structurally, each rear light is a plastic housing with a plastic transparent lens, on which the areas of lamp luminescence are highlighted in different colors. The left and right lights are not interchangeable.
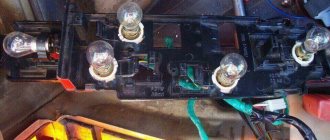
A plastic board is inserted inside the case. The board has a tape with printed conductive tracks and a common terminal for the connecting block of the wiring harness. Lamp holders are also installed on the board at the track output points.
Each rear light of VAZ 2108, 2109, 21099 cars has the following lamps:
— turn signal lamp A12-21-3
— side light lamp A12-5
— fog lamp A12-21-3
— reverse light lamp A12-21-3
— brake light lamp A12-21-3
The reflector does not have lamps. The board has a curved section with a mirror coating for the fog light lamp (reflector).
Board and rear lamp lamps for VAZ 2108, 2109, 21099 cars
Fastening the rear lights of VAZ 2108, 2109, 21099 cars
The taillights are secured in the openings of the rear trunk of the car with four nuts each.
Connecting the rear lights of VAZ 2108, 2109, 21099 cars
The wiring harness (plus) comes to the rear lights from the fuse mounting block: block Ш9 (Х9) on the left side of the car (driver's side) to the left rear light. From the left rear light there is a branch to the right one. The negative is the black wire in the blocks, connected to the screw securing the rear lights.
Malfunctions of the rear lights of VAZ 2108, 2109, 21099 cars
In addition to mechanical damage, the following malfunctions of the rear lights are possible:
— The direction indicators do not work on VAZ 2108, 2109, 21099 cars, reasons
— Side lights do not work on VAZ 2108, 2109, 21099 cars
— The fog light in the rear lights of VAZ 2108, 2109, 21099 cars does not work
— The reverse light does not work on VAZ 2108, 2109, 21099 cars
— Brake lights do not work on VAZ 2108, 2109, 21099 cars
Notes and additions
— The design, fastening, connection and malfunctions of the rear lights of VAZ 2108, 2109, 21099 cars are similar to the design, fastening, connection and malfunctions of the rear lights of VAZ 2113, 2114 cars.
Connection diagrams for lamps in the rear lights:
“Connection diagram for direction indicators on VAZ 2108, 2109, 21099”
“Connection diagram for dimensions on VAZ 2108, 2109, 21099”
“Connection diagram for fog light on VAZ 2108, 2109, 21099”
“Connection diagram for the reversing light on VAZ 2108, 2109, 21099”
“Connection diagram for brake lights on VAZ 2108, 2109, 21099”
TWOKARBURATORS VK -More information on the topic in our VKontakte group
More articles on the rear lights of VAZ 2108, 2109, 21099 cars
— Wires for rear lights of VAZ 2108, 2109, 21099 cars
— Checking the serviceability of the rear light boards of VAZ 2108, 2109, 21099 cars
— Rear light boards for VAZ 2108, 2109, 21099
— Rear lamps for VAZ 2108, 2109, 21099
— The procedure for removing the rear lights of VAZ 2108, 2109, 21099 cars