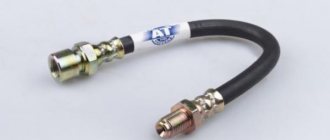
Removing, replacing, installing the clutch cable
Directory
Tags
Removing, replacing, installing anti-roll bar
Removing, replacing, installing timing belt
Removing, replacing, installing rear suspension shock absorber spring
Inspection, checking the steering
Removal, replacement, installation of the crankshaft and its bearings
Symptoms: the clutch pedal has moved to its lowest position, the free play of the clutch pedal has increased.
Possible cause: Clutch drive cable is damaged.
Tools: socket set, wrench set, flat screwdriver, solid oil.
1. In the car interior, under the dashboard, unscrew the fastening nut of the clutch cable support to the pedal bracket using an 8-mm wrench. Remove the stop from the bracket.
2. Disconnect the locking bracket and the housing of the driven disc lining wear compensation mechanism from the clutch pedal pin (use a screwdriver).
3. Remove the plastic bushing from the pedal pin. Inspect the bushing for wear and, if present, replace the bushing after applying grease to it.
4. Remove the clutch release cable seal from the hole in the front panel (in the engine compartment of the car).
5. Pull the tip of the cable in the direction of straight-line movement of the car, and then remove it from the groove located on the clutch release fork.
6. Unscrew the fastening nut of the cable end to the bracket on the gearbox using a 17mm wrench. Prevent the cable end from turning by holding it with a second wrench.
7. Remove the cable end from the slot in the bracket, and then pull the cable out of the hole in the front panel.
8. Remove the clutch cable from the vehicle.
9. To install a new clutch drive cable, first pass it through the hole in the front panel, and then fasten the housing of the driven disc lining wear compensation mechanism to the clutch pedal pin.
Note. Before installing the wear compensation mechanism on the clutch pedal pin, lubricate the pin bushing with grease.
10. Fix the cable sheath stop on the pedal bracket.
11. Install the sealing element of the clutch cable sheath into the slot in the front panel.
12. Install the cable end into the gearbox bracket, and then tighten the cable nut.
13. Screw the driver onto the lower tip of the clutch drive cable so that the tip protrudes relative to the driver end to a height of 0 - 1 mm.
14. Install the clutch release cable to its original position as follows:
– move the lower tip of the drive cable all the way forward in the direction of straight-line movement of the vehicle;
– hold the tip in an extended position;
– measure dimension L (the distance between the clutch release fork and the driver). The distance L should be 27 millimeters;
– if the permissible value does not correspond, set it by rotating the leash in the desired direction.
15. Insert the end of the drive cable into the groove located on the clutch release fork, and then release it. The leash must be installed on the fork without play under the action of a spring.
Note. Before installing the tip guide on the clutch release fork, lubricate its surface that contacts the fork with grease.
16. Depress the clutch pedal all the way three times, then measure distance L again (see point 14).
17. Repeat the adjustment if necessary.
Source: www.avtika.ru
Design, adjustment, configuration and replacement of the Lada Priora clutch
The content of the article:
1. Lada clutch device
2. Adjusting the clutch of Lada Priora
3. Replacing the clutch in Lada Priora
4. Setting up the clutch of Lada Priora
Lada clutch device
From "Murzilka". The connection is made through a special ratchet mechanism that regulates the length of the cable. Therefore, during the operation of the vehicle, it is not necessary to regularly check and adjust the working stroke of the clutch pedal. This mechanism also ensures that there is no play in the clutch release drive.
During operation, the driven disk linings wear out. To compensate for this wear, an automatic cable length adjustment mechanism is built into the clutch release drive. As the linings wear, the clutch release fork lever turns and tightens the cable. At the same time, the spring located in the bushing of the adjustment mechanism is compressed and tightens the clamps of the toothed tip of the cable. The clamps release the tip, as a result of which it is freely pulled out of the cable leader, compensating for wear on the disc linings.
If the driven disk linings are not worn out, then when the pedal is released, the bushing only touches the bracket and does not release the clamps - the toothed tip of the cable does not move relative to the body. As the linings wear, the clutch release fork lever with the threaded end of the cable moves forward (in the direction of the vehicle), tensioning the cable. In this case, the spacer sleeve, resting against the bracket, releases the spring-loaded clamps and the toothed tip of the cable moves out of the housing by the amount necessary to compensate for the wear of the linings.
After installing the cable, we adjust the clutch drive. To do this, pull the cable forward by the threaded end until it stops, overcoming the force of the spring, and hold the cable in this position. Using a caliper we measure the distance from the end of the plastic leash to the clutch release fork lever, which should be 27 mm. If necessary, rotate the leash to achieve the required distance. When removing the load (releasing the cable), the leash should adhere to the fork lever without play. After this, press the clutch pedal three times to activate the automatic cable length adjustment mechanism. We check the full travel of the clutch pedal, which should not exceed 146 mm.
Adjusting the clutch of Lada Priora
It started to smell like the clutch periodically. I decided to tighten it up, opened the Murzilka and was surprised that it was so easy to do this on a Priora. I waited until the weekend, took a regular screwdriver and a ruler.
Turn off the mass air flow sensor and remove the air filter.
We see a cable and a plastic clip at the end.
We pull this clamp towards ourselves,
measure how many mm from the end of the plastic clamp to the plug (should be 27mm). I had 15mm.
We twist this clamp counterclockwise,
thereby increasing the size from plug to clamp. We measure, it should be 27mm, if so, then release the cable and put it in the fork. We get into the car, press the clutch 3 times, go back and look, measure how much it has become, if everything is the same 25-27mm, then everything is done, if more or less, we adjust further. In the end, we put everything back together, start it, and check it. Personally, the smell immediately disappeared for me, which means the clutch will still live.
Replacing the clutch in Lada Priora
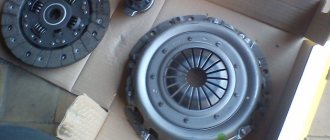
2 months ago the clutch began to act up (it became harder to press, some clicks appeared when pressed) and the release bearing began to rattle. While I was driving, I thought it would pass, but the clutch release rattled louder and louder, and the clutch began to work even worse. I consulted with friends, they said go buy a new clutch, your release lever will soon fall apart, and it’s better to change the entire clutch right away, since there are many difficulties. I went to the store and consulted with the salesman about which clutch was best to buy, the salesman advised to take the KRAFT or VIS company, but said that they charge more for KRAFT than VIS, so I had to take KRAFT, the price is 1800 rubles. Just 3 weeks ago the clutch disappeared and the speed stopped turning on. I immediately drove it into my uncle’s garage and slowly began to disassemble everything with him.
To replace the clutch you needed: 1. Bricks - the more the better and 2 jacks. 2. A set of wrenches and sockets with various extensions (the heads for 8 and 19 were most useful. I will need a wrench for 15! 3. A small shaft for centering the clutch disc (I took it at disassembly, the shaft itself was cut off from another box, the price is 100 rubles ).
They jacked it up with 2 jacks and placed it on bricks.
We pulled both CV joints out of the box.
We removed the left pillar to make it easier to crawl up, pull out and put the box back in.
Here is an old basket, still on the engine, half of the petals are gone.
The release lever fell apart, I had a hard time assembling spare parts from it in a box, and one of the ears broke off.
The clutch had apparently already been changed, since it was also CRAFT.
I installed a new rod on which the release bearing runs.
This is an old stock.
The whole job took 7 hours.
Setting up the clutch of Lada Priora
On the Lada Priora VAZ 2170 (2172, etc.) the clutch release drive is backlash-free, i.e. There are no gaps in the drive. The clutch release cable is equipped with a ratchet-type mechanism to compensate for its length during operation when the clutch disc linings are worn, so adjustment of the clutch drive in operation is not required. However, according to the manufacturer's recommendations, during each maintenance it is necessary to monitor the clutch pedal travel and at the same time the clarity of the gear shift.
Adjusting the clutch release drive Lada Priora VAZ 2170
Adjusting the clutch release drive Lada Priora VAZ 2170
Clutch device Lada Priora VAZ 2170
1. Set the clutch release cable to its original position, for which, overcoming the force of the mechanism spring, move the lower tip of the cable forward in the direction of vehicle movement until it stops. Holding the tip in an extended position, measure the dimension L between the fork and the leader, it should be 27 mm. If the size does not correspond to the specified value, set it by rotating the leash in the desired direction. 2. Insert the end of the cable into the groove of the clutch release fork and release it. Under the action of the spring, the tip driver should be installed on the clutch fork without play. NOTE Before installing the tip driver on the clutch fork, apply LSC-15 or Litol-24 lubricant to its surface in contact with the fork. 3. Press the clutch pedal three times all the way and measure the distance L again (see point 1). If necessary, repeat the adjustment of the clutch release drive.
Before adjustment it was L=15-17 mm. Made 27 mm. No difference…
https://www.drive2.ru/l/8322921/
https://www.drive2.ru/l/1140337/, https://www.drive2.ru/l/3266412/, https://www.drive2.ru/l/1597710/
next article:
Refinement, adjustment of the short-stroke gearshift link and replacement of the linkage bushing in the Lada Priora
Contents of the article: 1. Refinement of the short-stroke rocker of the Lada Priora 2. Adjustment of the new model of the rocker in the Lada
Rating 0.00 [0 Vote(s)]
Clutch cable adjustment
Before making adjustments, you need to prepare the car. For convenience, it is recommended to remove the air filter housing.
- Pull out the clutch cable with force and hold it in this position.
- We measure the distance with a caliper or a ruler between the plastic nut of the clutch guide and the release bearing drive fork. The distance should be exactly 27 mm.
- When taking measurements, there is very little space in the engine compartment and it is quite difficult to measure accurately, so it is recommended to prepare a 27 mm stick in advance and measure using it.
- Adjustment is carried out by tightening or unscrewing the plastic nut of the leash, depending on the distance between the parts.
- After completing the work, you must press the clutch pedal several times. This is necessary for the auto-adjustment mechanism to select the correct cable tension.
When adjusted correctly, the leash will fit snugly against the fork, and the clutch pedal will be 20 cm from the floor or at the level of the brake pedal
Source: enginehack.ru
Causes of breakdowns and solutions to problems
Domestic automakers are not particularly reliable and durable in their parts and assemblies. It is not surprising that many car components quickly fail and are no longer suitable for further use. All this causes many car owners to have characteristic problems in the operation of the clutch mechanism on their car. However, you should not blame only car manufacturers for all the problems that arise, since many malfunctions are the result of careless operation of the car by the car owner himself.
Solution
| Cause | |
| Insufficient pedal travel causes the clutch itself to “drive” | To eliminate this defect, it is necessary to regulate the mechanism drive itself. Car service station professionals can help solve this problem. |
| Clutch pedal sticking | This problem usually occurs when parts of the drive mechanism are damaged. This can be resolved by replacing the damaged part. |
The cable should be adjusted as often as possible. The fact is that such preventive work helps to avoid a number of problems and, accordingly, allows you to save a considerable share of the financial resources of car owners. Normal operation of the clutch mechanism is the key to safe operation of the vehicle.
The principle of operation of the flexible drive of the Priora coupling
On the first models of Russian VAZ passenger cars, with rear-wheel drive, the clutch was engaged using a hydraulic system. That is, as with the brake drive, when the pressure from the master cylinder is transmitted to the working, actuating mechanism. When developing a new series of VAZs with driving front wheels, this scheme was abandoned. A simple and reliable system for engaging the clutch mechanism using a special cable was developed. The principle of the rocker arm works here. When you press the lower part of the pedal, the upper working area, through the base (rod), goes in the opposite direction and pulls the cable along with it.
The other end of the flexible connector is attached directly to the clutch drive fork. When you press the pedal, the clutch disengages, making it possible to engage or change gear in the box.
How does the Priora clutch cable work?
For stable operation of the drive, the cable itself (core) is enclosed in a special casing, which is fixed motionless. One end of it is fixed near the clutch fork, on the gearbox, and the other, directly in the cabin, next to the pedal. At both ends of the cable there are special fastening devices that fit into the socket on the pedal and on the fork. They are radically different from each other, and it is impossible to confuse them. There are also fastening devices at the edges of the casing. In addition, there is a rubber coupling for installation in the hole in the body when the cable passes from the passenger compartment to the engine compartment. That is, you can decompose the device like this:
- cable;
- casing;
- fork mount;
- pedal loop;
- casing fasteners 2 pcs.;
- rubber protection for the opening into the interior.
In general, the core moves inside a more rigid shell, under the action of the pedal and the return springs of the Priora clutch. This ensures its stable operation.
How to change the clutch cable on a Priora video
On all cars produced by the Russian automaker AvtoVAZ, including the most popular model in our country, the Lada Priora, the clutch is activated thanks to a mechanism called a clutch cable.
This special mechanism is very important in the car control system and is sometimes called a clutch.
Those car owners who prefer to carry out replacements and repairs in the car in a timely manner and with their own hands will be interested in studying this material, in which we will tell you about this device and how the clutch cable is replaced and other nuances.
About working on the Lada Priora clutch cable
Initially, on domestic passenger VAZs with a rear-wheel drive system, the clutch was engaged thanks to an ordinary hydraulic system. The principle is exactly the same as that of the brake drive: all the pressure from the main cylinder is supplied to the so-called working cylinder.
Only modern cars, such as, for example, the Lada Priora we are considering, received a front-wheel drive system; the specialists of the automobile manufacturer abandoned this principle of operation of the device in question, which greatly facilitated maintenance.
The company has developed a reliable and very simple system for engaging a car clutch using a cable, now it is the main one in the entire system.
The principle of the rocker arm, so to speak, is applied here, that is, when pressing the lower part of the corresponding pedal while sitting in the car, its working part, located at the top, passing through the rod (the so-called base), certainly begins to go in a completely different direction, plus everything else at this time she pulls the cable straight and, of course, behind her.
The second end of the cable is located on the drive fork of the clutch system. When the pedal is pressed, the clutch is released, thus directly enabling shift/on. transfer.
Clutch cable device in Priora
In order for the drive to work properly and stably, the core (cable) is located inside a special casing, completely fixedly fixed.
As mentioned above, one end of the cable is attached to the clutch fork, as you understand, on the gearbox, and the other end is located in the cabin near the pedal. Each end is equipped with a fastening device. The ends are very different from each other, and it is simply impossible to confuse them in any way.
There is also a rubber coupling; it is installed in the body in the hole where the cable goes into the compartment where the engine is located from the car interior.
So, the device consists of the following elements:
- In duplicate, fasteners for the casing.
- Clutch cable.
- Fastening element for fork.
- There is a special loop for the pedal.
- Rubber casing to protect the interior opening.
As you already understand, the core is located inside a hard shell, where it moves under the influence of return springs and the pedal itself. Thanks to this, its stable operation is ensured.
Priora diagnostic connector
Priora doesn't start well when hot
What are the main faults in the Priora clutch cable?
When the clutch cable on a Lada Priora is already in a state close to failure, or even possibly has failed, the driver will immediately feel it. When an attempt is made to engage the clutch in order to shift or engage a gear. Main types of breakdowns:
- The drive fastener to the pedal or probably the fork is broken. Always at such a moment the pedal will fall to the floor.
- The cable is disheveled. In this case, it is almost impossible to press the clutch pedal.
- The cable has broken. In this case, the pedal also falls freely.
All this indicates that it is time to conduct a thorough check of the drive on the Lada Priora. Each of the above malfunctions indicates that the clutch cable needs to be replaced and everything can be done even with your own hands. There is no point in replacing individual parts.
If you need to service your all-wheel drive, then you need to contact specialists and they will carry out preventive work for you; a car with all-wheel drive requires constant monitoring of the units.
Changing the clutch cable on a Priora
As we said, replacing the clutch cable in your LADA Priora is possible with your own hands, the most important thing is to know how to change it correctly. Read more about this.
To replace you will need the following tools:
- The keys are ordinary 8“/17“.
- Pliers/screwdriver/pry bar.
The replacement begins with dismantling the old drive, and you need to start from the interior of the LADA Priora. You will have to do everything with an assistant. Algorithm of actions:
- Slowly release the clutch fork. In this case, an assistant removes the cable fastening bracket from the pedal.
- Unscrew the fastening of the casing near the pedal. Use key 8 for this.
- Let's move on to the engine compartment, and using a screwdriver you should carefully pull out the seal there and pull the cable out there.
- We disconnect the negative terminal of the battery, since the work will be carried out next to the starter drive.
- Remove the air filter. Access to the cable fastening is now open.
- Using a 17 key, we easily release the shell latch. Thus, the core will be weakened and the tip in the fork at the point where the clutch is engaged can be freely removed.
- Remove the casing from the groove. This is all that is required for the drive to become free.
- Let's go to the salon. Let's start installing the new device. At this stage, the assistant must pull the cable from the engine compartment into the passenger compartment. Before starting installation, lubricate all open areas of fastening the tips and the core itself.
- We place it properly in the cabin, secure the tip mechanism, of course, to the pedal.
- Attach the casing.
- We press out the fork and attach the clamp directly to the fork.
- We put it in the place where the casing is supposed to be fastened, directly on the gearbox. Using a 17 key, we adjust the tension of the device in question.
- We fix the seal that was previously removed from there in a special hole in the passenger compartment.
- We put a device such as a car air filter in its rightful place.
Let's sum it up
Now you know how to change a mechanism such as the clutch cable on the popular LADA Priora. You can clearly see that this is an absolutely simple procedure, the only thing that is required is the help of another person, sometimes you can manage it on your own. The main thing is to know the correct operating algorithm and follow it, following the instructions given.
Source: https://Vaz-Lada-Granta.com/priora/kak-pomenyat-tros-stsepleniya.html
Malfunctions and their symptoms in the clutch drive of front-wheel drive VAZs
If the clutch cable is in poor condition, or has already failed, this is immediately noticeable when you try to engage the clutch to operate the gearbox. The most common breakdowns are:
- break of the cable itself;
- ruffling of the clutch core body;
- failure of the drive fastener to the fork or pedal.
If the fastener or cable breaks, the pedal falls freely, and if the core becomes ruffled, on the contrary, pressing becomes very difficult. If these signs appear, it is necessary to urgently check the drive.
Replacing the clutch cable "Priors"
To remove and install this element of the clutch drive, you need a small set of tools:
- mount;
- screwdriver;
- pliers;
- wrenches 8 and 17.
The operation of dismantling the drive begins from the Priora interior. It takes two people to do this.
One presses the clutch fork, and the second removes the core mounting bracket from the pedal. Of course, you can do it alone, but it’s more difficult. Then, using a size 8 wrench, unscrew the housing fastening near the pedal. Using a screwdriver, carefully push the hole seal into the engine compartment and remove the cable there.
Now work under the hood of the Priora. First of all, disconnect the battery terminal, since you will have to work near the starter wire. Then remove the air filter. This will provide free access to the mechanism fasteners. Now that he has left the interior area, release the shell lock with the key 17. When the core is loosened, the tip is freely removed from the socket in the clutch engagement fork. Remove the casing from the groove, and the entire drive is free. It can be changed.
How to replace the clutch cable on a VAZ 2170-VAZ 2172?
Note! The cable is changed very easily, about 30 minutes will be enough for you, we do not recommend that you go to a service station and have it replaced there, because it is a waste of money (In fact, you need to go to a service station when something serious has happened to the car, which you cannot do is within your power, but because of trifles, going there all the time is at your personal discretion) and if they are not there, then it is better not to save on spare parts, but on work!
It will be useful: How to bleed the brakes on a VAZ-2109 (carburetor, injector) alone: step-by-step instructions
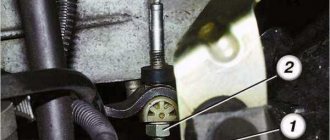
Removal: 1) First, remove the rubber boot, which covers the holes into which the clutch cable exits, so that dirt and moisture do not get into it (This boot is indicated by a red arrow), as soon as it is removed, use an “8” wrench to unscrew the nut (Look in the place indicated by the blue arrow; the nut is really hard to see in the photo), thanks to which the cable sheath stop is attached to the bracket, and as soon as the nut is unscrewed, remove the stop from the bracket.
2) Now look at the place where the tip of the clutch cable is connected (And it is connected to the end of the pedal, see the photo below for more details), this tip is installed on the clutch pedal finger (The finger is indicated by a blue arrow) and secured to it with a lock, which is indicated by a red arrow, as you can see, in the photo this lock has already been removed, you will have it on your finger, so that you can remove it, use pliers or a screwdriver and remember something, it is better to buy this lock in advance at a car store, since Basically, it always gets lost and it becomes almost impossible to find it inside the car.
Note! After one of the ends of the clutch cable is disconnected, look for a plastic bushing on the finger, be sure to check whether it is worn out or has any defects (Because of it, extraneous noise can simply occur in the cabin when squeezing the clutch), if with it everything is in order, you don’t even have to touch it, but if it has defects, then remove this bushing and replace it with a new one, and lubricate the new bushing with Litol-24 or LSC-15 grease before installation, and even if you don’t If you change it, we still recommend that you lubricate the surface of the old bushing with one of these lubricants!
3). to the bracket and disconnect it from it, to do this, hold the tip from turning with one wrench, with the other at this time loosen the nut that is located next to the bracket (see photo 2) and after that, pulling the cable, remove it from the bracket and pulling the cable forward (As the car moves), first pull it into the engine compartment, and then completely remove it from the car.
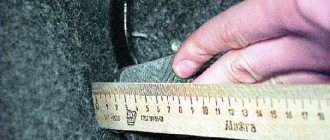
Installation: Installation of the cable is carried out in the reverse order and it is inserted through the engine compartment and then brought out into the car interior. The cable is attached to the clutch fork in this way: first, a rein is screwed onto the tip so that the tip of the cable protrudes straight out a little (Approximately 1 mm) from the driver, in addition, we recommend that you coat the surface of the driver with which it comes into contact with the fork with Litol-24 or LSC-15 grease, then install the tip in its previous position (On the clutch fork), but only pull it out when it it will fit into the slot until it stops (see photo 1) and measure this distance, which is indicated by the letter L with a caliper or a ruler, it should be 27 mm, if it does not match, adjust it using the leash that was screwed onto the tip of the cable and finally release the tip, under the action of the spring, it should rest against the fork (see photo 2), check that there are no gaps and after checking, press the clutch pedal 3 times, then check the distance L again and, if necessary, adjust it using the leash located on the tip of the cable.
Additional video: You can clearly see the process of replacing the clutch cable with a new one in the video below:
Installing a new element
You need to start assembly from the Priora's interior, although you can only feed the cable from the engine compartment. When it is already placed in place in the cabin, attach the cable end compensation mechanism to the pedal. Attach the casing. Then, pressing the plug, secure the clamp for the plug.
Having installed the housing mount on the gearbox in place, use a 17 key to adjust the correct tension of the device.
Attach the rubber seal to the hole in the passenger compartment and replace the air filter. That's it, replacement of the flexible clutch drive is done.
In the video, the process of dismantling the Priora clutch cable:
Source: mashintop.ru
Clutch adjustment on Priora step by step instructions
Replacing the clutch cable on a Priora is carried out in the event of a break in this part or when it moves tightly in the corresponding shell.
Step-by-step instruction
Disassembled clutch pedal
To change the clutch cable, you will need a set of screwdrivers and wrenches. Initially, the air filter, which is located in the engine compartment, is removed. The clutch cable is pulled forward. Then it is removed with a leash from the groove of the lever.
Using a “17” wrench, unscrew the nut securing the tip of the shell of this unit to the bracket several turns. You will need to hold it with a hex wrench. The tip is removed from the bracket. The last element is located in the Priora's interior.
The nut that secures the bracket is unscrewed with an “8” key. Since replacing the cable on a Priora is carried out in difficult conditions, to facilitate the work, it is recommended to firmly pull the clutch pedal. Using a screwdriver, pry up the rear edge of the last element. Then the pedal is dismantled.
The next step involves pulling the cable sealing boot out of the hole. After dismantling it, turn away and remove the leash from the tip. If the Lada Priora clutch sensor fails, it is replaced with a new device. As for installing the clutch cable, this procedure is carried out after checking the condition of the plastic bushing on the corresponding pin. If it is worn out, a new unit is installed. The pin and bushing will need to be lubricated with a special substance.
Installation of the clutch cable on the Priora begins with passing this element through the hole in the shield from the car interior into the engine compartment. Then the sealing cover is mounted, and the housing of the corresponding cable mechanism is put on the finger. After fixing it, the cable sheath is secured.
It is screwed onto the tip of the wires so that its end is flush with the similar element of the leash. The last element is installed in place. Next, adjust the clutch drive on the Priora. This procedure involves pulling the cable forward by its tip until it stops completely. In this position, the distance from the lever to the end is measured. This figure should be 27 mm.
You can achieve the desired size by rotating the leash. Its adjustment provides for the removal of the load by adhering to the lever, without creating a gap. Then press the clutch pedal 3 times. This step will allow the mechanism to automatically adjust the length of the installed unit to operate. It must be taken into account that the full travel of the corresponding pedal should not be more than 146 mm.
Basic principles
Replacing the clutch cable on a Priora involves subsequent adjustment of this unit. Auto mechanics know how to adjust the clutch. If the Lada is a front-wheel drive car, then the clutch pedal should be at the same level as the corresponding element of the brake system. In this case, the full stroke of the first device should fluctuate between 125-135 mm. Oscillations up to 160 mm are allowed.
Clutch adjustment involves loosening the 1st clutch cable adjusting locknut. It is located in the engine compartment on a bracket. By tightening the 2nd locknut, the pedal travel is adjusted. In this way the desired value is achieved. Upon completion of this procedure, the 1st locknut is tightened.
If complications occur, you will need to seek help from specialists. Often, adjusting the cable does not solve the existing problem. It should be noted that after installation, the gearbox is mounted manually (on weight and without various devices). When performing this work, a slight misalignment of the first shaft is allowed. But this factor can lead to breakage of the cermet bushing and loss of the driven disk.
How to adjust the cable
To prevent the bushing from breaking on the Priora, it is recommended to use a device that allows you to mount the input shaft and gearbox correctly, taking into account the splines, eliminating distortions. Clutch adjustment is carried out taking into account the characteristics of the vehicle's transmission.
Replacing the clutch release cable of Lada Priora (VAZ-2170)
If the cable breaks or moves tightly in the sheath, replace the cable assembly.
Remove the air filter (see “Removing the air filter”). In the engine compartment...
... by pulling the cable forward, we remove the leash with the cable from the groove of the clutch release fork lever
Using a “17” wrench, unscrew the nut securing the front end of the cable sheath to the bracket on the gearbox several turns, holding the sheath by the hexagon with another wrench of the same size.
We remove the end of the cable sheath from the bracket on the gearbox. Inside the car, under the dashboard...
...using an 8 wrench, unscrew the nut securing the cable sheath bracket to the pedal bracket. The operation of removing the housing of the automatic cable length adjustment mechanism from the clutch pedal pin must be performed in a hard-to-reach place. To make the operation easier, pull the clutch pedal firmly towards you...
...so that the trailing edge of the pedal slightly deforms the thin sheet metal of the body panel. Use a screwdriver to pry up the retaining bracket of the clutch pedal pin...
...and remove it (for clarity, shown in the engine compartment with the clutch pedal cover removed).
Remove the eye of the housing of the automatic cable length adjustment mechanism from the clutch pedal pin. We remove the cable sealing cover from the hole in the front panel...
...and pull the cable into the cabin.
Unscrew and remove the leash from the threaded end of the cable. Before installing the cable...
...check the condition of the plastic bushing on the pedal pin. We replace the worn bushing with a new one and apply grease to the pin and bushing.
We install the cable in the following sequence:
– we pass the cable through the hole in the front panel from the passenger compartment into the engine compartment;
– install the sealing cover into the hole in the front panel;
Do-it-yourself Lada Priora clutch cable replacement step-by-step instructions
As practice shows, replacing the cable connecting the clutch drive with the gearbox on a Lada Priora is very rarely required. It breaks quite infrequently. The most common problem with it is the threads; its components become frayed. For this reason, the clutch mechanism begins to jam regularly and the pedal eventually does not want to return to its place.
The replacement procedure is not particularly complicated, but it does require time and some effort. For work you will need the following tools and materials:
- a set of keys;
- flat screwdriver;
- cable clamp.
You can get to it in Priora only through the engine compartment. To do this, of course, you will need to open the hood. The cable itself is located next to the gearbox.
In what cases does an element need to be replaced:
- when broken;
- due to jamming;
- due to stretching;
- in case of failure of the mechanism regulating its length.
Removal process
First of all, you will need to dismantle the air filter:
- remove the cable itself, using a leash to remove it from the fork of the drive that disengages the clutch;
- using 17 keys (2 pieces), partially unscrew the two nuts holding its shell on the gearbox crater bracket and pull it out;
- under the dashboard, located directly in the car interior, tighten the nut with an 8mm wrench from the pedal itself.
You just have to remember that getting to the place where the lower part of the cable is attached to the pedal will be quite difficult.
Access is hampered on one side by the engine compartment partition, and on the other by the lower edge of the instrument panel. The work space is significantly limited. But performing the required operation is quite simple - using a flat-head screwdriver that fits the length.
It will be much more difficult to remove the staple. To make it easier to operate, the pedal is raised as high as possible. Ideally, the bracket should appear above the opening. The main thing is to remove the fastening from the cable itself. In the future, it is easy to put on the bracket either using pliers with long lips, or from the side of the power unit with your hands.
Next you will need:
- remove the expansion tank of the engine cooling system;
- dismantle the thermal insulation of the engine on the left side;
- Unscrew the bolts and remove the fastening brackets holding the rubber boot in place (both on the left and on the right) and remove it completely;
- Using a screwdriver, carefully remove the retaining bracket from the fastening axis of the cable guide;
- the latter, in turn, is removed from the foot drive finger.
It is important not to lose the plastic sleeve installed there. Without it, the cable cannot be attached
If it becomes unusable, you need to put a new one on your finger.
Finally, all that remains is to pull out the mat holders (there are 2 of them). This must be done carefully, since they are plastic and break easily.
After this, you need to remove the rubber cover installed in the partition of the engine compartment and finally pull out the damaged cable.
How to install
Before installing a new cable, you need to thoroughly lubricate both the bushing and pin on the pedals. The plastic composition Litol-24 is best suited for this.
Then the end of the cable is threaded into a hole located in the bulkhead of the engine compartment on the passenger compartment side of the car so that it ends up in the engine compartment. The rubber cover is also tucked in there.
The gear tip driver is put directly onto the clutch drive pin and secured with a bracket.
The end of the shell is secured with a nut to the pedal bracket. Make sure that the fixation is secure. It is unlikely that anyone will like to, if something happens, climb there again due to a poor-quality connection.
Next, under the hood, the lower part of the shell is stuck into a special hole on the gearbox bracket.
The leash is screwed onto the end of the cable (there is a thread there) - the latter should protrude approximately one turn outward, but no more.
Now comes the time to adjust the clutch drive. Upon completion of this process, the pedal is pressed all the way two or three times and then the setting is repeated.
The working surface of the tip driver must be treated with the above-mentioned lubricant.
All that remains is to make sure that the entire mechanism is now working properly and install all previously removed parts in place.
You can learn more about the process in the video below:
Replacing the clutch cable Priora
Reference Information:
| Our brand: |
| Our build: |
| Auto repair: |
| Traffic police: |
| News: |
| Humor: |
| About the project: |
Priora clutch, replacing the clutch cable.
If the cable breaks or moves tightly in the sheath, replace the cable assembly. Remove the air filter. In the engine compartment.
. By pulling the cable forward, we remove the leash with the cable from the groove of the clutch release fork lever.
Using a “17” wrench, unscrew the nut securing the front end of the cable sheath to the bracket on the gearbox several turns, holding the sheath by the hexagon with another wrench of the same size.
We remove the end of the cable sheath from the bracket on the gearbox. Inside the car, under the instrument panel.
. Using an “8” wrench, unscrew the nut securing the cable sheath bracket to the pedal bracket. The operation of removing the housing of the automatic cable length adjustment mechanism from the clutch pedal pin must be performed in a hard-to-reach place. To make the operation easier, pull the clutch pedal firmly towards you.
. so that the trailing edge of the pedal slightly deforms the thin sheet metal of the body panel. Using a screwdriver, pry up the locking bracket of the clutch pedal pin.
. and remove it (for clarity, shown in the engine compartment with the clutch pedal cover removed).
Remove the eye of the housing of the automatic cable length adjustment mechanism from the clutch pedal pin. We remove the cable sealing cover from the hole in the front panel.
. and pull the cable into the cabin.
Unscrew and remove the leash from the threaded end of the cable. Before installing the cable.
. check the condition of the plastic bushing on the pedal pin. We replace the worn bushing with a new one and apply grease to the pin and bushing. We install the cable in the following sequence: – thread the cable through the hole in the front panel from the passenger compartment into the engine compartment; – install the sealing cover into the hole in the front panel; – put the housing of the automatic cable length adjustment mechanism on the pedal pin and secure it; – secure the cable sheath; – screw a plastic leash onto the threaded end of the cable so that the end of the cable tip is flush with the end of the leash; – insert the leash into the groove of the clutch release fork lever. After installing the cable, we adjust the clutch drive. To do this, pull the cable forward by the threaded end until it stops, overcoming the force of the spring, and hold the cable in this position.
Using a caliper we measure the distance from the end of the plastic leash to the clutch release fork lever, which should be 27 mm. If necessary, rotate the leash to achieve the required distance. When removing the load (releasing the cable), the leash should adhere to the fork lever without play. After this, press the clutch pedal three times to activate the automatic cable length adjustment mechanism. We check the full travel of the clutch pedal, which should not exceed 146 mm.
Source: avtotaz.ru
Features of replacing the clutch cable on a Lada Kalina car
The clutch cable (TC) is one of the most important elements of the car, thanks to which the clutch operates. Its malfunction can seriously affect the operation of the clutch mechanism and even lead to a complete stop of the car and the impossibility of further movement. The article provides detailed instructions for replacing the clutch cable on a Lada Kalina.