Replacing and adjusting the trunk lock on a VAZ 2108, VAZ 2109, VAZ 21099
Welcome! Want to learn how to properly replace a trunk lid lock?
If yes! Then, in this case, we have prepared an article especially for you, after reading which you can easily replace the trunk lock on cars of the Samara family. The duration of replacing the trunk lock will be around 10-15 minutes, but if this is not the first time you are doing this work, then you can do it in 3-5 minutes. The entire progress of the work will be in photographs, making everything very clear to you. Summary:
Lock replacement and repair
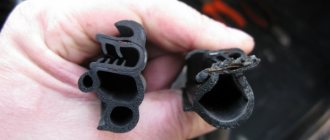
Often, the core in the lock of the rear door (tailgate or trunk lid) breaks (fails), that is, the secret. It can break because in winter wet snow gets into it and freezes. The lock needs to be opened, you take it and hit the secret with something to press it.
It can break off from impacts, as it is made of a fragile material - duralumin. Moreover, in the cold this material becomes even more fragile. Also, the lock can break for other reasons, for example, due to wear and tear.
When the secret breaks off, you may not notice it. During movement, it falls out of the lock due to vibration and gets lost. As a result, the tailgate (trunk) door lock will need to be repaired.
If you don't want rust under your car's mudguards, do this
Replacing the lock
We'll tell you how to repair the trunk lock. It's not that difficult, we'll give you simple recommendations.
- You don't need to buy a completely new lock, don't rush into purchasing. After all, only the middle part is broken, otherwise it is intact. Nowadays, car stores for VAZ-2109, 2108 sell absolutely all spare parts, even those you wouldn’t think of. The core, that is, the secret, is sold separately. Although it is made in China, it is of quite good quality. For sale is a set consisting of three locks: for two front doors and for the back, with two keys included. The cost of the set is approximately 80 rubles. I did not find one separate secret for the rear door lock, although it may also be for sale. An entire factory-made lock costs around 420 rubles, while a Chinese-made lock costs 150-200 rubles.
- When you change the lock, and this is not so difficult (I will not dwell on the replacement process in detail), do not be too lazy to coat all the insides of the lock with a thin layer of brake fluid. Wipe thoroughly to remove dirt and dust first. This will prevent the lock from freezing in cold weather if moisture gets into it.
- How to remove a factory-made lock? It is made of fragile duralumin. You need to lightly hit it with a hammer several times in the direction of removal. This is done until the thin collar on the lock body breaks off and it flies out of the lock. There is no other way to get her out. Then, to insert a new secret, you need to push out the locking pin that holds the secret in the working position. Then insert the secret, press the locking pin in and caulk the edges of the pin a little so that it does not come out.
The car stalled and will not start - what to do?
Adjusting the latch and replacing the trunk lock on a VAZ 21099:
Removal: 1) First, to remove the lock from the trunk lid, use a wrench or an extension with a head cap to unscrew the two nuts that secure the lock to the trunk lid.
2) Once the retaining nuts are removed, remove the inner lock from the cover by hand.
3) Next, remove the small spring from the same place and check its condition.
Note! If the spring suddenly becomes too compressed or skewed, replace it with a new one!
4) And then from the inside of the trunk lid, remove the button with the cylinder and check the condition of the button in the same way.
Note! Replace the lock button that is not working and also slows down when pressed with a new one!
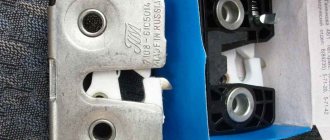
Note! The trunk lid lock of the VAZ 21099 car is not dismountable, so do not try to repair it or do anything with it. If the lock is in a defective condition and is faulty, then it must be replaced with a new one!
1) First, put the entire system back together. That is, if you previously removed the button with the cylinder and a small spring, then install them in their places in the reverse order of removal.
2) Next, take the new lock in your hands and install it in its place, still tightening it with the same fastening nuts.
3) After installation, try closing and opening the trunk lid. If, when closing the lid, the trunk lock suddenly does not fit into the hole in the latch, usually in this case a distinct knock is heard in the area of the lock, and the lid closes very poorly, in this case:
• First, pick up the extension cord with the union head and use it to remove the two bolts that secure the clamp.
• Next, adjust the clamp and then screw these bolts back. Thanks to this operation, achieve clear closing and opening of the trunk lid.
Installation:
The trunk lid lock of the VAZ 21099 car is not dismountable, so do not try to repair it or do anything with it. If the lock is in a defective condition and is faulty, then it must be replaced with a new one!
- First, put the entire system back together. That is, if you previously removed the button with the cylinder and a small spring, then install them in their places in the reverse order of removal.
- Next, take the new lock in your hands and install it in its place, still tightening it with the same fastening nuts.
- After installation, try closing and opening the trunk lid. If, when closing the lid, the trunk lock suddenly does not fit into the hole in the latch, usually in this case a distinct knock is heard in the area of the lock, and the lid closes very poorly, in this case:
First, pick up the extension cord with the union head and use it to remove the two bolts that secure the clamp.
Next, adjust the clamp and then screw these bolts back. Thanks to this operation, achieve clear closing and opening of the trunk lid.
Adjusting and removing the latch, as well as replacing the trunk lock on a VAZ 2108, VAZ 2109:
Removal: 1) At the beginning of the operation, remove the trim from the trunk lid, to do this:
• First, use a screwdriver to pry up the “10” pistons and then remove them.
• And after removal, remove the trim from the trunk lid of the car.
2) When the casing is removed, use a wrench or socket wrench to remove the two nuts that secure the lock to the cover.
Note! When unscrewing the nuts, be careful, because immediately behind one of this nuts there are two “negative” terminals, which can be very easily damaged!
3) Next, when the nuts are unscrewed, disconnect these two “negative” terminals from the metal stud.
4) And then remove the lock from the luggage compartment lid.
• Now let's move on to removing and adjusting the latch.
Note! If you do not want to remove it and know that it is well adjusted, then continue reading below, in the “Installation” section!
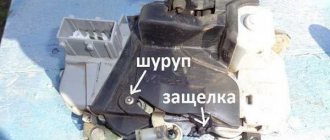
1) To remove the clamp, first unscrew the two bolts that secure the clamp using a wrench.
Note! If the trunk lid does not close well, or when closing the lid there is an impact in the area of the lock, then in this case, adjust the position of the latch by moving it in the desired direction!
2) Then use a screwdriver or hand to pry up the fastener and then remove it from the car body.
Note! If the trunk lid again does not close well and has vertical play, then in this case, adjust the position of the lock exclusively in height!
3) Finally, remove all shims.
Note! If necessary, increase or decrease the number of shims. This will make the trunk lid easier to close!
Installation: 1) To install the lock and door trim in place, follow the steps below:
• First, attach the new lock to the place where the old one was installed.
• Then put two “negative” terminals on one of the studs and then tighten both nuts securing the lock.
Installation:
The trunk lid lock of the VAZ 21099 car is not dismountable, so do not try to repair it or do anything with it. If the lock is in a defective condition and is faulty, then it must be replaced with a new one!
- First, put the entire system back together. That is, if you previously removed the button with the cylinder and a small spring, then install them in their places in the reverse order of removal.
- Next, take the new lock in your hands and install it in its place, still tightening it with the same fastening nuts.
- After installation, try closing and opening the trunk lid. If, when closing the lid, the trunk lock suddenly does not fit into the hole in the latch, usually in this case a distinct knock is heard in the area of the lock, and the lid closes very poorly, in this case:
First, pick up the extension cord with the union head and use it to remove the two bolts that secure the clamp.
Next, adjust the clamp and then screw these bolts back. Thanks to this operation, achieve clear closing and opening of the trunk lid.
Remaking the floor in the trunk of a VAZ-21099
Hello Kulibins! I think it’s no secret to many people what kind of trunk the 99 is, not only is it small and not convenient, but the floor is not even and has a hole in the middle. If you put the spare tire “face up”, it seems like a more or less level floor, but there is nowhere to put all the little things.
If you turn the spare wheel upside down, the carpet and all your luggage will fall through. Putting a rubber mat is not an option, I have a gas cylinder. That’s why, when I did a complete ShVI for my car, I decided to immediately finish the trunk as well.
For this you needed:
- plywood sheet 10mm;
- piano hinges;
- jigsaw;
- can 88 glue;
- hands and desire.
To begin with, I rolled up the trunk with a 2 mm vibrator.
arches and wings splen 8mm
I cut out plywood on the mat that is in the trunk and a hatch for the spare wheel
No matter how you look at it, you can’t fit the whole thing in, that’s why I had to cut off a piece
I made a frame from 20 x 30mm bars and screwed it to the floor with self-tapping screws, I made sure to cover the screws on the back side with mastic
threw splen 8mm and native Shumka
bottom view, hatch divided into two parts
the floor is screwed to the bars with self-tapping screws
hatch in open position
modification of the plastic that covers the lights
carpet glued with 88 glue
I couldn’t think of anything better than just drilling a hole for the finger
view from salon 2
finally nothing will fail
plastic on the seat is also in carpet
attached the emergency lights and the stop for the hatch
This is how the trunk turned out. Until next time.
We install a lock from Lada Kalina on VAZ 2109, VAZ 2108
I don’t know about anyone, but the stock lock on the “chisel” just got me.
I'm tired of the fact that the spare parts come with blatant junk, and the fact that sometimes it's simply impossible to adjust it so that it closes and opens normally with an electric drive, it's so crooked and crooked. I think that those who think that my hands are crooked and I cannot adjust the lock should hold their tongues. Over the course of three years of operation, I changed 8 (if not more!) locks and 2 or 3 counter parts. I regulated everything. I put washers, nuts and other hardware, removed gaskets, always made all the adjustments, looking from the inside, checked the cover for crookedness, looked at the hinges... everything was useless. The locks simply fell apart on the move after 2-3 months of use, the pins flew out, the tongues broke, etc., and my trunk lid flew up during the next jump on the bumps... very cool, especially on the highway at a speed of over a hundred and with a trunk full of junk. Okay, those were the lyrics, let's get down to business.
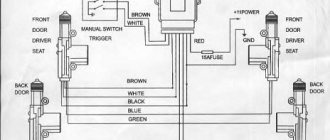
We will need: -VAZ 2108-09-13-14 "Samara" with a hatchback body (aka "chisels"), -the owner of the above "chisels" who is fucked with a stupid stock lock (or the one who will do all this), - time, -lock from Lada-"Kalina" (catalog number 1118-5606010-10), -a little corner 30 x 30 mm, 1-2 mm thick. You need about 10-15 cm.p., - an M6 x 50-60 bolt (for the mating part) or a mating part to the lock, - two M6 x 25-35 bolts + 4 M6 nuts + washers, - the trunk lock motor reducer (i.e. ... almost any motor, as long as it is reliable, the slightest effort will be enough, since the lock is opened by a spring inside it, and not a drive), - a little cable or rod for connecting with the lock + fittings, - wires, button, relay, terminals, heat shrink – everything for connecting the lock opening motor. -a little paint.
Tools: -electric drill, -angle grinder (aka “grinder”), -files and needle files, -hacksaw for metal (it’s not convenient to work with a grinder everywhere), -spanners and open-end wrenches for 8 and 10, -vise (it’s hard to do without them) – the parts are too small), - crimp for terminals, - pliers, - lighter (shrink heat shrink),
So, initially there was an idea to adapt the door lock (more precisely, the outer part) from the same “chisel” (I changed the locks to silent ones, so I had as many as 4 of them lying around unnecessary). The idea was born while looking at foreign-made trunk locks. In essence, they are approximately the same as door ones (meaning car doors, of course). The idea was not only born, it was even almost realized, see photos 01 and 02. The remains of the stock lock served as a bracket.
The idea transformed when I went to a parts store. I came in with the goal of finding something more suitable... or the counterpart of the door lock from the “chisel”. Searches on the Internet, by the way, didn’t yield anything special. Most of the links were, alas, dead. Only conversations on forums, I haven’t seen any photos at all, because... The links, again, don't work. Maybe I was looking poorly... Well, okay, we’ll do it ourselves)))
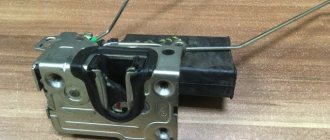
And then I saw it - a lock from a Kalina, cat. number 1118-5606010-10. Just what you need. It is similar to a door lock, it can be opened with a cable, the tongue is “covered” with plastic, as on the silent door locks mentioned above. True, there was no “answer” in the store, but it’s not so scary, I made it myself, then I’ll buy my own one. Photo of the castle without modifications – 03 and 04.
Next, the lock needs to be modified (well, how could we do without it))). The modifications consist of cutting off all the protruding metal on the top of the lock, or rather part of the lock opening mechanism and its platform. The “opener” lever is also shortened slightly + a file is made on it for better fixation of the opening mechanism cable. All modifications are shown in photos 05 and 06. The modified lock is shown in photo 07. The block with the wire is a limit switch, as I understand it. It closes/opens when the lock opens/closes (I’m not sure exactly when it closes and when it opens, you can look at the lock and the limit switch - and everything will immediately become clear). Can be used to turn on the trunk illumination or signal that it is not closed tightly. A useful thing, in short. But I foolishly broke it, only then did I realize why it could be useful to me... well, okay. By the way, the salesman in the store said that it was an electric drive of the lock)))
Now we need to make a bracket for the lock. There is nothing complicated here - we have 2 locking pins on the trunk lid and 2 holes in the lock. With this installation of the lock, they are at an angle of 90 degrees relative to each other. We will attach it to 30 x 30 mm corners. I kept the standard lock as a plug, for which it was also modified by sawing off almost its entire working part, i.e. the tongue and its brackets, along a plane parallel to the plane of fastening the lock. The mounting ears survived so that there was something to attach it to. Making the lock open with a key seems too difficult to me in this case. Yes, it is not necessary, in my opinion. It is enough to remove the emergency cable somewhere. The modified stock trunk lock is shown in photos 08 and 09.
The counter part of the “Kalinovsky” lock is a bracket made of a U-shaped rod, onto which it snaps. Due to the lack of this counter part in the store, I made it from a piece of 30x30 angle and an M6 bolt with a nut. The corner before this was “bent” a little with a sledgehammer. The M6 bolt was also slightly bent. This was done due to the fact that the platform on the body for the mating part is slightly inclined. And the lock stands strictly vertical when the lid is closed. The finished response part is shown in photo 10.
Of course, everything was constantly being tried on “from the inside”, i.e. from the salon side. All holes were drilled slightly larger than the hardware for which they were intended - to allow for adjustment. The entire structure is clearly presented in photos 11, 12 and 13
Now we install everything on the car (after painting it first). Between the lock from the Viburnum and the corners we had to put M6 nuts (they are screwed onto the bolts that secure the lock to the corners) as adjusting spacers - the lock was too low. The lock is installed - inside view - photo 14.
In this case, implementing an electric drive is as easy as shelling pears...we place the motor on the desired side and connect the motor to the “opener” lever on the lock. You can connect with anything you want, as long as there is the possibility of adjustment and a fairly rigid connection at the same time. I connected them with a cable, only on the lever I did not put the cable itself, but a “chip” with 2 holes - the cable is inserted into one, the other “chip” is not put on the lever. Photo 15 gives a sufficient idea of the drive structure.
Preparatory operations
First you need to provide your workplace with the necessary equipment. This will be an affordable set that will include:
- open-end wrenches;
- Phillips and ordinary screwdriver;
- extension for the socket wrench and the wrench itself;
- cleaning material;
- marker or felt-tip pen;
- two bars to support the lid.
Rearranging the tailgate of a car is an operation associated with physical effort and precision installation, so you need to find an assistant for the job. Inaccurate installation will lead to problems with the locking mechanism and excessive noise effects when driving.
The best option would be to replace the unit in a specialized workshop that has all the necessary tools and the skill to perform the operation. In addition, during installation, specialists will replace all necessary fasteners, and the door will be installed securely.
When replacing a door with your own hands, you need to study the sequence of the operation. In this case, you should familiarize yourself with the materials on motorist websites on the Internet. Various resources provide photos and videos with a detailed description of the work.
It is also necessary to know that even slight deformation of the removed components and parts can cause difficulties when installing in the reverse order. Therefore, it is necessary to have a repair kit in stock.
Troubleshooting
If a key or silumin rod breaks, you should not immediately buy a new block with a handle. On sale you can find special repair kits for VAZ 2108-099 door handles, which contain these parts in 2 copies.
This way you will save money and easily change the key yourself by removing the handle using the following sequence of actions:
- Remove the decorative panel.
- Disconnect the rod connecting it to the locking device from the handle mechanism.
- With the glass fully up, unscrew the 2 fastenings of the handle to the door card.
- Remove the handle, replace the parts and put it back.
If the rod is disconnected, then you need to remove the inner lining and put it in place, as described above. Using the moment when the facing panel is removed, check what caused the disconnection of this rod so that history does not repeat itself when the door is slammed.
Malfunctions of the locking mechanism can only be eliminated by removing it. In a situation where the device has a lot of wear, as happens on the driver and front passenger doors, it is recommended to replace the lock with a new one.
Didn't find the information you are looking for? on our forum.
We recommend reading:
Poor starting on a cold VAZ 2112 injector, 16 valves, possible causes and solutions
VAZ 2114 vibration when accelerating
Low beam on VAZ 2114 went out
Candles for 2106 vases
How to change a VAZ windshield with your own hands? Step-by-step instruction
VAZ 2109 if the trunk lock breaks
VAZ 2114 how to reset daily mileage on
It shoots into the muffler, the reason is for the VAZ 2106 and other cars
Rear door removal procedure
Before starting work, you need to disconnect the wires. To do this, remove power from the battery. At the negative terminal of the output, loosen the fastening with a simple screwdriver and remove the connection.
Further work on removing the door is carried out in three stages.
- Remove the door stops in the open position.
- Remove the trunk.
- Replace trunk hinges.
Remove gas-filled stops
To prevent the door from falling when the stops are removed, it must be secured in the open position. For this you will need bars. We install them so that they do not interfere with the removal of the stops and freeing the door from connection with the body and the wires feeding the rear door and license plate illumination units.
Each of the stops is attached to the door using a bracket. You can disconnect the stop from above by removing it with a screwdriver, as if dropping it. After this, the stop is removed from the bottom and removed away from the work site. The brackets are removed from the door, and if the efforts are excessive, the fastening unit will be deformed. This bracket is unsuitable for further assembly and requires replacement.
Remove the trunk
How to replace a VAZ 2109 trunk door is written in detail in the technical manual for the car. If you follow the sequence as prescribed in the instructions, there should be no difficulties.
The first thing you need to do is remove the door trim. At the same time, use a simple screwdriver to remove the fastening buttons or pistons around the perimeter. There are only ten attachment points.
Installation of a new door
The VAZ 2109 trunk door is secured with the reverse sequence of operations performed when removing the door. At the same time, all soft seals are replaced with new ones, and deformed electrical connectors should be replaced with serviceable ones. During the production of a trunk canopy, the following is carried out:
- installation of trunk hinges;
- installation of hinge fastenings;
- the tailgate is assembled and installed;
- The stops are installed in place.
Possible problems when installing a new door
After installing the new door, you should check the operation of all mechanisms. In this case, an unconditional indicator of correct installation will be precisely adjusted gaps between the body parts and the trunk lid. All contacting parts must first be coated with LSC-15. Apply it to the lock assembly as well.
To ensure normal operation of the locking device, close the lid. In this case, closing with force indicates the need to adjust the locking device. It consists of installed latches and the tongue of the locking device, which fits into them.
The clamps can be adjusted by moving horizontally when the alignment of the two working surfaces is shifted. To do this, you need to mark the contour of the interaction between the lock and the latch. If there is an offset, then centering steps should be performed.
- Loosen the mounting bolts.
- Place the lock and latch in the desired position.
- Tighten the fastening and check the operation of the lock.
- When a positive result is achieved, secure the knot completely.
Adjusting the latch will help solve the problem of vertical play of the door and its tight movement. If the play is axial, then an additional plate can be installed in the clamp. When closed tightly, one plate can be removed. There are times when the lid starts to open randomly on a bumpy road. In this case, you should work with the tongue of the locking device, deepening it slightly or moving it towards the passenger compartment. If the lock was changed at the same time as the door, the system must be adjusted. The tongue may differ from the original one by microns.
After adjusting the installed door and making sure that all systems work well, you can consider the work completed.
Replacing the trunk lock
In a specialized store, this part is sold complete with larvae. However, some forethought is required here. You cannot remove the key from the cylinder, because the mechanism may fall apart and reassembling it, most likely, will not be possible.
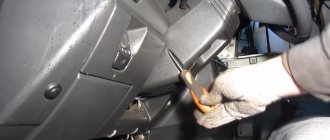
In order to gain access to the trunk lock, you first need to remove the panel, which is secured with plastic rivets (hedgehogs). If you hook these devices under your hat, they can be easily pulled out. Hedgehogs often break, so it is best to buy them too when purchasing a lock. You need to remove all the rivets to easily and conveniently remove the panel. Once the replacement is complete, the rivets can be inserted by pressing them with your finger.
After the socket is removed, you need to unscrew the nuts on the old lock, and then remove the lock itself. After this, a new one is inserted into the free space and the nuts are tightened. All that remains is to put the socket in place and insert the hedgehogs.
Latch setting
If the lower part of the trunk lock and the latch do not change, then no adjustments are needed. Otherwise, when replacing, the new latch must be adjusted for ease of opening/closing the trunk.
To adjust, loosen the two bolts at the front and then close the luggage compartment. As a result, the latch should adjust itself. After this, you need to open the trunk and tighten the bolts.
It happens that after adjustment, the latch selects a crooked position. In this case, you will have to check whether the trunk closes well. If everything goes smoothly, there is no need to touch anything. Otherwise, you need to independently find the best place for the latch by moving it.
Replacing the hood lock on a VAZ-2109 - we solve the problem ourselves
The variety of cars on the roads of our country can capture everyone’s imagination. However, among our car enthusiasts there are those who would never trade their beloved “nine” for anything. Indeed, the VAZ-2109 rightfully deserves to bear the title of cult, because many of us gained experience behind its wheel. However, we should not forget that at first universal love was very difficult for the car. Not least because of trivial problems with the trunk and hood locks. What can we say, many VAZ-2109 owners still repair these car parts, sparing neither effort nor time.
Trunk lid VAZ 2109 Lada Samara
- Repair manuals
- Repair manual for VAZ 2109 (Lada Samara) 1987+.
- trunk lid
Warnings
The trunk lid is locked with a key.
The trunk lid should close without much force. Otherwise, the lock needs to be adjusted.
EXECUTION ORDER↓ Comments ↓1. Description of the car 1.0 Description of the vehicle 1.1 Appearance 1.2 Engine compartment 1.3 General data 1.4 Technical characteristics 1.5 Passport data 2. Vehicle operation 2.0 Vehicle operation 2.1 Safety rules and operating recommendations 2.2 Side doors 2.3 Trunk lid 2.4 Opening and closing the hood 2.5 Luggage compartment 2.6 Adjusting the front seats 2.7 Controls 2.8 Interior ventilation and heating 2.9 Eliminating fogging or frosting of windows 3. Vehicle maintenance 3.0 Vehicle maintenance 3.1 Checking the tightness of the engine and gearbox seals 3.2 Checking the tightness of the cooling system 3.3 Checking the tightness of the fuel system 3.4 Replacing the coolant 3.5 Replacing the oil filter and engine oil 3.6 Replacing the air filter filter element 3.7 Checking and adjusting the generator drive belt 3.8 Replacing the belt generator drive 3.9 Cleaning and flushing parts of the crankcase ventilation system 3.33. Replacing lamps 4. Car care 4.0 Car care 4.1 Car washing 4.2 Caring for and restoring body paint 4.3 Body lubrication 4.4 Cleaning drainage holes 4.5. Car storage 4.6 Preparing for winter use 4.7 Tips for starting the engine in severe frost 4.8 What is useful to buy for winter 4.9 Tips for winter use of the car 5. Problems along the way 5.0 Malfunctions along the way 5.1. Engine 5.2. Checking electrical equipment 5.3 Extraneous knocking noises appeared 5.4 Vibration and shock on the steering wheel 5.5. Brake problems 5.6 Wheel puncture 6. Chassis 6.0 Chassis 6.1. Front suspension 6.2. Rear suspension 7. Steering 7.0 Steering 7.1 Steering wheel 7.2 Steering column 7.3 Steering mechanism 7.4 Replacing steering rods 8. Brake system 8.0 Brake system 8.1 Front wheel brake 8.2 Rear wheel brake 8.3 Wheel cylinder 8.4 Brake drive 9. Electrical equipment 9.0 Electrical equipment 9.1 Relay and fuse box 9.2. Generator 9.3. Starter 9.4. Lighting and light signaling 9.5. Heater 9.6. Windshield wipers 9.7 Sound signal 9.8. Ignition system 9.9 Instrument panel (high) 10. Body 10.0 Body 10.1 Replacing the front buffer 10.2 Replacing the rear buffer 10.3 Replacing the radiator trim 10.4 Replacing the front fender 10.5 Removing and installing the hood 10.6 Adjusting the hood 10.7 Adjusting the hood lock 10.8 Front door 10.9 Rear door 11. Engine and its systems 11.0 Engine and its systems 11.1 Removing and installing the engine 11.2 Adjusting the clearances in the valve drive 11.3. Power supply system 11.4. Lubrication system 11.5. Cooling system 11.6. Exhaust system 11.7 Complete disassembly of the engine 11.8 Cylinder block. Inspection, troubleshooting and repair 11.9 Piston with connecting rod. Disassembly, troubleshooting and assembly 11.10. Cylinder head 11.15. Carburetor adjustment 12. Transmission 12.0 Transmission 12.1 Gearbox and differential. Main components and parts 12.2 Removing the gearbox 12.3 Installing the gearbox 12.4 Adjusting the clutch drive 12.5 Disassembling the gearbox 12.6 Inspecting and troubleshooting gearbox parts 12.7. Secondary shaft of the gearbox 12.8 Primary shaft of the gearbox 12.9. Differential 12.16. Clutch drive 12.17. Front wheel drive 13. Applications 13.0 Appendices 13.1 Appendix 1. Basic data for adjustments and monitoring 13.2 Appendix 2. Fuels and lubricants and operating fluids 13.3 Appendix 3. Tightening torques for threaded connections 13.4 Appendix 4. Service book 13.5 Appendix 5. Vehicle electrical diagram |