Rear light connector diagram for VAZ 2109
Rear lights on the VAZ 2109 and its modifications are one of the most painful topics for their owners. Problems with constant short circuits, oxidation of connectors or their failure are familiar to everyone who has owned or owns this car. In some cases, the tail light connectors need to be replaced. To do this, you can use a multimeter and ring all the wires one by one, turning on and off various lighting devices, or, if the wiring on your car has not been changed, then you can use the VAZ 2109 rear lights connection diagram presented below.
Tail lamps for VAZ 2109:
1 — direction indicator lamps; 2 — side light lamps; 3 — brake light lamps; 4 — fog lamps; 5 — reversing lamps;
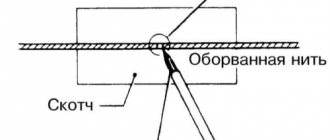
Pinout of VAZ 2109 rear light connectors:
1 - brake light. The wire is red for both lights. 2 - mass. Black wire for both lights. 3 - reverse. Green wire for both lights. 4 — direction indicator. The wire is blue for the right light, blue-black for the left. 5 - fog light. The wire is orange and black for both lights. 6 - side light. The wire is yellow for the right light, yellow-black for the left.
vaz-2109.ru
Causes and actions in case of breakdown
Among the reasons for the breakdown of the rear parts of the lighting system on a VAZ 21099, 2108 or 2109, the most common are:
- Bulb burnout. It happens due to wear or power surges and is almost the most popular reason for replacing rear headlights.
- Oxidation of contacts. Occurs due to poor quality of terminal contact, electrolyte leakage, or cracks in the battery case.
- Fuse failure. This cause of failure is due to voltage surges.
- The reverse sensor is broken or its wiring is broken.
- Burnt out contacts on the headlight film.
- Lack of ground on the board.
The most common and easiest fault to solve is a lamp burnout. The product must be replaced with a new one by turning off the light sources, opening the trunk and disconnecting the column of wires.
To do this, you will most likely have to remove the trunk trim of the VAZ 2108 or 21099, which is located behind the lamp. After this, squeezing the latches (they are located on the sides), you need to take out the panel and unscrew the lamp, after pressing on it. To install a new rear lamp, reverse the process.
It will be useful: Replacing the chain for Skoda Octavia 1.8
Replacing lamps in the rear lights of a VAZ 2109
To clean the contacts from the white coating that accompanies oxidation, you need to clean them. To do this, remove the headlight unit. The ground must be returned to its place, and the nearby wiring must be tested for correct operation. Broken fuses on VAZ 2109 and 21099 are not difficult to find - their diagram is usually presented on the block cover.
If you are faced with the problem of constant lighting of the reversing lights, this may be caused by problems with the wiring or the cessation of operation of a special sensor located on the box.
When the car headlight switch stops working, you can get to it through the engine compartment or from underneath the car. You can diagnose the failure of this component of the lighting system as follows:
- start the VAZ 21099 and shift it into reverse gear;
- close the contacts. The rear lights should light up at this time;
- Use a multimeter to check if the contacts are closed when you turn on the rear headlight switch, having first removed the switch;
- make sure that the contacts are soldered securely, assemble the switch and check its operation again. If a normal short circuit is observed, replace it.
Repair and tuning of rear lights on the legendary Nines - VAZ 2109
The rear lights of the VAZ 2109 can not only cause inconvenience with their breakdowns and malfunctions. If, of course, this happens, below you can find out how to eliminate some of them. It is also important that the lights can be tuned.
You can find out what the breakdown may be and how to solve the problem below. We will talk about modified nines.
Possible malfunctions of brake lights and their elimination
- Due to a voltage drop, a short circuit may occur and the paws will burn out.
- If it's time to strip the wires because the contacts have oxidized and the terminals do not conduct current well enough.
- Often, in the event of a voltage drop, it may be necessary to remove and replace fuses.
- If the reverse sensor contacts are broken or damaged.
Removing the brake light switch sensor
In the case of the problems listed above, the easiest way, of course, is to install a new lamp. This happens without any difficulty: you just need to turn off the lights, open the trunk and remove the wiring block. After this, holding the fixing elements that are installed on the sides, remove the panel and unscrew the lamp. In its place, install a new light device and assemble the assembly in the reverse order. If we talk about stops, both lamps and one of them may not work, that is, only in one headlamp.
If such a problem occurs, it is necessary to immediately diagnose:
- Check the fuse and, if necessary, replace it with a new one. Fixing a breakdown is not enough, because, as in the case of human diseases, a burnout may be a fault in the system that needs to be corrected. If this is not done, you can change the device until the end of the life of the VAZ 21099. One of the reasons may be a short circuit.
- If the wiring in the signal lamp sockets has oxidized, the lamp needs to be twisted a little in the socket to scrape off the damaged layer. To make the work done more effective, you can clean the contacts with sandpaper.
- If the lamps in the stops burn out, you need to replace it with a new one and check whether the system will work. And if the contacts are bad, they need to be cleaned both on the board and on the wire block.
- If the tracks in the headlight circuit board are burnt out, then you can remove the board and visually diagnose its integrity. If there are burnt tracks, they can be modified by replacing the wiring.
- The sensor is faulty or the electrical circuit is broken. First, you need to remove the red and white wires from the sensor and connect them with a piece of wire. If the brake lights come on, then the sensor needs to be replaced; if not, you need to check the electrical circuit. It needs to be checked for broken contacts.
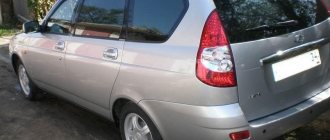
Removing and replacing rear lights
- It is best to make the replacement before wiring problems begin.
- To work you need to remove the lights. On the VAZ 21099 it is hidden by a plastic decorative trim in the trunk.
- Now unscrew the fixing screws on the trim and remove them.
- Disconnect the block with wires and carefully remove it, being careful not to damage the board, because it sits tightly in place.
- Now, using a 10mm wrench, unscrew the 4 nuts securing the headlight housing. Remove the part from the machine. Now you can install the new part and calmly begin the replacement.
- The collection is done in reverse order (the author of the video is Automaniac1994).
Taillight tuning ideas
To highlight the car and make it unique and unique, that is, tuned, you can use several tips. You can use alternative optics.
These lights are much more reliable and beautiful than regular headlights. Among other things, tuning the rear lights can protect the VAZ 21099 from some problems. You can resort to modernization, and then the glass will not fog up and the contacts will not oxidize.
In addition, the rear lights on a VAZ can be painted from the inside. Of course, you need to use a special mixture, because the usual one becomes deformed when heated. In order for it to last as long as possible, the headlights must be disassembled and the additional turn signal reflector removed. Then, using sandpaper, remove the chrome from the lamp and then apply a primer to the surface.
The primer should dry for about 1 hour, in addition, the mixture must be applied in several layers. The dye must also be applied in several layers, and wait about an hour until it dries completely. After completing the work, you can assemble the lantern. When applying sealant of an identical color, the old one must be removed and then the surface of the lantern must be degreased. If the procedure is carried out incorrectly, it will create new problems.
In addition, you can resort to the following methods of independent tuning:
- LED headlight covers. This element looks quite beautiful and unusual. In addition, overlays can be used to decorate not only the rear headlights, but also the fog lights and turn signals. Some even decorate the rims on wheels or the inside of the interior with them, if working with the headlights is no longer possible.
- Diode rings. Also a very popular option. When designing such a decoration, it is best to use high-quality materials and not slack in the work, then the effect will be excellent. Ready-made rings or tape are used for the product.
Photo gallery "Modernization of rear lights"
In the photo below you can find out how to upgrade the lights.
1. Pull out the board. 2. Install reflectors. 3. Change the connection connector.
Video “Refinement of rear lights”
You can learn more about modifying the rear lights on the VAZ 2109 from the author of the video, Dmitry Sergeevich.
Was this article helpful?This article was helpfulPlease share the information with your friends
avtozam.com
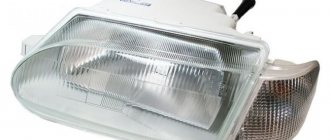
How to replace the lamp in the main headlight on a VAZ 2108-VAZ 21099?
Removal: 1) At the very beginning of the operation, you will need to remove the “-” terminal from the battery, because as a rule, if the work is done with wires, then it is necessary to de-energize the battery, since if something gets on the block of wires that you disconnect from the headlight water, then because of this, an overvoltage may occur due to which your wiring may burn out or melt. (For information on how to remove the terminal, see the article entitled: “Replacing the battery on a VAZ”, point 1)
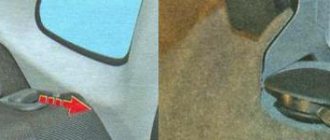
2) Then, when the battery is de-energized, find the same cap that is indicated by the red arrow in the photo above and then grab it with your hand and turn it counterclockwise about 90 degrees and thereby completely remove it from the car body.
3) After which you will see in front of you a block of wires and the lamp itself to which this block is connected, so you will need to grab this same block with your hand and completely disconnect it from the lamp so that it does not interfere with replacement.
4) And to complete the operation, disconnect the wire fastener that holds the lamp as shown in the photo below and then, holding the lamp terminals with your hand (the terminals are indicated by arrows), carefully pull it out of the hole in which it is located.
Note! Before you start removing the lamp, be sure to pay attention to how it is installed, and install the new lamp in the same way!
Installation: The new lamp is installed on the car in the reverse order of removal.
Note! Before installing the lamp, remember once and for all, in no case should you take the light bulb by the glass bulb with your hands (the glass bulb is indicated by an arrow), otherwise, after touching this bulb, greasy marks will remain on this bulb, which consequently lead to rapid wear of the lamp, therefore If you put your hand on this flask, then look for a clean rag (Must be clean and you can also moisten it a little with alcohol) and use it to wipe the entire glass flask from your fingers and dirt!
It will be useful: Top 15 liquids for gur (psf, atf, dextron). which ones are better
Additional video: You can see the entire process of replacing a light bulb in more detail and clearly in the video below:
Remaking the rear lights on a VAZ 2108/2109
Flashlight tuning process:
Step one. Installing LEDs and painting lights
First, you need to glue the LED strip to the outer part of the lantern. To do this, you first need to mark the flashlight and determine how the diodes will be located on it. Next, the LED strip must be fixed with epoxy resin. Otherwise, the tape will lag behind, since the diodes get quite hot during operation.
After this, you need to cut out squares from paper and stick them on each LED; this is necessary for protection so that the diode is not painted. Well, after that the flashlight is painted matte black directly on top of the LEDs. After the paint has dried, the papers can be removed and the diodes will be exposed.
Step three. Connecting diodes
To connect LED strips, you need to make holes for the wires in your original flashlight. Next, the wires are simply soldered to the contacts to which standard light bulbs are connected. The brake light and marker must be connected via diodes; diodes from rectifier bridges are suitable for this, since they are powerful enough for these purposes. Regular diodes can burn out. When you press the brake, not only the brake lights come on, but also the rear lights.
It will be useful: Test Renault Grand Scenic 3
Well, accordingly, you need to remember to connect the right and left turns.
That's all, at this point the tuning can be considered complete. You can see what happened in the video.