The air conditioner in its design has filters and heat exchangers that create resistance to flow movement. They retain dust, dirt, allergens and microorganisms. Most of the harmful components settle on the filters and can be spread throughout the room.
Depending on the number and type of filter elements, allergens, house dust particles, microbes and viruses settle on them. It is not necessary to call specialists in all cases, because there is a lot of information in different sources on how to clean an air conditioner yourself.
Consequences of late maintenance
As already mentioned, when an air conditioner is used for its intended purpose, particulate matter contained in the air, microorganisms and allergens accumulate in it. This leads to improper operation of the device, and this can also deteriorate the well-being of people in the room.
Untimely maintenance is fraught with respiratory infections and colds, the appearance of an unpleasant odor that is difficult to get rid of, breakdowns and failures of system components. The operation of the device deteriorates, its performance drops, and it ceases to perform its assigned functions. All this can lead to a complete system stop. Repairing an air conditioner after failure due to improper and untimely maintenance is much more expensive than the cost of cleaning.
Causes of unpleasant odor
The stench that appears when the air conditioning system is turned on is the result of dust, bacteria and mold entering the evaporator of the car's air conditioner along with the air. After it is turned off (usually when the car is stopped), the temperature of the air inside the evaporator and the freon in the tubes is leveled, dust and dirt adhere to the surface of the radiator, and in conditions of high humidity and comfortable temperature conditions, ideal conditions are created for the rapid decomposition of organic residues contained in dust. And they, in turn, are a breeding ground for microbes.
The products of rotting organic matter, together with the waste products of microflora, lead to the appearance of unpleasant odors. When the air conditioning is turned off, the stench does not spread beyond the evaporator, but as soon as you start the engine, stagnant air rushes into the cabin through the air duct system. The appearance of odors just indicates that it is time to clean the car air conditioner evaporator.
Best time for service
It is better to avoid contamination, and if this happens, you should definitely think about how to clean the air conditioner. The need for maintenance is determined by the following phenomena:
- the system cannot maintain the air temperature set by the user (sometimes this can be caused by incorrect choice of power or unexpectedly high outside temperature);
- the air flow even at maximum fan speed is significantly less than usual;
- unpleasant odor;
- reducing the amount of condensate flowing from the drainage hose;
- extraneous sounds during system operation;
- heat exchanger freezing;
- water leaks from the indoor unit.
If any of the above symptoms appear, you should think about how to clean your air conditioner. Even if the operation of the device does not raise any questions, there is scheduled maintenance that helps prevent the parameters from deteriorating.
Service procedure
There are clearly defined work rules and recommended maintenance schedules by equipment manufacturers. They may be indicated in the operating instructions or on the manufacturer's website. These documents will help you understand how to clean your air conditioner at home.
Service of devices used for commercial purposes, as well as industrial and semi-industrial systems, is best left to specialists.
Procedure for servicing a household split system:
- The device must be de-energized. If the power does not flow through the plug, but directly from the electrical panel, then it is necessary to turn off the circuit breaker.
- Open the cover on the front panel - this can be done using special protrusions on both sides of the case.
- You need to get the mesh filter and all additional filters, if any.
- Carefully remove the horizontal blinds from their mounting points.
- The next step is disassembling the case. To do this, you need to unscrew the screws located at the bottom of the case under the protective caps and near the display, then remove the front cover.
- Clean and reinstall all components.
Cleaning and replacing the filter
If a simple user of a split system asks how to clean the filter in an air conditioner, in most cases you will hear the answer: “Pull it out and wash it.” This is partly true. If the contamination is severe, then first of all you need to clean the filter from adhering dirt with a dry brush, then rinse thoroughly in warm soapy water or using any detergent. After complete drying, it is treated with a disinfectant solution.
Some types of filters need to be replaced with new ones. These may be additional cleaning elements with a deodorizing and anti-allergenic effect. They are not suitable for maintenance, and you should not think about how to clean the air conditioner yourself. The device must be provided with such filters in advance.
Cleaning the air conditioner evaporator
The evaporator is located in a plastic housing of the climate unit in the passenger compartment under the car panel. During vehicle operation, dangerous microorganisms (fungus spores, mold, etc.) can accumulate in the air conditioner evaporator, which can lead to human respiratory tract disease. If the evaporator is heavily contaminated, an unpleasant odor is felt in the car interior when the air conditioner is turned on. It is recommended to clean the evaporator once a year
.
To clean the evaporator
Can:
- use special preparations for cleaning car air conditioners (cleaning the evaporator through the drain hole or through the interior, see the instructions on the can).
- contact a specialized service, where they will treat the evaporator with special chemicals. If the evaporator is heavily soiled, replace it with a new one.
Video example of disinfection through the interior (Lada Vesta):
To extend the life of the evaporator,
dry it regularly. To do this, 3-5 minutes before the end of the trip, turn off the air conditioning and leave only the fan running. This time is enough for the surface of the evaporator to dry. A similar procedure is included in the home air conditioning program. Also, do not forget to regularly clean the drain pipe (located under the bottom of the car).
How to clean an air conditioner radiator and fan
The next important element is the heat exchanger. When it becomes clogged, the power of the system decreases and the efficiency of its operation decreases. After removing the filter and the front of the housing, you can begin cleaning the radiator. To do this you need to use detergents and brushes. A steam generator would also be useful. The control unit must be covered with film.
A degreasing solution is sprayed onto the surface of the heat exchanger, which does not react with copper and aluminum. After 15-20 minutes, the heat exchanger must be rinsed with clean water and cleaned with a brush. If necessary, repeat the procedure several times. The steam generator greatly simplifies cleaning work.
Let us explain the issues related to how to clean the air conditioner drain. First of all, you need to rinse the condensate tray. If necessary, the drainage pipe is cleaned both from the outside and inside. The radial fan is cleaned using the same methods as the heat exchanger - using a brush, washing liquid and a steam generator.
How to remove the air conditioner radiator yourself?
Sometimes it happens that it is urgently necessary to dismantle the air conditioner or its individual parts, but there is no time to wait for the technician or for some reason it is impossible to invite him. In this case, you have to act independently. However, if you do not have experience in such a matter as disassembling an air conditioner, then everything can end very badly. Therefore, we invite you to read our publication, which will discuss in detail the process of dismantling the air conditioner radiator.
Why remove the air conditioner radiator?
It is worth mentioning right away that it will not be possible to remove the radiator from a unit that is already installed. To do this, you will have to completely dismantle the air conditioner and disconnect the freon pipes. And in this case, there will be a need to pump the refrigerant into the indoor unit. Such operations can only be entrusted to a master. Now we list the main situations in which it may be necessary to dismantle the radiator:
•For cleaning the air conditioner
True, this is only feasible if, after cleaning, the air conditioner is to be installed in a new location. By the way, such cleaning will be the most effective, since it is difficult to get to the radiator of a unit mounted on the wall.
•If freon evaporates through the radiator
In this case, the radiator requires soldering, and the specific location of the refrigerant leak may not always be accessible on the installed air conditioner.
Removing the air conditioner radiator with your own hands: a guide
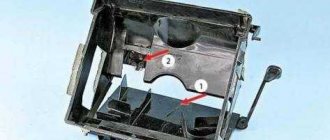
1.First you need to get rid of the service housing that protects the unit. To do this, you need to carefully unscrew all the available fasteners. If you can, remove the electronics, but you need to do this with extreme caution so as not to damage the display and sensor wires;
2. Next, you need to free the left side of the air conditioner evaporator from the fixing screws or self-tapping screws. It's not that hard to do;
3.Next we work with the right side of the equipment, unscrewing all the retaining bolts and snapping off the clips in the same way. It may be necessary to disconnect the ionizer (if equipped), other sensors and electrical wires from the radiator;
4. At the final stage of removing the radiator, you may be blocked by the control unit. In this case, it also needs to be dismantled.
That's it, problem solved. Now you can clean the air conditioner before installing it in a new location, as well as repair or replace the radiator. We hope that our publication helped you find the answer to the question of how to remove the air conditioner radiator yourself. If you have any more questions, feel free to ask them on our forum.
System assembly
When all surfaces are cleaned and dried, it is necessary to assemble the split system. This is done in the following order:
- the drainage bath returns under the radiator on the stops - you need to make sure that there is no gap left between the heat exchanger and the pan;
- the front cover is installed in place, the mounting screws are screwed in;
- carefully inserted into the holes of the blinds in the direction of air flow - you need to check that they are in the right position;
- power is supplied, the system is switched on to cooling mode, and the heat exchanger is treated with an antibacterial solution;
- The filter is installed in place and the lid is closed.
We hope that these simple tips on how to clean your air conditioner at home will help you do it right. It is important to follow technology and safety measures.
External unit service
Those users who are thinking about how to clean their home air conditioner believe that only the indoor unit needs it. This is not so - the heat exchanger of the outdoor unit also becomes clogged. To clean it, you must provide access to the device, turn off the power and disassemble it.
The heat exchanger is cleaned with a dry brush from street dust, poplar fluff, pollen and debris. Next, you need to wash it with water and a cleaning solution. Particular care must be taken to ensure that water does not enter the compartment with electrical communications. The washed and dried unit is assembled and its operation is checked. We strongly recommend inviting specialists for these operations.
How to rinse and clean a radiator?
The normal functioning of the car's cooling system is very important for its normal operation, because the result of untimely diagnosis or replacement of the necessary elements can result in serious problems in the operation of the engine.
Therefore, for normal operation of the cooling system, all you need is proper care and regular maintenance.
The radiator, as its main component, which absorbs the main flow of mud and dust, especially needs timely washing and cleaning. Sand, dirt, dust, rust and scale, the corpses of careless insects - all this accumulates in large quantities on the radiator, located directly in front of the car engine.
If you realize that your car’s cooling system is malfunctioning and the radiator is clogged, then there are two options for solving this problem:
- spend money and buy a new radiator,
— rinse and clean the existing radiator yourself or get this work done by a specialist.
How to clean a car radiator yourself?
Tidying up the engine cooling system yourself is not that difficult. The main thing before starting cleaning is to follow all safety rules, namely: be sure to let the engine cool, firmly secure the hood, and wear waterproof gloves.
To check the level of contamination of the radiator, you need to drain all the antifreeze from it (if the liquid is clean, then the radiator does not need to be flushed yet - there is no scale or rust) and pour clean water (preferably distilled) into the cooling system.
Then you need to start the car and let it run for 15-20 minutes, and then drain the water. This operation must be repeated several times until clean water comes out of the radiator drain taps. To make flushing more effective, add a radiator cleaning agent to the water (can be replaced with caustic soda or anti-scale agent). To do this, you won’t need a lot of special radiator flushing agent—just a few grams will be enough. Try not to overuse the amount of product, and follow the instructions on the packaging of the cleaning product - if the dosage is too high, you can damage the cooling system.
After flushing the radiator is completed, you need to drain the water with the cleaning agent and rinse the radiator with clean water at least 5 times. Failure to properly remove radiator cleaner residue can contribute to corrosion in the radiator. In order to prevent scale formation, various additives are added to antifreeze, the main component of which is ethylene glycol, which, due to their anti-corrosion and lubricating properties, prevent the formation of rust and various deposits in the radiator.
Very often, overheating of a car engine can be caused by a clogged external radiator (for example, dust, leaves, sand).
To solve this problem, the radiator is usually purged. For this radiator cleaning process, you can remove it and wash it on the floor using standard mini-washers or a jet of water under pressure. Try not to overdo it with pressure, because this can damage the radiator honeycombs. When flushing the radiator, it is undesirable to use chemical liquids based on aggressive acidic components. This can cause significant damage to the entire cooling system, radiator seals and hoses.
The last step in cleaning and flushing the radiator is to fill it with new coolant and pump out any excess air that may have formed when it was filled. To remove air pockets, open the radiator cap and start the engine for a few minutes. After the cooling system starts operating, the air pockets will come out on their own; all you have to do is add a little antifreeze into the resulting free space and close the lid.
Recharging with refrigerant
In some cases, it may be necessary to add the missing amount of freon to the system. This may be indicated by poor cooling performance even after cleaning. In order to accurately determine the need for refueling, you need to use instruments to check the operating parameters of the refrigeration circuit:
- system pressure;
- temperature of heat exchangers and compressor;
- absence or presence of compressor oil leaks at the service ports.
It is impossible to assess the need for this procedure without special instruments, and under no circumstances should you independently draw a conclusion about a freon leak. Sometimes a complete refrigerant change may be required.
Guides-Auto.ru
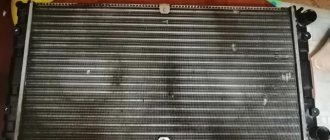
Today we will tell you how to replace the radiator of a Hyundai Solaris air conditioner at home, as quickly and cheaply as possible.
Luzar radiator was chosen for replacement
art.:
LRAC 08L4
- bought for 3990 rub.
In various car services, such a service costs from 5,000 rubles, while the radiator replacement itself lasts no more than 30 minutes (provided you know what to do).
Procedure for replacing the Hyundai Solaris air conditioner radiator:
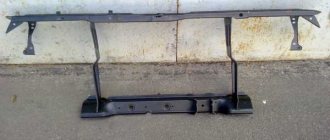
1. Remove the bumper.
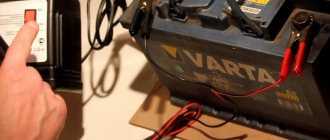
If you have not done this, we recommend reading how to remove the front bumper of a Hyundai Solaris . 2. Remove the negative terminal of the battery. It will be useful to know how to protect battery terminals from dirt .
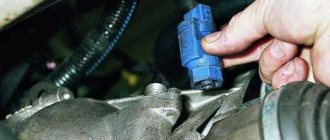
3. Next you need to reduce the pressure in the system. It is best to do this at a technical station. maintenance, but you can also do it manually: remove the two nipples, as shown in the figure below, and use a screwdriver to release the pressure, as on wheels. 4. Unscrew the 4 self-tapping screws with a head set at “8” and remove the top plastic cover 5. Now you need to use a head at “10” to remove the upper fasteners of the radiator and the signal so as not to interfere. 6. Now you need to remove the right plastic casing, it is held on by two 10-point bolts. 7. You need to unscrew the Hyundai Solaris air conditioner in such a way that the left casing cannot be removed because of them. We unscrew the two nuts with a 10mm socket and simply disconnect them. We move the hoses to the side and remove the left casing in the same way as we removed the right one. 8. The radiator can be removed. It is held on by latches at the top points, and is simply tucked into the corresponding plastic ears from below. We bend the latch a little and pull the radiator up. That's it, the Hyundai Solaris air conditioner radiator has been removed from the car. Some readers will have a question about whether the factory radiator is replaceable with the one we chose at the beginning of the article. Next, we will show you that this is just a myth and it is possible to install the selected Hyundai Solaris air conditioner radiator instead of the factory one.
So, a few words and comparisons:
The radiator comes with plugs in the holes, but without studs for securing the tubes. Therefore, you will have to borrow them from an old air conditioner radiator. They are twisted with a simple Phillips screwdriver from the end of the stud. They can also stick (or sour) and will not yield to a screwdriver, so you can resort to using pliers.
The fasteners are all the same
It is recommended to purchase new O-rings for the tubes. If there is no store at hand, and there are not a single rubber ring in the bins, then the old ones can be installed again, having first lubricated them with a little motor oil or a similar substance before installation.
If you decide to change them, here are their article numbers: Code for the elastic band for the upper tube: 9769034630
Code for the rubber band on the lower tube:
9769034610
Well, then we put everything in place and assemble it in reverse order.
Now all that’s left is to go and refill the system (about 2000 rubles) and the air conditioner is back to normal! It is worth noting that a working air conditioner slightly increases the gasoline consumption of Hyundai Solaris .
How to clean the air conditioner in a car
The specifics of servicing a car device are noticeably different from those for a household device. Due to the special operating conditions of this type of equipment, cleaning is carried out according to a different principle. In a car, the air conditioner is subjected to heavy vibration load, which leads to frequent leaks even in properly installed systems. To find and eliminate them, special solutions are used that are visible under ultraviolet light.
To clean, you need to perform a number of steps:
- purchase liquid for cleaning car air conditioners;
- start the car engine, open all windows and turn on the air conditioning system at full power;
- spray liquid into the external air intakes of the climate system, turn it off and wait a while;
- switch the system to recirculation and repeat the procedure for the internal grilles.
Refilling is carried out using a special rubber hose, which must be connected to the port of the refrigeration circuit. Then you should supply freon of the required composition from the cylinder. If you lack the skills and components, it is better to do this at a car service center.
How to clean the outside of a car's air conditioner radiator?
Nowadays, air conditioning is an indispensable human assistant, especially in the summer. A car air conditioner, regardless of type, performs one task: it cools and cleans the air in the cabin. Therefore, as soon as the cooling system begins to function poorly or an unpleasant odor appears inside the car, we immediately ask ourselves the question: how to clean the outside of the car air conditioner radiator?
Why do you need to clean your air conditioner?
The good condition of the radiator is very significant and important, since it is this part that is responsible for ensuring heat exchange between the coolant and the environment.
Radiator operating principle:
- Gaseous freon is converted into liquid, and heat is released.
- The refrigerant vapor, heated in the compressor, rises to the upper part of the radiator, passing through the tubes, giving off its heat to them.
Important! Thus, heat exchange occurs, as a result of which the gaseous freon cools and forms droplets. At the top of the condenser there is steam, and at the bottom there is liquid, which enters the evaporator.
Causes of radiator failure
If this entire system does not work fully, then it is quite possible that the car’s air conditioning radiator needs to be repaired. The cause of the problem may be minor mechanical damage resulting from an accident. Microcracks can also contribute to this. They mainly arise as a result of corrosion and the destructive effects of various reagents, because heat exchangers are mainly made of aluminum.
Important! To remove such damage, weld the depressurized areas using argon welding, since simply cleaning the air conditioner radiator does not make sense. For more serious damage as a result of the same corrosion, completely replace the radiator with a new one.
Dust, dirt, and debris collected in the radiator can also lead to disruption of heat exchange. Therefore, flushing the air conditioner radiator is simply necessary, because any breakdown of this element can lead to more serious malfunctions in the entire climate system.
How to clean an air conditioner radiator?
To clean the air conditioning radiator in a car of any brand, first of all, care is required, since it is quite fragile. Therefore, stock up on time and patience so that haste does not lead to irreparable consequences.
To get to the radiator, remove the front grille of the car. It is necessary to clean the element with minimal water pressure, since the structure is quite fragile and with higher pressure the ribs of the honeycomb can be bent. Cleaning the radiator consists of several operations:
- Elimination of debris from internal cavities.
- Cleaning system hoses and tubes.
Important! If a stream of water helps us from the outside, then for other areas we need a special device: a washing kit. You can buy such a kit, and the instructions for it will help you master the operation.
Flushing the radiator from the outside:
- Karcher. This method is based on water washing technology. To safely clean a radiator with a Karcher, use a “vario” as an attachment, not a “mill”. To prevent the radiator honeycombs from bending, use low speeds, wash not point-blank, but at a distance of 30-50 cm. The angle should be right or close to it.
- Compressed air. This method is similar to the previous one, only air is used instead of water.
- Without specialized equipment. Sweep some of the dirt off the radiator with a nylon brush and wash its fins with soapy water.
- Using cleaning products. Currently, you can find a large number of cleaning products on the market to combat dirt. These can be aerosols or an ordinary radiator cleaning spray. Apply the cleaner to the radiator, wait a while (specified in the instructions) and wash off the dirt with an ordinary watering hose.
Adviсe:
- You can clean the outside of your car's air conditioner radiator using a toothbrush, as well as a brush for painting radiators (with a long handle and slightly bent at the end). With such a brush it will be much more convenient for you to reach distant and hard-to-reach corners.
- First clean the radiator dry, since it is better to remove clouds of dust before they get wet, and then blow the element with compressed air or rinse with water if desired.
Important! If the air conditioner not only works poorly, but also a specific unpleasant odor appears in the cabin, then it is necessary to clean the air conditioner evaporator.
Cleaning the air conditioner evaporator using a kit
The surface of the evaporator is always wet, which means that if the element is faulty, the air entering the cabin will be damp and unpleasant. To fix the problem, use car air conditioning cleaning kits.
Important! This product will quickly eliminate unpleasant odors in the ventilation ducts and air ducts of the car within about 10 minutes. It is easy to use; there is no need to dismantle the cabin filter.
Instructions for using the kit:
- Before using the product, the surface of the evaporator must be dry: open all car windows.
- Place a receiving basin under the drain hole to drain the waste.
- Dry the air conditioner evaporator and turn on the interior ventilation mode.
- Start the engine.
- Set the maximum heater temperature.
- Direct the air distributor towards your feet.
- Leave the ventilation system running for 10-15 minutes.
- Turn off the engine.
- Use the kit according to the instructions.
- After cleaning the evaporator, turn on the heater at full power to eliminate evaporator condensation.
Important! While spraying, keep the car windows and doors closed.
Proper handling of your air conditioner will extend its life. Good luck, car enthusiasts, have a comfortable ride with clean and pleasant air. Bon Voyage!
serviceyard.net
Security measures
All work on installation and maintenance of split systems must be carried out in strict accordance with the rules and regulations for handling electrical appliances. Do not clean the air conditioner while it is connected to power. After servicing, you must wait until all surfaces and parts are completely dry before plugging it into the outlet. Strict adherence to the recommendations of equipment manufacturers and generally accepted safety standards will help you figure out on your own how to clean your air conditioner with maximum efficiency.