How to change the mirror element on the rear view mirror of a VAZ-2110
Some sources describing the replacement of the mirror element of the side rear view mirror on a VAZ-2110 car claim that this procedure is quite difficult, and there is a possibility of damage when replacing it.
The opposite could be proven by the owner of a dozen, who independently decided to change the broken spare part. All this is nonsense - everything changes in 3 minutes! I froze for half an hour because I was in no hurry, waited for the garage to warm up and overcame my childish interest in dismantling vehicles))) Therefore, I removed the mirror completely... At the same time, I glued the triangle under the mirror from the inside with a piece of Shumka - now the wind does not whistle in the area of the mirror)))
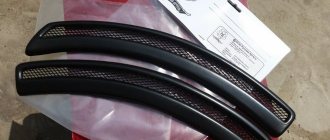
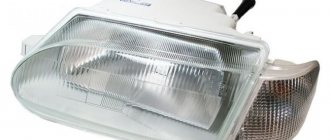
Photo 1. On the left is a burst element, on the right is a new one for 35 UAH in the nearest auto store
Photo 2. From the inside, unscrew the knob on the mirror adjustment lever...
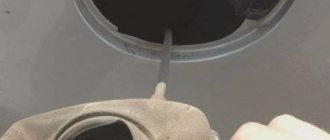
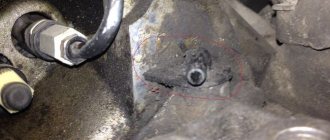
Photo 3. From the inside we see this picture...
Photo 4. The factory even took care - they stuck on a piece of Shumka!
Photo 5. Well, here’s the procedure itself...
Photo 6. The same white regulator plate...
Photo 2 - (one bolt under the plug), then remove the plastic casing (in theory it is attached to three “pistons”, but after removing the lever, it fell off immediately for me!) and unscrew the three bolts directly securing the mirror.
Photo 3 - glue the Shumka, tuck it under the side window seal (the holes can be lightly pierced with a screwdriver - the Shumka does not interfere with installation)">
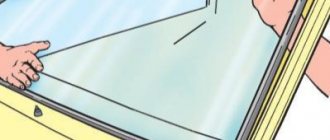
Photo 5 - We were intimidated by the complexity, but everything is simple to the point of pain: press all the way with your finger on point “1”, then put your finger under point “3”, pull slightly towards yourself, the mirror element easily snaps off... Don’t pull too hard - it is still attached to the white mirror adjuster plate - under arrow “2”. And that’s it... Everything was removed without damage or cut hands...
Photo 6 - Remove the mirror element in the direction the arrow is pointing... Take a new one, put it on the plate (you can’t go wrong with the position - everything is logical there), then carefully place it in the middle and lightly press with your fist (or something else with an area larger than 5x5 cm) until it clicks...
Then we assemble everything and screw it in the reverse order... Don’t forget that the three mirror mounting bolts need to be tightened very well - the Shumka is a little tight to compress... And if you don’t hold it, the mirror itself will vibrate on the bumps and will not be able to withstand even the weakest vandal attack! And don’t blame me for the quality - I don’t always carry my digital camera with me...))) Good luck to you and smooth roads!
Reassembly
I will say right away that the assembly is carried out simply in the reverse order of the previously carried out dismantling work. Therefore, I see no point in talking about this separately.
With mirrors on special mounting brackets, everything is also extremely simple. All that remains is to tighten the fasteners and fix the mirror on the ceiling or side of the car.
But what’s really more difficult is gluing a car mirror. To begin, choose the appropriate composition. Household superglue or double-sided adhesive tape will not work. Tested by many car owners. It's better to ask for the appropriate adhesive at an auto parts store. If found, for gluing you need:
- choose a warm and sunny day without high humidity;
- create a temperature in the garage of 25-27 degrees;
- remove all dirt and traces of old glue from the body;
- walk a little along the joint with sandpaper;
- sand the gluing area on the mirror;
- degrease all surfaces;
- Apply the required thin layer of glue to the holder;
- spray the purchased activator on the fastening area;
- attach the glass to the surface;
- press the mirror to the glass;
- keep as long as the glue manufacturer said;
- remove the remnants of the used activator and glue from your mirror and also the holder itself;
- put the entire structure in its rightful place;
- use as intended.
(No ratings yet)
Did you like the article?
Subscribe to updates and receive articles by email!
We guarantee: no spam, only new articles once a week!
Almost any modern car has basic comfort features that allow the driver to easily operate the vehicle. In the event of a malfunction, including failure of the electric drive of the side mirrors, it is, of course, better to show the car under warranty as quickly as possible to specialists. If the car has already expired its warranty period, you can try to cope with the problem yourself.
Original article taken from vento-club.com
The side mirrors are adjusted in different planes by two small DC electric motors using a worm wheel and set screws. Typically, electric drive control buttons are located on the driver's doors of cars. But, depending on the car model, there may be other variations.
Failures of the electric drive of side mirrors can be electrical or mechanical.
How to disassemble the rear view mirror of a VAZ 2110
It often happens that the rear view mirror mount becomes loose and the mirror holds well; in other words, she disappears (someone dropped her off at your place). It happens that the side mirror is broken or cracked - you need to change it. The mirror angle adjustment drive needs to be repaired.
Of course, go to the dealership and the mirror will be attached in place. If there is no service nearby, you will have to act on your own. The rear view mirror is important on the road: the driver can observe the situation on the road in the field of view behind the rear fenders and rear bumper. The mirrors of different brands of cars are different: interior mirror and side mirrors, regular, folding, electric, etc. When removing and disassembling any mirror, you must be very careful not to damage the mirror itself.
In order to disassemble the mirror, you need the following tool:
3.2 flathead screwdrivers (they clamp the latches with them).
A narrow, long screwdriver and a piece of soft cloth (to wrap the screwdriver).
10 star or regular screwdriver with variable bits.
How to remove the electric side mirror (Included):
1. Remove the triangular trim from the front door.
3.5. Disconnect the mirror wiring connector. Do not damage the heating mirror wiring!
3. While holding the mirror, unscrew the 3 mounting screws.
4. Remove the mirror assembly.
5. The completed mirrors are made in reverse order.
Do it yourself, repair Lada Kalina mirrors, do it yourself. Removing the mirror element
Removing the rear view mirror using a mechanical drive:
1. Remove the mirror retaining bracket.
3. We remove the mirror.
4. Installation is in the reverse order.
Disassembly procedure
Once the structure has been removed, disassembly can begin. If it is required, of course. Perhaps you have found a new mirror whose price suits you completely. Then you can skip this point.
If it is necessary to disassemble an element, we start from whether it is internal or external.
The interior mirror is disassembled as follows:
- there is a place where the glass and the body are connected;
- spin is inserted;
- pressed with little force;
- a gap appears;
- use a mediator to pass along the entire length of the gap;
- the body is divided into 2 parts;
- the mirror is removed;
- everything else is located underneath it;
- We carry out the necessary work.
You may also need to disassemble the car side mirror. It doesn't matter whether it's left or right.
Dismantling and disassembling the rear view mirror of the VAZ-2110
The need to remove the side rear view mirrors of a VAZ 2110 may arise for various reasons, for example, for painting, installing heating, or completely replacing them. Disassembly is therefore necessary to carry out repairs or any other modifications.
How to remove the rear view mirrors of a VAZ 2110 - detailed instructions
There are several ways to remove the mirror element from the housing:
- Pressing on the central part of the mirror from the inside, unclip it using a curved screwdriver. In this case, you need to be as careful as possible so as not to accidentally break the mirror element itself.
- The second method is more risky, but no less effective. To get the mirror, you need to not forcefully, but sharply hit the mirror body on some soft elastic surface.
Removing the mirror housing from the triangular mount is quite simple; you just need to unhook the spring, unscrew the adjusting rod and remove its pin.
How to glue a car mirror to the windshield
First we need to decide on the glue that we are going to use.
What glue should I use?
The main rule: the glue holding the interior mirror to the windshield must be two-component. Yes, there are many varieties of all-purpose glue. But in this case, universal glue will not work. The fact is that two-component glue perfectly withstands sudden temperature changes, high humidity, and most importantly, vibration. Conclusion: the mirror element should not be glued with universal glue.
How to disassemble the rear view mirror of a VAZ 2110
How to disassemble a car mirror
There are many reasons to analyze a car's side mirror. This may be the desire to paint it or tidy it up after the woodcutter picked it up. Many car drivers are interested in how to disassemble a car mirror and how to remove it quickly and easily. Due to inept movements, a car mirror can become completely unusable, and then a new one will be needed, and as a result the mirror will be installed in a car service.
But there are many brands and even more models of cars and mirrors for them. There are also many types of mirrors. electrical, folding, rotating elements, etc. The most important thing is how to remove it to avoid damage. Below are general steps to analyze your camera's side mirror.
Removing the mirror
Naturally, it will be more convenient to disassemble a mirror removed from the car, so it should be removed. What will it take?
Removing a power mirror. First, remove the mirror lock, remove the three screws that secure the mirror to the door frame, and then remove the mirror.
Removing the electric mirror. First thing to do. disconnect the negative terminal from the battery. Next, unplug the power cord, remove the three screws that secure the mirror to the door, and remove them.
Removing mirrors
There are several ways to make a car mirror.
Disassembling the entire mirror element of a VAZ 2110
replacing side mirrors on a VAZ 2110
, 2111.2112 and the like.
Replacing side mirrors on a VAZ 2110
Video review of replacing the mirror element with an external mirror, rear view
such cars
First way
Using a curved object or screwdriver, carefully rotate the mirror while pushing it from the inside. Trying to pull the mirror away from the edge may damage it. Some motorists use many objects to remove the mirror element. It could even be all kinds of kitchen spatulas. Some wrap the edge of the spatula with electrical tape to avoid damaging the surface of the mirror. Others use a single solid blade. correct the gap, and insert the other one more softly into the resulting groove.
Second way
To remove the mirror element, you need to hit the body with a soft object. it could be anything. To detach the mirror housing from the triangular mount, remove the spring, unscrew the adjusting rod and remove the pin. Assembly and installation of the mirror is usually done in the reverse order.
Detailed and universal method
In the car, press down on the plastic cover that covers the screws that secure the mirror. With the cover removed, remove the three screws holding the mirror in place and remove it. Then carefully remove the rubber pads.
If the rubber gaskets are damaged, it will be very difficult to buy new ones; they are rarely sold separately.
Now unscrew the two screws that secure the mirror adjustment joystick. Analysis of the joysticks themselves. The procedure is simple, you just need to carefully remember the position and color of the cable, as different colors are responsible for setting them. Then remove the three screws that are located in the bottom plastic corner. it is most susceptible to damage during vehicle operation. Then it should be removed. How to remove the mirror element has already been described above. After removing the mirror element, remove the four screws and remove the rest.
Apply silicone glue
The easiest way, of course. Ask a friend or take your car to a body shop if you need a mirror replaced or a paint job. But most owners are used to having their car repaired. This is a significant money saving.
Common device problems
Let's look at a few troubles that every car enthusiast may encounter.
Peeling off the mirror surface
Sometimes this kind of trouble happens even on new cars. The reasons can be very different.
- the manufacturer decided to save money and used a low-quality adhesive;
- during the work, the master did not allow the glue to set properly;
- the mirror came unstuck due to too sudden temperature changes (and this is the most common reason, especially in frosty winter).
In all these cases, the car owner will have to use two-component glue, as shown above.
Other Possible Causes of a Power Side View Mirror Not Working
It may well be that the motor itself with the worm gear, which controls the folding of the mirror (similar to those installed in Chinese children's toys), or the board responsible for changing the power supply when the load increases at the end of the stroke, has failed.
The mirror may buzz, but not fold, if the gear on the shaft with the worm is worn out. You can do this type of electric side mirror repair yourself.
The left and right mechanisms for folding and adjusting the mirrors are exactly the same. They differ only in setup and connection. After the mirror is assembled, but the color cover has not yet been installed, you need to check the correct control of the mirror: if, when adjusting the vertical position, the mirror is adjusted horizontally, you need square plugs.
This is what the control body of the folding mechanism of the left (top) and right (bottom) mirrors looks like. Saz can see the difference in the settings: the right mirror is assembled in the “disassembled” position, and the left one is “assembled”.
Before the mirror is removed from the car, it must be set to the “disassembled” position in order to be assembled in the same disassembled position (otherwise, it must be assembled in the “assembled” position).
Dismantling the folding left mirror mechanism.
Now it can be applied to the corresponding part of the body, with which the mirror is attached to the body pillar.
Having turned the mechanism to the “disassembled” position, we assemble it in the reverse order. It is impossible to make a mistake with the rotation angle, since the mechanism rotates at a certain angle. It just needs to be turned from one extreme position to the other.