Replacing the VAZ 2107 driveshaft coupling
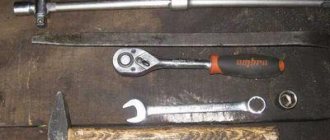
The coupling is replaced on an overpass, a lift or from an inspection pit. Tools you will need:
- two 13mm wrenches;
- two 19mm wrenches;
- head or key 27;
- set of heads;
- pliers;
- chisel;
- hammer;
- slotted screwdriver;
- awl;
- steel beard;
- round nose pliers with thin curved ends;
- vice with workbench;
- special puller for bearings (preferably);
- CV joint type grease.
To replace the coupling, you must perform the following steps:
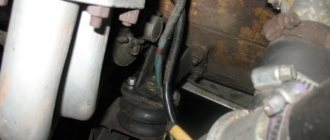
- Find the parking brake cable equalizer under the car. Use pliers to remove the front cable spring.
- Loosen the cable tension by unscrewing the adjusting and fixing nuts with two 13mm wrenches.
- Remove the equalizer and move the cable to the side.
- Using a hammer and chisel, make marks near the axle gearbox at the junction of the cardan and the main drive gear flange. Since the driveshaft is centered, it is extremely undesirable to disturb the position of its elements relative to each other during assembly. Therefore, before dismantling work, appropriate marks should be applied so that during the subsequent installation of the cardan, all parts will be placed exactly in their original position.
- Supporting the rear propeller shaft with your hand, use a 13mm wrench to unscrew the four flange connection nuts.
- Separate the flanges.
- Use a hammer and chisel to mark the centering flange and the front of the cardan.
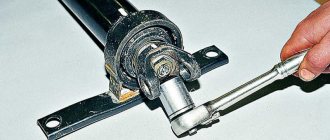
- Using a thin slotted screwdriver or an awl, bend the four fixing tabs on the sealing ring located near the coupling.
- Move the cage with the seal in the opposite direction from the coupling.
- Using a 13mm wrench, unscrew the nuts securing the safety bracket.
- Using a 13mm wrench, unscrew the nuts of the cross member to which the intermediate support with the suspension bearing is attached. Hold the cardan and remove the cross member.
- Move the cardan and remove its splined end from the elastic coupling.
- Remove the driveshaft.
- Using a 13mm wrench, unscrew the two nuts securing the gearbox cross member. The back of the box will move down along with the coupling.
- Using two 19mm wrenches, unscrew the three nuts on the bolts securing the elastic coupling.
- While rotating the gearbox shaft, using a hammer and a punch, carefully knock out the clutch mounting bolts one by one.
- Tighten the body of the old coupling with the clamp that comes with the new coupling, and remove it together with the centering flange. Instead of a clamp, you can use wide, thick tape.
- Loosen the clamp and disconnect the flange.
- Use a clamp to tighten the new coupling and install it on the flange.
- Insert bolts into the gearbox shaft flange.
- Install the coupling with flange onto the gearbox shaft.
- Tighten the nuts on the bolts securing the elastic coupling.
- Remove the clamp from the coupling.
- Install the cardan in accordance with the marks made earlier.
- Connect the front parking brake cable and adjust it.
Replacing an elastic coupling on a VAZ 2107:
- Using the 13th wrench, unscrew the nuts securing the gearbox cross member to the body. The box will settle a little;
- Using keys “19”, unscrew the nuts securing the elastic coupling bolts;
- We rotate the gearbox shaft, simultaneously knocking out the coupling bolts;
- We dismantle the coupling and flange. We disconnect the coupling and the flange by unscrewing the 3 nuts;
- We install a new coupling on the flange, without removing the tightening clamp from the new coupling;
- Insert the bolts into the gearbox flange;
- We install the coupling so that the flange pins fit into the grooves of the coupling.
The renovation is complete. We recommend watching a useful thematic video
VAZ 2107 is a rear-wheel drive car. The transmission of torque from the gearbox to the rear axle gearbox is carried out via a cardan shaft. The shaft itself is considered a fairly reliable unit and can serve for decades. However, some of its elements, such as the elastic coupling and the suspension bearing, require constant attention and periodic replacement.
How much do supports for the seven cost?
A consumable spare part, and not only VAZ 2107 ball joints, the price of which is of interest to us primarily, but also many other hardware for classics are extremely popular. This is due to both design features and the resource of the iron itself. We have provided a comparative table of ball joints for classic VAZ and for modern, that is, front-wheel drive models. As you can see, they take more classics, because they have a shorter resource, and it is more profitable to sell them, since the set of supports for the 2107 is 4 pieces, and for MacPherson front-wheel drive models there are only two. Hence the prices and the queue of manufacturers. Here's the infographic.
Be that as it may, the market is a market, and in the end it’s up to us to ride. Therefore, let's look at the VAZ 2107 ball joint not as a product, but as a necessary part of the front suspension.
Popular and useful repair instructions for VAZ 2107
Those who are seriously interested in the repair and maintenance of the VAZ 2107 should familiarize themselves with the popular instructions that owners of this vehicle model most often refer to. These include replacing the VAZ 2107 clutch, replacing the VAZ 2107 master brake cylinder, replacing the VAZ 2107 generator and other procedures necessary during active vehicle operation in harsh road conditions.
In addition to them, drivers will find it useful to replace the VAZ 2107 pump, which will allow the cooling system to return to its former performance and eliminate the possibility of engine overheating. For those involved in an accident, replacing the wing of a VAZ 2107 will be useful - a procedure that even a novice driver who is aware of the algorithm of actions can cope with.
There are also a number of materials that site users found most useful. Thus, car owners believe that they will need information on why the VAZ 2107 heater does not heat well, how to adjust the ignition and how to repair a 5-speed gearbox.
In addition to video instructions, on the pages of the section you can also find a repair manual for the VAZ 2107, consisting of a photo and a text description. Photos of the process will be no less informative, which means that such a manual will be the best option for the car owner in comparison with factory information material.
Replacement of VAZ 2107 cardan crosspieces
Faulty crosspieces cannot be repaired. Theoretically, the universal joint is considered a very reliable part with a service life of more than 500 thousand km. In reality, even the highest quality crosspiece requires replacement after 50–70 thousand km. The reason for this is bad roads, intensive use of the car, etc. To replace the VAZ 2107 CC you will need the following tools and materials.
- set of wrenches;
- hammer and spacer made of soft metal;
- the spacer is slightly smaller than the diameter of the crosspiece lugs;
- round nose pliers or pliers;
- bearing puller;
- sharp chisel;
- metal brush;
- solid oil
Dismantling the VAZ 2107 cardan
Before replacing the CC, it is necessary to dismantle the cardan drive. This is done as follows.
- If the car has been in use for quite a long time, the cardan mounting nuts are filled with WD-40 or kerosene. After that they can be easily unscrewed.
- Use a sharp chisel or other tool to place marks on the flanges of the cardan and axle. This is necessary to ensure mutual alignment during subsequent installation of the cardan.
- Using a 13-mm wrench or socket wrench (preferably curved so as not to damage the threads of the nuts), unscrew the cardan mounting nuts. If the bolts start to spin, you should fix them with a screwdriver.
- The suspension bearing mount is removed.
- The cardan is pulled out.
Removing the VAZ 2107 cardan cross
The cups and bearings can be removed from the driveshaft clamped in a vice using a special puller. However, this device is not very convenient and is used extremely rarely. Usually a standard set of tools is used. Dismantling the cross is carried out in the following order.
- Using round-nose pliers or pliers, remove the retaining rings from four sides of the cross.
- Cups with bearings are knocked out of the eyes. Usually one of the cups flies out on its own after removing the retaining rings. The remaining three cups are knocked out through the spacer.
Before installing new CCs, the lugs, fork and grooves for the retaining rings are cleaned of dirt and rust with a metal brush. The installation itself is carried out as follows.
- Any two cups facing each other are removed from the new crosses.
- The crosspiece is inserted into the eyes of the end of the cardan.
- Cups with bearings are generously lubricated with grease or G' Energy grease and installed in place.
- Using a hammer and a soft metal spacer, the cups are driven in until a groove appears for the retaining ring.
- The other two cups are removed, threaded into the eyes and reassembled.
- The bearings are driven in until the retaining rings are secured.
- The remaining retaining rings are driven in.
Installing the cardan
When installing a cardan with new crosspieces in place, you must:
- lubricate all connections with grease;
- make sure that the lubricant does not get sand or dirt;
- check the condition of the crosspiece seals and, if necessary, replace them;
- install parts in accordance with the marks made during dismantling;
- First insert the splined part into the flange, and then tighten the cardan bolts.
Video: replacing the VAZ 2107 universal joint
Thus, to replace the cardan cross, all you need is the car owner’s desire to do it himself and a standard set of mechanic’s tools. Carefully following the instructions of specialists will allow you to do the work efficiently and avoid possible mistakes.
Signs of malfunction of VAZ 2107 crosspieces
Malfunctions of crosspieces are usually associated with wear of the sealing collars and dirt getting inside the bearings, which, having abrasive properties, begins to destroy the metal. This manifests itself as follows.
- at a speed of about 90 km/h, characteristic impacts from below are felt;
- when the reverse gear is engaged, vibration appears;
- When the driveshaft swings from side to side, play is detected.
It is much easier to identify a faulty crosspiece on a removed cardan. If the bearings are damaged, the hinge will rotate poorly in one of the planes, and sounds resembling crunching or rustling will appear.
Clicking noise when starting
The first sign of a faulty universal joint is a loud clicking sound when turning on first gear at the start of movement. When such sounds, reminiscent of a clinking pan, appear, it is recommended to rotate the parts of the cardan in different directions with your hands, while holding the hinges. If large play is detected, the crosspieces must be replaced. It is noteworthy that sometimes clicks can appear only during a sharp start from a standstill, and when the movement begins smoothly, they may not appear.
Vibration
Often, if the crosspieces are faulty, vibration occurs when reversing. Sometimes it does not disappear even after replacing the crosspieces, but begins to appear at average speed. Moreover, the vibration may become even stronger than before replacing the CC. Such situations are a consequence of non-compliance with the alignment of the cardan elements during its assembly.
Sometimes vibration persists even after work has been done correctly. The reason for this is usually the use of low-quality products when replacing CC. Experts advise tapping the cups on all sides with a metal tube before installing new crosses. This will allow the stuck circlips to move and the vibration will go away.
Replacing the driveshaft crosspiece of a VAZ 2107
All repairs are carried out with your own hands quite simply; no pitfalls will be identified in the process. The first thing you need to do is get the rear of the car off the ground. Moreover, the larger your belly, the higher you need to raise it. Secondly, you will need some tool:
- A set of keys (in particular, for “12”, “13”, “14”).
- Screwdrivers.
- Hammer.
- Retaining ring remover.
- Wooden spacers.
That's all, now you climb under the car and unscrew everything you see. Namely:
- Suspension bearing with a key “13” from the body of a VAZ 2107.
- Four nuts from the flange, using wrenches “12” and “13”. Sometimes it is needed for “14”, it all depends on what spare parts were used during the previous repair.
Then the cardan falls to the ground and needs to be knocked out of the gearbox. To do this, you can use a hammer and a wooden spacer. Ideally, use a wooden mallet or a bronze hammer to avoid damaging the driveshaft.
Then arm yourself with a ring puller and pull them out one by one. What to do next? The instruction manual advises using a special puller, but practice shows that a few sharp blows with a mallet on the edge of the VAZ 2101-2107 driveshaft are enough for the glasses to fly out. Before installing a new cross, be sure to clean the seats to ensure there is no dust or dirt.
First put it on the flange, and then on the cardan - this is the most optimal sequence. And I would also like to note: when replacing the VAZ 2107 driveshaft crosspieces, there is no need to install the retaining rings that come with the kit. The fact is that they can be several microns wider, and this will lead to destruction of the mechanism. Therefore, it is better to leave the old rings.
The driveshaft is removed from a VAZ 2107 car if it is damaged, when the balancing is disturbed as a result of vibration during movement, as well as to perform other repairs, for example, to disassemble the universal joint or replace the elastic coupling.
Repair work to remove the cardan transmission must be carried out in a pit or overpass. To perform the work you will need a standard set of tools. The sequence of your actions should look like this:
- Having driven the car into the pit, engage neutral gear. Jack up the rear wheel so that it is suspended.
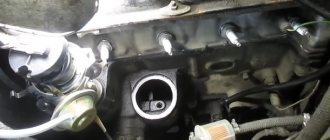
- If the seven is injection, then it is necessary to remove the heat shield located above the catalytic converter. Using a 13mm socket wrench, unscrew the four nuts securing it to the car body studs and remove it by pulling it towards you and up.
- Now you can start removing the driveshaft. Before removing the universal joint, it is necessary to apply marks using a file to the universal joint fork body and the rear axle gearbox flange. If you plan to replace the driveshaft with a new one, then the marks are not needed. We will need to take risks when installing it in place so as not to upset the balancing, since the driveshaft gradually becomes unbalanced during operation and if it is installed in a different position relative to its original place, then when driving at high speeds some vibration may appear in the lower part of the body car.
- Using a thirteen-size open-end wrench, unscrew the self-locking nuts of the bolts securing the cardan to the rear axle gearbox flange. Using a mounting bracket, we keep the cardan from rotating. After unscrewing the bolts, take them out and hang the rear part of the cardan on a wire to any rear suspension rod. The nuts must be replaced with new ones during installation.
- In the front part of the cardan, it is necessary to straighten the four tendrils of the oil seal race and move it inward along the shaft.
- Using a thirteen-size socket wrench, unscrew the two bolts securing the intermediate shaft support to the bracket and disengage the driveshaft from the elastic coupling and remove it from the car, pushing it towards the rear axle.
At this point, the repair work on removing the driveshaft of the VAZ 2107 is completed. Install in the reverse order of removal, aligning the marks on the hinge and the gearbox flange. Lubricate all spline joints.
Sources
- https://carnovato.ru/zamena-podvesnogo-podshipnika-kardannogo-vala-i-krestoviny-na-vaz-2101-2107-svoimi-rukami/
- https://vaz-remzona.ru/zamena-krestoviny-kardannogo-vala-vaz-2107/
- https://remont-vaz2106.ru/kardannyj-val-vaz-2107
Malfunctions of the VAZ 2107 driveline
You can determine that the VAZ 2107 driveshaft is faulty by the following signs:
- Knocking sound after engaging the clutch. The cause of the knocking may lie in a poorly tightened universal joint drive, worn splines, damaged elastic coupling, or failed crosspiece bearings.
- Grinding noise when the car is moving. This sound occurs when the cardan joint bearings (crosspieces) are heavily worn.
- Vibration of the cardan when driving. This phenomenon occurs when there is mechanical damage to the driveshaft or dirt adheres to the driveshaft, which disrupts its alignment. Vibrations also occur when there is significant wear on the gearbox driven shaft, outboard bearings, cardan crosspieces, drive gear flange of the rear axle gearbox, or loose fastening of the cardan drive.
- Knocking noise during sudden acceleration or engine braking. The reason for this lies in the wear of the cardan shaft crosspieces.
You can check the condition of the cardan drive by placing the machine on a lift or inspection hole. The transmission parts should not play when the cardan is “rocked” in different directions.
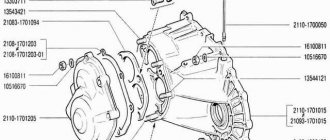
What are the main parts of the VAZ 2107 cardan transmission?
- Parts capable of changing the angle and length of the transmission are the coupling (5), as well as rigid hinges (9.7) and elastic (3). It is called a coupling. The role of the coupling is that it reduces the noise of the connection and angular torque is transmitted. Repair of the driveshaft is required if the coupling material is cracked and crumbled. Simply put, the clutch needs to be replaced.
- The cardan coupling consists of 6 rubber parts (30), with metal spacers (31) between them. These parts are tightly connected into a one-piece unit, so in case of failure, the most correct solution is to replace the coupling.
- The coupling is placed between the flanges (4,2). They are attached to it with 35 bolts.
- Intermediate support (6), which serves to reduce vibrations and various types of beating.
- The front shaft of the VAZ 2107 (5) is a pipe with splines installed by welding. There is a tip (40) at the front. One of the coupling flanges is located on it, and the rear splined end is located on the support bearing (6). The bearing itself is well insulated from dirt by seals. Repair of the driveshaft is necessary if the splines are worn out.
- The rubber pad (12) in which the bearing is located dampens vibration well. On it, the front shaft may move slightly.
- The intermediate cardan support is attached to the bracket (15).
- Important is the safety bracket (27), which prevents the shaft from falling out if the coupling fails. If this bracket was not there, then the cars would overturn at full speed, and such cases have happened before. In this case, repairing the driveshaft is impossible; replacement is required.
- The difference between the rear shaft (8) and the front “neighbor” is that it has a hinge fork at the ends.
- The hinge itself is an important element of the transmission; it consists of a pair of forks (23), one crosspiece (22) and, in a separate figure above, needle-shaped bearings (20) - there are 4 of them, rings (19) and oil seals (21). The bearings are pressed with a fairly large force of about 800 kg into the fork holes. They are non-separable; if they malfunction, they need to be replaced.
- The cross has the required gap, from 0.1 to 0.4 mm. Only within such limits is the crosspiece correctly centered. There are rings in five sizes and five different colors for proper alignment. Repair of the driveshaft most often consists of correcting these gaps and replacing the rings.
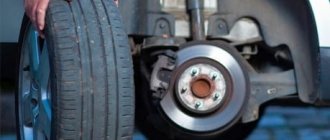
Front suspension design of the VAZ 2107
The time-tested double wishbone suspension appeared much earlier than the McPherson swing plug. The double wishbone is objectively better than the racks in terms of geometry and controllability, stability and endurance. But it’s not for nothing that we started with the market. MacPherson is much cheaper. It is three times cheaper to produce the most profitable double wishbone suspension. That's why they put it on the front of very inexpensive cars. At the rear, MacPherson can be found in a Mercedes, Cadillac, or BMW - this is the number one suspension for expensive sevens. But it's not that.
Structurally, the double wishbone suspension holds the car much better when turning, has better control and is more stable in terms of directional stability. This happens due to a larger number of attachment points for the moving part of the suspension, if you don’t go into details. And the VAZ 2107 is an excellent example of how a strong and unpretentious design lasted on the assembly line for almost 50 years without any problems. This scheme is still used today and will continue to be used for a long time. Although the weak point in it is the ball joint.
Repair of VAZ 2107 cardan
You can dismantle the VAZ 2107 driveshaft for repair or replacement without a ramp or lift. To do this you will need:
- open-end and socket wrenches 13;
- flat screwdriver;
- head 13 with a knob or ratchet;
- hammer;
- pliers.
To repair the cardan you will need a standard set of tools
Dismantling the cardan
To repair or replace the flexible coupling, the cardan will need to be removed from the vehicle. Its dismantling is carried out in the following order:
- The parking brake secures the rear wheels.
- Unscrew the four bolts securing the cardan to the rear gearbox.
- Unscrew the two nuts securing the outboard bearing to the body.
- With a gentle blow of a hammer, the shaft is knocked out of the splines. If the coupling is operational, there is no need to remove it.
- Marks are applied to the cardan and rear axle flange (notches with a hammer, screwdriver or chisel) so that their position does not change during subsequent assembly. Otherwise, noise and vibration may occur.
Replacing the cardan cross
If there is play in the hinges, the crosspiece is usually replaced with a new one. The fact is that worn needle bearings cannot be repaired. Dismantling the cross after removing the cardan is carried out as follows:
- Using a special puller or improvised tools, remove the retaining rings that hold the hinge cups in the grooves.
- By striking sharply on the crosspiece with a hammer, the glasses are removed. The glasses that came out of their seats as a result of the impacts are removed with pliers.
- The joint seats are cleaned of dirt and rust with fine sandpaper.
- The new crosspiece is installed in the reverse order.
Video: replacing the VAZ 2107 crosspiece
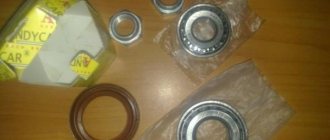
Replacing the outboard bearing
If the bearing or rubber suspension has exhausted its service life, replacement is carried out in the following order:
- The cardan is removed from the car and the forks in its central part are disconnected.
- Use a 27 wrench to loosen the central nut securing the bearing to the shaft.
- Use a puller to press out the fork, unscrew the nut and remove the fork itself.
- Unscrew the two bolts securing the bearing to the cross member. The cross member is removed.
- The intermediate support with a suspended bearing is mounted on spacers (for example, on a corner). The bearing is knocked down using the head.
- When replacing a bearing without a rubber part, remove the retaining ring with a suitable tool and, using a suitable head, knock out the bearing itself.
- Assembly is carried out in the reverse order, having previously lubricated the bearing.
Video: replacing the suspension bearing on a VAZ 2107
Cardan assembly
Assembly and installation of the driveshaft on the VAZ 2107 is carried out in the reverse order
In this case, you should pay attention to the following important points:
- When repairing an outboard bearing, the spline joint and the fork itself must be lubricated before installing the fork. Litol is best suited for this.
- The fork fastening nut should be tightened with a torque wrench with a torque of 79.4–98 Nm. After this, the nut must be secured with a metal attachment.
- After installing the seal ring and the seal itself, as well as the flange on the spline connection, the clamp should be fixed by bending the antennae with a screwdriver.
- The spline connection of the front shaft must be lubricated using a special syringe. For this it is recommended to use “Fiol-1” and “Shrus-4”. The crosspieces themselves are lubricated with the same syringe.
- After installing the hinges, use a feeler gauge to check the gap between the cup of each bearing and the groove for the retaining ring. The gap should be between 1.51 and 1.66 mm.
- After installing the retaining rings, hit the forks of the crosspieces several times with a hammer from different sides.
- The front flange and the rear of the universal joint must be attached to the flexible coupling and the rear gearbox, respectively.
During assembly, it is recommended to lubricate all bolted connections. This will make repair work much easier in the future.
Replacing the suspension bearing VAZ 2107
To replace the propeller shaft outboard bearing, you must:
- Disconnect the handbrake cable and remove the driveshaft in accordance with paragraphs. 1–13 instructions for replacing the flexible coupling.
- Using round-nose pliers, remove the retaining rings of the crosspiece needle bearings.
Video: replacing the suspension bearing on a VAZ 2107
Purpose and design of the VAZ 2107 driveshaft
The driveshaft is a mechanism that connects the gearbox to the rear axle gearbox and is designed to transmit torque. This type of transmission is most widespread on vehicles with rear-wheel drive and all-wheel drive.
Cardan device
The VAZ 2107 driveshaft consists of the following elements:
- one or more sections of thin-walled hollow pipe;
- splined sliding connection;
- fork;
- crosspiece;
- suspension bearing;
- fastening elements;
- rear movable flange.
The driveshaft of the VAZ 2107 has a fairly simple device
The cardan transmission can be single-shaft or double-shaft. The second option involves the use of an intermediate mechanism, to the back of which a shank with splines is attached to the outside, and a sliding sleeve is fixed to the front through a hinge. In single-shaft structures there is no intermediate section.
The front part of the cardan is attached to the gearbox through a movable coupling with a spline joint. To do this, there is a hole with internal splines at the end of the shaft. The cardan design involves longitudinal movement of these splines at the moment of rotation. The design also includes a suspension bearing attached to the body using a bracket. It is an additional attachment point for the cardan and is designed to limit the amplitude of its movement.
A fork is located between the middle and front element of the propeller shaft. Together with the crosspiece, it transmits torque when the cardan bends. The rear part of the shaft is attached to the rear axle gearbox through a flange. The shank engages with the main gear flange through external splines.
The cardan is unified for all classic VAZ models.
Cross device
The VAZ 2107 crosspiece is designed to align the axes of the cardan and transmit torque when its elements bend. The hinge provides connection for the forks attached to the ends of the mechanism. The main element of the crosspiece is needle bearings, thanks to which the cardan can move. These bearings are inserted into the fork holes and secured with retaining rings. When the joint wears out, the driveshaft begins to knock while driving. A worn crosspiece is always replaced with a new one.
Thanks to the crosspiece, it becomes possible to rotate the cardan at different angles
Types of cardan shafts
Cardan shafts are of the following types:
- with constant velocity joint (CV joint);
- with unequal velocity joint (classical design);
- with semi-cardan elastic joints;
- with rigid semi-cardan joints.
The classic cardan consists of a fork and a cross with needle bearings. Most rear-wheel drive cars are equipped with such shafts. Cardan shafts with CV joints are usually installed on SUVs. This allows the selection to be completely eliminated.
There are several types of cardans: on CV joints, with elastic and rigid hinges
The mechanism with elastic hinges consists of a rubber coupling capable of transmitting torque at angles of no more than 8˚. Since the rubber is quite soft, the cardan provides a smooth start to movement and prevents sudden loads. Such shafts do not require maintenance. The rigid semi-cardan joint has a complex design that involves transmitting torque thanks to the gaps in the spline connection. Such shafts have a number of disadvantages associated with rapid wear and complexity of manufacturing, and are not used in the automotive industry.
CV joint
The imperfection of the design of a classic cardan on crosspieces is manifested in the fact that at large angles vibrations occur and torque is lost. The universal joint can deflect by a maximum of 30–36˚. At such angles, the mechanism may jam or completely fail. Cardan shafts on CV joints, usually consisting of:
- balls;
- two rings (outer and inner) with grooves for balls;
- separator that limits the movement of the balls.
The maximum possible angle of inclination of the cardan of this design is 70˚, which is noticeably higher than that of the shaft on the crosses. There are other designs of CV joint cardans.
The CV joint allows you to transmit torque at large angles
Replacing the VAZ 2106 universal joint
The cardan crosspieces must only be replaced, since the bearing needles and the outer and inner parts of the race wear out, which leads to the formation of play. This indicates the impossibility and inappropriateness of restoring the part. If characteristic signs indicate that the cardan joints need to be replaced, you will need to dismantle the shaft itself, and then begin repairs. For the upcoming work you will need the following tools and materials:
- open-end wrench 13;
- head 13 with a knob or ratchet;
- copper or aluminum extension;
- hammer;
- compression pliers with thin jaws;
- universal puller;
- chisel;
- new crosspiece;
- lubricant “Fiol-1” or “CV joint-4”;
- large screwdriver.
To remove the cardan and replace the crosspiece, you will need a standard garage tool kit.
Removing the cardan
On the VAZ “Six” the driveshaft is mounted to the rear axle gearbox, and closer to the gearbox the driveshaft is held by an outboard bearing. Removing the shaft from the car is carried out as follows:
- Unscrew the cardan mount with a 13 key.
- If the bolts turn when unscrewing the nuts, insert a screwdriver, pressing the fasteners.
- When unscrewing the last bolt, hold the shaft with your other hand, since it may fall on you. We move the cardan to the side after completely unscrewing the bolt.
- Using a chisel on the flange of the elastic coupling, we mark the position of the cardan.
- Using a screwdriver, bend the seal ring near the coupling.
- We move the holder along with the sealing ring to the side.
- We unscrew the central fastening and hold the cardan itself.
- For final dismantling, we pull the shaft off the gearbox.
Removing the cross
After dismantling the driveshaft, you can immediately begin disassembling the crosspiece:
- We mark the universal joint forks to avoid disturbing the factory balancing during assembly. To apply marks, you can use paint (pictured below) or hit it lightly with a chisel.
- We remove the retaining rings using special pliers.
- Having clamped the cardan in a vice, we press out the bearings through suitable mandrels or knock them out with a hammer.
- We disassemble the hinge, moving the crosspiece in the direction of the removed bearing, after which we slightly turn the crosspiece and remove it from the fork.
- Press out the opposite bearing in the same way.
- We repeat the steps described in paragraph 3 and completely dismantle the cross.
- We repeat the same steps with the second hinge, if it needs to be replaced.
Installing the crosspiece and cardan
We install the hinge and shaft in the following order:
- We remove the cups from the new cross and insert it into the eyes.
- Place the cup in place, carefully tapping it with a hammer until a groove for the retaining ring appears. We mount it and turn the cardan.
- In the same way, insert and fix the opposite cup, and then the remaining two.
- Apply Fiol-1 or CV joint grease to the spline joint of the cardan and insert it into the flange of the elastic coupling, fixing the protective ring.
- We attach the driveshaft to the body and to the rear axle gearbox.
Video: replacing the cardan cross on a VAZ 2101–07
The cardan crosspieces are filled with lubricant from the factory. However, when replacing a product, I always syringe the hinge after the repair. There will be no excess lubrication, and its lack will lead to increased wear. For crosspieces, it is recommended to use “Fiol-2U” or “No. 158”, but in extreme cases “Litol-24” will also do. Although I know car owners who use Litol for both crosspieces and spline joints. When injecting, I pump the lubricant until it begins to come out from under the seals. According to the regulations, the hinges must be serviced every 10 thousand kilometers.
The serviced crosspieces are lubricated through grease fittings with a special syringe.
You don't have to be an experienced auto mechanic to replace universal joints. The desire of the car owner and step-by-step instructions will help identify the malfunction and carry out repairs in a garage without making mistakes.
Is it possible to replace the crosspiece without removing the cardan?
Replacing the cuff of the secondary shaft of the VAZ-2107 gearbox
Most often, repairing the driveshaft crosspiece is impossible. In this case, a complete replacement of the part will be required. To do this, you need to perform a number of actions. Basically, the replacement of the crosspiece is carried out with the obligatory removal of the cardan. This is due to the complexity and bulkiness of the design.
Replacing a part may
be carried out without removing the entire driveshaft if you have a special puller, which can be provided by a car service, and the special skills of a specialist.
In any of the options, before removing the cross, it is necessary to clean the surface for future work and remove dirt and dust from it. The next mandatory step is to apply special markings that indicate the exact location of the forks. Only after such preparatory actions have been carried out, the retaining rings are removed. In a car service, a special puller is used for this. It is not recommended to remove the driveshaft crosspiece fastening using available tools, as this can lead to mechanical damage to other parts of the driveshaft.
After removal by an experienced technician
Be sure to clean all holes and grooves from accumulated dirt in them, remove burrs and eliminate other sources of possible damage in the future.
When replacing an old part with a new one, special attention should be paid to the cups. First of all, you need to carefully remove them from both sides, making sure that their contents are not lost
Next, after the filling is in the eyes, you need to put on one cup and install it in the right place. If the work is done correctly, a recess will subsequently open for installation of the retaining ring. Next, the cups of the device are pressed in.
Important! When replacing, all parts must be treated with a special lubricant. It is recommended to replace old fasteners with new ones
The installation of the cross must occur without deviations or distortions, as this leads to rapid wear of the parts due to their improper functioning.
An experienced specialist should carry out work on replacing the driveshaft crosspiece. The above actions require a high level of skill, care and are carried out using special tools.
Is it possible to qualitatively replace the driveshaft crosspiece in artisanal conditions?
Replacing the cross
driveshaft - a specific process. It is characterized by a high level of complexity and labor intensity. To replace the cardan crosspiece, special knowledge is required. A person must not only understand technology in general terms, but also know the features of this part, its correct position for normal functioning. In addition, to replace this part of the propeller shaft without removing the cardan, you must have a special puller.
Replacing the crosspiece incorrectly in a homemade environment can lead to additional malfunctions in the entire mechanism. This is fraught not only with large expenses in the future, but also with a risk to life and health. This type of vehicle malfunction can lead to a traffic accident.
Only specialists can correctly diagnose the malfunction and assess the actual condition of the part. To do this, it is recommended to contact a car service. Professionals will always complete the task quickly and efficiently!