Features of heating installations, photo gallery
It is important to divide structures according to the method of thermal energy distribution. This will make it easier to select a specific long-burning pyrolysis furnace:
- A device with a water heating circuit is a universal device for organizing heat conservation inside a living space. It works like a boiler to heat water. The best option for a country house. They are characterized by high performance, affordable cost and the ability to operate without a source of electricity.
- A device with variable placement of the heat exchanger. If the combustion compartment is located at the top of the structure, and the gas processing tank is located at the bottom, then it is necessary to create a forced exhaust system using a fan or smoke exhauster. If the firebox is located at the bottom, then draft will be created naturally.
If you have any questions, it is recommended to contact a professional.
Selecting a Specific Type
The buyer has two options: consult a specialist or conduct independent research. It is important to answer three questions:
- Purpose of purchasing the unit.
- Its location.
- What fuel will the owner use for combustion.
When purchasing a unit for DIY installation, take into account the dimensions of the device. Allocate enough space. It all depends on the parameters of the room. If you want to avoid wasting additional time, choose a metal alternative that is portable. The brick structure is permanently installed for long-term use, making it ideal for residential use.
Each manufacturer calculates the ratio of oxygen to gas; it is important to take this parameter into account.
what is it for and how does it work
Not all car owners are familiar with the cabin filtration mode, its beneficial properties, and application features. Let's look at what air recirculation in a car is and how to use it. In fact, recirculation is the intake of air from inside the cabin, filtration through the air conditioning system and subsequent distribution through the deflectors.
The main difference between recirculation and conventional intake is that the air flow comes from the cabin, and not from the outside. The recirculation mode allows you to quickly heat and cool the air, since the temperature in the cabin differs from the temperature outside the car. The climate control system consumes less time, power, and fuel consumption by the engine.
In practice, few people use this function. Most often, recirculation is used to prevent unpleasant odors from penetrating into the interior. For example: the car ahead is smoking heavily, there is a lot of smoke, there is a dusty section of the road. In order not to feel these odors, they activate the mechanical air recirculation button and block access from the outside.
Positive sides
- Relatively rapid change in flow temperature. One air intake from outside is equal to 2 – 3 cycles inside the cabin.
- Heating occurs even faster due to the difference in temperature indicators.
- Power take-off is 35% lower.
- An indispensable function for drivers and passengers suffering from allergic reactions, hypersensitivity to odors, dust, and pollen.
Negative factors
- complete absence of clean air from outside. Despite partial filtration during cyclic exchange, the air becomes polluted and absorbs more harmful substances, and humidity increases;
- prolonged inhalation contributes to the development of allergenic diseases;
- Prolonged air recirculation in the cabin leads to fogging of the windows. The problem is eliminated by combining the operation of air conditioning and filtration.
Health officials and car manufacturers recommend using the recirculation mode for 15 to 20 minutes. Afterwards, be sure to open the windows, let in fresh air and ventilate the interior.
Button location and mode activation
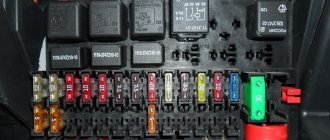
Each car has a mechanical button located differently. The practice has developed of installing it on the front torpedo in the central part in the area of the climate unit. To simplify the search, manufacturers use typical markings - a car with a ring arrow inside the cabin. In the image above, this button is indicated by the number 3. When you see it, feel free to activate it and use it. Deactivating the filtration mode occurs in a similar way, only for this purpose a mechanical button with a different design is used - an arrow “out of the cabin” or pressed again.
Some domestically produced technical equipment is not equipped with automation, and drivers use levers. For example: VAZ models discontinued from production have three adjustment levers: supply of cold, hot (warm) flow, closing the damper with a mechanical drive.
Cars equipped with climate control automatically regulate the temperature and take care of the cleanliness of the air flow. All processes are controlled by an air recirculation sensor. It is installed under the center console of the car. When activated, the controller analyzes the temperature and air content. Household climate control equipment operates on a similar principle.
Typical faults
Subject to moderate use and careful handling, the service life is unlimited. Failure is caused by exceeding the permissible current, a short circuit in the circuit, and the negative consequences of an accident or shock.
In practice, there are cases of poor contact between the block and the terminals, blown fuse, and mechanical damage.
Don't forget to periodically ventilate the interior. Every second technical inspection, replace the cabin filter and troubleshoot the external air supply channels.
Video: Air recirculation, how it works.
autocity365.ru
Structural Components
To produce a smokeless pyrolysis furnace, durable rectangular sheets of high-alloy steel are used. For most models, double walls are created, and the empty space is filled with sand or water (in the case of installation with a water circuit). In the process of constructing the system, you can take an ordinary metal barrel with thick walls that can withstand high temperatures for a long time.
There are two combustion chambers inside the device. In the first container, fuel is burned, and in the second, pyrolysis products are mixed with oxygen. If the firebox is located at the top, then it is necessary to install a grate between the compartments. In a metal structure, special plates are used as partitions.
An integral part of the device is a fan to create draft. This component facilitates the transport of gases to the afterburning compartment. An alternative is a smoke exhauster connected to the exhaust duct. Each element is connected to the entire system that ensures the operation of the unit.
Using the heater correctly: golosoff
Since there's been such a binge with the winter operation of the car, here's a heap for you about the stove.
By the way, the heater in a mass-produced car appeared only in the middle of the last century; before this thing was considered superfluous. For example, the first domestic “people’s” car, the Moskvich-400, did not have a stove.
Initial data. Winter, morning, -15°C, I really want to go to work as soon as possible, in the warmth. Preferably in comfort.
Quickly warm up the interior after a cold engine start
Manual stove.
Recirculation - ON, Air direction - “towards the feet”, Heat - to maximum, Fan - to minimum.
As the engine warms up, increase the fan speed. You should turn on the fan at maximum speed no earlier than the engine temperature gauge needle reaches a quarter of the scale (its normal position on most models is the middle) - this will not warm up the interior faster, but the engine will take longer to heat up.
Climate control.
Turn on recirculation and press the Auto button, the climate will do everything itself.
While the interior is warming up, you can shake off the snow from the car or do something else useful. By the way, to minimize snow getting from the car into the cabin, just brush it off with your hand around the perimeter of the door window and only then open it. You can brush it off with a brush, but then you will have to carry it home with you overnight.
Nuance.
If the windshield is covered with a high-quality layer of ice, direct the air “on the glass + at your feet.” Once the ice has melted, switch to the foot position for the manual heater and to the Auto position for the climate control.
Important
. After starting the trip, at the first signs of icing/fogging of the windows, turn off the recirculation. The fact is that there is a lot of moisture in the exhaled air, which, when recirculation is turned on, remains in the cabin and condenses on cold surfaces, including glass.
In case you don't know what recycling is
The stove can take air either from the street or from the cabin. The second option is called recycling. It can be useful, for example, when there is a smoking KamAZ truck ahead, so as not to smell its exhaust. In this context, recycling is useful for other reasons. The air in the cabin is warmer than outside, it is easier to heat it, so when recirculation is turned on, the performance of the stove increases significantly. In addition, in this mode, less heat is removed from the engine, which helps speed up warming up.
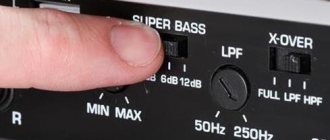
It is indicated in almost all machines by the same icon; in the picture it is under the word PUSH. Somewhere next to the icon there is a light indicating that the mode is on.
Recirculation is on (we take air from the passenger compartment).
Recirculation is turned off (air comes from outside).
When you need to drive fast and the windshield is covered with ice
Recirculation - ON, Air direction - “on glass”, Heat - to maximum, Fan - to maximum.
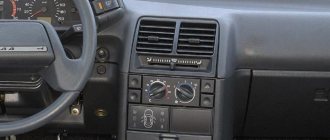
In the “on the glass” position, as a rule, air also blows from the side deflectors, which are near the doors. As a rule, it is possible to close them. Take advantage of this opportunity and let all the air go to the glass. In the photo there is a twist under the deflector, the left position is open, the right position, marked with an arrow, is closed.
You get out yourself and scrape off the ice with a scraper, a credit card, an ax, depending on what you have at hand. An assistant, if available, can be asked to sit behind the wheel and press the pedal to 1500-2000 rpm, so the engine will warm up much faster. Alternatively, you can press the pedal yourself and give your assistant an ax or whatever you have to scrape the ice off the windshield, but I wouldn’t.
The method should not be abused; increased engine speeds do not add to the life of the engine when it is cold.
While driving
Recirculation - OFF
Manual heater control
. In cold weather while driving, set the airflow direction switch to the “feet” or “feet + face” position.
In the “legs” position, a certain amount of air also enters the glass, sufficient to remove moisture from it. There is no need to direct the flow of hot air to the “on the glass” or “on the glass + to the feet” position - this will lead to the melting of snow on it, the flow of the resulting water with its subsequent freezing on the wiper blades, which will lead to their actual inoperability . In the worst case, the glass may also freeze. In the very worst case, it can also crack.
In city traffic jams this is not so important; sometimes you even have to heat the glass, but on the highway you will suffer from icing if you constantly heat it from the inside. Heating the glass, if present, will not help either, and may make things worse.
We select the minimum fan speed to prevent the glass from sweating. Well, it should be warm, of course.
By the way. If it turns out that the engine is warmed up, but the cabin is cold and the glass, accordingly, is also cold, directing a stream of hot air onto the glass under such conditions will most likely lead to the appearance of a crack on it. You've probably seen horizontal cracks in the lower part of the windshield - this is it.
Climate control
. Put it in “Auto” mode, it will do everything itself.
We've arrived
Before leaving the car for a long time, for example, for an overnight stay, it is useful to stand for a minute or two with the door open so that the windows cool down, otherwise the snow that has fallen on the glass will turn into ice, and the moisture contained in the air of the cabin will fall out as it cools on everything that comes to hand, including glass and all sorts of electronic things in the guts of the car, but this is of no use to them.
After washing, such a pause is absolutely necessary, otherwise you risk not opening the frozen door the next morning. Or tear it off along with the seal. Or tear off just the handle from the door.
Thaw
Turn on the air conditioner and let it work for at least a few minutes; it gets really boring in the winter and that’s why it sometimes refuses to work in the spring.
Little tricks
The designers of a terrible number of cars are not aware of the existence of floor mats with sides. Because of this, the air ducts that should blow into the feet of the rear passengers actually blow into the sides of the rear floor mats, from which the air bounces off and mainly heats the space under the front seats.
Treatment. Place something under these air ducts, thus raising the nozzles above the sides. The stove will heat the interior more efficiently and evenly, the rear passengers will become warmer, and your butt will no longer fry.
Change the cabin filter more often, preferably at every service, even if the regulations do not require it. A clogged filter significantly reduces the efficiency of the stove.
Rattlers will last longer if they are turned on only when a person is in the appropriate seat.
More about winter car operation: To warm up or not to warm up - about the need to warm up before a trip. Inhumane heating of the interior. Methods - about pre-heaters and other heaters.
golosoff.livejournal.com
Pyrolysis furnace - drawings and operating principle
To create a mechanism for heating a room of any nature, it is important to correctly draw up a drawing indicating all the parameters and collect available materials. You should decide on the shape of the housing and the location of the cameras and calculate the power for specific apartments. How to determine dimensions:
- Let’s assume that to heat the air inside a room at low temperatures in winter, a device with a power of 10 kW is required. The possibility of installation in standard operating mode must be taken into account. We know that in the mechanism for generating volatile substances, the power indicator is up to 30% of the intensity of the combustion process. Therefore, to obtain 10 kW of energy when generating gas, it is important that the furnace produces 34 kW (10 * 0.3).
- For calculations, it is better to choose fuel with the lowest energy intensity. The most common option is dry beech. Let's calculate the size of one bookmark, which is capable of providing 34 kW. A portion of fuel is burned in 75 minutes. This means that it should generate about 150 Megajoules of energy. To calculate the required mass of the product, taking into account that it is only 80% processed and the efficiency of the homemade device is 50%, you need to use the formula: mass = 150 MJ / (15.5 * 0.8 * 0.5) = 24.17 kg. We remind you that the density of dry beech is 620 kg/m3. To convert the resulting figure into volume, we do the following: 24.17/620 = 0.039 or 39 liters.
- Calculation of the capacity of a chamber for burning wood with a load factor of about 0.6, we solve the expression: 39/0.63 = 61.9 liters.
When creating a drawing or diagram with all the required indicators, take into account the shape and features of the room where the stove will be installed.
Diagram and design of the VAZ-2109 stove
Many car owners, when faced with problems with their heating system, immediately turn to a car service center, but there are also those who prefer to solve the problem themselves. But for this you need to know how the heater works and the location of its main elements.
You will learn what the diagram and structure of the VAZ-2109 stove looks like from the inside in our article.
Internal structure and principle of operation
The heating system installed on the VAZ-2109 has its own differences and features compared to other cars in the AvtoVAZ line.
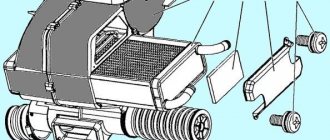
The heater consists of a pair of plastic casings (on the right and on the left), which are connected to each other along the entire perimeter with clamping brackets. A special flagellum is placed in the grooves of the casings to seal it well. The fan supplies air flow to the interior of the machine. The VAZ-2109 stove is designed so that the fan can be easily removed independently from the engine compartment.
An electric motor of type 45.37230 is attached to the casing, and a fan is located on its shaft. To obtain its desired rotation speed, additional resistance was provided. It was attached to the left side of the hole in the heater casing using a screw.
Heating system radiator
A radiator is built into the stove body to heat the air flows, which then blow into the cabin. Using three screws, this element of the system is screwed to the right casing and sealed with a polyurethane foam gasket.
The radiator design is a combination of:
- 2 rows of tubes.
- 2 rows of cooling plates.
- 2 plastic tanks.
Tap
It has two pairs of pipes, it is connected to the cooling system by rubber pipes, where coolant circulation is ensured using a pump. In the valve casing, on the axis of the supply line, there is a plate valve, which has a hole; it allows the coolant to pass through. The valve lever is connected by a rod to the handle lever, which also controls the process of heating the air flow. If you turn this lever, the hole in the valve will open the line for coolant to enter the radiator.
To ensure uniform heating of the car interior, the stove has two central nozzles, as well as left and right, to which air ducts are connected.
Exhaust ventilation
The car is equipped with exhaust ventilation, which circulates air from the interior to the street. It is located behind the body openings for the side windows.
Air also passes out through the deflectors when the car moves. The ventilation process is carried out due to the vacuum that occurs at the deflectors during movement. Air is sucked out from the rear of the cabin under the deflector trim; for this purpose, the rubber valves are pressed out and the air flow goes out through the deflector hole to the street.
Rubber valves are needed to prevent outside air from entering the car interior.
Electrical component of the stove
Below is an electrical diagram for turning on the fan. For it to work, you need a temperature sensor, which is located in the radiator. When the coolant reaches a certain temperature, the sensor gives a signal and the fan turns on automatically.
Main components:
- Mounting block.
- Ignition.
- Additional resistance (resistor).
- Motor.
- Button that controls the motor.
A – to the terminal with a plus sign “30” of the generator.
Some cars still have an old mounting block installed, in which case the fan is turned on via a relay.
Heating system elements
The stove diagram clearly shows the location of its main functional elements. It should be noted that the design of the stove on the VAZ-2108, 2109 and 21099 models is the same. Many car owners know that the heater in these models is not fully developed. As a result, the interior is not heated properly, so a decision is made to modify the stove with your own hands. Just in this case, it is important to know the design of the heater so as not to confuse anything.
Components:
The design of the stove of the VAZ-2109 car, whether it is a high panel or a low one, is absolutely identical. Therefore, the information presented will be useful to owners of this model with any instrument console.
Knowing the main points and what is located where, you can already try to independently deal with the problems that arise and fix the malfunctions that appear, while saving money and time on trips to the service station.
remam.ru
What tools and materials will be needed
To implement the project you should purchase:
- Cast steel sheet of grade St20 with a thickness of at least 4 mm.
- Equal angle corner with parameters 4x50 mm.
- Steel pipe with a diameter of up to 60 mm.
- Durable reinforcement with a cross-section up to 8 mm.
- Several cylinders with a caliber of up to 120 mm to create a system for removing combustion products.
- Apparatus for welding the entire structure together and consumables.
- A drill and a drill bit capable of piercing a sheet of the thickness described above, as well as a grinder saw.
- Construction level, ruler, pencil and hammer.
Buy high-quality tools from a specialized store, as you will have to work with steel components. Purchasing reliable items will create a long-lasting installation.
We are preparing a place for installation of a pyrolysis stove
The structure must be assembled inside the room where it will function. It is better to order sheet cutting according to the parameters in the drawing from a third-party contractor in order to save time. This will allow you to get a product of excellent quality.
Stages:
- We build a foundation from concrete or other durable and non-flammable raw materials. The base area should be slightly larger than the dimensions of the future product.
- We maintain a distance from the wall to the installation - at least 80 cm.
- We cover the floor with fireproof and slightly heated material at a distance of 1.2 meters.
To create protection for the floor covering, sheets made of non-combustible material are best suited.
Construction process
The design of a pyrolysis furnace is complex and requires a professional approach. The heating device is made in the shape of a cylinder or a rectangle, so you first need to make blanks from an equal angle corner. It is necessary to make elements of vertical and horizontal posts 1 meter high and weld them into a frame.
Then we create walls, and for this we make two openings in the front panel for the combustion chamber and ash. We weld fasteners onto the finished components to create a hinged door. We attach one corner to the inside - they are needed for mounting the grate and pan, which will isolate the combustion compartment from the container for afterburning gases.
Then we perform the following algorithm:
- We select a side wall at the level of the fuel combustion compartment and cut in a blower with a damper, which is created from a part of a metal pipe with a diameter of no more than 60 mm. Next, we make a hole under the firebox with a caliber of 0.85 cm and insert there an axis for the valve (made from reinforcement), which should protrude from one side so that you can make a shank (a handle for ease of use). Then we attach a steel disk that corresponds to the length of the blower. To fix the position of the damper, attach a spring handle.
- We create a bottom and a tray with a grate. We attach the lid to this structure. The partition that separates the combustion chamber must have several openings, the total volume of which does not exceed 8% of the area of the entire part. We also leave a free space of ¼ of the length of the compartment between the edge and the wall of the installation.
- We connect the stove to the chimney, and weld a branch with a diameter of about 120 mm to the hole. It is necessary to attach a sheet horizontally to it, which will delay the release of gas from the processing chamber.
- We add a shutter, which is performed using the same algorithm.
The finished structure can be improved by turning it into a convector. To do this, pipes or curved parts are installed inside.
Diagram and design of the VAZ-2115 stove
If the heater in the car does not work, especially in the cold season, there is a possibility of being left without a means of transportation, since in the cold you can simply freeze inside the car. In severe frosts, it is very difficult to clear the windshield of ice to ensure visibility, and with a non-working stove this becomes doubly problematic. You may not even be able to get to a service station.
But most often, if you know the operating principle, circuit and design of the VAZ-2115 stove, you can solve the problem on the spot yourself.
Construction of the VAZ-2115 heating system
The electrical diagram of the VAZ heater operation is represented by the following elements:
- Electric motor with fan. The fan drives hot air into the car interior and onto the windshield.
- Buttons and levers for switching heat level and air flow speed. The VAZ-2115 has 3 options for heat flow rates that can be adjusted.
- Additional resistances that provide the required rotation speed of the stove fan (step-down tungsten turn coils).
- Fuses and connection wires.
The diagram of the VAZ-2115 stove presented below clearly shows its operating structure and components.
Connection diagram for the VAZ heating system
- Mounting block.
- Ignition.
- Unloading ignition relay.
- Heater motor switch.
- Additional resistor.
- Stove motor.
- Stove control button.
- Heated rear window.
K7 is a relay that turns on the heated rear window.
Heater operation diagram
- Fan.
- Windshield defroster.
- Damper that distributes air flow to the central and side deflectors; zones that warm the feet of the driver and passenger.
- Damper that controls the stove.
- Radiator.
- Airflow to the driver's feet.
- Internal air duct.
The operation of the stove is based on the following principle
The cooling and heating system works the same on almost all VAZ car models. The heater is turned on using a regulator located in the car itself; antifreeze is supplied to the radiator. Its temperature after warming up reaches more than 80 degrees. After which the fan starts working, operating at one of 3 speed modes.
The fan begins to create a directed air flow. It moves from the outside of the heating system into the interior of the car. Using control flaps, the driver selects heating zones, there are three in total: on the feet, on the windshield and in the car interior.
The key element of a car's heating system is the fan, and if it fails, the heating will be lost. Without it, hot air will not enter the cabin, and to heat the interior of the VAZ-2115, it will take not a couple of minutes, but a couple of hours.
Major electrical failures of the heating system of the VAZ-2115
If no changes occur in the heating system at any position of the switch knob, then most likely the system motor is faulty (the brushes are worn out) or there is no voltage at the terminals. But also in this case there may be problems with the ignition switch or mounting block (fuse F4 has blown).
It is important for the proper operation of the car's heating system that there is no more than 3 ohms at the engine ground (installed under the hood).
If the heater works normally at maximum engine speeds, and problems arise only at low speeds, then the cause of the malfunction most likely lies in the speed switch button or additional resistors.
If you turn on the interior heating system and hear a noise and the heater is not blowing properly, this also indicates an engine problem. Malfunctions may include jamming of the impeller or armature bearings. Malfunctions can be eliminated by replacing components or, if necessary, lubricating them. But, as a rule, these actions have a short-term effect and the problem returns.
Over time, any equipment breaks down and requires repair. Therefore, the heating system is no exception here, and the least that needs to be done for preventive purposes is to at least carry out periodic visual inspections and diagnostics. Don’t forget that over time the system ages and wears out, so the older the car, the more it needs to be prepared for the heating season.
remam.ru
How to properly use and clean the device
When you start the device for the first time, open the damper and place dry beech on the grate and set it on fire. Once completely burned, add more fuel and close the door. Adjust the combustion intensity with a blower.
Due to the nature of its operation, cleaning is done infrequently. The logs burn out almost completely, which prevents the formation of soot.
In case of problems, repairs are required - further operation of the broken structure is not recommended. The most common breakdown is a change in the shape of the door, which is best replaced immediately. Sometimes the weld seam diverges - the problem must be repaired immediately.
An installation of this type is quite easy to assemble, but it is necessary to accurately calculate all the parameters and draw the drawing correctly. The heating system must be created from high-quality materials that are characterized by durability. Only in this case will the device perform its function for many years. If you have problems with the construction of the unit, it is recommended to enlist the help of a professional. Contact a specialist for help or simply buy a ready-made pyrolysis oven.
Where is the Heater Tap on the VAZ 2110
Content
Internal ventilation on a VAZ of the tenth family. supply and exhaust: air is supplied into the cabin through holes in the windshield cover (spontaneously when the car is moving, or forced when the furnace fan is blown. These holes have valves that allow air to pass through, but do not allow it to enter the car. This design improves the thermal insulation of the cabin .
Heating channels and controls: 1. air ducts for heating the rear part of the cabin; 2. lining of the floor tunnel; 3. air ducts for heating the feet; 4. central ventilation of nozzles; 5. ventilation of side nozzles; 6. nozzles for heating the glass of the entrance door; 7. control lever for the internal heating system; 8. air distributor housing; 9. heated feet; 10. windshield heating valve; 11. heater.
The principle of operation of the heater heater on the VAZ 2110 2111 2112
VAZ 2110, 2111, 2112 do not have a heater valve. Cabin temperature is controlled by an air damper, which controls the flow of hot air into the cabin. In the summer, antifreeze enters the plate, which is why some car owners additionally install a tap to turn off the antifreeze supply in the summer. The VAZ-2110 heater control system is automatic, the temperature is maintained exactly up to 2 degrees Celsius. Also, it is better to control the air damper than the valve (it can fly around or get stuck).
The air entering the cabin is heated as needed by passing through the heater core and distributed according to the position of the air flow regulator. Most of the air goes to the windshield and... through deflectors blocked by shock absorbers. to the side windows and to the center of the cabin. Air is also supplied to the feet of the driver and front passenger through two pairs of deflectors (one pair on the knees, the other on the floor) and to the feet of the rear passengers through a cushion to the floor tunnel and two air ducts under the front seats.
The air recirculation system is used to speed up the heating of the cabin and prevent the penetration of outside air (when crossing polluted, smoked, dusty sections of the road). When the recirculation button (on the unit panel) is pressed, the electro-pneumatic valve opens, and under the influence of vacuum on the inlet pipe, the recirculation damper blocks the access of outside air to the passenger compartment. Thus, the operation of the recirculation system is possible only when the engine is running. At the same time, if the fan is turned on, the air in the cabin continues to circulate through the heater ducts.
READ Bmw E36 Alternator Belt Replacement
The fan has three operating modes: low speed, medium speed and automatic selection (determined by the control unit). Fan motor. collector, direct current, with excitation from permanent magnets. Current consumption at maximum speed. 14 A.
Depending on the selected speed, the engine is connected directly to the vehicle’s on-board network (maximum speed) or through an additional resistor. The latter has two spirals with a resistance of 0.23 Ohm and 0.82 Ohm. If both circuits are included in the circuit, the fan rotates at a low speed if only one (0.23 ohms). in the middle
It is not recommended to press the fan wheel away from the motor shaft. can balance The engine cannot be repaired (except for cleaning the manifold); if it fails, it should be replaced as a fan wheel assembly.
Spare parts for the heater (VAZ 2110 2111 2112): 1. electro-pneumatic valve; 2. heater air heater housing; 3. air absorber water reflector screen; 4. recirculation valve, control valve; 5. air recirculation damper; 6. Rear heater housing with air absorber; 7. duct heater damper; 8. heater control valve; 9. radiator; 10. heater radiator housing; 11. fitting for steam outlet; 12. Inlet hose fitting; 13. installation of the outlet hose; 14. heater motor with fan; 15. engine housing; 16. support platform for the heater damper control lever; 17. heater control cover drive lever; 18. micromotor of the damper drive gearbox; 19. resistor; 20. heater cover.
The heater radiator (hob) is mounted horizontally under the device panel in a plastic case and consists of 2 plastic containers (on the left. Steam outlet) and 2 rows of duralumin pipes with extruded plates. Depending on the position of the dampers, part of the absorbed air passes through the radiator (in the last positions of the dampers, all the air passes or does not pass at all), and the rest passes through the radiator. Unlike previous VAZ models, there is no mixer that blocks the flow of cold water through the stove radiator, so when the engine is running, the heater radiator always heats up. This design ensures low system inertia at startup (this air temperature is reached more quickly) and no leakage associated with valve leakage. The heater is controlled by commands from an electrical control unit.
Heater (oven) in manual and automatic modes
The air temperature in the cabin is set by setting the control knob (temperature sensor) to the appropriate scale division (from 16 ° C to 30 ° C, at 2 ° C intervals). The device reads information about the temperature in the cabin from a ceiling sensor equipped with a microwave fan. After. Depending on the temperature difference, it includes a micromotor that controls the heater dampers. The micromotor is equipped with a heater cover position sensor (ring resistor). The signal from the sensor is sent to the control unit, which turns off the micromotor when the damper reaches this position. Automatic mode, in other words “AND” A motor reducer is added to the control unit to regulate the speed of the fan motor.
READ How to Adjust Starline B9 Alarm Sensitivity
Setting the air supply temperature from the heater
For a clear option, there is a cutting screw on the control unit. To check the temperature control accuracy, close all doors and windows and place the temperature control indicator next to the temperature sensor. Set the fan controller knob to position A and set the temperature control to the temperature measured by the temperature control indicator. If after 15 minutes the actual temperature in the cabin does not match, remove the controller from the socket and turn the adjustment screw clockwise. raise the temperature and against. decrease. After adjustment, check the operation of the control unit again. The control unit, microwave fan temperature sensor, micromotor and heater cover sensor cannot be repaired and must be replaced with new ones in case of malfunction.
Malfunction of the temperature sensor and controller in the passenger compartment of a VAZ 2110 2111 2112
1. With a working room temperature sensor, the heater operating mode should be as follows: at maximum (red dot). movement to open the damper; at least (blue dot). movement to close the damper, other positions are fixed depending on the temperature set by the room temperature sensor. To see if the flap is coming out, it's best to remove the front vents, they have two plastic clips on the right and left (be careful not to tear off the backlight wire when removing). After removing the deflectors, you can clearly see whether the damper is moving or not, i.e. air passes through the heater or not. You can also check the resistance of the room temperature sensor.
Checking the interior temperature sensor on a VAZ 2110, cars 2111 and 2112.
Damn temperature. The resistance of the temperature sensor should be as follows: at 22 s. 20 Ohm; at 16 s. 25 Ohm.
Checking the controller using a heater (stove)
The controller is checked as follows. Remove the controller from the socket. Turn on the ignition, turn on the temperature control and measure the voltage on the pink and brown wires (long controller connector). If the voltage changes (should be off after installing the temperature controller and off after about 13 seconds), then the controller is working, if not, the controller needs to be replaced.
READ Battery light on VAZ 2110
Checking the micro-gearbox VAZ 2110 2111 2112
Make sure that the micro-gearbox is energized. It is not easy. To get there, you need to remove the defenses. Open the engine department. We unscrew the sound insulation, unscrew the two guitars using 10 bracket fasteners, remove the windshield wiper blades and unscrew the three screws that are under the round plugs and push the guard, which completely flushes the washer hose. We see two connectors. One. damper position sensor and a second micro-reducer, for which brown and pink wires are suitable. We remove the connector, turn the temperature controls and measure the voltage. If it changes, it means that the wire is not fraying anywhere, if it does not change, it means that there is a gap in some places in the beam. Checking micro gears. We supply 12 volts from the battery to the micro-gearbox connector. If it doesn't spin, then sure. will change, if it works, then the contacts in the connector will simply oxidize. To be completely sure of the efficiency of the gearbox, it can be removed by unscrewing the three mounting screws (be careful not to push the screws in) and placing the micro gearbox to the right. Turn it off, clear the receipt. If not, buy a new one. There is a position sensor on the microgear. So don't worry during installation, you don't need to configure anything. The controller itself installs the shutter on the sensor.
Typical malfunctions of the heater (furnace) VAZ 2110 2111 2112 and their possible solutions
For example, the VAZ 2110 heater only works in one position. "2", What could be the problem?
Most likely, the following malfunctions may occur. 1. An additional resistor was burned on the heater body to adjust the speed. through it in position “I” and “1” the fan is connected. In this case, you need to go to the heater (this can only be from the engine compartment) and replace the resistor. 2. A wire that burned inside the controller (to remove it, you need to disassemble the controller and replace it). 3. The wire retreated into the relay block located on the right under the hood.
A little warm air from the valves (operation of the micromotor, gearbox and recirculation valve).
The cabin temperature gauge and antifreeze level should be checked as low levels will affect the temperature (antifreeze may not reach the "furnace" or it may become airy due to low levels). You should also check the thermostat. In addition, the article provides additional information about the heater and its controller. "VAZ 2110 2111 2112 electric heater motor, installation of a heater control system"
Source