Device
First of all, you should know the very structure of the heating system in order to clearly understand what and how to repair, because for the VAZ 2110, interruptions in the operation of the heater are a typical phenomenon, and from time to time requiring the intervention of reliable hands - be it a driver or a service station worker.
For stable and high-quality driving in a car, it is recommended not only to be able to use the heating system, but also to understand the heater’s structure. The operating principle of the system can be found here: https://vazweb.ru/desyatka/otoplenie/otopitel.html
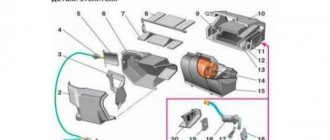
So, the heating system consists of: 1. The actual heater unit, which provides heating for the interior. It is represented (by importance of details):
- An electric motor on which a fan is also attached to pump hot air;
- A radiator, without which the entire system does not work. Moreover, unlike the old heater, the radiator of the VAZ 2110 stove of the new model does not have a tap that shuts off the flow of antifreeze (antifreeze) through the radiator. Thus, it is always (whether in winter or in summer) heated. This was done supposedly in order to eliminate leaks that were often observed through this tap, and also to heat the interior as quickly as possible when necessary. In the summer, the supply ventilation goes past the radiator, but still some VAZ 2110 owners, when repairing the stove, add this tap to the system;
- There are three dampers. One is responsible for air intake recirculation, the second opens/closes the heater duct, the third, the most important for the interior, controls the heater;
- A resistor that regulates the blowing speed.
All parts are packaged in a block with additional valves, shields, and fittings. This entire device is housed in a housing and is located under the hood closer to the instrument panel.
2. The next block represents the air ducts of the VAZ 2110. They extend directly from the stove and provide:
- Interior ventilation through central nozzles;
- The air distributor works to supply heat (or regular air for ventilation);
- Two air ducts are directed to the rear of the cabin;
- There is a whole system of five nozzles for heating the feet;
- Two side air ducts provide heating for the side windows and part of the interior, providing better heating;
- Two nozzles for ventilation.
This, in a nutshell, is the principle of distribution of hot or cold air inside the VAZ 2110.
3. The electronic control unit for the stove operates from the passenger compartment. It includes:
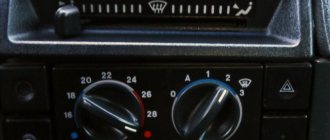
- Controller handle. This device allows you to set the temperature in the cabin that the stove unit should produce. It turns on by turning the knob and sets the temperature from the air, the temperature of which will correspond to that outside, up to 30°C. Most often, this part is called the ACS controller (automatic heater control system);
- The temperature sensor is responsible for turning on the heater when the temperature in the cabin drops by 2 degrees against the set one. The sensor has a microfan, and if the control knob is in position A, then the micromotor in the stove block turns on and the damper begins to operate, ensuring proper heating. Therefore, before starting repairs of the heating system, the operation of this sensor is usually checked. It is located next to the heating lamp on the ceiling of the VAZ 2110. Since it is not repairable, in the event of a breakdown this device should be replaced immediately.
This material will help you quickly and efficiently replace the stove fan in a VAZ 2110: https://vazweb.ru/desyatka/otoplenie/zamena-ventilyatora-pechki.html
Ceiling interior air temperature sensor
How to repair the heating system of a VAZ 2112
An indispensable device for any car in cold weather is the stove. Sometimes it is necessary to replace the radiator heater on a VAZ 2112 with all the elements. The interior of the VAZ 2112 has built-in supply and exhaust ventilation. Air enters the cabin through special holes made in the windshield linings. Air can be supplied spontaneously or forcefully. In the second case, the supply is provided by the heater fan. It can exit the passenger compartment through cracks between the panels located inside the doors and holes in their ends. Built-in valves allow air to pass out and prevent it from getting in, which improves thermal insulation in the cabin. If necessary, the heater radiator preheats the air before entering the cabin.
What are the features of the VAZ 2112 heater radiator?
- The heater radiator of a VAZ 2112 car is located in a plastic casing under the dashboard in a horizontal position.
- The design consists of two rows of tubes made of aluminum with two plastic tanks pressed onto them. On the left there are two fittings: one for draining, the other for supplying coolant.
- The position of the dampers regulates the flow of part of the air that is taken in by the radiator. Its main flow passes by the radiator. If the damper is in its extreme positions, no air flows at all.
- A design feature is the absence of a tap, which should shut off the flow of coolant, which ensures constant heating of the heater radiator when the engine is running. In this case, the required temperature in the cabin is achieved faster, and the absence of a tap reduces the number of joints, places that can leak and create a lack of tightness in the entire system.
Dismantling the heater radiator of a VAZ 2112 car
If the heater radiator leaks, it must be replaced. Replacing the heater radiator in a VAZ 2112 begins with dismantling the entire dashboard and steering column. The work must be carried out carefully, which is due to the manufacture of most connectors from fragile plastic latches and clamps that can easily be broken. The radiator can be removed without dismantling the panel. Replacing the heater radiator on a VAZ 2112 is easier to do with the evaporator removed, but this requires preliminary depressurization of the main air conditioning system and removal of the refrigerant. The radiator removal instructions suggest:
- Disconnect the battery.
Tip: Before dismantling the heater radiator of a VAZ 2112 car, you need to drain the antifreeze.
- Disconnect the hoses installed on the heater bulkhead from the engine compartment side.
- Push the rubber seal on the partition into the interior of the cabin. To do this, you need to disconnect the edges of the seal from the edges of the hole in the partition.
- Remove the cover, the ashtray, the receiver, for the center pillar, and the front panels.
- Remove the heater and air conditioning control panel.
- Remove the electronic control unit without disconnecting it from the connector block.
Tip: To ensure sufficient space for the heating system under the radiator housing, the control unit must be moved to the side.
Dismantling the control unit of a VAZ 2112 car
- Unscrew the bolts securing the left pillar to the base of the body and the bolts securing the ground wires; you do not need to completely remove the pillar.
- Unscrew the bolts that hold the right strut, then it is removed from the car.
- Use a Phillips screwdriver to unscrew the self-tapping screws that secure the stand to the front plastic panel from its reverse side.
Tip: In order to avoid distortions, you need to press the screwdriver tightly. Otherwise, the heads may break.
- Remove the central air duct duct.
- Above the heater core, slightly shifted forward, there is a dividing damper, which must be removed along with the air duct section to increase the working space.
- Loosen the nuts on the studs that secure the left side of the evaporator housing.
- Unscrew the nut on the stud located near the upper pedal lever for controlling the throttle valve.
- Remove the bolts holding the lower right corner of the heater housing.
- Remove the heater lugs from the studs.
- Move part of the air conditioner evaporator housing to the side.
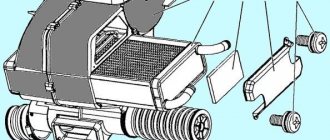
- Remove the heater from under the front panel; its general appearance is shown in the photo.
General view of the heater of the VAZ 2112 car
Tip: Before removing the heater, you first need to move it away from the engine compartment until the ears come off the studs, then move the device to the left, lower it down and remove it from the car.
- Remove the clamps holding the heater pipes to the housing.
- Remove the radiator from the housing.
Installation of a new heater radiator for a VAZ 2112 car
Replacing the VAZ 2112 heater radiator is done in the reverse order of removal. So:
- The nuts that secure the evaporator housing and heater housing to the engine compartment bulkhead are designed for one-time use. Therefore, they need to be replaced with new ones. The price of parts is relatively low, and reliability increases.
Tip: When assembling, you must ensure that the seal is correctly positioned on the dashboard - on the windshield side in its place. The central nozzle body was installed without distortion, the wiring went into the right openings, otherwise everything would have to be reassembled.
- When the VAZ 2112 16 heater radiator is replaced, you need to tighten the drain plug.
- Fill with coolant.
- Warm up the car until the radiator fan starts running.
- Check the tightness of the system, the operation of the heater, and the dampers.
- Check the operation of electrical equipment and instruments on the panel.
In this way, you can replace the heater radiator of a VAZ 2112 car with your own hands. All details of the work can be seen in the video. Reliable operation of the heater radiator creates comfortable conditions for the driver and passengers while driving a VAZ 2112.
Differences in design
The VAZ 2110 was equipped with stoves of the so-called new or old model. Both systems, including those on the VAZ, which has an injector instead of a carburetor, are not particularly different in design.
So, the immediate differences:
- The main difference between the new stove and the old one is in the design of the heater radiator. Therefore, if you are repairing a heating system and decide to install a new model instead of an old radiator, then take into account some nuances;
- In addition, the SAUO controller is also not exactly like that. 4 or 5 position controllers manufactured before the fall of 2003 have already been discontinued and are not suitable for new heater models;
- The micro-gearboxes are also different, starting from release in September 2003. They differ in resistors (shaft position sensors), so you need to check whether the resistor in the MMR model that you purchased is interchangeable.
Repair
If you are planning a major overhaul of the stove, especially if you still have an outdated system, start by purchasing a new stove radiator (it is better to buy a copper one, it heats much better), and this will only improve the performance of the heater.
But the design of the VAZ injector stove is practically no different from carburetor cars.
The following is a breakdown of the following points:
- The engine block has a plug from which antifreeze is drained into some container;
- The frill is moved forward a little (a lengthy operation), the windshield wipers and everything that gets in the way are removed;
- The heater housing is removed. You should know that the body is divided into two parts. The front one is removed along with the fan;
- Next comes the cabin filter housing. It can be changed at the same time;
- The other part of the fan housing is removed;
- The clamps are loosened, the hoses are removed;
- Then, with some effort, the radiator is removed.
Assembly, as they say, is in reverse order. Just one more nuance: if you have an outdated stove, then pay attention to two points:
- When installing the plastic case, make sure that the pedal fits into the desired groove;
- Knowing the structure of all components, be sure to double-check their tightness.
Before adding antifreeze, do not forget to make sure that the engine block has a well-tightened plug. Be sure to make sure that the entire system is running smoothly and more efficiently than before.
Removing and installing a heater radiator on a VAZ 2110
1. Before starting work, disconnect the negative cable from the battery.
2. Now you need to remove the windshield frame trim, trim and soundproofing padding.
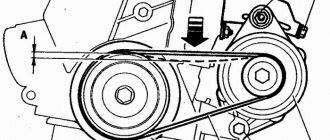
3. Then remove the heater fan.
4. Unscrew the screw securing the vacuum hose clamp. Disconnect the hose from the heater housing.
5. Hook up and remove the 3 spring brackets securing the front heater air intake housing.
6. Now unscrew the 2 screws of the middle fastening of the front housing.
7. Unscrew the screw of the side fastening of the front housing
8. Now you can remove the front housing.
9. Disconnect the steam exhaust hose from the radiator fitting by loosening the clamp.
10. Loosen all clamps on the hoses and disconnect them from the radiator fittings.
11. Remove the 2 rear heater housing mounting brackets.
12. Unscrew the 3 screws securing the rear heater casing.
13. Now you can remove the rear heater cover
14. Remove the radiator.
15. If the radiator is leaking, it needs to be replaced. Clean the outside of a usable radiator with a brush. To clean it inside, blow out the radiator with compressed air.
16. Reinstall the heater core in reverse order. When installing the rear casing, make sure that the fork on the damper shaft engages the lever.
17. If you managed to hook the flap to the lever, then it remains in the raised state. If the damper drops, it means the fork is not caught on the lever.
18. Finally, fill the system with coolant and check the operation of all devices and the tightness of all connections.
Video on the topic:
VAZ 2110 stove, heater, fan, dampers, video of replacing the VAZ 2110 stove radiator
The VAZ 2110 stove is perhaps the most problematic and capricious mechanism in the entire car design. You cannot do without a stove or a faulty interior heater radiator on a VAZ 2110, given our cold climate. If in the summer a non-working stove may not bother you, then with the onset of the cold season it often turns out that the stove on the VAZ-2110 is blowing cold air. Today we will try to talk in great detail about the design, repair and replacement of the heater on the “ten”. For clarity, we will supplement the text with photographs and videos.
Let’s say right away that the design of the heating system on the “ten” is fundamentally different from what was on the old VAZ models. The most important feature and difference of the interior heater is that the VAZ 2110 heater radiator and its fan are located not in the cabin, but in the engine compartment. This design has its advantages, for example, to replace the heater radiator or stove fan, you do not need to completely disassemble the front panel (dashboard).
Another important difference is the electronic control of climate processes in the cabin. For this purpose, the VAZ 2110 is equipped with a so-called automatic heater control system (AHC). Photo of the SAUO block below.
By the way, the SAUO unit on “tens” of different years of production varies. Since 1996, 4 types of SAUO controller have been produced. It is worth taking this into account when purchasing a unit as a spare part. It is this device that controls the temperature in the cabin and the operation of the fan. You can set the temperature from 16 to 28 degrees.
But how does this miracle device work? On the ceiling of the “tens” cabin there is a temperature sensor or a ceiling air sensor with a built-in (very small) fan for air circulation. It is this sensor that sends information about the actual temperature in the cabin, and the SAUO unit gives a command to the micro gearmotor (MMR), which in turn opens or closes the main damper, which is responsible for the access of hot air to the cabin. When the temperature in the cabin changes, the ceiling sensor gives a new signal, the micro-gear motor is activated, turning the damper, closing or opening the access of hot air to the cabin. This way the set temperature is automatically maintained. Next is a photo of the VAZ 2110 heater air duct diagram .
Brake replacement procedure
Man has always strived to minimize his own labor, to solve a problem with a minimum number of movements. The impetus for the development of technology is a very interesting factor - our laziness.
Removed the brake cylinder
It was laziness that largely led to the emergence of an original method of replacing the heater radiator on a VAZ 2110. In this case, the heater does not have to be removed. The entire job will take more or less experienced car owners an hour, but a beginner may need a little more.
The work is carried out as follows.
- Drain the coolant using the remote control heating pipe.
- Disconnect all pipes and remove the expansion tank.
- Disassemble the frill.
- Remove the brake pedal, grabbing the VUT at the same time, to gain access to the radiator.
- We take out the old radiator from there and install a new one in its place.
- Assembly is performed in reverse order.
- Return the coolant.
- With such a procedure, it would not be amiss to replace the cabin filter at the same time.
As you can see, the process is quite simple and original, not requiring excessive effort or professional skills. Any car owner can cope with such a task.
Regardless of which radiator you choose, try to carry out each stage of its replacement as competently and carefully as possible. To be fair, let’s add that the copper unit is better than DAAZ. And the money spent on it is largely worth it. Of course, if you are not going to sell the car right away, but plan to use your own VAZ 2110 for several years to come.
Many car enthusiasts for the time being try not to notice that the heating radiator has begun to “drip”, which soon leads to the fact that repairs become inevitable. As you know, a stove without antifreeze, which slowly leaks away, will not work.
And no matter how much you put off removing the radiator in this situation, this time will certainly come. Let's consider when it is necessary to replace the heater radiator of a VAZ 2110, and how to do it yourself without going to a service station.
The design of the VAZ 2110 cooling system
VAZ 2110 heater blows cold, why?
Many owners of “ten” complain that at some point the stove constantly blows cold air and no amount of turning the handles of the automatic heater control system can save the situation. There can be a lot of problems and malfunctions. For example, the ACS controller itself is faulty, the ceiling sensor or micro-geared motor is faulty and simply does not open or close the damper. Another reason is the air (air lock) in the heater radiator, which is simply not capable of heating the air passing through it. Below is a schematic representation of the VAZ 2110 heater device .
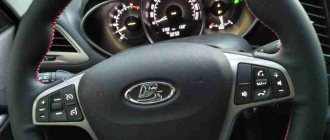
Heater dampers VAZ 2110
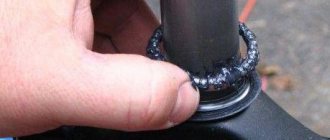
Often the cause of poor performance of the “tens” heater is the damper of the VAZ 2110 heater . The damper may not close tightly or open poorly. The heater flap itself is made of plastic, which can become warped and perform poorly over time. Many car owners buy a metal damper and change it themselves. How to check the functionality and evaluate the condition of the heater damper? Everything is quite simple, remove the central air duct deflector and there you have it - a damper! Let's look at the photo.
Next, carefully inspect the damper, turn on the stove, turn the controls on the ACS unit and see if the damper works at all. How does it move, does it fit tightly. If she does not respond to commands, then the problem may not be her at all. For one thing, you can see if the lever for redirecting the air flow from the glass to the feet works.
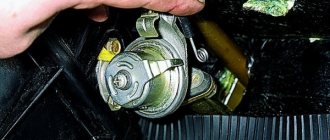
Heater fan VAZ 2110
It is quite simple to determine the performance of a stove fan by looking at the noise. If the fan motor burns out, then it naturally will no longer work. However, before rushing to change the stove fan, you need to make sure that the fuse has not blown. As we already wrote above, the fan of the VAZ 2110 stove is located not in the cabin, but in the engine compartment. To get to it, you will need to remove a special apron that separates the engine compartment from the heater housing, vacuum brake booster and windshield wiper mechanism. The actual photo is below for clarity.
So we got to the stove fan, removing the apron and heater casing. By the way, next to you you will see the cabin filter, in the housing a little to the left. It needs to be pulled out and cleaned. If no one has changed the filter before you, over many years of operation it is seriously clogged with debris and interferes with the normal circulation of air, which is sucked into the cabin of the VAZ 2110.
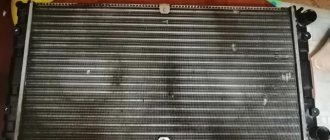
Heater radiator VAZ 2110
The radiator of the “tens” heater is located in the same place as the fan, that is, under the hood (see photo above). To remove it, you must first remove the fan from the heater casing. If you notice a strange smell in the cabin, lift the floor mats; if there are puddles of antifreeze or antifreeze, then the radiator of the VAZ 2110 heater is leaking. Although the clamps may no longer hold... in any case, you will have to disassemble and find out the cause of the leak. Next, we offer a couple of videos demonstrating the process of disassembling, removing the apron, stove fan, cabin filter and heater radiator.
Stories from our readers
“Fucking basin. "
Hi all! My name is Mikhail, now I’ll tell you a story about how I managed to exchange my two-wheeler for a 2010 Camry. It all started with the fact that I began to be wildly irritated by the breakdowns of the two-wheeler, it seemed like nothing serious was broken, but damn it, there were so many little things that really started to irritate me. This is where the idea arose that it was time to change the car to a foreign car. The choice fell on the melting Camry of the tenth years.
Read more: Skoda Octavia where is the fuel filter located
Yes, I had matured morally, but financially I just couldn’t handle it. I’ll say right away that I am against loans and taking a car, especially not a new one, on credit is unreasonable. My salary is 24k a month, so collecting 600-700 thousand is almost impossible for me. I started looking for different ways to make money on the Internet. You can’t imagine how many scams there are, what I haven’t tried: sports betting, network marketing, and even the volcano casino, where I successfully lost about 10 thousand ((The only direction in which it seemed to me that I could make money was currency trading on the stock exchange, they call it Forex. But when I started delving into it, I realized that it was very difficult for me. I continued to dig further and came across binary options. The essence is the same as in Forex, but it’s much easier to understand. I started reading forums, studying trading strategies. I tried it on a demo account, then opened a real account. To be honest, I didn’t manage to start earning money right away, until I understood all the mechanics of options, I lost about 3,000 rubles, but as it turned out, it was a precious experience. Now I earn 5-7 thousand rubles a day. I managed to get the car buy after half a year, but in my opinion this is a good result, and it’s not about the car, my life has changed, I naturally quit my job, I have more free time for myself and my family. You’ll laugh, but I work directly on the phone)) If If you want to change your life like me, then here’s what I advise you to do right now: 1. Register on the site 2. Practice on a Demo account (it’s free). 3. As soon as you get something on the Demo account, top up your REAL ACCOUNT and go to REAL MONEY! I also advise you to download the application to your phone, it’s much more convenient to work from your phone. Download here.
By the way, it is important to know not only a high-quality manufacturer, but also to be able to distinguish a fake from an original in a store!
So, let’s vote and leave reviews about the radiators of the VAZ 2110 stove :
- What kind of heater radiator was installed?
- Which one was replaced by a new radiator?
- Impressions and comments on the operation of the radiator, etc.
ps All off-topic comments will be deleted.
The best aluminum heater radiator for VAZ 2110-12
The best copper heater radiator for VAZ 2110-12
Sooner or later, any, even the most reliable and simple part in a car, wears out and requires replacement. First of all, this concerns technological and complex design elements. The VAZ-2110 heater radiator is just such an element of the interior cooling and heating system. If we have a copper radiator installed that is not standard, it can be successfully repaired and installed back. Regular DAAZ aluminum radiators, unfortunately, cannot be repaired. Therefore, today we will replace two heater radiators at once on the tenth family - the old and new models.
Read more: Fuse box for Mercedes 124
The device of the stove on the VAZ 2110
Today we will get acquainted with the stove and its structure on a VAZ 2110 car.
As you know, the heating system has a direct impact on the level of comfort. If in summer there is no special need for interior heating, then in autumn and winter it is problematic to imagine traveling without it. Theoretically, you can drive, but lower temperatures are unlikely to benefit your health.
Dismantling the heater
Device
Periodic malfunctions in the operation of the heating system for the VAZ 2110 are an ordinary and common thing. Therefore, the owners of this model from the Russian automaker have to dig around in their own garage every now and then or send the car for repairs to specialists from service stations.
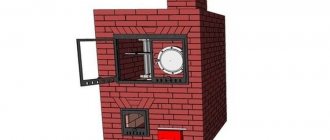
Heater circuit diagram
To understand exactly how to carry out repair and preventative measures, you first need to familiarize yourself with the diagram of the stove and its components.
Element
Peculiarities
A fan is mounted on it. Both elements contribute to the injection of heated air into the cabin
Design Features
For the VAZ 2110, it is possible to install two types of stoves - new and old. Regardless of the engine used (injection or carburetor), there are no fundamental differences in the designs of the stoves.
But what is the difference between the new and old type stoves? Let's try to figure it out.
- Radiator design. This is the main difference between the devices. Therefore, when replacing a radiator from an old one to a new one, be sure to take into account the installation nuances;
- The controller knob on stoves is slightly different. Old-style heaters have a main problem - they have been discontinued. They cannot be an analogue for 4 and 5 position controllers, which began to be equipped with dozens of them in the fall of 2003;
- The micro-gear motors for the stoves are different, starting in September of the same 2003. The difference lies in the shaft position sensors (resistors). Therefore, when making repairs, make sure that the devices are truly interchangeable and that you bought old-style resistors for your old stove, not new ones. Otherwise the gearmotor will not work.
Repair
As we have already noted, the design of stoves on dozens with carburetor and injection engines has practically no differences. Therefore, the repair instructions below are suitable for owners of a VAZ 2110 with both types of power units.
If you are planning to overhaul your old-style stove, we recommend starting with the purchase of a radiator. Use copper as it is more efficient and helps the heater work better.
To carry out repairs correctly, strictly follow the points presented in our instructions and rely on video materials.
- There is a plug on the engine block through which coolant is drained into any container. If you plan to use the same antifreeze or antifreeze again, choose clean containers.
- Next you need to move the frill forward. This process will take quite a long time, so be patient.
- Next, you need to remove the windshield wipers and get rid of as much as possible of everything that could interfere with the repair process.
- Remove the body of your stove. It is divided into two parts, which is important to know in advance. The front part of the stove body is removed directly along with the fan.
- After this comes the stage of dismantling the cabin filter. Check its current status. If the filter is dirty, this is an excellent reason to replace it.
- The next stage involves removing the second part of the housing.
- Loosen the clamps used on the hoses a little. This will allow you to easily remove the hoses.
- Having applied some effort, you can now finally remove the radiator from its seat.
Reassembly
In fact, reassembling the unit only involves following the opposite sequence of operations. By disassembling the stove, you have the opportunity to simultaneously inspect other elements of your car to make sure they are working.
The only nuance that you should pay attention to when reassembling is the type of stove. If you have an old-style heater, then it is important to pay attention to a couple of issues.
- When the plastic housing is mounted in place, make sure that the pedal fits neatly into the groove intended for it.
- Check how tightly all the nodes fit into their seats. Otherwise, unpleasant consequences may arise that will force you to dismantle the entire assembly again. And this, as you already understand, is not an easy process.
That's it, now all that remains is to return the coolant back into the system and tighten the plug securely. Test your vehicle in a garage before driving it on public roads.
Removing the heater radiator
- Before installing the radiator, it is necessary to drain the coolant (antifreeze or antifreeze). If the fluid has a dirty, rusty color, replace it. Unscrew the expansion tank cap, thereby relieving the pressure in the system. Having found the drain plug behind the ignition module, drain the coolant.
Provide containers for it in advance.
- Inspect the heater pipes for cracks and leaks. If they are found, their replacement is also strongly recommended.
- Prepare new clamps; old ones, when reused, will not provide proper fixation.
- Prepare a tool - a small Phillips screwdriver.
Replacing the old-style VAZ 211X heater radiator (stove)
Remove the casing covering the stove, secured with clips.
We dismantle the frill (a plastic windshield that covers the space from the hood to the windshield). To do this you need a Phillips screwdriver.
Disconnect the washer hoses that are attached to the frill.
Disconnect the fan. Resetting the power terminals (“+” and “-“).
Disconnect the coolant level sensor connector.
Then we unscrew all the screws and unclip all the latches connecting the stove casing. The procedure is very long and tedious.
Then disconnect the heater pipes and the expansion tank hose. Then remove the stove from the housing.
Inspect the radiator, if you are the happy owner of a copper device and the leak is insignificant, then contacting a specialist who specializes in soldering, it is quite possible to restore it.
After this, it is necessary to reassemble, as in most cases, in the reverse order.
Replacing the heater radiator (stove) of a new VAZ 2110 model
1. As when replacing the radiator of an old-style stove. Drain the coolant, remove the frill, the sound insulation that blocks access to the stove casing, and the wipers along with the levers.
2. Remove both hoses connected to the heater radiator (just disconnect the clamps and pull the hoses off the fittings), as well as the hose that discharges steam into the expansion tank.
3. Disconnect the fan power connectors.
4. Remove the gearmotor, having first disconnected it from the power supply
5. Find the heater mountings to the body and also dismantle them.
6. Unscrew the four screws securing the air filter cover. Remove the cover and take out the filter, for convenience.
7. Both halves of the stove body are secured with 3 self-tapping screws - we also unscrew them. Then, unscrew the self-tapping screw, which is located under the air supply hose (L-shaped).
8. Divide the heater halves into 2 parts: first take out the left part, then the right part.
9. Release the brackets holding the right side of the heater.
10. After this, we take out the damper and replace it with a new one if necessary.
11. Install the radiator, rinse if necessary with a special engine cleaner, and reassemble the heater in the reverse order.
Replacing the heater radiator (stove) of a VAZ 2110 with a new sample video
Heater damper VAZ 2110: causes of malfunctions and repairs
On the VAZ 10th family, which includes the VAZ 2110-2112 models, the designers used an electronically controlled interior heating system, thanks to which the temperature set by the driver is maintained automatically.
On the VAZ-2110, instead of a manual heater control mechanism with a cable drive of the main elements - the coolant shut-off valve and dampers, an automatic heater control system (AHC) controller with a temperature sensor and a gearmotor that regulates the position of the dampers are used.
In such a stove, the valve for shutting off the antifreeze supply is no longer used, and the adjustment of the heater operating mode - “heating” or “ventilation” - is carried out by a central damper, which directs the air flow through the radiator or bypassing it.
Causes of failure
Often, with the onset of cold weather, drivers notice that the stove in the 2110 VAZ does not work efficiently or refuses to warm up at all. Therefore, performance checks and preventative maintenance must be carried out even in the warm season. The main reasons for the lack of heating in a “family” of tens are:
- malfunctions, significant wear of the damper, gearbox;
- fluid leakage;
- temperature is not regulated;
- malfunction, incorrect temperature sensor;
- control unit failure
If a malfunction is detected, in many cases it is necessary to replace the stove and its elements. This process is simple, but quite lengthy, and dismantling is completed in 3 hours, and installation of a new product takes a couple of hours more. No special tools are required, a set of wrenches, socket wrenches, a short Phillips screwdriver, pliers will be enough, tweezers are preferable, you will also need to stock up on clamps (4 pieces or more). The VAZ 2110, 2112 stove comes in two types: one was equipped with the car before September 2013, the second after the specified date, the differences in the replacement process are minimal.
Features of the design of the VAZ - 2110 stove damper
Note that VAZ-2110 of different years of manufacture uses heaters that differ in design:
1. Old-style stove damper
Old heaters use two central dampers, one of which blocks the flow of air into the cabin from the outside, and the second one redirects the air flow to the heater radiator or bypasses it. They are interconnected by drives and opened by a micromotor gearbox.
2. New sample
In the new type of stove there is only one central damper and it is connected by a drive to the gear motor directly, and not through a lever.
3. Under the “Euro” panel
Structurally, such a stove does not differ from the new type of heater, but in it the damper for distributing the air flow into zones is controlled by another micromotor gearbox.
It is easy to visually distinguish the stoves by the location of the heater fan. In the old-style interior heater, the fan is located horizontally, while in the new model, it is positioned vertically. Their gearmotors are also different.
Causes of malfunctions
Depending on the design of the stove, the damper may cause a disruption in the efficient operation of the heater for the following reasons:
- deformation;
- wear of seals;
- deterioration or damage to control levers and rods;
- skew.
Deformation is a problem with old-style heaters. The first dampers of the VAZ-2110 stove were equipped with plastic elements that bent under the influence of temperature. Because of this, even when completely closed, cold air from outside leaks in and mixes with the heated air, and the efficiency of the stove decreases. Subsequently, the designers replaced the plastic flaps with aluminum ones and the problem with deformation disappeared.
To ensure tightness, the dampers have seals that reduce air leakage. Initially, foam rubber seals were used, which quickly wore out and became damaged. Later, foam rubber was replaced with rubber, but this only extended the service life of the seal; over time, the rubber ages, cracks and collapses.
On old-style stoves, rods and levers may break. On new heaters, there is another problem - wear on the edges of the square end of the gearbox, with which it is inserted into the groove made in the damper axis. As a result, the limit switch bypasses the groove, and the heater damper jams, although the gearmotor operates. The misalignment occurs due to the displacement of the damper axis in the mounting holes of the housing. Because of this, the damper warps and jams when opening.
Features, mounting of a new type stove
The VAZ 2112 stove installed on the car since 2013 has a difference in the mounting, which consists of:
- 1. Screw in the middle;
- 2. Two nuts above the exhaust manifold;
- 3. Nuts in the corner on the left.
If there is a rear window washer reservoir, remove it too. The air filter is pressed to the heater by a cover with 4 screws. The VAZ 2112, 2110 stove has two components (connected with 3 screws). They can be seen behind the L-shaped hose. By unscrewing the screws, you can disconnect both parts of the VAZ 2110 heater. It is moved as far as possible to the right, holding the left side and moving its top away from you. The remaining right side will come off without much effort. Then remove the steam exhaust hose through the provided hole on the right side.
The right part of the 2110 stove itself structurally also consists of 2 halves, it is fastened with brackets; if they are removed, it disintegrates into its component parts and the VAZ 2110 stove damper will be visible. It can be made of various materials; the best option is an aluminum damper.
The assembly features of the new type of stove 2110 are:
- When using a plastic damper, be sure to check whether it moves without the slightest effort; if this is not entirely true, adjustment will be necessary. It is also possible to slightly adjust the aluminum one. When this device is installed, you need to move it to the “cold” position. It is recommended to buy a double for the washer hose; this will greatly simplify the installation/disassembly of the wind cover.
Diagnosis of the problem
If the reason why the VAZ-2110 stove does not work is the damper, it is not difficult to identify it. To do this, disassemble the central deflector, turn on the ignition and rotate the temperature setting knob to its extreme positions. In a working stove, the central damper will not knock and will completely open and close the air supply channel.
If the heater damper does not move or stops in a position that does not completely block the air passage, it may be stuck. You can verify this by pushing the valve with your hand or a long rod. If after this the damper returns to its normal position, then this is the reason why it is jammed. Through the mounting hole of the deflector, you can assess the condition of the damper and its seals. If the damper is deformed, its bend is clearly visible.
Repair and restoration of the stove damper
The deformed heater damper of the VAZ-2110 cannot be repaired; it only needs to be replaced. In this case, it is better to purchase a replacement metal part that is not so susceptible to temperature effects.
Whatever heater is installed on the VAZ-2110, to carry out repair work, the heater must be completely disassembled. In this case, the process of dismantling and disassembling depends on the design of the stove.
A positive aspect of the heater design on the VAZ - 2101 is its location - to get to it and the dampers you can from the engine compartment and you don’t have to remove the front panel.
Disassembling an old-style stove
For example, let's look at how to disassemble an old-style heater:
- Remove the terminal from the battery.
- We remove the windshield wipers, the seal, remove the air intake near the windshield (“jabot”) from the car, in the process you will need to disconnect the windshield washer nozzle tubes.
- We dismantle the insulation that separates the stove body from the engine compartment.
- We remove the gear motor.
- We divide the housing of the stove and air filter into two halves. To do this, unscrew the coupling bolts around the perimeter of the housings and remove the mounting brackets.
- Disconnect the fan power wires.
- Remove the outer half of the air filter and heater housing (along with the fan).
- We dismantle the inner part of the fan housing.
After this you will have access to the dampers. If you are only planning to repair or replace the heater dampers, there is no need to drain the antifreeze, since the heater radiator will remain in place and will not be removed.
Before removing the dampers, carefully inspect and remember their position and the way they are engaged. Further actions depend on the nature of the damage. Deformed damper parts cannot be repaired and only need to be replaced. As for damaged rods and levers, try to repair them or simply replace them. The damaged seal is replaced.
When assembling the stove, pay special attention to the engagement of the dampers. Do it as it was before disassembly, otherwise the dampers will not work correctly, which will affect the performance of the heater.
Disassembly and repair of a new type heater
The new model stoves are disassembled differently:
- disconnect the battery terminal, drain the antifreeze;
- dismantle the frill and insulation;
- disconnect the power wires of the fan and micromotor gearbox;
- unscrew the fasteners that secure the stove body to the body;
- disconnect the coolant supply pipes to the heater radiator;
- We remove the heater from the car along with the filter housing.
After this, we disassemble the stove body, dividing it into two halves, after first disconnecting the air filter housing and removing the mounting brackets. Next, we change or repair the damper, assemble the heater and install it on the car.
Note that the general algorithms of work are indicated above, but in reality, dismantling the stove is not so easy, since many fasteners are located in hard-to-reach places, sometimes you have to disconnect or remove elements that make it difficult or interfering with the removal of the unit.
Removing the heater radiator
Your first priority is to get rid of the antifreeze. It is better to drain the coolant into a clean container if you filled it recently and it is in good condition. This will allow you to refill it later.
- Relieve pressure by opening the expansion tank cap. Just let the car cool down before doing this.
- Next, behind the ignition module, find the plug that needs to be unscrewed.
- You should have about 4 liters of coolant coming out of the hole. Therefore, prepare a container of appropriate size.
- Or you can drain through the expansion tank. Although this option is not particularly convenient.
After draining the coolant, you can begin further dismantling the radiator. But here the procedure depends on what kind of unit we are dealing with - a new or old model.
Let's consider both options separately.
Old stove
The radiator is removed from the engine compartment. This is done as follows:
- Remove the rubber frill seal;
- Under the brake master cylinder, locate the fasteners that hold the frill in place. Unscrew it;
- Now remove the screws that hold the right side of the frill in place. There should be four of them in total;
- Disconnect the two small clamps on the frill. They hold wires and hoses;
- The positive terminal and negative wire are disconnected from the fan;
- Move the left side of the frill forward a little, but you don’t need to remove it completely. All you need to do is unscrew a couple of fasteners;
- Remove the wind cover;
- If there is a coolant level sensor terminal, disconnect it;
- Remove the steam exhaust hose from the expansion tank.
Removing the thermal insulation
Next, you need to remove some elements one by one. Proceed strictly in the specified sequence.
- Windshield washer hose.
- Wipers.
- Windshield trim. Heater housing clamps.
- Front part of the heater with fan.
- Cabin filter.
- The second part of the case is the fan.
- All hoses (steam outlet, return and supply).
- Radiator housing.
If your existing radiator is made of copper, the presence of a leak does not indicate a mandatory replacement. It can be soldered. Only this question is better to entrust to a specialist. Even if you pay more money, the decision will be competent and correct
So we figured out how to remove the heater radiator on an old-style VAZ 2110. When installing a new unit or a repaired old one, make sure that the pedal of the plastic housing from the fan fits into the groove. If this is not done, the gearbox will not be able to change the position of the damper. Consequently, there will be no heat inside the cabin.
In addition, it is better to replace this plastic pedal with an aluminum one. Not expensive, easy, but reliable and durable.
New stove
If you are dealing with a new type of stove, there are some nuances regarding fixing the heater to the body.
To remove the unit, you will need to dismantle several elements. Namely:
- There are screws at the bottom of the windshield, the middle one can be unscrewed;
- Also unscrewed is a pair of nuts that you will find slightly above the intake manifold;
- The nut located to the left of the filter must be removed;
- If there is a reservoir with washer fluid for the rear window, then it and the air filter are removed.