Do-it-yourself adjustment of VAZ 2101 valves
A lot depends on how correctly the valves in a car are adjusted: engine operation, its starting, power and, accordingly, fuel consumption. Therefore, it is not surprising that most motorists do not even try to delve into such procedures, but immediately entrust all the work to professionals. However, there are also car owners who are accustomed to doing everything with their own hands. If you are one of them, you have come to the right place; today we will deal with adjusting the valves on the VAZ 2101.
Tools
So, in order to adjust the valves on your Zhiguli you will need:
- a set of screwdrivers and wrenches (socket, open-end);
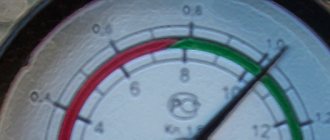
- a special tool designed to adjust the gap between the levers and the camshaft cams, or a flat feeler gauge (aka A.95111) 0.15 mm thick.
The procedure for adjusting the valves of the VAZ 2101
When everything you need is at hand, and the engine temperature does not exceed 20 degrees, you can proceed to active actions.
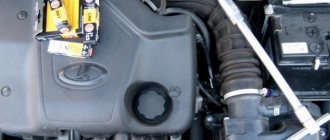
1. Using a 10 mm socket wrench, unscrew the 3 nuts securing the air filter cover and remove the latter.
2. Using a size 8 socket wrench, unscrew the four nuts holding the air filter to the engine.
3. Disconnect 2 hoses from the breather cap: air intake and crankcase ventilation.
4. Remove the air filter housing with the support plate, disconnect the air damper control cable and the engine drive rods.
5. Using a 10mm socket wrench, unscrew the eight valve cover mounting nuts and remove it.
6. Arm yourself with open-end wrenches 13 and 17, as well as a feeler gauge (or a special tool), turn the engine until the marks on the camshaft sprocket and the crankshaft coincide.
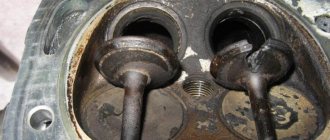
7. Check the clearance of cams 6 and 8 (from the sprocket), that is, those closest to the windshield and one further away from it. To do this, insert a dipstick on the side under the camshaft above the rocker. It should fit in there, but not freely, but with slight pinching. If everything is so, immediately proceed to the next step; if not, make the adjustment: holding the nut at 13, release it, and then tighten the nut at 17 to the required clearance.
8. Turn the car engine shaft 180 degrees, that is, about 6 turns with the key - the mark on the asterisk “looks” at “9 o’clock”. Check the clearance and, if necessary, adjust cams 4 and 7.
9. Rotate the motor shaft 360 degrees from the original position - the mark on the asterisk “looks” at “6 o’clock”. Check the clearance and, if necessary, adjust cams 1 and 3.
10. Make the last rotation of the motor shaft 180 degrees from the previous position - the mark on the asterisk “looks” at “3 o’clock”. Check the clearance and, if necessary, adjust cams 2 and 5.
11. After installing the new valve cover gasket, secure it by lightly tightening the nuts.
12. Return the removed parts to their places in reverse order.
I recommend reading:
Source: https://autoepoch.ru/remont-i-obsluzhivanie-avto/regulirovka-klapanov-vaz-2101-svoimi-rukami.html
The procedure and diagram for adjusting valves on the VAZ-2101
Today we will discuss how to independently adjust the valves on a VAZ-2101 car. To begin with, it should be noted that this procedure must be taken with the utmost seriousness and scrupulousness, since many factors will depend on how responsibly the owner carries it out, for example:
- How stable will the car engine be?
- How much fuel will be consumed?
- What will be the power of the machine?
- Will the engine start and function normally, etc.
Very few motorists know how to correctly make such adjustments in a VAZ-2101, so they prefer to take the car to a car service center. In this article we will talk in detail about what is needed for such a procedure and what is the procedure for its implementation. At the same time, saving both money and time.
Before you begin, you need to check that you have the following tools:
- socket and open-end wrenches;
- Screwdriver Set;
- There should also be two valve cover gaskets (one of which is a spare);
- flat feeler gauge A.95111 with a thickness of 0.15 millimeters or, as an alternative, a special tool that regulates the distances between the camshaft cams and the levers.
If you have everything you need, making sure that the engine temperature does not exceed +20 ° C, you can start working.
Adjusting the VAZ 2106 valves in two steps with your own hands - Auto Moto Special
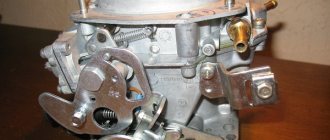
Adjusting the VAZ 2106 valves is necessary when a characteristic knocking sound is heard when the engine is running, when engine power drops and fuel consumption increases.
The VAZ 2106 valves must also be adjusted when the engine idles intermittently, the idle speed “floats”.
Due to the design features of the gas distribution mechanism (GRM) of the VAZ 2106 engine, adjustments have to be performed quite often, approximately once every six months. This simple procedure can be easily mastered and performed with your own hands.
The engine is knocking - you need to adjust the valves
The valve system of the VAZ 2106 engine is made according to the rocker arm design. The cam of the rotating camshaft runs onto one edge of the rocker arm, lifts it, and the other edge, mounted on the top of the valve, pushes it down, opening it slightly to admit the air-fuel mixture or release exhaust gases.
If the clearances between the rocker arms and cams are within normal limits, the valves open to the amount necessary for proper engine operation. If the gaps are small, the valves do not close completely, which leads to a decrease in engine power, increased fuel consumption and “burnout” of the valves.
Increased clearances lead to increased noise during engine operation and deformation of the valve stems, leading to an even greater increase in clearances.
During fuel combustion in the engine cylinders, the engine components and parts, including the gas distribution mechanism, heat up. As a result of heating, the gaps between the camshaft cams and rocker arms decrease. The dimensions of the temperature gaps are determined by the developers of the VAZ 2106 engine and amount to 0.15 mm.
lesson on self-adjustment of VAZ valves
In a cold state, the parts of the gas distribution mechanism have maximum clearances, therefore, at the moment the engine starts and for several minutes after it, noise is heard from the collision of the rocker arms and rods. Gradually, the engine and timing system heat up and the noise decreases. This occurs due to the sampling of the thermal gap.
The procedure for adjusting valves using a feeler gauge
Adjustment work is carried out on a cold engine. The engine temperature should be between 20-25 degrees Celsius. The car must be parked on level ground. If work is carried out in a garage, it is necessary to ensure a sufficient level of illumination of the work area.
List of tools for making adjustments:
- Flat slot screwdriver.
- Key or recoil starter to turn the crankshaft.
- Wrenches rated “10”, “14” and “17”.
- Directly the dipstick itself. The probe will act in this case as a special measuring device, which will allow one to judge whether the thermal gap is set correctly.
- The initial stage of work can be called partial disassembly of the gas distribution mechanism, which will provide access to adjustable parts. To do this, remove the air filter cover and the air filter itself.
The valve system of the VAZ 2106 engine is designed according to the rocker arm design
Then the valve cover is removed and the camshaft housing, valve rocker arms and valve stems themselves are revealed to our eyes. After this, rotate the crankshaft until the marks on the front oil seal cover and the pulley match.
This position of the crankshaft corresponds to the beginning of the compression stroke in cylinder No. 4. In this position, the clearances of valves No. 8 and No. 6 of the fourth and third cylinders are checked. We insert a 0.15 mm thick feeler gauge into the gap between the camshaft cam and the rocker arm. The probe should enter with some effort.
THIS IS INTERESTING: How to check the windshield wiper motor
If the dipstick does not enter or enters too easily, then the gap must be adjusted.
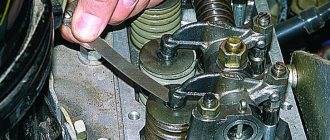
Correct clearance adjustment occurs as follows:
- Using a wrench set to “14” we hold the head of the adjusting bolt, and with a wrench set to “17” we loosen the tightening of the lock nut.
- By turning the head of the adjusting bolt, we adjust the gap.
- We use a locknut to fix the position of the adjusting bolt.
- After fixing the position of the bolt, we recheck it with a feeler gauge.
In order to correctly adjust the valves, it is necessary to create a kind of table indicating the sequence of valve adjustment:
- adjust 6 and 8 valves;
- turn the crankshaft half a turn;
- adjust 4 and 7 valves;
- turn the crankshaft half a turn;
- adjust valves number 1 and 3;
- turn the crankshaft half a turn;
- We complete the adjustment by setting valve clearance 5 and 2.
Then you should completely rotate the crankshaft several times and check the clearance again using a feeler gauge, and then reassemble all the components and parts dismantled before adjustment. We have made sure that adjusting valves using the feeler gauge method comes down to two simple operations (in two steps): turning the crankshaft and adjusting the height of the bolt. However, this method cannot be called accurate due to the presence of wear in the cam-rocker friction pair.
The adjustment method using an indicator and an adjustment rod does not have the above disadvantage.
Adjustment with rack
As with the first method of adjustment - using a feeler gauge, the car must be driven onto a horizontal, flat surface and the work area must be kept clean and well-lit.
If you notice high fuel consumption, adjust the valves
Adjusting valve clearances using a rack and an indicator allows you to obtain the greatest accuracy of work. As in the first method, you will need keys for 10, 14 and 17, as well as a key for turning the crankshaft or a “crooked starter”.
Preparatory work is similar to the first method. This is removing the air filter along with the housing and valve covers. Next, we align the crankshaft until the marks on the pulley and the front cover align.
We begin the next stage of work by installing the rack, which should be secured to the camshaft housing with three bolts. Next, we lower the dial indicator into the rack seat opposite the adjustable valve and clamp it with the fastening screw. The indicator must be installed so that its measuring rod rests against the upper surface of the cam.
Having set the indicator scale to zero, we proceed to actually measuring the existing gap and adjusting, if necessary. The adjustment is made using the same method as when adjusting with a feeler gauge. The locknut is loosened, the height of the adjusting bolt head is changed, and when the required clearance is reached, the locknut is tightened.
The valve adjustment scheme is the same as in the first method.
After adjusting all eight valves, you need to turn the crankshaft several times and check the clearances again using an indicator and a rack.
Then we install all the dismantled parts in place, do not forget the nuts and washers in the timing mechanism (this also happens). The tightening torque of the valve cover nuts is from 6 to 7 Nm (0.6-0.7 kgf-m). The order of tightening the nuts is from the middle to the edges.
This method is somewhat more complicated than the method of measuring the gap with a feeler gauge, but it is more accurate and effective, since it allows you to set the required valve clearances even with wear on the rocker arms and cams.
The result of successful valve adjustment will be a reduction in fuel consumption, an increase in engine power, which will run smoother and with less noise.
Source: https://AvtoMotoSpec.ru/remont-avtomobilya/regulirovka-klapanov-vaz-2101.html
Adjustment
- The first step is to remove the air cleaner cover and remove the air filter.
- Next, use a size 8 wrench to unscrew all the nuts and disconnect the hoses attached to it.
- The air cleaner housing can now be removed.
- Next, using a screwdriver and a 8mm wrench, first disconnect the choke cable, then the gas rod, and remove the spring and washer.
- Then, using a 10 mm socket wrench, you need to disconnect and remove the valve cover.
- Now the engine needs to be turned so that it coincides at two points:
- marks on the crankshaft;
- sprocket on the camshaft.
- Immediately, without changing the position, you need to check the distance between 6 and 8 valves (you need to focus on the information given below):
| Crankshaft rotation angle (indicated in degrees) | No. of the cylinder in which the compression stroke is carried out (end) | No. of adjustable valves |
| 4 | 8 and 6 | |
| 180 | 2 | 4 and 7 |
| 360 | 1 | 1 and 3 |
| 540 | 3 | 5 and 2 |
- Now you need to count the number of valves from the camshaft sprocket.
- Next, the dipstick is installed above the rocker under the camshaft. If it does not jam, you can loosen the 17 nut on the corresponding rocker, while holding the 13 nut with your other hand so that it does not turn.
- Then you need to turn the same 13 nut and “jam” it with a 17 nut, now you need to check the gap again with a feeler gauge.
- When the required distance is found, the final tightening should be done using a 17 key.
- Then you can adjust the next valve.
- The next step is to rotate the motor shaft 180 degrees (from the camshaft side, the mark on the sprocket should be approximately at “9 o’clock”).
- The following valves (4 and 7) are adjusted according to the information given in the table above.
- Next, the shaft again rotates 180 degrees until the star indicates “6 o’clock.”
- Now you can begin adjusting valves 1 and 3 according to the table.
- The final step is to turn the engine shaft again 180 degrees (3 o'clock position) and adjust valves 2 and 5.
Note: in most cases, after disconnecting the camshaft and attaching it back, it is necessary to turn the starter, then check the clearances again and, if necessary, adjust them.
Before installing the cover in place, you should carefully inspect all nuts 17 and make sure that they are tightly tightened. If the gasket is damaged, it must be replaced with a new one.
Note: Tighten the nuts from the center outwards and do not over-tighten, even though the valve covers are quite strong.
Now you need to assemble everything, install it in place and test it.
In conclusion, it must be said that, as you yourself have seen for yourself, adjusting the valves in the VAZ-2101 is not difficult; there is no need to take the car to a car dealership. It is enough to have the required tools and the desire to keep your car in order.
We hope our article was useful to you!
Source: ladaprofi.ru
What spark plugs to put on a VAZ 2109 Carburetor ~ AUTOTEXNIKA.RU
One of the most common problems with the appearance of dark carbon deposits on the spark plugs of VAZ 2109 and VAZ 21099 cars is the incorrect gap between the SZ electrodes.
Now many spark plug manufacturers say that there is no need to adjust the gaps, but in fact, every car owner should know how to fix this problem and check and adjust the spark plugs without the help of others.
The main malfunctions arising from incorrectly adjusted spark plug gaps.
The main malfunctions that arise due to incorrectly adjusted spark plug gaps include the following:
- Increased fuel consumption
- Unstable motor start
- Engine oil getting on spark plugs and almost everything else.
Therefore, every driver should know how to adjust the gaps independently, but we will help you with this using the example of the VAZ 2109 car and its modifications.
Virtually all spark plugs currently produced have a factory-set gap between the electrodes. It is different for each manufacturer. It is also different for spark plugs for carburetor engines with contact and non-contact ignition systems, and for spark plugs for injection engines.
Moreover, it is recommended to make the gap much smaller by 1 mm in winter, and larger by 1 mm in summer. This method achieves improved engine starting and stability of its operation at different atmospheric temperatures.
And again talking about candles!!! Attention to the gaps!!!
It is believed that cranking the engine for a long time with the starter at low ambient temperatures can discharge even the newest battery so much that its voltage is not enough to form a spark with a very large or normal gap between the electrodes. At the same time, increasing the gap places additional stress on the ignition coil.
When installing new spark plugs on the engine or checking old ones, you need to measure the gap between their electrodes. At the same time, old candles should be cleaned of carbon deposits. The check is carried out with a round probe of the required diameter.
Measuring with a flat probe will be inaccurate because there is virtually always a small indentation on the side electrode of the spark plug due to metal transfer to the center electrode. This is especially typical for candles that have already worked for some time.
The gap between the electrodes of the spark plugs is adjusted by bending or, on the contrary, bending the side electrode. It is best to use a special key to carry out this operation. After bending, the gap is checked again.
— For spark plugs on carburetor engines with a contact ignition system for VAZ 2101, 2102, 2103, 2104, 2105, 2106, 2107 cars, the recommended gap between the spark plug electrodes is 0.5-0.7 mm, for VAZ 2108, 2109, 21099, 2105, 2107 with a contactless ignition system 0.7-0.9 mm.
For injection engines of VAZ 2107, 2108, 2109, 21099 cars 1.0-1.1 mm.
An incorrectly set gap between the electrodes of the spark plugs leads to dilemmas with starting the engine, unbalanced engine idle speed, jerking when starting and driving, “failures”, loss of power and throttle response, and an increase in the engine’s fuel appetite. Normal operation of the engine can only be ensured by a spark plug with a gap specific for a given type of engine.
THIS IS INTERESTING: What does the color of spark plugs mean?
WHAT CANDLES TO PUT ON A VAZ
With the smallest gap, the spark will be short and weak, combustion of the fuel mixture is aggravated, with a larger gap, the voltage required to break through the air gap between the electrodes of the spark plug increases. In this case, there may be no spark at all.
There is no need to set the gap on multi-electrode spark plugs.
Source: https://autotexnika.ru/kakie-svechi-postavit-na-vaz-2109-karbjurator/
Tips for adjusting valves
If the valves in your car begin to tap, or compression in the cylinders has decreased, it would not be superfluous to check the thermal clearances between the camshaft cams and the valve rockers. In some literature, rockers are called valve levers or rocker arms.
You can easily familiarize yourself with the procedure for carrying out work with setting the required gap values (and they differ for different engines) by typing the corresponding request into any search engine on the Internet.
I would like to give some advice on adjusting valves, based on practice, using the example of a classic, that is, VAZ 2101 - 2107.
There are many descriptions on adjusting classic valves, which describe the operating order of the cylinders, the devices used, which nuts to turn, which ones to tighten, but few people touch on the little things that sometimes bring all efforts to naught.
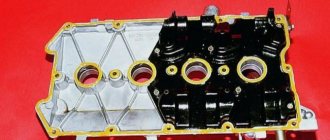
Installing the cylinder head cover
The whole process begins with removing the cylinder head cover under which the camshaft assembly is located. Theoretically, there is nothing complicated there, but when it comes to practice, seemingly small troubles arise, which then result in an oil leak from under the cap.
This is especially true when, after adjusting the valves, the cover is put back in place. The fact is that it (the cover) is screwed on using M6 nuts, which are screwed onto studs of the appropriate diameter.
So, many try to avoid oil leakage by tightening these nuts more tightly, thereby breaking off the threads in the nuts, which are designed only for competent actions.
What are these “competent actions”? Firstly, the nuts are tightened diagonally, not in order. Secondly, you need to tighten them with a torque wrench, which can be used to control the applied force. What this force will be can be found out from the corresponding tables included in the operating instructions for your car. And then, do not try to use a used gasket under the cover. Only new!
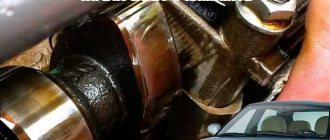
Another thing you need to pay attention to when adjusting the valves. There are three marks on the classic crankshaft pulley: two to correctly set the ignition timing, and the third to determine TDC, which is necessary to determine the top point of the piston in the cylinder. The challenge is not to confuse these labels.
Adjusting valves VAZ 2101 - 2107
If you have forgotten and doubt the purpose of the tags, the problem is solved as follows. Take a piece of plain paper (you can even use newspaper), lightly moisten it and close the threaded hole for the candle with this piece. Then, when turning the crankshaft, you need to not miss the moment when the piece of paper is pushed out of the cylinder, which will indicate the TDC of the piston in the cylinder.
Business tip:
- The crankshaft must only be turned with a special wrench.
- To unscrew and tighten the adjusting nuts, use only serviceable wrenches. Otherwise, since the height of the nuts is small, the key may break off and you will injure your hand.
- To determine the thermal gap, use only a special probe.
- Adjust the valves on a cold engine.
- Don't forget that when adjusting the valves, the camshaft rotates 360º and the crankshaft 720º.
Source: https://remontzhilya.ru/sovety-po-regulirovke-klapanov.html
We adjust the valves to
Why is proper valve adjustment ? How to independently adjust the valves on VAZ (classic) cars? These are the issues that will be addressed in the proposed material on VAZ repair and maintenance.
Why is valve adjustment done?
The gas distribution mechanism of the car is designed in such a way that there must be a thermal gap between the parts of the pusher and the valve. The manufacturer has set the thermal gap value, which should be 0.15 mm. This is the tolerance that is calculated for the expansion of the metal when it is heated. In the absence of this gap, the engine gas distribution mechanism will not function correctly, which can lead to negative consequences and failure of the power unit.
Signs of improper valve adjustment
If the thermal gap is smaller than required, then after the engine warms up, the valve does not close completely, which leads to a decrease in compression in the cylinder and, accordingly, a drop in power.
If the thermal gap is larger, then the valve does not have sufficient clearance when opening, which leads to a decrease in the supply of the fuel mixture to the combustion chamber and insufficient exhaust gases coming out of it.
Guide to adjusting valves VAZ (classic)
Before starting the adjustment work, I would like to immediately note that the adjustment of VAZ valves is carried out only on a cold engine. Of the necessary tools, you will need keys for “13” and “17” and an adjusting feeler gauge. To make the adjustment, you need to loosen the locknut of the adjusting bolt and turn it until the required clearance is achieved.
It is important to remember when making adjustments!!!
- If the feeler gauge fits into the gap with little effort, no adjustment is required.
- If the probe does not pass or, on the contrary, enters too freely, adjustment is necessary
- Removing the valve cover
- Turn the crankshaft until the marks on the camshaft pulley and the bearing case housing coincide.
- We adjust the 6th and 8th valves first
- Then we turn the crankshaft clockwise 180 degrees and adjust the 4th and 7th valves.
- The next turn of 180 degrees is the adjustment of the 1st and 3rd valves
- And the last revolution of the crankshaft is the 5th and 2nd valve.
| Crank angle | No. of adjustable valves (cams) |
| 0° | 8 and 6 |
| 180° | 4 and 7 |
| 360° | 1 and 3 |
| 540° | 5 and 2 |
How often should valves be adjusted?
Adjustment of VAZ valves should be carried out after engine repair, as well as after removing and installing the cylinder head. Also, we should not forget that during the operation of the car, parts undergo natural wear, which can lead to an increase in the thermal gap. Therefore, the frequency of valve adjustment should be every 20-30 thousand kilometers.
Source: https://remontauto-vaz.ru/page/reguliruem-klapana-na-klassike-vaz-2101-vaz-2107
How to adjust valves on a VAZ 2101-2107?
1) First, remove the cylinder head cover. (For information on how to remove the cylinder head cover, read the article, “Setting the valve timing by marks,” in the “ removal ” section, from point 1-10)
2) Then set the piston of the fourth cylinder to the TDC position. (For information on how to install the piston of the fourth cylinder to the TDC position, see the article “Installing the piston of the fourth cylinder to the TDC position”)
3) Then adjust the “eighth and sixth” valves, but before you start adjusting them, check if they need adjustment, to do this:
1. Insert the feeler gauge into the valve gap and see how it moves there.
Note! When you insert the feeler gauge into the gap, it should move there with little difficulty, but if it moves smoothly in and out of the gap, then the valve needs adjustment!
4) If the valves need adjustment, then:
1. Insert the probe into the “sixth or eighth” valve and then use the key indicated under the letter “B” to loosen the lock nut.
2. At the same time, use another wrench to set the valve gap you need by unscrewing or tightening the adjusting bolt, which is marked with the letter “A”.
3. And to complete the operation, tighten the bolt indicated under the letter “B”.
5) Next, read the section “Sequence of valve adjustment” just below, and adjust all the remaining valves on your car.
In what order should the valves be adjusted?
Note! Before you start studying, remember one thing that will be indicated in the instructions, namely, it will say that the crankshaft will need to be turned “180°”, which means half a turn! (The crankshaft revolutions are easy to understand by following the mark on the camshaft)
1) You should start adjusting the valves:
1. First from the “sixth and eighth” valves.
2. Then you will need to turn the crankshaft clockwise, exactly 180° and then begin adjusting the “fourth and seventh” valves.
3. Next, again turn the crankshaft 180° clockwise, and this time adjust the “first and third” valves.
4. And to complete the work, turn the crankshaft 180° clockwise again, and then adjust the “second and fifth” valve.
Important! 1) Do not disturb the order of valve adjustment! 2) The valves need to be adjusted only on a cold engine!
For newbies! Question: What does the gap adjustment feeler look like? Note: The photo shows two types of probes!
Adjusting the Valves of the VAZ 2101
Almost everything depends on how correctly the valves in a car are adjusted: engine operation, its starting, power and, accordingly, fuel consumption. Therefore, it is logical that most motorists do not even try to delve into such procedures, but immediately entrust all the work to experts. But there are also car enthusiasts who are used to doing everything with their own hands. If you are one of them, you have come to the right place, now we will deal with adjusting the valves on the VAZ 2101.
THIS IS INTERESTING: How to open a Skoda Octavia without a key
Adjusting the Valves of the VAZ 2101
6. Arm yourself with open-end wrenches 13 and 17, as well as a feeler gauge (or special equipment), turn the engine until the marks on the camshaft sprocket and the crankshaft coincide.
7. Check the clearance of cams 6 and 8 (from the sprocket), in other words, those closest to the windshield and one further away from it. To do this, insert a feeler gauge from the side under the camshaft above the rocker. It should fit in there, but not freely, but with slight pinching. If everything is so, immediately move on to the next step; if not, make an adjustment: holding the nut at 13, loosen it, and then tighten the nut at 17 to a suitable gap.
8. Turn the car motor shaft 180 degrees, in other words, 6 turns here and there with the key - the mark on the asterisk “looks” at “9 o’clock”. Check the clearance and, if necessary, adjust cams 4 and 7.
9. Rotate the motor shaft 360 degrees from the initial position - the mark on the asterisk “looks” at “6 o’clock”. Check the clearance and, if necessary, adjust cams 1 and 3.
10. Make the last rotation of the motor shaft 180 degrees from the previous position - the mark on the asterisk “looks” at “3 o’clock”. Check the clearance and, if necessary, adjust cams 2 and 5.
11. With the new valve cover gasket installed, secure it in place by slightly tightening the nuts.
12. Return the removed parts to their places in the reverse order.
Source: https://sis26.ru/regulirovka-klapanov-vaz-2101-video/
The work on adjusting the valves of the VAZ 2101 takes place in several stages:
Before starting work, you should check the engine temperature: work should be carried out in a cold environment, with a temperature not exceeding +20 degrees Celsius.
- Remove the air filter and remove the air cleaner housing. To do this, you need to remove the air cleaner cover, remove the air filter, unscrew the nuts (you will need a size 8 wrench), and remove the hoses. As for the hoses, the small one comes from the carburetor side, the large one from the bottom. Once the hoses are disconnected, the housing can be removed. By the way, the choke cable also needs to be disconnected (a size 8 wrench and a flat-head screwdriver will come in handy).
- Removing the valve covers. Turn off the throttle, remove the washer and spring, and unscrew the nuts holding the valve cover. There are 8 nuts in total, the key for them is a 10 key. After all the nuts are removed, you can remove the cover.
- Adjustment.
The engine must be cranked until the marks on the pulley and the front engine cover and the camshaft sprocket completely coincide. Using the table above, check the clearances in cams 6 and 8 (from the camshaft sprocket). To do this, the dipstick is installed above the rocker and under the camshaft. The dipstick installation location is easy to see if you look to the right.
If the feeler gauge moves freely, you can loosen the 17 nut on the corresponding rocker, and hold the 13 nut with the other hand, keeping it from turning. The 13 nut must be locked with a 17 nut (with the probe moving tightly). The final tightening is carried out with a key set to 17. After which you can move on to the next cam.
The engine shaft must be rotated 180 degrees so that the mark on the sprocket stops, when viewed from the camshaft, at approximately nine o'clock. The fundamental coincidence is not very important.
Cams 4 and 7 are also adjusted according to a special table.
Again, rotate the motor shaft 180 degrees, the mark on the sprocket at the bottom should correspond to “six o’clock”, and on the crankshaft pulley should match. We adjust cams 1 and 3 according to the table.
Again we rotate the shaft 180 degrees, at “three o’clock” along the asterisk. We adjust cams 2 and 5.
After completing the adjustment work, you need to check all the nuts for 17 - they should be tightened tightly, and the feeler gauge should fit tightly in the gaps. If necessary, adjustments are made on the spot without closing the lid. You should immediately check the condition of the gasket (maybe it should be replaced).
In the same way as when replacing the cylinder head or camshaft, tighten the cover nuts from the center to the edges. Moreover, it is better to do this in several passes, gradually increasing the tightening force.
After all the work has been done in the reverse order, a test run is carried out. If necessary, additional adjustments can be made immediately. However, even most beginners make do with a one-time valve adjustment, and they cope with this task quite successfully, saving their own money, and at the same time also having fun and increasing self-esteem.
Source: videovaz.ru
VAZ 2101 - valve adjustment
When servicing the engines of classic Lada cars, a number of tasks arise, neglecting which is simply criminal in relation to the engine. Checking the thermal clearance of the valves and, if necessary, adjusting it is just that case. The VAZ 2101, as the most striking representative of the classics, is an unpretentious car to maintain and quite durable, however, it also needs to be given attention.
:
Valve clearance value
The thermal clearance of the valves in the gas distribution mechanism is necessary in order to compensate for the thermal expansion of the cylinder head parts and the cylinder head housing itself. If you do not adjust or check the gap in time, the entire gas distribution mechanism will not work correctly, which will lead to a significant loss of power, unreasonably high fuel consumption and instability of the engine in any mode.
The plant recommends checking the thermal gap at least every 15-20 thousand km, although many reduce this interval, knowing about the quality of oils and spare parts. Be that as it may, you need to check the gap not only based on the service mileage, but also on the behavior of the engine. A characteristic knock in the gas distribution mechanism, as well as those manifestations that have already been mentioned, can indicate a violation of the thermal gap.
VAZ 2101 on gas and fine adjustments
The valve timing in the VAZ 2101 engine, valve adjustment of which is on the agenda today, is designed in such a way that they not only ensure optimal filling of the combustion chamber with the fuel-air mixture, but also facilitate purging of the combustion chamber at the end of the power stroke. This allows the engine to work at full efficiency and optimal consumption of gasoline or gas.
By the way, the VAZ 2101 on gas also requires adjustment of the thermal gap, but an allowance of 0.05 mm must be taken into account. This is required by the higher octane number of the gas mixture compared to gasoline and slightly different operating conditions of the gas distribution mechanism under the influence of higher temperatures.
Checking the thermal gap
First, let's check the thermal gap and do this after 15 thousand mileage, regardless of whether a violation of the nominal value appears or not. To do this, you will need a minimum set of tools and this table, which indicates the procedure for adjusting the valves.
As you can see, measurement and adjustment must be carried out in strict accordance with the angle of rotation of the crankshaft relative to the marks on its pulley and the front engine cover. The ratio of the marks is shown in the photo below. As an option, and to avoid mistakes, you can put bright marks with a marker on the camshaft drive gear. Like that.
The mark on the camshaft housing boss coincides with the mark on the gear when both valves are closed on the fourth cylinder, which corresponds to position number one in our table.
To control the gap between the valve and the lever, you must have a device for adjusting the valves or a minimum standard set of tools and an adjustment probe for adjustment with a working part thickness of 0.15 mm. It is probably not worth describing the process of dismantling the air filter and its housing. The only thing is that it is advisable to place a piece of rags in the carburetor so as not to drop a nut or some other small thing into the manifold.
Adjustment of valves
If knocking, unstable operation, or increased vibration occur, you should pay attention to the valves.
If the valve timing of the gas distribution mechanism is disrupted, they do not operate accurately, that is, the full volume of gas does not enter the working area of the cylinders, complete combustion of the fuel-air mixture in the working chamber does not occur, and the cylinders are not purged. This is all accompanied by the appearance of a shock load on the camshaft cams on the drive lever and the shaft rod. Fuel and engine oil consumption also increases. What happens if you drive with unadjusted valves? Answer: rapid wear of engine parts, increasing cost and repair time.
The greatest danger to a car engine is a gap that is less than permissible. Too little clearance between the drive lever and the camshaft cam prevents the valve head from sitting tightly in its seat on the cylinder heads. Through a valve that is not seated, gases from the burnt fuel-air mixture are knocked out of the combustion chamber. Because of this, the exhaust valve cap around the perimeter begins to burn.
Rubber oil deflectors, also known as oil deflectors, also burn out due to a burnt valve cap, which leads to increased engine oil consumption. If the wear of engine parts is large, then it may be better and easier to do an engine swap with your own hands or at a service station.