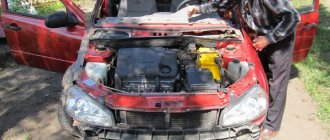
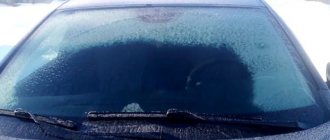
It has long been no secret that the safety of the driver and passengers depends on the driver’s timely reaction to danger on the road. And if the car is equipped with glass that impairs visibility (broken, with a “lens” effect, etc.), then the reaction time increases significantly. This can cause an accident, and the appearance of a car with broken glass is greatly deteriorated.
You need to immediately understand that replacing the windshield on a VAZ 2106 is quite difficult and this operation will require skill. If you are not sure that this can be done on your own, then it is better not to undertake it and contact the service.
In order to replace the windshield on a VAZ 2106 you will need the following:
- lace molding
- silicone cream
- rope
- sealant or anticorrosive
- various tools (knives, screwdrivers, keys, etc.)
Installing the windshield yourself
As a rule, it is impossible to make a replacement alone , so it would be better to take at least a couple more hands to help.
First you need to remove all unnecessary things from the panel (including the mirror), and then the glass itself. After removing the cord, it must be thrown away, as over time it becomes unsuitable for reinstallation. It is usually quite difficult to pull out the cord, because over time it loses its elastic properties and sits tightly in the frame. Then you need to remove the molding using a knife. After this, the glass can be easily removed from the frame.
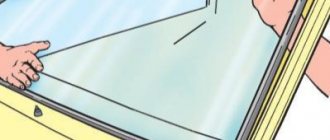
After removal, you need to put on the molding. To do this, you need to place the new glass on a soft surface so as not to damage it and put it on using the marked corners on it. The corners should fit neatly onto the tops and the cutouts should be over the gutters that are on the body. The protruding edges should be generously coated with silicone cream to make it easier to fit into place.
Before the next steps, you need to coat the rope with the same cream and place it in the grooves in the molding, along the entire perimeter. After this, the glass is pressed tightly to the installation site. In this matter, the main thing is not to overdo it to avoid damage. Having pressed, you need to slowly and carefully pull out the rope, at this time the molding will open and everything will fall into place. You can pat the edge a little with your hand, this will speed up the process.
This work should be done by two people.
Using a Phillips screwdriver, unscrew the three screws.
. and remove the windshield pillar trim.
Similarly, remove the cover of the second rack. Remove the ceiling lining (see Replacing the ceiling lining ). We start work from one of the upper corners of the glass.
Using a slotted screwdriver, we press against the inner edge of the glass seal and tuck it behind the flange. We fix the seal by inserting a screwdriver into the resulting gap, but not deeply so that the glass does not crack. Using the second screwdriver, we continue to thread the seal behind the roof flange.
Why do you need to replace your windshield?
There are two main reasons that lead to the need to replace your windshield.
- Penetration of moisture from under the seal. Leakage between the glass and the body occurs due to the presence of an untaped area. If there is no warranty, you will have to carry out the repairs yourself. Sometimes it is possible to eliminate a leak when a hole is detected by filling the gap with sealant. If you cannot get rid of the leak, you will have to completely re-glue the glass.
- Damage to the windshield. Many motorists have encountered problems such as cracks and chips. They gradually grow, forming a whole “web” on the windshield. In this case, you will not be able to pass the state technical inspection, and the operation of the vehicle will be unsafe. If there is minor damage, chips and cracks can be repaired, otherwise the glass must be replaced.
Windshield
The windshield of a car, also called a windshield, is installed in the front of the body and provides protection for passengers and the driver inside. Since it is the windshield in a car that experiences the greatest impact from the environment (gravel, sand, dirt, etc.), it is on this element that damage in the form of chips and cracks most often appears. Sometimes situations arise when a pebble flies into the glass from passing or oncoming traffic, causing a cobweb (numerous cracks) to appear across the entire surface of the glass. In this case, the windshield must only be replaced. Therefore, it would be useful for owners of the VAZ “Six” to know in advance the dimensions of the windshield, which have the following values: 1440 x 536 mm.
How to remove glass
The windshield is replaced with a minimum number of tools, but for convenience and safety, this procedure is best carried out with an assistant. The following tools will be needed:
- slotted and Phillips screwdriver;
- hook for prying up the seal.
Dismantling is carried out as follows:
- Using a Phillips screwdriver, unscrew the fastening of the side trim.
How to install glass
Installing new glass will require the preparation of the following materials:
- glass degreaser;
- clean rags;
- a rope with a diameter of 4–5 millimeters and a length of at least 5 meters;
- molding.
Installation consists of the following steps:
- We spread a soft cloth on the table to avoid scratches on the glass. We put new glass on it.
- We stretch the seal in the corners and then along all sides of the glass.
Video: how to replace the windshield on classic Zhiguli cars
Windshield tinting
Many VAZ 2106 car owners tint the windshield and other windows of their car. The main goals pursued are the following:
- reducing interior heating in summer;
- retention of glass fragments on the film in the event of an accident;
- protection of interior elements from damage under the influence of ultraviolet radiation;
- reducing the likelihood of being blinded by reflections of snow or headlights of oncoming traffic.
Having decided to darken the windshield, the main thing you need to know is about the light transmittance, which for the body element in question should be at least 75%, and for the front side windows - 70%. Other glasses can be tinted at your discretion. From the required list of materials you will need:
- shampoo;
- pure water;
- spray;
- glass cleaner;
- rubber spatula;
- sharp blade, knife;
- non-woven napkins.
Tinting is carried out in the following sequence:
- Clean and degrease the inner surface of the glass.
Materials and tools for windshield replacement
Before you start replacing your windshield, you need to stock up on the following materials and tools:
- metal string with 2 handles;
- awl or sharpened wire;
- suction cups for holding glass;
- screwdrivers;
- spanners;
- chisel;
- masking tape;
- glue-sealant for glass;
- gun for applying sealant;
- solvent, primer;
- tampons and gloves.
To replace glass, you will need a closed and dry room (garage or car bay). The car must spend at least one day in it.
To do the job efficiently and safely, you will need one or two assistants. Before starting work, the car should be washed (how to properly wash a car), especially in the area of the windshield.
How to remove an old windshield
A clean car must first be placed in a garage or box on a flat surface. The procedure for removing the windshield is as follows:
- Using a flat-head screwdriver, you need to remove the rubber seal located on the outside of the car.
- Wipers, plastic protection, and moldings are dismantled.
- In the cabin, the dashboard and front seats should be covered with film to protect them from dust and dirt.
- The seal is removed from the interior side, and the front pillar cards are pryed off in the area of the latches and dismantled.
- Now you need to unscrew the screws and remove the sun visors.
- The existing sensors and wires that go to the windshield must be disconnected and removed.
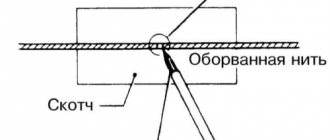
- An awl or sharpened wire is used to pierce the sealed seam (old glue).
- A faceted string is inserted into the puncture, after which handles are attached to its edges. It is more convenient to start cutting the old windshield from the upper left corner.
- It is more convenient to carry out the work of cutting the adhesive-sealant together. One is conveniently located inside the cabin, and the second is on the outside of the car. The principle of operation is simple: first, one person pulls the string towards himself, and the other holds his section taut. Then the string moves in the opposite direction. In this case, the string shifts along the windshield.
- In those places of the body where the string can touch the panel or trim, a piece of metal sheet should be placed.
- When a cut has been made along the entire perimeter, the windshield is removed from the car using suction cups.
- Now you need to clean the old glue from the body and glass (if it will be installed again). This requires a chisel and solvent.
Windshield replacement.
The need to remove the windshield arises mainly for repairs or complete replacement. The windshield is one of the most important parts of a car's body rigidity. If there is no windshield, the body may become skewed, and this will not be noticeable to the naked eye. We will tell you how to repair chips and cracks in future articles.
We will tell you further about how to replace the windshield and what is needed for this. To remove and subsequently install the windshield, you will need a cotton blanket, a nylon cord 5 meters long and 4 mm in diameter, and a screwdriver.
Remove the side and interior mirrors, sun visors, move away, or better yet, remove the windshield wipers. Unscrew the screws securing the decorative trim of the front side pillar and remove it.
Next, using a screwdriver, pry up the seal in the upper corner of the glass and move it behind the body flange.
Using your fingers, press out the seal, press on the glass and remove its upper edge from the body opening. You should press on the glass carefully, as if there are cracks the glass can break.
Carefully lifting the top and side parts, remove the glass. You should remove the glass with an assistant, as it is extremely inconvenient for one person and you can accidentally break the glass.
Remove the seal from the old glass. Using a metal brush, clean the glass opening from dirt, rust and mastic residues.
How to install a windshield
Over time, the sealing rubber becomes dull and becomes unusable, which is why there is water on the dashboard in the cabin, noise and dust. We recommend replacing the old seal with a new one.
Place the old or new seal on the glass, install the sealing cord
Place a nylon cord into the groove of the seal so that at the bottom of the glass, the ends of the cord stick out about 30 cm. With the help of an assistant, insert the glass into the groove on the body so that the ends of the cord are inside the passenger compartment.
Slowly pull the cord so that the seal extends beyond the body flange, while an assistant should press lightly on the reverse side. If necessary, adjust the end of the seal with a screwdriver. It is important to follow one rule: each end of the cord must be pulled approximately to the middle of the glass.
Install the mirrors, visors and handrail in the reverse order.
Next, we will briefly describe how to remove the rear window. In principle, the rear window is removed in the same way as the windshield, with the exception of some additional operations.
You should remove the glass trim trim, it is located in the lower corner, pry it off with a screwdriver and remove it.
You should start removing glass from the bottom corners
Windshield Installation
Installation of a new windshield is carried out in the following sequence:
- Before applying glue to the surface of the body and glass, it is necessary to treat the contour with primer. It will improve the adhesion of the surface to the glue.
- Before applying the glue, it is advisable to warm the tube or container with a hairdryer or warm water, then it will be more convenient to apply the sealant to the base.
- A clean rubber seal is mounted on the glass.
- The dispenser tube is trimmed at approximately a height of 20 mm (width 5 mm).
- The glue can be applied both to the contour of the windshield and to the surface of the body. Most specialists treat glass with sealant. But in the absence of suction cups, it is better to glue the perimeter of the body. It is very important that the sealant strip is continuous. The only joint is made at the bottom center.
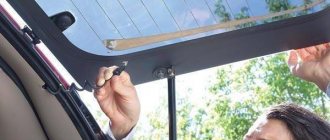
- After applying the glue, the windshield must be carefully placed in the opening. After placing the glass in place, lightly press on it - then it will fit tightly to the body, and the sealant will fill all the voids.
- To prevent the glass from accidentally moving, it should be secured with several strips of tape.
- After replacing the windshield, you can install plastic protection, side moldings and wipers.
- Do not slam the doors, trunk or hood to avoid creating vibrations and dislodging the glass.
- In this position, the car must be left alone for a day. It should be remembered that the higher the air temperature in the garage or box, the faster the glue will polymerize. If the room temperature is below 0 degrees, the sealant will not harden.
The next day, the tape is removed and the windshield and adjacent areas of the body are washed. At this point, you can check the tightness of the resulting seam. If a leak is detected, then you should additionally glue both the inner perimeter and the outer side of the seam. When 100% tightness is achieved, the car can be completely assembled.
If all windshield replacement operations are carried out carefully and consistently, the result will please the car enthusiast. High-quality installation with your own hands often eliminates ridiculous mistakes that even car service technicians make in a hurry. The main thing is that they are not afraid to master new levels of automotive repair.
Installing a new windshield
Before gluing and installation, it is necessary to prepare the surface by cleaning it from traces of glue and other unnecessary residues.
- The layer of old glue is not completely cut off. I recommend leaving a small even layer on the frame to improve grip.
- Carefully clean all glass joints from glue crumbs, dust, sand, etc.
- Treat the frame opening with an activator.
- The new windshield of the VAZ 2110 must be carefully cleaned of dust, then everything should be properly degreased.
- Take the windshield and place it upside down, then put on the molding; if it does not fit tightly, secure it using tape.
- Now turn the glass over and walk along the edge on which the activator will be applied - white spirit.
- Using a swab soaked in primer, mark a strip where the adhesive will be applied along the entire length of the molding.
- All the same actions must be done in relation to the opening of the glass frame, after which leave the surface to dry for 10-15 minutes.
- We begin installing the windshield of the VAZ 2110. Load the heated glue into the gun, then slowly, carefully apply the glue to the surface approximately 1 cm thick.
Important! If you do not have special suction cups that are used to pick up glass, then it is better to apply glue not to the glass, but to the frame itself. Practice all subsequent steps to install the windshield on the first try.