Replacing the stove pipe of a VAZ 2110
In our climate, a car heater is an irreplaceable thing. It can sometimes come in handy even in summer))) Having driven through the winter without much hassle, the other day I discovered a wet spot under the car. You could even say puddle. It's always not pleasant when your car leaks.
By the smell it was determined that it was antifreeze. Having examined the space under the hood, I found nothing. Only wet pan. I decided to go to the garage and figure it out. I got there without any problems, although upon arrival I saw that the level of antifreeze in the tank had dropped significantly. And again, the source of the leak did not reveal itself.
It was decided to drive the car at idle. Before the fan operates. Only after sufficient pressure had been created did I discover that the supply pipe to the stove was leaking. From under the clamp. Half the job is done, the problem has been identified)))
Why do you need a pump in a car?
If we talk about the operation of a car engine, then we immediately touch upon the topic of its cooling. Indeed, without high-quality cooling, the engine will not be able to work for a long time and will definitely “boil”. Thanks to the circulation of coolant, it becomes possible to operate the engine at any time of the year under any external conditions.
The power component on the VAZ of the tenth family has a rather complex structure. During the working cycle, the pistons rub strongly against each other, which invariably leads to strong heating of the surfaces. The only way to prevent engine overheating is to constantly maintain the desired temperature in the friction zone through the circulation of coolant. It is for this purpose that the VAZ design includes a cooling system.
Coolant (antifreeze or antifreeze) is poured by the driver into the expansion tank of the car. From it, the liquid is transferred through pipes to the water pump, and from there it goes to the radiator and cylinder block. The water pump (or pump) is designed to pump antifreeze through the system while the engine is running. That is, the pump starts together with the engine and turns off after the driver turns off the car. Without a pump, the entire cooling system can be considered ineffective, since only the pump can create rapid circulation of liquid throughout all parts of the system.
The pump is designed to create the necessary pressure in the cooling system to move the liquid.
Car engine cooling system repair
How does an engine cooling fan work?
I think there is no need to say that the SOD is intended to cool engine parts that are heated as a result of its operation. To identify problems with the engine cooling system yourself, you need to understand how this system works:
Operating principle of the engine cooling system
The SOD contains:
- Engine cooling radiator, which is designed to cool heated coolant with air flow.
- A radiator fan that increases the cooling intensity of the coolant in the radiator.
- The heater radiator, which is the source of heat for the car interior.
- An expansion tank, which serves to compensate for changes in the volume of coolant due to temperature. You won't be able to add antifreeze without it either.
- A pump or centrifugal pump that circulates coolant in the system.
- A thermostat, which is designed to regulate the amount of coolant passing through the radiator, thereby ensuring optimal temperature conditions in the system.
- The coolant temperature sensor is one of the cooling system control elements.
The coolant in the SOD circulates constantly, that is, it has forced circulation, which is provided by the pump.
Depending on the temperature, the liquid circulates in a small or large circle. To speed up engine warm-up, the coolant moves in a small circle, bypassing the radiator. The thermostat is closed. When the coolant (coolant) heats up to a certain temperature, the thermostat opens and the coolant begins to circulate in a large circle (through the radiator). In the radiator, the coolant is cooled by a counter flow of air, or by an air flow from a fan, which turns on when the coolant reaches a certain temperature. After cooling, the liquid again enters the small circle and so the cycle of movement of the coolant is repeated many times, maintaining the operating temperature of the engine (98-103°C).
Diagnose the engine cooling system and identify problems
The first step is to check the coolant level in the system. In cars of the tenth family, this is done either visually (the expansion tank must be half full) or using the coolant level indicator (installation instructions). If there is an antifreeze leak, then inspect the engine compartment for smudges. Usually the causes of antifreeze leakage are: old clamps on the pipes, a broken engine cooling radiator (radiator repair) or an old heater radiator (heater radiator replacement).
- Check the thermostat. With the engine warm, touch the upper and lower radiator pipes with your hand. If the top one is hot and the bottom one is cold, and the radiator is barely warm, then the thermostat is stuck and the coolant circulates only in a small circle. By the way, the thermostat can also get stuck in the open position, then the engine does not warm up to operating temperatures. The thermostat needs to be replaced.
- Another reason for engine overheating may be air in the engine cooling system (how to remove an air lock is described here).
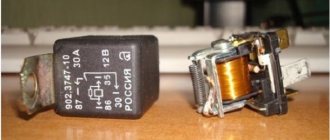
- If the radiator fan does not turn on, then check the coolant temperature sensor, wiring to the fan and relay.
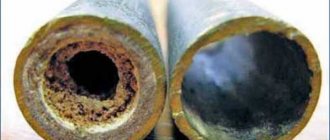
- It is not uncommon for the radiator honeycombs to become clogged due to dirt and dust and it is not able to cool the antifreeze properly. The result is engine overheating, and the solution may be to clean the radiator.
Refinement of the engine cooling system
- To make maintaining the coolant temperature more stable, you can install a 6-hole thermostat. In addition, it can still be modified!
- You can warm up the antifreeze more quickly in winter and reduce the pressure in the system if you convert the dozens of SODs to the Kalina system.
- You can improve coolant circulation in the SOD by installing an alternative, more efficient pump (Luzar). An additional pump in the SOD is also not a bad idea.
- The standard radiator fan on the VAZ 2110 (Carlson) has only one speed. You can easily modify the fan start-up, or replace the fan with a more efficient and silent one.
- It is possible to change the car's firmware, then you can set a lower temperature for the radiator fan.
| What malfunction of the cooling system on a VAZ have you encountered most often? |
Work order
Every slave must have its own consistency. Then it can be done efficiently.
- The wire from “—” is disconnected from the battery.
- The coolant is drained.
Tip: Before draining the coolant, you must allow the engine to cool, otherwise the temperature of the drained liquid will be high.
- The lining, frame trim on the windshield, and sound insulation upholstery are removed.
- The heater fan is removed.
- The vacuum hose clamp is disconnected from the stove body.
- Using a screwdriver, remove the three spring clips that secure the front housing of the heater air collector.
- Remove the screws securing the front housing.
- The front housing is removed.
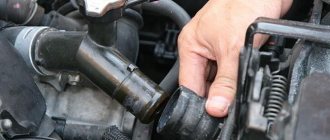
- The tightening of the clamps is loosened and the hoses are disconnected from the fittings.
Installation of new pipes
When replacing the stove pipes on a VAZ 2110, it is better to replace the clamps connecting all the elements. So:
- Replacement in progress. New pipes have been installed on the VAZ 2110 stove for supplying coolant and draining it from the radiator.
- The remaining parts and assemblies are installed in the reverse order.
- Coolant is poured into the cooling system and the tightness of the pipes and all connections is checked, if necessary they are tightened.
Replacing a tee or outlet hose of a VAZ 2110 heater radiator
Attention: There are cases when coolant leaks at the junction of the tee with the heater, expansion tank and engine cooling pump. Sometimes it is enough just to tighten the hoses on the pipes with new clamps
Sometimes it is enough just to tighten the hoses on the pipes with new clamps.
Tip: Tightening the clamps must be done very carefully so as not to cut through the rubber of the hose, which may lead to the replacement of the hose. https://www.youtube.com/embed/V701JLSSLyc
https://youtube.com/watch?v=V701JLSSLyc
Repairing a hose without removing it from the car
- The damaged end of the element is cut off.
- A piece of the same hose is attached to a metal pipe approximately 60 millimeters long and 20 millimeters in diameter. The price of such an element is low, which saves money and repair time.
- To reduce the tension of the hose, its length should be increased by 8 millimeters.
- If antifreeze leaks from the joint between the hose and the heater radiator, then it is necessary to remove the vacuum booster.
How to replace the stove pipe of a VAZ 2110 is clearly visible in the video presented.
Replacing tee hoses
Instructions and work order:
- The clamp securing the filling hose to the tee branch pipe is loosened.
- Coolant is drained from the expansion tank.
- The clamp connecting the hose of the tee and the branch pipe of the pump supply pipe is loosened, the hose is removed from the branch pipe, and the remaining liquid is drained from it.
- The rubber belt securing it is unfastened from the expansion bull.
- The connector is removed from the sensor that monitors the level of cooling liquid in the tank.
- The hose that removes steam from the tank is disconnected.
- The tank is removed from the niche and moved to the side, along with the second hose that removes steam.
- Unscrew the screws securing the left noise-insulating upholstery of the engine compartment.
- The top screw holding the central upholstery is removed.
- Remove the connector from the sensor in the brake reservoir, which monitors the fluid level in it.
- Unscrew the nuts securing the vacuum booster of the main brake cylinder.
- The cylinder is removed from the studs and, together with the brake pipes, is moved forward. This causes the tubes to bend.
- The hose is removed from the vacuum booster pipe, having first bent the upper corner of the upholstery.
Further work is performed inside the car:
- We move the vacuum booster, bracket and brake pedal assembly to the side and free access to the pipes located on the heater radiator.
- To disconnect the lower hose, you must first remove the upper supply hose.
- The clamp is loosened and the lower hose is removed from the pipe.
Installation of new elements is carried out in reverse order.
Tip: For greater reliability of the connection, before installing the tee on the pipes, it is better to install additional clamps.
A timely inspection and, if necessary, replacement of the hoses of the VAZ 2110 stove and the car’s cooling system, with your own hands, is the key to reliable operation of the car’s engine.
Engine cooling system VAZ 2114
Engine cooling system VAZ 2114
The VAZ 2114 engine cooling system is of interest to many owners of this car. Unfortunately, domestic cars are not distinguished by good build quality and reliable operation of their various systems, including the VAZ 2114 engine cooling system.
But before you find and fix a malfunction in the VAZ 2114 engine cooling system, you need to know its structure and operating principle. We'll talk about this next.
Internal heat exchange
The operating principle of the VAZ 2114 engine cooling system is based on internal heat exchange, which occurs using liquid. I won’t reveal anything new to you here, since the operation of the cooling systems of 99% of all cars in the world is based on this principle.
The reason for this was that this principle is much more efficient and reliable than the air cooling system.
We are all familiar with the legend of the domestic automobile industry, the Zaporozhets car, on which the engine stood at the rear and was cooled using directed air flows.
And how the owners of this car suffered, coming up with various tricks to increase the efficiency of this system so that the engine does not overheat.
Important drawback
However, the engine cooling system of the VAZ 2114 and all other similar cars has one important drawback: constant monitoring of its condition, periodic mandatory maintenance and repair.
The operation of such a cooling system is based on forced circulation of coolant through a closed circuit. The only thing that connects it to the external vir is the expansion tank.
Design of the VAZ 2114 engine cooling system
The VAZ 2114 engine cooling system consists of:
- Electric motor;
- Pump;
- Left and right radiator barrels;
- Necks;
- Filler and drain plugs;
- Drain pipe.
Of course, the radiator, expansion tank, tubes and hoses through which the coolant circulates, thermostat, electric fan and its activation sensor, pipes for the heater radiator, carburetor heating unit.
Also included in the cooling system of the VAZ 2114 engine is the camshaft drive belt, which drives a centrifugal pump or simply a pump.
Principle of operation
The circulation of liquid in the car's cooling system occurs forcibly under the influence of a centrifugal pump, which, in turn, is driven by the timing belt.
The electric fan has four built-in plastic blades. It is mounted on the motor shaft. The electric motor, in turn, constantly reacts to the readings of a special sensor and, depending on its readings, turns on and off.
As you know, the VAZ 2114 engine cooling system is not as such without a thermostat valve, which has two channels, main and additional. The thermostat has a special filler that is sensitive to changes in ambient temperature.
In general, the thermostat valve is one of the most important elements of the cooling system of any car. When the coolant temperature reaches approximately 87 degrees (plus or minus 2 degrees), the main valve opens and allows coolant to flow through the large circuit.
When the coolant temperature reaches 102 degrees, the stroke of the main valve stops at 8 mm (for VAZ 2114).
Design and diagram of the heater (stove) VAZ-2110, 2111 and 2112
Winter is coming, and no matter how popular the saying is ready to sleigh in the summer, we begin to put the heater in order only closer to winter. This small cutout from the Murzilka will help us with this, which will tell us how the stove in the tenth VAZ family works. We present to your attention a diagram of the heater air ducts and control parts for the VAZ-2110 heater
1 – rear heating air ducts 2 – floor tunnel lining 3 – foot heating ducts 4 – central cabin ventilation nozzles 5 – side cabin ventilation nozzles 6 – front door window heating nozzles
7 – control lever for the interior heating system 8 – air distributor housing 9 – foot heating flap 10 – windshield heating flap 11 – heater
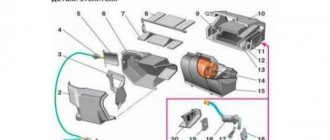
And here is a diagram of the parts of the VAZ-2110 stove, the design of dampers, valves, etc.:
1 – electro-pneumatic valve 2 – front heater air intake housing 3 – air intake water deflector flap 4 – recirculation damper control valve 5 – air intake recirculation damper 6 – rear heater air intake housing 7 – heater duct damper 8 – heater control damper 9 – radiator 10 – heater radiator casing
11 – steam exhaust hose fitting 12 – supply hose fitting 13 – exhaust hose fitting 14 – heater electric motor with fan 15 – electric motor housing 16 – support platform for the heater control damper drive lever 17 – heater control damper drive lever 18 – damper drive micromotor 19 – resistor 20 – heater casing cover
Note that the VAZ-2110 heater has an air recirculation system, that is, the air is not taken from the street, but simply circulates inside the cabin. The advantages of recycling are that dust, odors from the street, etc. do not enter the cabin. Cons: the windows fog up, the air in the cabin is not updated. When the recirculation system is turned on, the air flow during movement does not flow by gravity into the cabin, so the heater motor must be turned on. The electric motor in the tenth stove is essentially not repairable; it is recommended to change it in case of any malfunctions. The heater is controlled by an electronic control unit. There is no faucet that shuts off the flow of coolant into the heater radiator in the VAZ-2110 and is not provided for by the design. That is, the radiator is always on.
Internal structure and principle of operation
The heating system installed on the VAZ-2109 has its own differences and features compared to other cars in the AvtoVAZ line.
The heater consists of a pair of plastic casings (on the right and on the left), which are connected to each other along the entire perimeter with clamping brackets. A special flagellum is placed in the grooves of the casings to seal it well. The fan supplies air flow to the interior of the machine. The VAZ-2109 stove is designed so that the fan can be easily removed independently from the engine compartment.
An electric motor of type 45.37230 is attached to the casing, and a fan is located on its shaft. To obtain its desired rotation speed, additional resistance was provided. It was attached to the left side of the hole in the heater casing using a screw.
Heating system radiator
A radiator is built into the stove body to heat the air flows, which then blow into the cabin. Using three screws, this element of the system is screwed to the right casing and sealed with a polyurethane foam gasket.
The radiator design is a combination of:
- 2 rows of tubes.
- 2 rows of cooling plates.
- 2 plastic tanks.
It has two pairs of pipes, it is connected to the cooling system by rubber pipes, where coolant circulation is ensured using a pump. In the valve casing, on the axis of the supply line, there is a plate valve, which has a hole; it allows the coolant to pass through. The valve lever is connected by a rod to the handle lever, which also controls the process of heating the air flow. If you turn this lever, the hole in the valve will open the line for coolant to enter the radiator.
To ensure uniform heating of the car interior, the stove has two central nozzles, as well as left and right, to which air ducts are connected.
Exhaust ventilation
The car is equipped with exhaust ventilation, which circulates air from the interior to the street. It is located behind the body openings for the side windows.
Air also passes out through the deflectors when the car moves. The ventilation process is carried out due to the vacuum that occurs at the deflectors during movement. Air is sucked out from the rear of the cabin under the deflector trim; for this purpose, the rubber valves are pressed out and the air flow goes out through the deflector hole to the street.
Rubber valves are needed to prevent outside air from entering the car interior.
Description of design
VAZ-2110 engine cooling system (with carburetor)
VAZ-2111 engine cooling system (with fuel injection system)
The cooling system is liquid, closed type, with forced circulation. The tightness of the system is ensured by the inlet and outlet valves in the expansion tank plug. The exhaust valve maintains increased (compared to atmospheric) pressure in the system on a hot engine (due to this, the boiling point of the liquid becomes higher, steam losses are reduced). It opens at a pressure of 1.1-1.5 kgf/cm2. The intake valve opens when the pressure in the system decreases relative to atmospheric pressure by 0.03-0.13 kgf/cm2 (on a cooling engine).
The thermal operating conditions of the engine are maintained by a thermostat and an electric radiator fan. The latter is turned on by a sensor screwed into the left radiator tank (on a VAZ-2110 engine) or through a relay based on a signal from the electronic engine control unit (on VAZ-2111, -2112 engines). The sensor contacts close at a temperature of 99±2°C, and open at a temperature of 94±2°C.
To monitor the coolant temperature, a sensor is screwed into the engine cylinder head and is connected to a temperature gauge on the dashboard. An additional temperature sensor is installed in the exhaust pipe of injection engines (VAZ-2111, -2112), which provides information to the electronic engine control unit.
The coolant pump is a vane, centrifugal type, driven from the crankshaft pulley by a timing belt. The pump housing is aluminum. The roller rotates in a double-row bearing with a “lifetime” supply of grease. The outer ring of the bearing is locked with a screw. A toothed pulley is pressed onto the front end of the roller, and an impeller is pressed onto the rear end. A thrust ring made of a graphite-containing composition is pressed to the end of the impeller, under which there is an oil seal. If the pump fails, it is recommended to replace it as an assembly.
The redistribution of liquid flows is controlled by a thermostat. On a cold engine, the thermostat bypass valve closes the pipe leading to the radiator, and the liquid circulates only in a small circle (through the thermostat bypass pipe), bypassing the radiator. On a VAZ-2110 engine, the small circle includes a heater radiator, an intake manifold, a carburetor heating unit and a liquid chamber of a semi-automatic starting device. On VAZ-2111, -2112 engines, liquid, in addition to the heater, is supplied to the throttle assembly heating unit (heating of the intake manifold is not provided).
At a temperature of 87±2°C, the thermostat bypass valve begins to move, opening the main pipe; in this case, part of the liquid circulates in a large circle through the radiator. At a temperature of about 102°C, the pipe opens completely and all the liquid circulates in a large circle. The stroke of the main valve must be at least 8 mm.
The VAZ-2112 engine thermostat has an increased resistance of the bypass valve (throttle hole), due to which the fluid flow through the heater radiator increases.
Coolant is poured into the system through the expansion tank. It is made of translucent polyethylene, which allows you to visually monitor the liquid level. The on-board monitoring system also reports a drop in the fluid level; for this, a sensor is provided in the tank lid. Two steam exhaust pipes are also connected to the tank: one from the heater radiator, the other from the engine cooling radiator.
The radiator consists of two vertical plastic tanks (the left one has a baffle) and two horizontal rows of round aluminum tubes with pressed-on cooling plates. To increase cooling efficiency, the plates are stamped with a notch. The tubes are connected to the tanks through a rubber gasket. The liquid is supplied through the upper pipe and discharged through the lower. Next to the inlet pipe there is a thin pipe for the steam pipe.
The use of water in the cooling system is not recommended: hot water causes intense corrosion of aluminum parts.
| previous page4.36. Engine disassembly and assembly | next page 5.1. Description of design |
VAZ-2111 engine cooling system with fuel injection system
Cooling fan does not work
1 – expansion tank; 2 – plug; 3 – steam removal hose; 4 – hose from the expansion tank to the thermostat; 5 – coolant temperature sensor in the outlet pipe; 6 – throttle unit; 7 – radiator supply hose; 8 – radiator outlet hose; 9 – left radiator tank; 10 – right radiator tank; 11 – drain plug; 12 – radiator core; 13 – electric fan casing; 14 – electric fan impeller; 15 – electric motor; 16 – pump gear pulley; 17 – pump impeller; 18 – camshaft drive toothed belt; 19 – heater radiator outlet pipe; 20 – pump supply pipe; 21 – tap; 22 – heater radiator; 23 – coolant drain hose from the throttle pipe; 24 – coolant supply hose to the throttle pipe; 25 – coolant temperature indicator sensor; 26 – exhaust pipe; 27 – heater supply pipe; 28 – thermostat; 29 – coolant level sensor.
Maintenance and repair of the VAZ 2110 stove
Caring for the heating system in the warm season has specific features. Since during the operation of the equipment a lot of scale accumulates inside the radiators, the efficiency of the entire unit is reduced. To clean the ballast elements, the car owner will need a pair of worm bars, a pair of rubber seals, keys, a cooler and a reservoir for collecting used antifreeze.
Initially, turn off the electric motor and allow it to cool. A rag must be placed at the bottom of each pipe. Next, the hose clamps are loosened, through which the coolant is directed into the engine compartment. Then they remove the rubber connectors from the tap and pipes, unscrew the screws of the fasteners on the seal, and disconnect the drive rod on the tap with the fan housing.
The radiator pipes are removed from the hole located in the damper of the engine compartment. When removing the tap, clean the pipes and the tap. To accurately diagnose a breakdown of the heater switch on a VAZ 2110, it is necessary to analyze the voltage on the contacts when changing the position of the assembly handle. If there is no change in voltage, it should be replaced.
The flap may also become deformed and jam in some positions. Nowadays you can purchase a steel damper and replace a deformed one made of plastic, but this is a rather labor-intensive undertaking. You can quickly force the VAZ heater to pump in warm air in this way. First you need to turn off the controller.
When 12 V power is supplied, the damper will open/close in accordance with the polarity. The controller is not able to provide the necessary current to move a jammed or deformed valve, and feeding directly from the batteries will allow you to forcefully act on it, changing the polarity. After this, you need to set the heater regulator on the VAZ 2110 to the maximum position, put the heater controller back and do not change the position of the regulator until spring.
When it warms up, it will be possible to disassemble the stove and figure out the cause of the jam.
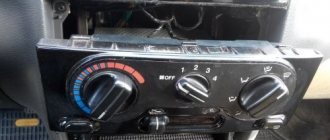
Design features of the VAZ-2110 stove control unit
One of the common heating system problems that VAZ-2110 owners encounter is the failure or malfunction of the heater control unit. Dozens of them are equipped from the factory with stoves, which are coordinated through an automatic heater control system. In short, the system is called the SAUO block. The main indicators of its malfunction are the operation of the heating system not in all modes. If one or more stove speeds do not work, then most often the problem is in the ACS unit. Thanks to the electronic module of the VAZ-2110, the temperature set by the driver is maintained in the car interior.
Before you begin repairing the VAZ-2110 heater, you need to find out what kind of heater is on your vehicle. Cars that were produced before September 2003 are equipped with old-style stoves. Accordingly, there are significant differences in the design, which are important to pay attention to during repairs.
The ACS unit consists of electronic elements, which are coordinated using handles on the central console of the machine.
The VAZ-2110 stove control unit is equipped with a controller with two handles. The right handle is responsible for turning on a certain fan speed. An additional resistor is directly responsible for switching its speeds. Old style stoves have resistors for two or three fan speeds. The new model stoves have a modified resistor RDO 2123–2118022. The unit for coordinating the operation of the improved stove model has four speeds and does not have an auto mode.
Replacing the pipe
I went to the store, bought a set of pipes (in reserve), clamps, and antifreeze to top up. I returned to the garage and began to disassemble. This was my first time replacing this pipe. I knew that it was going to the stove and I also knew that I would have to take a lot of disassembly, plus drain the antifreeze.
First things first. First, I unscrewed several screws and removed the left trim (aka sound insulation). Then I removed the air pipe, loosening two clamps, and also disconnecting the crankcase ventilation pipe.
Next, I proceeded to dismantle the front window trim and removed the wiper arms.
After all the operations performed, I finally saw where the damaged pipe ends. But it is blocked by the heater fan housing.
So we’ll remove it too. It is held on by three screws and two top latches. There were no problems with withdrawal. In one step I cleaned the fan of debris.
I didn’t take out the fan itself, I just moved it a little to the left. And now I had access to the clamp and pipe.
Adjusting the stove controller
The manufacturing plant provides for heating the interior to the specified temperature in fifteen minutes with a deviation of up to two degrees. Use the controller knob to set a comfortable temperature in the car interior.
To check the proper functioning of the stove, use a regular mercury room thermometer. If after fifteen minutes the interior has not warmed up to the required temperature, the controller must be adjusted.
To do this, pull the heater control module back out and rotate the temperature regulator, first to the maximum value, then in the opposite direction. After carrying out such actions, install the unit in place and check the operation of the stove again.
At the same time, it is necessary to check the operation of the heater dampers. If there are extraneous sounds when switching temperature modes, then you need to check the condition of the dampers. If cold air flows well, but hot air hardly flows in, then the lower damper is faulty. If there is no normal flow of cold air but there is a good flow of hot air, there is a problem with the upper damper. The reason may be deformation of the dampers under the influence of air of different temperatures. In this case, it is better to replace the standard plastic dampers with aluminum analogues, which are more resistant to temperature changes.
After adjusting the controller, all heater elements are installed in their original places. Assembly is carried out in reverse order.
Necessary tool for replacing the heater core
In order to deal with this problem as comfortably as possible and carry out repairs with minimal labor costs, it is advisable to have the following list of tools on hand:
- Ratchet handles large and small
- The head is 13 deep and 10 similar
- Extension
- Regular length screwdriver with Phillips blade
- Short screwdrivers: flat and Phillips
- Magnetic handle
Since the stove radiator is located in a rather hard-to-reach place, you will first have to perform some preparatory steps, namely:
- Remove the windshield wiper arms assemblies
- Remove the trapezoid assembly with the wiper motor
- Get rid of all plastic windshield linings, frills, insulation and sound insulation
- Dismantle the heater motor
- Drain the coolant from the system
And only after this you can directly begin the process.
Lada 2110 PhiX › Logbook › Replacing the upper pipe of the VAZ 2110 cooling system
Hi all! Unexpectedly, a small problem occurred: the upper pipe of the cooling system ruptured. About 4 liters of antifreeze leaked out, which is approximately half of the total volume.
The breakdown, although unexpected, was quite predictable. The car is already 12 years old, and naturally, no one has changed the pipes over the years. During extreme maintenance of the cooling system, www.drive2.ru/l/5156633/. which was only half a year ago, the thought of replacing the pipes came to my mind, but the “toad” defeated common sense. The end result is a waste of time and money.
New pipe CO 220r,
5l Antifreeze “Felix” 680 RUR,
Clamps “Norma” 2 pcs. 90 rub.
Fortunately, the store was still open; it was about 20:00. I had to change the pipe on a hot engine, right in the parking lot in front of the store, what a pleasure.
The pipe broke for a reason; it probably happened during sudden braking, which had to be done so as not to roll over a pedestrian who was crossing the road in the wrong place. The motor bit on the cushions and pulled the pipe, which has already lost its elasticity. Change the pipes in a timely manner and save time and money.
Issue price: 1,000 ₽ Mileage: 179,000 km
Previously Minor repair of BI BSK VAZ 2110 Next Gates GT5050 windshield wiper blade for VAZ 2110
How to drain antifreeze
Now all that remains is to drain the antifreeze into a container. I used a 5L bottle and only drained from the block. See how to drain antifreeze here.
A piece of garden hose (about 1.5m) worked very well for draining.
That's all. After draining the coolant, I unscrewed the two clamps of the torn pipe and replaced it with a new one. That's where the pipe broke.
I didn’t encounter any particular difficulties in my work, even though I was doing it for the first time. As a result, I gained invaluable experience and money savings. The service would charge from 600 to 800 rubles. In addition, I wiped all the hidden cavities and removed debris from them. It's unlikely that a service station would do this to you. Video to help))) (replacing the stove)
https://youtube.com/watch?v=rH5QtJFwLUo
How to replace the VAZ 2110 fuel filter with your own hands - step-by-step guide
2. The VAZ fuel filter is replaced using an inspection pit or a lift. First of all, you need to find a fine filter; it is a small cylinder and is located under the machine, in the beam area and is attached to the bottom using clamps. (see photo) There are two fuel line hoses connected to it, so you can easily find it.
4. Now you need to remove the filter, this is done using the keys “17” and “19”. Clean the connections from dirt and dust, treat them with a WD tool if necessary, then unscrew the fuel line fittings, as well as the bolt securing the filter clamp, and remove the old filter.
6. Tighten the nuts of the fittings and check the tightness of the connections.