After buying the car, I immediately changed the oil and filled it with 5w40 mannol
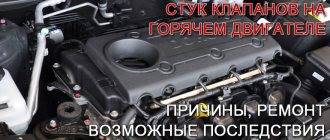
and drove 8000 km and could hear the valve knocking when it was cold, so once the sensor came to life I decided to immediately check the valve clearances.
I read smart articles and wrote a piece of paper about how much clearance there should be for each valve. intake - 0.2 +-00.5 exhaust - 0.35 +-00.5 Actually, 1,4,5,8 are exhaust valves and 2,3,6,7 are intake valves.
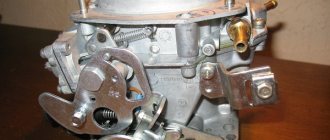
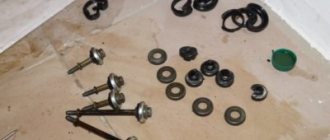
In a nearby service station - garage, I asked for a rack for recessing the valves, without any problems they gave me a rack and a jar containing 2 handfuls of washers... And then everything is as in this video, a very visual aid
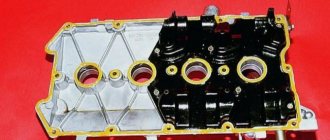
There are sad photos when I just took off the valve covers and sadness, sadness
In this case, we only consider adjusting the valves on a VAZ 2110 with an 8-valve engine, since it is not carried out on a 16-valve engine, since hydraulic compensators are installed on them. Thus, if you are the owner of a dozen with a sixteen-valve engine, then when a characteristic knock appears, you only need to replace the hydraulic valves, but if your VAZ 2110-12 is equipped with an eight-valve engine, then you need to adjust the thermal clearances of the valves.
This procedure, if you have the necessary tools, can be done with your own hands. We will help you in this matter with step-by-step instructions with photographs.
Self- adjustment of valves on a VAZ 2110 looks like this:
- First remove the valve cover;
Install a special device for adjustment (you can do without it using 2 powerful flat-blade screwdrivers);
Place the first cylinder at TDC. To do this, you need to set marks on the crankshaft and camshaft (on an 8-cl. engine; on a 16-valve engine).
We take the required set of washers (thickness 3-4.5 mm in increments of 0.05 mm), tweezers and a feeler gauge, measure the gaps one by one and install adjusting washers of the required thickness. We find out the required thickness of the washer using the formula:
H = B+(A–C), where A is the measured gap, B is the thickness of the old adjusting washer, C is the nominal gap, H is the thickness of the new washer under the pusher obtained by calculation.
In the table below, you can see the sequence in which you need to turn the crankshaft half a turn and adjust the valve clearances on the 8-valve VAZ 2110 engine. By the way, install the new washer in the pusher with the marking down.
After installing the washer, remove the lock and check the gap with a feeler gauge again. If the selection was made correctly, then a 0.20 or 0.35 mm feeler gauge should enter the gap with little effort.
Read more: How to determine the kW of an engine
We carry out this procedure on all the valves, then we assemble everything in the reverse order, start the car and observe a noticeable difference in engine performance after adjusting the valves.
To prevent camshaft wear and valve burnout, attention should be paid to the prevention of the gas distribution mechanism. Engines with a simpler timing system require periodic tuning. Adjusting the valves of the VAZ 2110 8 valves with your own hands is a common task for many motorists. We will try to describe in detail the entire work process.
For reference! The valves on the VAZ 2110 with an injection 16-valve engine cannot be adjusted. These engines have a gas distribution mechanism with hydraulic compensators, which should be changed periodically.
Setting rules
Every car owner can refer to the manual regulations. It is worth saying that the nominal installation of valves on the VAZ 2110 8-valve injector occurs at the factory. According to the operating instructions, it is recommended to carry out the first adjustment at 10,000 km. This mode is called running-in. And then, adjustments should be made every 45,000 km. In some cases, engines operate properly up to 80,000 km.
For reference! The installation of valve pusher washers on VAZ 2110-12 vehicles (8 valves), with injection and carburetor engines, is completely identical.
Order of Operations
On a note! To ensure the safety of the technician, it is necessary to reduce the pressure in the cooling system. To do this, you need to partially drain the liquid. You also need to disconnect the battery.
A complete replacement of the coolant is not required for this type of repair if its service life has not expired. It is better to install the machine on an overpass or inspection hole. Further work is performed in the following sequence:
- Disconnect the battery by removing the negative terminal.
- First, the cover of the expansion barrel is opened, and a container with a volume of at least 5 liters is placed under the cylinders. The coolant is drained into it; after draining, the cover must be replaced.
- Then you need to remove the casing; to do this, unscrew the mounting bolts.
- Now you need to fix the crankshaft at the dead top point of the 1st cylinder. To do this, the gear is engaged and the pulley mounting bolt is turned. The correct position is determined in this way: the mark on the timing case coincides with the mark on the shaft gear.
- To statically fix the crankshaft, you need to insert a screwdriver between its teeth.
- Now you need to loosen the tension on the timing belt; to do this, slightly unscrew the nut holding the roller. This is done with a special key, the direction of movement is counterclockwise.
- After this operation, the roller and belt can be removed.
- Now you can completely remove the casing. To do this, unscrew the five mounting bolts.
- The water pump is now available. You need to pry it off with a screwdriver and remove it. The seat should be cleaned.
- Now the VAZ 2110 8-valve injector pump is being directly replaced. But first you need to take a new gasket, coat it on both sides with autosealant, and install it on the pump.
- The pump is installed in place.
- Subsequent work is performed in the reverse order to that described above. It is advisable, along with replacing the VAZ 2110 8 pump, to change the roller and timing belt. This way you can accurately calculate the service life of these elements.
- After installing the belt in place, you need to check its tension. To do this, take one of its fields with your fingers and unfold it in a horizontal plane. If you cannot turn the belt more than 90 degrees, the tension is normal.
- After completing the work, add old or new coolant to the required level.
Attention! After completing the work, you need to test the pump's performance again. The engine starts again, heats up to operating temperature, and the pipe is pinched with a gloved hand.
If squeezing requires effort and your fingers feel the movement of the liquid, everything is done correctly
Only after positive test results of the pump can you hit the road by car. For the procedure for replacing the VAZ 2110 8-valve pump, watch this video.
Symptoms
To understand that the valves on the VAZ 2110 engine need adjustment, it is enough to know the behavior of the engine. After prolonged use, the car owner may notice that the engine has begun to work somehow differently. This fact should alert you, because the consequences can be serious.
The main symptoms of a faulty valve mechanism adjustment on a VAZ 2110 look like this:
- the engine is noisy when starting up after a long period of parking (clacks);
- compression in the cylinders disappears (the engine loses its former power);
- Valve cover gasket leaks oil;
- “shots” appeared in the carburetor or muffler;
- fuel consumption has increased.
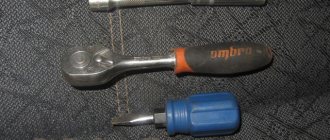
The listed signs can be diagnosed independently, without resorting to the services of a car service. Before you put the VAZ 2110 in for repairs and begin adjusting the valves, you should prepare a mechanic’s tool: a micrometer, a rack for pressing the pushers and a multi-part feeler gauge. The last thing to measure is the thermal gap between the camshaft cam and the adjusting washer. Instead of a rack, it is possible to use two powerful slotted screwdrivers.
The installation kit (fixture and probe) is sold in most Auto Parts stores. Its cost varies from 200 to 500 rubles. Correct installation of valves on a VAZ 2110 8 valve injector or carburetor is the key to success.
How to carry out repairs yourself
Having some auto mechanic skills, any owner of a domestic car is able to repair it with his own hands without any problems, just follow the instructions below, carefully studying each stage of the work, conditionally divided into preparatory, dismantling, repair and installation.
Preparatory stage
It begins by turning off the on-board power supply to the car, for which the terminals are removed from the battery and it is necessary to drain the old engine oil into a prepared container through a service plug and coolant from the engine crankcase, this is done by disconnecting the lowest radiator pipe from the cylinder block, the only precaution is Carrying out the procedure on a cooled engine, otherwise you can get your hands burned!
Dismantling
The cylinder head begins with the removal of all attachments: cooling system pipes, vacuum system, intake and exhaust manifolds, generator and timing belts, having previously dismantled its casing, resulting in free access to the mounting of the cylinder head itself and the engine crankcase. Next, the bolts of the valve cover and cylinder head are unscrewed, after which it is carefully removed and placed on a workbench, at which point the dismantling stage is completed.
Repair
It starts with unscrewing the camshaft fasteners, then the valve lifters are removed and, using a depressurizer, we disassemble their spring mechanism and remove them from the back of the cylinder head. The next step is to remove the old guides using a screw puller and press new ones in their place until a characteristic click is heard by their retaining rings. We take a new valve, apply grinding paste to its working surface and begin grinding its mirror with a drill until it is completely ground in.
We perform this operation with all eight, after everything we thoroughly rinse the parts and cylinder head in a cleaning solution, and put the gas distribution mechanism back together.
Installation
We start by thoroughly cleaning the cylinder block crankcase from traces of old gaskets and sealants, apply a new one to special grooves, then carefully install the assembled cylinder head on the guides, tighten its fasteners to the required torque of 90-94 Nm with a torque wrench as shown in photo 6, adjust the gas distribution valves .
We install the valve cover, timing belt and all previously removed engine attachments. We fill the engine oil, change the oil filter, fill the cooling system with liquid, check for leaks and start the engine, listening carefully for any extraneous metallic knocks.
How to adjust valves on a VAZ 2110
There is no need to purchase shims in advance. They are relatively expensive. Initially, you have to establish the size of the gaps and only then buy the required number of washers with the exact dimensions. It is better to carry out work in a garage with good lighting. The roof and walls will protect from unwanted wind and rain, which can carry dirt into the open camshaft.
Attention! Before adjusting the valve mechanism on the VAZ 2110, the engine must be cooled.
Disassembly
If everything is ready, then we proceed to the first part of the repair - dismantling the parts:
- disconnect the terminal from the battery;
- remove the air filter housing (on a carburetor engine);
- disconnect the crankcase gas hoses and the throttle cable bracket from the valve cover;
- unscrew the bolts of the timing case. Remove the cover and gain access to the pulley;
- unscrew the spark plugs (this will make it easier to rotate the crankshaft to find TDC and BDC);
- Unscrew the valve cover nuts and remove it.
Read more: Pajero 2 disc offset
Before direct tuning, you should remember the mechanism of operation of the timing belt. Namely, the operating order of the valves (in our case, a VAZ 2110 with an 8-valve injector).
| Camshaft rotation angle, degrees | Cam No. (counting from camshaft pulley) | |
| Exhaust (gap 0.35.mm) | Inlet (gap 0.20mm) | |
| 0 plus 2-3 teeth | 1 | 3 |
| 90 plus 2-3 teeth | 5 | 2 |
| 180 plus 2-3 teeth | 8 | 6 |
| 270 plus 2-3 teeth | 4 | 7 |
The sequence of adjusting the gaps in the valve mechanism | ||
| Crankshaft rotation angle, degrees | N of the cylinder in which the compression stroke occurs (end) | N adjustable valves (cams) |
| 4 | 8 and 6 | |
| 180 | 2 | 4 and 7 |
| 360 | 1 | 1 and 3 |
| 540 | 3 | 5 and 2 |
The procedure for adjusting the valves on a VAZ 2110 with an 8-valve engine must be performed in the same sequence as in the table. As for installing valves on a VAZ 2110 with 16-valve engines, the diagram looks completely different.
| valve | 1 class (you) | 2 cells (ch) | Zkl (vp) | 4th grade (you) | 5th grade (you) | 6 cells (ch) | 7 cells (vp) | 8th grade (you) |
| Should ±0.05 | 0,30 (0,35) | 0,20 | 0,20 | 0,30 (0,35) | 0,30 (0,35) | 0,20 | 0,20 | 0,30 (0,35) |
| largest gap | 0,25 | 0,35 | 0,40 | 0,35 | 0,40 | 0,30 | 0,30 | 0,40 |
| washer | 4,30 | 3,82 | 3,52 | 4,22 | 4,50 | 4,27 | 3,87 | 4,25 |
| What kind of washer is needed | 4,25 (4,20) | 3,97 | 3,72 | 4,27 (4,22) | 4,6 (4,55) | 4,37 | 3,97 | 4,35 (4,3) |
Adjustment
After removing the valve cover, it is necessary to remove any remaining engine oil near the tappets. This can be done with a medical syringe or a rubber bulb. If there is a retaining rod, you should install it on the two outer studs intended for fastening the cylinder head cover.
Then, we proceed to the second part of the repair and do the following:
- We set the top dead center by aligning the marks of the camshaft pulley and the inner timing case. There are two ways to do this. Hanging and rotating one front wheel. Use a spanner wrench (head) to rotate the camshaft by the pulley mounting bolt, but this operation is dangerous due to breakage of the mounting bolt;
- After finding the top dead center, turn the camshaft slightly so that the pulley moves 40-50° from TDC (this is 2.5-3 teeth). We put our mark, from which we will then rotate the camshaft several more times, making additional marks;
- We measure the thermal clearance of the first valve (exhaust) by slipping one of the feeler gauges (0.35/0.4/0.45 mm) between the camshaft cam and the pusher. Nominal clearance 0.35 mm;
- if the first probe passes freely, then take a larger size (0.4 mm). The pitch is 0.05 mm;
- if the 0.4 or 0.45 probe does not pass, then it is necessary to replace the adjusting washer;
- We turn the pusher with the groove towards us, press it with the lever of the locking rack and take out the used washer with tweezers. Its inner side contains numbers with the original size;
- to calculate the required value, you must use the formula H = B + (A - C). Where:
- H—thickness of the new washer, mm;
- B—thickness of the used washer, mm;
- A - measured gap, mm;
- C—nominal gap, mm.
- The resulting result H is written down in a notepad. You will have to buy a washer of this exact size for the repair valve, rounding up the value;
- according to the table, we move on to the third valve (intake), its nominal clearance is 0.2 mm;
- measure the gap by inserting feeler gauges in order: 0.2/0.25/0.30 mm;
- write down the size of the probe, which is not included in the thermal gap;
- take out the washer and calculate the repair size using the above formula;
- then, according to the table, we turn the crankshaft several times to the indicated degrees and perform the operation with all the valves;
- We go to the store and buy the required number of adjusting washers of the required thickness, according to calculations;
- We install the washers in the pushers, according to the notebook;
- all valve clearances on the VAZ 2110 should be restored to the nominal sizes of 0.2 and 0.35, thanks to the use of adjusting washers;
- checking new thermal gaps;
- after replacing the washers, it is necessary to put the dismantled parts in place;
- we start the engine and observe its operation.
It is recommended to replace the cylinder head cover gasket on a VAZ 2110 (8 valves) with an injection engine, after adjusting the valves.
Replacing the fuel pump
The replacement process is quite easy. Just follow the instructions and you'll finish the job in no time.
- Disconnect battery power.
- Unscrew the fuel pump cap.
- Remove the connectors from the fuel pump.
- Loosen the clamp slightly, which is located directly on the fuel hose. It makes no sense to remove it completely.
- Unscrew both hoses through which fuel is supplied.
- Remove the gaskets. It is better to immediately replace them with new ones. These are consumable, cheap materials.
- The fuel pump is secured with 8 bolts. Unscrew them all and save the bolts.
- Remove the O-ring.
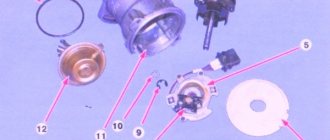
- Remove the fuel pump along with the float.
- Remove the seal, which is made of rubber.
- Replace the new fuel pump.
- Reassemble in reverse order.
It is hardly worth trying to repair an old fuel pump. It is difficult to vouch for the quality of the repairs performed, since one malfunction may lead to others. There is no point in taking risks. In addition, a new fuel pump is far from the most expensive pleasure for a VAZ 2110.
Doing the work yourself, the entire process of dismantling and installing the pump will take you about 20-30 minutes.
Follow the instructions, avoid any attempts at amateur activities. Please note that the cost of such a procedure at a service station will be even more expensive than purchasing the newest electronic fuel pump. Therefore, spending money on this makes no sense if everything can be done yourself.
The good thing about the VAZ 2110 is that the cost of its parts is incredibly affordable for domestic consumers. Plus, the design of the machine is quite simple, which allows you to carry out a number of repair work yourself, without fear of the consequences of incorrect repair.
Please note that if you do not have any experience in car repair and maintenance, it is not recommended to start your practice with such an activity as replacing a fuel pump. Practice on simpler tasks and over time you will learn all the joys of doing your own repairs.
Tool for work
In addition to the everyday set of sockets and spanners, which the owner of a VAZ 10 should already have, a few more tools will be required:
- A device that presses out pushers for removing adjusting washers from them. You can get by with a couple of powerful screwdrivers, but the price issue here is not so great that you pay for the savings with less convenience. You can completely remove the camshaft - but then you will have to remove the timing belt as well, again there is no gain in time.
- A set of feeler gauges - we will use them to measure the gaps.
- Micrometer - This is not necessary, but is very useful. When adjusting, the thickness of the new washer is calculated based on the thickness of the old one and the measured gap, but what to do if the thickness marking on the washer is erased (and no one has canceled the wear?). You can borrow a 0-25 mm micrometer, fortunately you can trust it by simple mixing without calibers.
Something else useful for you:
Adjustment frequency
The need to adjust the valve clearances in the VAZ 2110 is remembered when the characteristic sound of rattling pushers is heard from under the hood. With this, the VAZ 8-valve engine was lucky: there are engines in which the valve clearances manage to decrease as they wear out, and here the burnout of the valves and the need to dismantle the head would already remind of itself.
However, there is still no need to postpone adjustment until the last minute. The noise of the gas distribution mechanism itself is a direct consequence of the increase in shock loads in it: the top of the cam does not roll onto the pusher, but hits it. Even when idling, each cam will experience more than 400 such impacts per minute - and how many of them will there be in one trip? And impacts mean an increase in wear and a risk of developing fatigue stresses, and on the most loaded part of the camshaft.
Factory regulations require the first valve adjustment at 3000 mileage (breaking in of parts), then at 45,000 and then every 45,000 mileage. When purchasing a VAZ 2110 secondhand, it is worth combining valve adjustment with replacing the timing belt in order to immediately have a guaranteed starting point for routine procedures. As the mileage increases, a valve grinding procedure may be necessary.
Preparing to remove valves
We will make a replacement on this engine (21120)
However, on a VAZ-2112 engine it is easier to replace valves by dismantling the cylinder head: to press in new guides, the cylinder head plate would have to be heated. It's best to leave the valve guides in place. But then you will have to remove different equipment:
- There is a connector under the fuel pump hatch (photos 1 and 2). Turn it off so that the fuel pump stops pumping;
- Start the engine and let it stall;
- Remove the air filter: loosen clamps 1 and 2 and disconnect connector 3 (photo 3). Then use a 10mm wrench to unscrew the screw (photo 4).
All actions are illustrated by one photo.
Lowered the pressure, almost removed the filter
Remove the plastic filter housing along with the supply hose.
Disassembling the timing mechanism
Our goal is to remove both camshafts. On the VAZ-2112 engine, valve replacement can be performed even without removing the cylinder head. But the shafts will interfere in any case. Procedure:
- The negative terminal is disconnected from the battery;
- Remove the wires from the spark plugs, then disconnect them from the coils;
- The ignition module must also be removed (photo 2), and the crankcase ventilation hose must also be removed (photo 3);
- The bracket securing the injector wiring is screwed to the cylinder head cover (photo 3). Remove it! The same is done with the bracket of the second harness (DPZ and IAC);
- You will need to remove the receiver (photo 4). And the intake manifold holes are covered with fabric.
Study what the list says.
Preparing to dismantle the cylinder head cover
Like this
The cover itself is held in place by 14 bolts. A socket wrench is needed here. But first, let’s remove the plastic protection by unscrewing the six bolts with a 10mm wrench (photo 1).
We remove everything unnecessary in the timing drive
The timing mechanism has been removed!
Disconnect and remove the phase sensor under the right timing pulley. It is also necessary to disconnect the pressure sensor - it is located near the bracket that was removed. Using a 17mm wrench, without turning the pulleys, loosen the two mounting screws. A screwdriver is installed in the round holes - it is used as a stop. It remains to loosen the belt tension by partially unscrewing one nut (photo 3).
To remove the shaft, follow these steps:
- Remove the cylinder head cover;
- Unscrew 20 bolts (photo 1);
- Using two 15mm wrenches, unscrew the nut on the upper rod (photo 2). Do the same with the three nuts on the rod bracket (key “13”). The bracket is removed from the studs;
- Dismantle the bearing housing (photo 4);
- Now both camshafts can be removed (photo 5).
The meaning of what has been said is clear from the photo.
Timing drive disassembled
Hydraulics, that is, compensators, can be easily pulled out with a magnet.
Removing the cylinder head on a VAZ-21120 engine
We need to get rid of the fuel rail: use the “17” keys to unscrew pipes 2 and 3 (photo 1), and also remove clamp 1.
The ramp needs to be temporarily removed
The screws on the bar with the fuel line are unscrewed with a screwdriver. Then the rubber rings are removed from the pipes. You will also need to remove the tube with the oil dipstick - here you unscrew one “10” screw (photo 2). Finally, the two ramp mounting bolts are removed.
The main thing is to partially drain the coolant. Then top it up! Now unscrew the two nuts on the thermostat (photo 1) to move it to the side.
The thermostat should not interfere
The thermostat gasket is also removed. Using a “13” wrench, unscrew the nut with the “zero” wire. You can also disconnect the connector of the DTOZH sensor.
The VAZ-2112 engine is ready to replace the valves: use a “10” wrench to unscrew the bolts on the cylinder head and remove the plate along with the valves. Follow the turning sequence. Similarly, observe the sequence and tightening torque when assembling the cylinder head.
Recommended sequence (turn away)
Next, the actions specified in “Chapter 1” are carried out. We wish you success!
Dangers when repairing valves
Before starting work, it is necessary to refresh your theoretical knowledge regarding the design of the gas distribution mechanism, remember what a VAZ valve is, etc. If the design of a car is a “dark forest” for you, then it is better not to take risks and entrust the work to specialists, because Repair and replacement of valves are very serious and responsible operations.
You can, of course, find a lot of additional information on the Internet. But to systematize it, you still need minimal theoretical knowledge. Otherwise, it will be very difficult to understand the difference between the recirculation valve and the two-way valve from the VAZ intake valve. Of course, reliable operation of the air recirculation system of the VAZ 2110 is also very important.
But it cannot be compared with the operation of the valve mechanism or the idle system of the VAZ 2110. Violations in the adjustment of the valves of the VAZ 2110 can lead to very dire consequences. Increased noise when the engine is running is the least significant of them. Large gaps in the valve mechanism lead to loss of engine power
The longer you don’t pay attention to this problem, the worse the engine will “pull.”
In an incorrectly adjusted gas distribution mechanism, the camshaft and the VAZ valves themselves will also wear out intensively. Very often, especially when operating a car on gas, the valve disc burns out.
What to do if the valve is bent
Many VAZ owners have encountered the problem of bent valves on their cars. Although those who have not personally encountered this, but have heard from acquaintances or friends, are also interested in why such trouble occurs and whether this will happen to their “engine”. So on which VAZ 2110 engine does the valve bend? The valves bend on a 16-valve engine, which is due to its design.
Important! The exception is engines with a volume of 1.6 liters with 16 valves, in which recesses were made in the pistons. This happens due to a broken timing belt.
Subsequently, the “plate” or leg of the intake/exhaust valves is bent. Motors whose pistons have recesses specially created in case of a belt break are insured against such a problem.
This happens due to a broken timing belt. Subsequently, the “plate” or leg of the intake/exhaust valves is bent. Motors whose pistons have recesses specially created in case of a belt break are insured against such a problem.
To prevent such incidents from happening, you need to inspect the belt more often for wear. If the belt is worn out, then you need to change not only it, but also the tensioner roller, because quite often, due to a faulty roller, the belt wears out many times faster.
Troubleshooting
The main symptoms of a malfunction of the VAZ 2110 fuel pump are engine interruptions in various operating modes, lack of pressure in the fuel system, loss of acceleration dynamics, increased fuel consumption, or complete failure when trying to start the engine.
The first step is to check the functionality of the pump. When you turn on the ignition, you should hear a slight whirring sound from the pump under the rear seat for a few seconds.
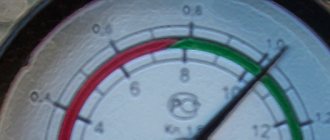
If the engine is running, it is necessary to check the fuel supply pressure using a pressure gauge; the fuel supply pressure to the injector should be 3.5 - 4 atmospheres. If the sound of the fuel pump is not heard, if you have an electrical tester, you can check whether power is being supplied to the pump.
To do this, you need to remove the back seat of the VAZ 2110, the decorative cover, and the terminal from the fuel pump housing, turn on the key to crank the starter, if the tester does not receive power, you need to check the relay, fuse or wiring trace for a break! If there is power, the fuel pump needs to be replaced.
The serviceability of the relay can be checked by replacing it with a working one from the fuse box, for example the high beam headlight relay. When replacing a new relay, you need to pay attention to the manufacturer and the recommendations of a spare parts specialist in the store; it is better not to save on the cost of the relay.