Checking the radiator for leaks
The diagnostic process is not at all complicated; we carry it out ourselves, and if you don’t have free time, visit a service station to have the work performed by professionals.
Checking the radiator from the engine compartment side
- We place the car within the perimeter of the repair area, on the inspection hole, and open the hood.
- From the engine compartment side, we inspect the surface of the radiator for drips and traces of antifreeze (antifreeze) leakage.
- We carry out similar actions from under the bottom of the car;
- We inspect the antifreeze supply/return lines, upper and lower circuits.
The most common places for depressurization: corners around the perimeter, joints, ties with clamps.
How to drain antifreeze from the cooling system of a Lada Granta
- The hood is open, the car engine has cooled down to a safe temperature so as not to damage the skin.
- We unscrew 6 screws from under the bottom and remove the oil pan protection.
- Unscrew the drain plug in the lower circuit of the radiator.
- At the same time, unscrew the drain plug on the wall of the cylinder block. We substitute the container.
We unscrew the plastic drain plug of the radiator tank.
Note to the driver!
- After the liquid is completely drained from the water jacket, screw in the drain plugs. Fill in new antifreeze in a volume of 7.5 liters to about or 8.0 liters to the recommended average level.
Recommendations for selecting sensors
In order not to delay the repair time due to the purchase of low-quality spare parts, service station technicians recommend purchasing only original parts.
When choosing a component manufacturer, always give preference to factory parts. Check the index matches carefully. An exhaustive list is provided in the operating instructions.
Buy analogues less often, even if they are more expensive than the “originals”. Do not use the services of dubious suppliers who sell spare parts at unusually low prices.
If you do not have personal experience in servicing a technical device, install the components at a service center, where they provide a quality guarantee for the work performed.
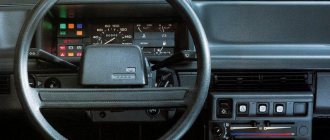
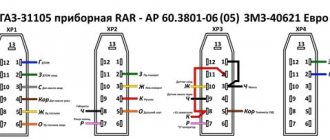
Old dashboard
This instrument panel was installed before June 15, 2014.
Find the engine temperature indicator here?
There is no engine temperature indicator on the old instrument panel. There is only an overheating warning light. On my previous cars, which did not have a temperature gauge, there were at least two warning lights: “cold engine” and “engine overheating”.
Car manufacturers allow the car engine not to warm up, citing global standards to prevent environmental pollution and save gasoline.
Read more about fuel consumption standards for the Lada Granta family of cars in the article: Grants fuel consumption on the passport and in reality, what is it like?
Ways to solve this problem
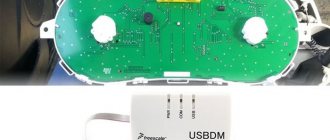
There are several ways to solve this problem. The simplest of them is to just hammer and drive like that. Most people do just that. You can flash the instrument panel, the result will be like this.
More on this a little later, when my diagnostic scanner arrives from China!
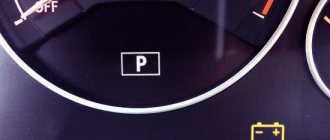
Installing a separate engine temperature indicator
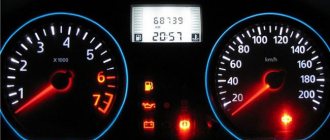
The easiest and cheapest way is to install a separate temperature indicator instead of the standard free button plug.
Temperature gauge installed in place of the standard plug next to the cigarette lighter
Installing such a digital indicator will not take much time.
- You will need to remove the panel trim (if you don't have air conditioning, the ideal location would be to the side of the heated rear window button).
- Next, disconnect the ground from the battery.
- We remove the glove compartment lid and pull out the diagnostic connector so that we have free access to it.
- We insert the digital indicator instead of the plug and connect the wires according to the instructions to the diagnostic connector using clamp terminals.
- We connect the ground, start the car and check the operation of the device.
- Carefully put everything back together in reverse order.
Viewing the temperature using a smartphone (tablet)
This method will require you to purchase a diagnostic cable that works via bluetooth. You will also need an Android device that supports bluetooth connection.
- Remove the diagnostic connector.
- Connect the diagnostic cable there.
- Install the “Torque” program or a similar one on your cell phone.
- Launch the program on your phone, start the engine and try to establish communication with the adapter.
- Once the connection is established, you can view the data that is transmitted from the sensors to the ECU.
How to check
After removing the sensor, it should be visually inspected for damage or corrosion. The easiest way to check the DTOZH is to replace it with a known good one.
- multimeter (in voltmeter mode, ohmmeter with a measurement limit from 100 Ohm to 10 kOhm);
- thermometer (with a measurement limit of at least 100 o C);
- heat-resistant container with a volume of 0.5 l.
The procedure for checking the power supply circuit of the DTOZH:
- Switch the multimeter to voltmeter mode;
- Remove the block with wires from the sensor and turn on the ignition;
- Connect the negative probe of the multimeter to the engine ground, and the other to terminal No. 1 of the block;
- The voltage at the output must be at least 12 V.
If there is no voltage or they are less than 12 V, it means that the battery is discharged, the power circuit or the computer is faulty.
Procedure for checking DTOZH:
- Switch the multimeter to ohmmeter mode;
- Prepare a container with hot water (about 100 o C);
- Connect the multimeter probes to the sensor terminals and lower its working part into water;
- We measure the resistance of the DTOZH as the water cools.
| USEFUL TIPS The expansion tank cap valve plays a major role in ensuring optimal temperature conditions. It maintains an excess pressure in the system of at least 0.1 MPa (1.1 kgf/cm2). In this case, the boiling point of water increases to 120 °C, and the coolant - to 130 °C. When the valve jams in the closed position due to overheating, a significant excess of excess pressure occurs - more than 0.2 MPa (2 kgf/cm2), which can lead to rupture of the expansion tank or breakage of one of the hoses. Therefore, once a year the expansion tank cap must be washed with running water. If in doubt, replace the expansion tank cap. Obviously, if you remove the expansion tank cap on an overheated engine and this action coincides with thermal shock, boiling of the liquid and the formation of air pockets in the cooling system will be guaranteed. Once a year, wash the radiator cells with a high-pressure water jet (using a special washer), directing the stream first towards the incoming air flow and then in its direction to remove dirt, adhering insects and road debris from the surface of the radiator. In this way, you can partially restore the efficiency of the radiator. If coolant leaks are detected, the burst hose can be temporarily repaired using duct tape. Reinforced (usually silver-colored) tape, which can be purchased at car dealerships, is especially suitable for this purpose. | 4. Very often, the cause of overheating of an engine whose cooling system is equipped with an electric fan is the failure of the radiator cooling fan. Start the Lada Granta VAZ 2190 engine, monitor the temperature and pay attention to whether the radiator cooling fan turns on when the engine overheats. 5. If the radiator cooling fan does not turn on, the fuse may be blown, the start relay is faulty, the motor is burnt out, or the wiring is faulty. 6. Check the integrity of the electrical wiring and the reliability of the connections of the electrical connectors. |
| Coolant temperature, °C | DTOZh resistance, Ohm |
| 100 | 177 |
| 90 | 241 |
| 80 | 332 |
| 70 | 467 |
| 60 | 667 |
| 50 | 973 |
| 45 | 1188 |
| 40 | 1459 |
| 35 | 1802 |
| 30 | 2238 |
| 25 | 2796 |
| 20 | 3520 |
| 15 | 4450 |
| 10 | 5670 |
| 5 | 7280 |
| 9420 |
Signs and causes of malfunctions of ODS Grants
There are not many elements involved in the cooling system, and therefore the list of faults is small. Signs of ODS problems:
- The engine gets very hot. Since the coolant temperature indicator on the Lada Grant was removed to reduce the cost, the driver will be able to track the temperature increase only after reaching a critical point. In this case, the warning indicator on the instrument panel will light up. Overheating is indicated by constant operation of the electric fan. Another reason is the failure of the temperature sensor, which transmits inflated readings to the ECU. Systematic overheating of the engine can also be determined by white carbon deposits on the spark plugs.
- The engine cannot warm up or takes a long time to warm up. In this case, the stove will blow cool air, the radiator pipe from below will be warm, but not as the engine warms up, but almost immediately after starting. A faulty thermostat is to blame. If the engine is in a constant state of insufficient heating, operation for a long time is prohibited, since it cannot be subjected to loads.
- Antifreeze leak. The problem can be determined by inspecting the elements of the ODS. On a hot engine, you can see fumes from antifreeze, and traces of coolant will also be visible under the engine. The most dangerous internal leak occurs when antifreeze enters the combustion chambers. Visually there are no leaks on the engine, but the coolant level in the tank is still decreasing.
Another characteristic sign of ODS problems is an increase in the oil level and white smoke from the exhaust pipe. This situation is dangerous due to the complete failure of the internal combustion engine, since the entry of antifreeze into the cylinders deprives the elements of the lubrication system.
Motor oil mixed with coolant completely loses its properties. Operating a vehicle with such a malfunction is prohibited.
Engine repair will be required, as the problem is related to a broken cylinder head gasket, a damaged water jacket, or a crack in the block.
The most common reasons are:
- natural wear and tear of parts;
- mechanical damage;
- violation by the owner of engine operation requirements.
The use of low-quality antifreeze, mixing different types of coolant, and installation of low-quality parts are also causes of malfunctions of the elements of the power plant cooling system. Repairs carried out without the appropriate knowledge, skills and experience lead to breakdowns. SOD problems require an early solution, as they affect the resource of the power plant.
No less dangerous are hidden problems, for example, engine detonation caused by overheating. Clogged radiator honeycombs prevent normal cooling, and the antifreeze temperature does not have time to decrease, causing the engine to overheat. Fuel detonates in the combustion chambers, the cylinder head gasket burns out, the plane of the cylinder head is disrupted, and the engine subsequently “jams”—there is a need for major repairs or replacement. The cooling system requires constant monitoring - you need to monitor the level of antifreeze in the expansion tank and periodically change the working fluid.
A pump malfunction is characterized by coolant leaks at the pump installation location, disruption or cessation of antifreeze circulation through the system. In this case, the engine overheats, but jamming of the pump bearing is even more dangerous, since on the Grant this leads to a broken timing belt and damage to the valves. Engine repair will be required. Malfunctions of the electric fan in most cases are associated with a violation in the electrical circuit, malfunctions of the thermal relay and the electric motor. Lack of forced cooling of the motor by a fan leads to overheating.
The most unpleasant malfunction for car owners is damage to the cylinder head gasket or a defect in the surface of the head at the point of contact with the cylinder block. Cracks in the cylinder head and cylinder head are less common. This causes coolant to leak into the oil sump. The tightness of the cooling system is also compromised if there are problems with the connecting pipes - cracks, blockages and loose connections.
Failures of the SOD can also include electronic malfunctions. In the case of Granta, this is a malfunction of the warning light warning of overheating and failure of the engine temperature sensor. As a result, the electric fan does not turn on at the right time, and the engine temperature exceeds critical values - overheating occurs.
Signs of DTOZH malfunction
The coolant temperature sensor affects engine starting and operation. Here are some symptoms that indicate that the sensor may be faulty:
- poor engine starting in cold weather;
- increased fuel consumption;
- poor exhaust on a cold engine;
- Problems with the engine cooling fan.
First, it’s worth understanding why temperature meters are needed in a car. It is completely clear what internal and external air temperature meters do.
They carry out their measurements, transmit a signal to the car’s ECU, and thanks to their work, the car either carries out climate control, or regulates the operation of the car’s mechanisms, or simply displays the obtained measurements on the dashboard (however, this is often done bypassing the ECU altogether).
Why, for example, do you need a coolant temperature sensor (DTOZH)? His work, although it seems just as obvious, is actually deeper in nature.
So, before antifreeze enters the engine, it passes through a meter, which records its temperature and sends it to the main computer. These measurements serve as analytical data for the processor, giving it an understanding of the efficiency of the heatsink.
After all, the coolant travels a long way, through the engine to the radiator, and then, wobbling through its tubes, returns to the engine, where it is re-measured.
The radiator is designed in such a way that air flows counter to the car cool the antifreeze without unnecessary costs on the part of the car. However, in hot weather or standing in a traffic jam, this may not be enough, and then the computer decides to turn on additional cooling in the form of fans located inside.
At the same time, the Lada Granta DTOZH, with its measurements, helps the computer determine the need for additional fuel injection. Although more often devices that measure incoming air or outgoing air (exhaust) are responsible for this.
As a result, the main positive criteria for the work of the DTOZh include:
- reduction in fuel consumption;
- reducing wear on machine mechanisms;
- improving vehicle performance and avoiding overheating.
This can also include bonuses such as notification to the driver or analysis of the operation of one or another form of coolant. But this already depends on the ability of the drivers themselves to recognize such signals.
The coolant temperature detector in the Lada Granta is installed on the thermostat housing. To work with it, you will need standard tools like a Phillips screwdriver, two pairs of hands, and perhaps a 19 mm deep socket to simplify the work.
The dismantling of the meter in the Lada Granta itself takes place in several stages:
- we find where the device is located, remove the air filter that prevents us from getting to it;
- disconnect the wires from the meter;
- remove the connector from the detector;
- Let's start unscrewing the device.
Advantages of the E39 temperature sensor
Before dismantling, be sure to turn off the power to the car by removing the terminal from the battery. After this, be sure to drain the coolant. Failure to comply with any of these conditions poses a threat to your life and health.
Installation of a new device occurs in reverse of its dismantling. That is, they screwed it in, put the wires back in place, and put the air filter back. After that, we poured back the antifreeze and connected the electricity.
However, two installation nuances should be remembered. The first is to convince yourself of the quality of the seal of the new sensor or add your own sealant (coolant should not leak out while the car is running).
Well, the second comes out of the first - start the car and make sure there is no antifreeze leakage.
Repairing the Lada Granta DTOZ is easy and simple. At the same time, the benefits of the device are difficult to overestimate. Therefore, the logical conclusion is made that you should not neglect replacing a failed meter. Replacement should be done immediately.
The absence of a working DTOZh leads to the immediate activation of the additional cooling system, even if there is no need. As a conclusion, this leads to unjustifiably high fuel consumption during vehicle operation.
Possible causes of failure
Before replacing the sensor, you should also check the circuit from it to the warning light. To do this, disconnect the pressure sensor terminal, and then lean it against the engine (to ground). If the circuit is in working condition, the lamp will stop lighting. Otherwise, the network is interrupted or damaged.
An important factor to remember when replacing is its condition.
When you pull out the grant oil pressure sensor, pay attention to whether it is oily or not. If it is oily, it means it is broken and needs to be replaced.
If it is not in oil, it is most likely not the problem.
A pressure gauge will help you determine the condition of the system. Screw it into the DDM cell, turn on the engine and at idle speed the pressure gauge should ideally show 0.65 kgf/cm2. Or even more. This indicates that the problem is only in the sensor.
If the coolant temperature sensor is faulty
If the installed sensor is faulty, the risk is that the cooling fan simply will not turn on. It goes without saying that this cannot go unnoticed by the entire cooling system, causing a rapid increase in engine temperature and overheating. The most unpleasant thing about this is that the driver currently driving the vehicle is unable to promptly notice the problem that has arisen, which can lead to serious engine repairs.
In order to be sure that the coolant temperature sensor is working properly, it must be checked periodically. You can easily do this yourself using a multimeter and a digital thermometer. The removed sensor must be lowered into a vessel with liquid heated to 100 degrees, and the resistance must be measured - it should be 177 Ohms. When the liquid temperature drops to 50 degrees, the resistance value will be 973 Ohms, and at 20 degrees it will be 3520 Ohms. If the indicators do not correspond, then the sensor needs to be replaced.
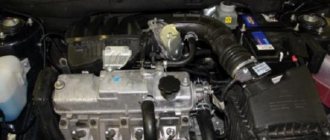
Elements of the Lada Granta cooling system
On Lada Granta cars with an injector, a closed liquid ODS with forced circulation of antifreeze is used. It removes heat and acts as a lubricant and does not freeze in severe frosts in winter. In a working system, the temperature of the Lada Granta engine is maintained at 95-100 degrees. Regardless of the body type, configuration, or the presence of air conditioning, the cooling system remains the same, without any changes. The SOD diagram is clearly shown in the photo.
SOD scheme
The standard SOD that comes with the Granta motor consists of a number of parts:
- radiator;
- electric fan;
- expansion tank;
- thermostat;
- temperature sensor;
- coolant pump;
- heater radiator;
- water jacket;
- connecting hoses.
Forced circulation is carried out along a small and large circuit.
Thermostat
One of the main elements of the SOD, which performs the functions of a valve, redirecting the flow of coolant from a small circle to a large circle. For the Lada Granta, the normal operating temperature can be 100 degrees +/- 2 degrees. If the antifreeze temperature is less than these values, the thermostat valve is in the closed position, the antifreeze circulates in a small circle, bypassing the main radiator - this way the engine warms up faster.
After heating the coolant (coolant) to 60 degrees, the valve begins to open slightly, and the antifreeze passes in a large circle, cooling through the radiator. In an SOD, the thermostat is the weakest link; it fails most often. The malfunction is explained by the valve jamming in the open or closed position, as a result of which the engine takes a long time to warm up or, conversely, overheats. The part cannot be repaired and must be replaced with a serviceable one.
Water pump
The water pump, or simply pump, forces antifreeze to circulate through the system. The unit is located in the cylinder block and participates in the operation of the timing belt, since it has a common drive with the gas distribution system.
The service life of the part is no less than 80 thousand km, but due to its poor quality, it is recommended to replace the pump together with the timing belt.
Radiator and fan
The radiator is designed to cool antifreeze. The fan is connected for the same purposes, triggering when the temperature exceeds 100 degrees. The radiator is cooled by the counter flow of air when the car is moving. In the summer heat, this is not enough, and an electric fan comes to the rescue.
The operation of the electric fan depends on the temperature sensor. The latter continuously monitors the engine temperature and, if the indicators are exceeded, transmits information to the control unit, which closes the circuit, connecting the fan. A sensor malfunction can cause the motor to overheat, since the fan will not turn on at the right time.
Connecting hoses and water jacket
Hoses connect all elements together, forming a closed system. Their malfunctions are associated with seal failure and leaks, and a lack of coolant leads to overheating. The engine water jacket is designed to circulate antifreeze and remove excess heat. Damage to this element will result in water hammer. This rarely happens when using antifreeze, but if water is used, which provokes corrosion, a similar result is expected.
Expansion tank
The volume of coolant increases or decreases depending on the temperature; an expansion tank is used to compensate for its amount. It is made of translucent plastic. To control the liquid level, maximum and minimum marks are placed on the tank. At the top there is a neck with a sealed cap, which combines the inlet and outlet valves. When the pressure in the system increases to 1.1 kgf/sq. cm the exhaust valve opens, allowing the boiling point to increase and preventing steam formation. As the liquid cools, the volume of the liquid decreases, and to prevent vacuum, the inlet valve opens and allows the lack of air into the tank.
Replacing the coolant temperature sensor on Grant
The coolant temperature sensor is located in the thermostat housing; it is number 14 in the diagram.
To change the DTOZH with your own hands you should:
- Drain the coolant (car mechanics do not drain it);
- Disconnect the connector with wires;
- Unscrew the sensor (key “19”).
Installation is carried out in reverse order. To eliminate the leak, replace the copper washer or apply a heat-resistant sealant to the threaded part of the sensor.
The coolant temperature sensor (not to be confused with the engine temperature indicator sensor) is installed on the Lada Granta car - directly on the thermostat housing.
It is this sensor that is responsible for the cold start of the car and prepares the mixture depending on the coolant temperature.
In other words, at a lower temperature of the coolant (in frost), one mixture is required, at a higher temperature, another.
If problems with starting are observed in different temperature ranges, it is necessary to check this particular sensor on the Grant. To do this you will need the following tool:
- Phillips screwdriver
- The head is 19 mm deep
- Extension
- Ratchet handle
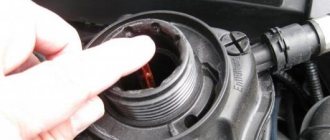
To understand where this sensor is located, its location is clearly shown in the photo below.
So, the first thing you need to do is disconnect the power connector from the sensor itself, first bending the latch to the side, and the result of this action is shown in the photo below.
Next, you can begin to unscrew the sensor using a deep socket and an extension with a ratchet.
It is worth noting that for greater convenience it is necessary to move the inlet pipe to the side by unscrewing it from the mass air flow sensor.
After the old coolant temperature sensor is removed, you need to install a new one, first apply thread locker.
We install the new one in the reverse order. The price of the sensor is no more than 300 rubles for the original one produced by AvtoVAZ. Then we connect the chip into place and start the engine to check the functionality of the system.
For the cooling system of any car, including the popular Lada Priora, it is not the most pleasant moment to be stuck in a traffic jam for a long time. When the car moves without long periods of downtime, the temperature load is removed by the oncoming air flow. There is no such flow when idling. When overheating, the radiator fan automatically turns on, but only if the coolant temperature sensor is working properly. This is a very necessary functional device for a car.
If the sensor does not work, replacement is required. In this material we will analyze in detail how the device works and where it is located. No less useful will be information on how to change this sensor on a Lada Priora. To replace, you will need a certain set of tools; such a tool is not a problem for a hundred; it is available in any car service center.
The system we are considering in the popular Lada Priora works by circulating fluid, as expected, through the radiator. The temperature decreases solely due to airflow. What types of blowing are there:
- The look is natural. As the name implies, in this case the natural air flow cools the radiator while driving.
- Kind of forced. When excessive heating occurs, the built-in fan is activated.
How does a fan work in the cooling system of a modern car:
- Through the positive contact, current flows to the so-called winding of the installed fan.
- The contact marked “-” is directed to the relay, which in turn is controlled by the ECU.
- The ECU, based on a signal from the coolant temperature sensor, turns on a device such as a relay to ground.
Attention! The domestically produced car Lada Priora does not have 1 coolant temperature sensor, there are 2 of them. And these are completely different devices. The 1st sensor sends a signal to the main computer, the 2nd sensor is responsible for the movement of the arrow on the dashboard.
In ordinary modern carburetor cars, the operating temperature is lower than in “injection” cars. For the latter it is 102-105 degrees. It is known that with such heating, the most ordinary water will naturally begin to boil. Therefore, you only need to use antifreeze or, as an option, antifreeze, the boiling point of which is at around 115 degrees.
A device such as the ECU on the Russian LADA Priora needs up-to-date and reliable information about the temperature of the power unit. When choosing sensors in a store for their subsequent installation, this is what you should be guided by. The sensors are located at the so-called cooling “jacket”.
The sensor that interacts with the computer is located in the metal thermostat housing, which in turn is installed on the head of the automobile cylinder block. Another sensor that interacts with the instrument panel is located in the cylinder block.
Important! The sensor interacting with the dashboard has 1 contact, and the sensor working with the ECU has a 2-pin input.
The device we are considering, from the engine control system via a computer, when it fails, gives a signal and the “Check Anger” light on the dashboard lights up.
The on-board computer always has an emergency built-in specialized program, and even if the coolant temperature sensor fails for some reason, the electronic unit will forcefully start the radiator fan.
One clarification: in this case, the fan will work constantly. Pay attention to the main signs of a failure in the LADA Priora cooling system:
- The panel displays a high temperature of the power plant.
- The fan runs non-stop.
- The "Check" light is on.
Be attentive to your car, and when the signal lights up on the dashboard, urgently undergo computer diagnostics of the electronic control unit. Thanks to such diagnostics, it will certainly be possible to identify the cause of incorrect operation.
If for some reason you cannot contact specialists for service, then you can do the work yourself.
- Allow the power plant to cool to an acceptable temperature.
- Prepare any rags.
- Remove the housing from the air filter. A shaped screwdriver will come in handy in this case.
- Carefully loosen the clamp and remove the air duct.
- At this stage, disconnect the harness and remove the rubber pads directly from the body.
- Remove the connector from the sensor.
- Now place the prepared rags on the clutch cover and under it.
- As quickly as possible, using a key set to “19”, unscrew the broken sensor and install a new one. Tighten everything as best as possible.
- Do not unscrew the coolant reservoir cap before the replacement procedure. In this case, losses of OX will be minimal.
- Now you can put everything back together in reverse order.
- Check the coolant level.
- Start the engine.
- When the fan works and everything works as expected, without interruptions or leaks, the work is considered completely completed.
Let's sum it up
Now you know how to replace a damaged sensor with a new one in your LADA Priora. This is not difficult to do, but you will need some skill and follow the instructions strictly. Remember that the lifespan of your car is in your hands. Pay attention to warning signs in a timely manner and, if possible, resolve them as quickly as possible.
Operating principle of DDM
The operating system is simple - under oil pressure, the measuring membrane changes position and, as a result, the contacts open or close. When the liquid level drops, the membrane falls, thereby disconnecting the contacts. After which a signal is triggered and displayed on the dashboard. If the oil pressure sensor on a Lada Granta fails, but the oil level is normal and the entire system, after testing, turns out to be operational, then it is recommended to check the meter itself.
Advice! If you haven’t looked under the hood of your car before and haven’t done at least a little repair and technical work, then you shouldn’t move on to the next stage. Despite the fact that the replacement process is very simple, you can damage the car due to lack of experience.