Below watch the video about the Chevrolet Niva instrument panel illumination not working and express your opinion about it in the reviews to the article.
Video quality: BDRip
The video was uploaded to the admin from user Aga: for immediate viewing on the portal.
To give the correct answer to the question The backlight of the Chevrolet Niva instrument panel does not work, you need to watch the video. After viewing, you will not need to seek help from specialists. Detailed instructions will help you solve your problems. Enjoy watching.
Humor on the topic: Women are like the Internet: for some – com., for others – net.
replacing light bulbs on a Chevrolet Niva dashboard
Chevrolet Niva, Kalina, instrument lighting disappeared
The instrument panel illumination of the VAZ family does not work
DIY instrument lighting for Chevrolet Niva
Niva Chevrolet instrument cluster freezing
Niva instrument panel problems and methods for eliminating them
Niva Chevrolet phase sensor died: we diagnose the ECM, panel self-diagnosis
How to remove the dashboard trim of a Niva Chevrolet
Why the instrument panel of VAZ 2110,2111,2112,21123 does not work.
Description of the Chevrolet Niva instrument panel
The dashboard (dashboard) is a kind of screen, looking at which the driver receives the necessary information about the operation of a particular vehicle system. Without it, it would be difficult to control driving speed, mileage, oil pressure or coolant temperature.
In this article we will look at the standard instrument panel of the Chevrolet Niva in terms of its design, information content, and common problems. In addition, we will talk about tuning models of devices installed on these cars.
What is the instrument panel we are considering? Chevrolet Niva is equipped with a shield that meets all modern requirements. It is convenient enough and moderately informative so that the driver, without being distracted from the process of driving the car, has the opportunity to know about all work processes and can prevent malfunctions in time.
Changing the light bulbs on the Niva Chevrolet dashboard with your own hands
It is difficult to scare a person who owns a Chevrolet Niva with anything.
He is not afraid of vibrations, ominous sounds from the distributor, or the darkness. Although, the darkness is sometimes annoying, especially in those moments when the lamps on the instrument panel do not light up. There is nothing special about the lamps themselves, W1.2W is exactly 1.2 W. These lamps are installed to illuminate the instrument panel, to illuminate the buttons on the panel, and as control lamps. They are often replaced with LEDs, but this is a separate topic.
First, let's find out how to change the light bulbs on the instrument panel of a Niva Chevrolet.
How to remove the control panel of the Chevrolet Niva stove
Niva Chevrolet, replacing the heater and backlight regulator in 5 minutes
Chevrolet Niva heater damper repair
How to change the stove on a Chevrolet Niva without swearing? with air conditioning.
Heater control unit assembly for Chevrolet Niva | MotoRRing.ru
We move the Chevrolet Niva air conditioner switch button to a more convenient place
DIY heater cable replacement
Niva Chevrolet heater blows cold air
Chevrolet NIVA heater controls
How to secure the heater damper cable.
Removing the stove control unit
Help. The first time I encountered a problem. The knob for controlling the temperature of the air flow from the oven turns. Only cold air blows from the ducts. I looked on the Internet how to disassemble the panel. I started to take it apart, but something didn’t work. He took off the handles, picked up the decorative panel, and removed it. Next, I unscrewed two screws and took out the light bulbs. That's all! I can’t remove the part further. I found an article on the internet remladavaz.ru/snyatie-iu…-otopitelya-niva-shevrole but I can’t do it.
Comments 29
Good DAY How did you put the bulb sockets back in? B***** wanted to change the light bulbs in the heater control panel (they didn’t light up, and it’s time to install LEDs :), at least less electric. will consume :)) I read everything and took it off as it should be, but when I took it out the bulbs spun and fell inside AND I DON’T UNDERSTAND HOW TO GET THEM WITHOUT REMOVING THE BLOCK :) If I remove the block with the magician and the controls below, I can get them out and insert them :)? or do you need to remove all the cables as already written
I can't help you. I didn't bother. I took it to the workshop and left for my shift, but when I arrived I picked it up already assembled.
I also turned it. I removed the twister, removed the axle, inserted the axle into the handle and used an F2 drill to drill the whole thing through. I ground the drill down and into the resulting hole instead of a cotter pin. and in the axis where the groove is inserted a piece of vacuum porous elastic so that the antennae move apart and return to their homeland. It doesn’t fly out! It doesn’t scroll!
Thanks everyone for the answers and advice. I will take many notes. I didn't dare take it apart myself. As I already wrote, it’s raining here, but we don’t have a garage. And to be honest, I was afraid that I wouldn’t be able to put this construction set back together. I drove a hundred. Issue price: 2 rubles! The toad is pressing! It turned out that small glasses got into the panel (it turned over in the summer), so they blocked the movement of the dampers!
Good DAY How did you put the bulb sockets back in? B***** wanted to change the light bulbs in the heater control panel (they didn’t light up, and it’s time to install LEDs :), at least less electric. will consume :)) I read everything and took it off as it should be, but when I took it out the bulbs spun and fell inside AND I DON’T UNDERSTAND HOW TO GET THEM WITHOUT REMOVING THE BLOCK :) If I remove the block with the magician and the controls below, I can get them out and insert them :)? or do you need to remove all the cables as already written
I removed the cables from the stove itself.
To get to the cables you need to disassemble the panel on the driver's side where the gas pedal is. You unscrew the panel and the drives there and disconnect them and pull the panel towards you. That's all. Hemorrhoids put the cables back.
I did it easier - I swapped places with the stove motor adjustment knob, it requires less effort.
Why take everything apart if only the handle is broken? O_o
So I only wanted to change the handle. I took off the handle and tried to turn the square “socket”, but nothing happened. I think the connection between the handle and the drive has disappeared.
I had the same problem. Everything was solved by simply rearranging the handles.
interesting option!)))) But I can’t put everything back together! The light bulb mounts have fallen in! Now, in order to insert them, you need to disassemble the sidewalls. No garage, it's raining! Mood …
Removing the dashboard of Niva Chevrolet
Dashboard Niva Chevrolet.
There is no way without removing the instrument panel and, by the way, replacing lamps is the only repair that the instrument panel is subject to.
If inaccuracies and malfunctions are found in the operation of at least one device, the shield along with the board is replaced. Regardless of whether repair or replacement is needed, the shield will have to be removed. This is done using a Phillips screwdriver and a flathead screwdriver.
Algorithm
The process goes like this:
- First of all, remove the negative terminal from the battery so as not to inadvertently short-circuit the electrical wiring.
Remove the negative terminal.
Using a Phillips screwdriver, unscrew the two screws of the upper fastening of the instrument panel.
Remove the plug next to the control lamp block.
We take out the plug to the right of the hazard warning switch and unscrew the screw.
Disconnect the wiring harness block from the block.
Chevrolet Niva instrument panel, replacement of backlight bulbs
Not a single modern car today can do without a dashboard, which allows the driver to promptly learn about the status of the main components and systems. Thanks to this, the car owner will always be able to repair incorrectly functioning devices in a timely manner and prevent more serious malfunctions in the future. From this material you can find out what the dashboard of a Niva Chevrolet car is, what malfunctions are typical for it and how to diagnose and replace the dashboard.
Description and location of indicators and instruments on the panel
The instrument cluster includes many elements.
In accordance with the diagram above, the shield structure is as follows:
- The coolant temperature control sensor, the arrow on it rises as the engine warms up. The controller needle should not be allowed to move into the red zone, as this will indicate overheating of the power unit.
- A tachometer is a device that measures the number of revolutions of the engine crankshaft.
- The left turn signal activation symbol, made in the form of a green arrow, appears when the corresponding indicator on the steering column switch is turned on. If the light blinks faster than usual, this may indicate a burnt out bulb.
- Right turn signal.
- Speedometer, this device allows the driver to know how fast the vehicle is moving. The speedometer is connected to the transfer case via an electric drive.
- Gasoline fuel level controller; the Chevy Niva uses an electromagnetic device that functions only when the ignition is activated. When the ignition is turned off, the controller needle moves down the scale.
- The fuel reserve indicator in the gas tank appears on the dashboard when the fuel level in the system is about 4-6.5 liters.
- The side light activation lamp appears on the dashboard when the corresponding optics are turned on.
- The brake system emergency symbol appears if the brake fluid level in the expansion tank has dropped to a critical level.
- High beam indicator.
- A key that allows you to reset the daily mileage readings. You can also use this button to switch to the clock or outside temperature sensor.
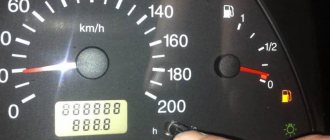
- A screen that displays the total and daily mileage of the vehicle.
- The Check Engine indicator indicates the need for engine diagnostics. It should always appear when the ignition is turned on, and disappear after starting the engine. If this light remains on while driving, the engine management system needs to be checked.
- Light alarm activation lamp.
- Symbol of time and temperature; you can switch from one mode to another using button 11.
- Battery low indicator, this light should always appear when the ignition is turned on and disappear after the engine is started. If the indicator is always on, this indicates that there is no charging current in the on-board network. This may be due to a failure of the voltage regulator or generator unit, or the lamp may light up if the tension of the generator strap is insufficient or breaks.
- Handbrake activation symbol. If your Niva Chevy is on the handbrake, the indicator will light up when you turn on the ignition and start the engine.
- Indicator of emergency low pressure of engine fluid. It should always appear when the ignition is activated. If it lights up after turning on the engine, this indicates low pressure in the system or a lack of engine fluid.
- Reserve indicator (video author - Artem S).
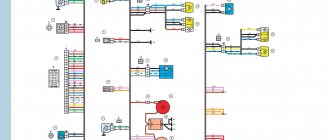
Dashboard plug addresses
The operation of the devices is controlled by an electronic module, which receives information from the sensors and sends it to the panel. To connect to it, as well as other components, the shield has two blocks with the following plug addresses:
| White 13-pin header (X-1) | |
| "Mass" (body) | |
| Tachometer (low voltage input) | |
| Tachometer (high voltage input) | |
| Battery (via fuse F-3) | |
| Coolant temperature sensor | |
| Fuse F-10 | |
| Empty (reserve) | |
| Electronic engine control unit | |
| Terminal “15” of the ignition switch (via fuse F-10) | |
| Handbrake switch | |
| Generator output "D" | |
| Oil pressure sensor | |
| Red block for 13 pins (X-2) | |
| Ambient temperature sensor | |
| Terminal “15” of the ignition switch (via fuse F-16) | |
| "Mass" (body) | |
| Panel light control | |
| Turn switch (starboard repeaters) | |
| Turn switch (left side repeaters) | |
| Brake fluid level sensor | |
| On-board computer | |
| Speed sensor | |
| Fuel level sensor | |
| F-14 fuse | |
| Emergency light switch | |
| Terminal "50" of the ignition switch | |
Possible faults
If you understand the designations of the light bulbs in the Niva Chevrolet instrument panel, let's look at the next point - possible malfunctions of the device:
- The instrument cluster does not work, but the engine starts normally. Most likely, the problem is caused by either a failure of the shield itself or a lack of power.
- The lights on the instrument cluster do not light up. If all the indicators stop working at once, this may indicate a break or fraying of the wire responsible for the lighting. If only some of the lamps do not work, then most likely they are simply burnt out.
- Devices not working - speedometer or tachometer. Most likely this is an electrical type problem; you need to disassemble the panel and look for the fault.
- Sensors do not work - fuel level, antifreeze temperature. As practice shows, this usually indicates poor contact in the electrical circuit. Usually this problem is solved by disconnecting and cleaning the plug contacts (the author of the video is the Ig K channel).
DIY diagnostics
In accordance with the service manual for the car, the control panel has its own diagnostic system, which allows you to check the device without removing it.
The sequence of actions for diagnosis is as follows:
- The ignition must be turned off and the daily mileage reset button must be pressed. Next, the ignition is turned on and the key is released. The arrows on the tidy devices must pass through the entire scale several times - this is a tidy test.
- Then hold down the reset button for five seconds - this will clear the processor memory.
- Now press the odometer reset button; the version of the software used should appear on the display. When you press the button again, numbers should appear on the display. The number 0 indicates that there are no malfunctions in the operation of the device, 1 - the microprocessor has failed, 2 - the fuel controller circuit has broken, 4 or 8 - increased or decreased voltage in the on-board network. If there are several breakdowns, the sum of codes will appear on the screen. For example, 14 is errors 2, 4 and 8, fault 10 is errors 8 and 2, etc.
Tuning options
The choice of options for tuning is not particularly large:
- Install a device from another car. In this case, you will need the services of a qualified electrician, since the connectors will have to be redone. You can also install a digital version of the tidy - it will be more than original.
- As a tuning option, you can install LED bulbs instead of regular ones. Many car owners choose this option because it is less expensive and the easiest to implement.
- Another tuning method is to install original instrument scales on the speedometer, tachometer and other sensors. Moreover, you can buy such scales either ready-made or make them yourself in accordance with your preferences.
Video “Tuned Flash FX-3 dashboard on a Niva Chevrolet”
How the tuned dashboard works in a Niva Chevy car - see the video below (author - PSG-TUNING channel).
replacing light bulbs on a Chevrolet Niva dashboard
How to replace light bulbs in the Chevrolet Niva dashboard
How to remove the dashboard trim of a Niva Chevrolet
DIY instrument lighting for Chevrolet Niva
Niva Chevrolet, replacing the heater and backlight regulator in 5 minutes
Replacing a light bulb in a VAZ dashboard. Comparison of LED and conventional light bulbs in the tidy
Niva instrument panel problems and methods for eliminating them
LED lamps for car dashboards from China.
sh.niva interior and instrument panel lighting with smooth ignition.
Instrument lighting for Honda Civic Ferio plus bonus (display inversion)
The green lighting of the console on the Chevrolet Niva did not really suit me; I wanted something different. I saw a blue-red backlight on one foreign car, it looks cool, so I’ll do the same on my car, especially since the vacation has begun, I need to spend my time usefully. I didn’t start with something complicated right away; first I installed blue LEDs in the dashboard, and installed two white LEDs to control the stove.
Then I installed fog lights and daytime running lights (I had also been planning this for a long time), they also had buttons in the interior. I installed a blue backlight on the PTF button and a white backlight on the DRL. I could have stopped there, but I still didn’t want to stop there, especially since I completed the work in just a couple of days, and there are still several weeks of idleness ahead.
I pulled out the buttons for the headlight adjustment and the brightness of the backlight. To dismantle them, I had to temporarily remove the cover of the fuse box and then press on the corresponding latches. I took the board and worked a little with a soldering iron. If there is no resistor or any other resistance to the LED in the button circuit, then you will have to install it; select a resistance with a nominal value of 1 kOhm. We follow approximately the same scenario with the seat heating buttons.
Replacing Light Bulbs in the Dashboard of a Chevrolet Niva
Chevrolet Niva “Shinovka” > Magazine> replacement
light bulbs
instrument
diode panels
After a couple of years, almost all the lights burned out the instrument
panels, and so I could not stand it and finally replaced what still needs to be done for our client lamps with diodes)
the panel
at first had no problems, everything is very simple.
Price list: 300 ₽ Mileage: 102,000 km
Chevrolet Niva 2006, petrol engine 1.7 l., 80 l. n., all-wheel drive, manual transmission. tuning
Comments 26
they burn out in a month
How many 3V diodes?
And, a photo of the finished result. Where?)
we also need to do what we saved for our client, it remains burnt in the dark to the touch, our client just has to turn it on.
Are the light fixtures on the slab the same as those in the trim? Are they the same for our client?
How did you get the LEDs out of the oven?
He pulled out the scroll, took out the socket, and the light bulbs under it.
But how did you take the turn? I just pull, but they don't give up. And that's why I'm afraid of breaking
replacement dashboard on Chevrolet dashboard cornfield
Replacing light bulbs on the Chevrolet Lacetti dashboard.
Hi all. I wanted to show this video, most save some money)))
How did you get the LEDs out of the oven?
figured it out, just sat)
I installed the stove on an LED strip. But something bright, you need to reduce the number of diodes. And beauty too! Time for 15 minutes heat gun!
Tell me how to remove the hob, 4.5 screws on the panel and where are the extra 4?
1 plug under the button to the right of the emergency lighting, 4 plugs to the right of the indicator lamps, but usually to replace it in the stove panel
You don't have to remove, just the cool sticks for our client should be carefully pulled out and the socket will be removed, and there you can also remove the light bulbs.
No, I didn't do it right, there is no such person, I just wanted to remove the plate where the turn was and it didn't work, I thought you were wrong about that!
Is the LED stuck to the lamp charging point? Convinced of the correct polarity while on vacation?
I didn't realize it was a flask
charging how it differs from the rest. Our client still has the lamp that I pulled out in the same way.
As far as I remember, the excitation is supplied to the generator through a charging lamp. Is there a fee now?
And sell, everything works well.
When the ignition is turned on, the generator excitation voltage is supplied to terminal “D” of the regulator (terminal “D” of the generator) through a warning lamp located in the instrument cluster 3. After starting the engine approximately. The excitation coil is powered by three additional diodes installed on the rectifiers. generator block. The operation of the generator is controlled by a control lamp in the instrument cluster. When on
Replacing a Hyundai Accent light bulb.
During ignition, the lamp should light up and, after starting the engine, turn off if the generator is correct. veins If the lamp burns brightly with other radiation when fully heated, it indicates a malfunction.
Removing and installing the Niva Chevrolet instrument cluster
We remove the instrument cluster to replace backlight lamps or control lamps or to replace the instrument panel itself.
Usually, in case of failure, the instrument cluster is replaced with a new one.
Disconnect the negative terminal of the battery
We remove the external lighting switch, to do this:
- use a screwdriver to pry off the switch
— remove the switch from the instrument panel panel
— disconnect the wire block from the switch
Then, set the steering column to its lowest position
Using a Phillips screwdriver, unscrew the two screws of the upper fastening of the instrument panel panel
Using the same screwdriver, unscrew the three screws of the lower fastening of the instrument panel by three turns.
Use a screwdriver to pry up and remove the plug located at the bottom right of the instrument panel
Use a screwdriver to pry up and remove the plug located on the top right of the instrument panel
Use a Phillips screwdriver to unscrew the two screws securing the instrument panel
Use a screwdriver to pry off the central plug
We take out the central plug
We move the edge of the instrument panel panel, overcoming the resistance of the latch and sliding the panel to the right
We move the shield away from the instrument panel
Mark the location of the wire blocks
We disconnect the blocks from the switches located on the panel
Removing the instrument panel panel
Using a Phillips screwdriver, unscrew the two screws securing the instrument cluster on the right side
Unscrew the two screws on the left side
Tilt the instrument cluster and move it away from the instrument panel.
Disconnect the two wire blocks from the instrument cluster connectors
Removing the instrument cluster
To replace backlight bulbs or control lamps, turn the socket counterclockwise and remove the socket with the lamp.
Remove the lamp from the socket and replace it with a new one
We replace the remaining lamps in the same way.
Install the instrument cluster in reverse order
Instrument lighting lamps Niva Chevrolet
Removing the instrument cluster, replacing lamps Niva Chevrolet (VAZ-2123)
Disconnect the wire terminal from the negative terminal of the battery.
We remove the external lighting switch (see “Replacing switches and regulators”, p. 307). Set the steering column to its lowest position.
Using a Phillips screwdriver, unscrew the three self-tapping screws of the lower fastening of the instrument panel by 3-4 turns (for clarity, shown on the removed instrument panel).
Using a Phillips screwdriver, unscrew the two fastening screws
instrument cluster on the right side.
. and two screws - on the left side of the combination.
Having tilted the instrument cluster, move it away from the instrument panel. Disconnect the two wire blocks from the instrument cluster connectors.
Instrument cluster lamps: 1—backlight lamps; 2 - warning lamps
We replace the remaining lamps in the same way.
We install the instrument cluster in the reverse order.
replacing light bulbs on a Chevrolet Niva dashboard
How to replace light bulbs in the Chevrolet Niva dashboard
DIY instrument lighting for Chevrolet Niva
Niva Chevrolet, replacing the heater and backlight regulator in 5 minutes
How to remove the dashboard trim of a Niva Chevrolet
DIY climate control lighting for Niva Chevrolet
Replacing a light bulb in a VAZ dashboard. Comparison of LED and conventional light bulbs in the tidy
LED lamps for car dashboards from China.
Chevrolet Niva problem with instrument panel lighting.
LEDS IN THE INSTRUMENT PANEL FOR VAZ 2110 2111 2112
Not a single modern car today can do without a dashboard, which allows the driver to promptly learn about the status of the main components and systems. Thanks to this, the car owner will always be able to repair incorrectly functioning devices in a timely manner and prevent more serious malfunctions in the future. From this material you can find out what the dashboard of a Niva Chevrolet car is, what malfunctions are typical for it and how to diagnose and replace the dashboard.
Torpedo tuning Chevrolet Niva
To tune the torpedo, you must first remove it. Don't forget to turn off the power beforehand. After which you can either cover the torpedo with leatherette, or paint it with a spray can or spray gun in any color you like. If you decide to cover the dashboard with fabric or leatherette, to do this you need to take measurements from the dashboard and make patterns from them so that it is convenient to cut the material and not confuse anything with the dimensions.
1
– Chevy Niva exterior lighting switch: Two mechanically connected switches are installed in the switch block: side light switch (left).
By successively pressing the switch key, the side lights in the headlights and rear lights are turned on and off; when the side lights are turned on, the control lamp in the button lights up green; headlight switch (right). When you press the switch button (fixed position), the headlights turn on. When you press the button again, the headlights turn off. Niva Chevrolet steering column switches: 1 – switch lever for direction indicators and headlights;
2 – switch lever for windshield wipers and washers. The turn indicator and headlight switch turns on the electrical circuits when the ignition is on and has the following positions of lever 1:
I – the turn indicators are off, the low beam headlights are on if the headlight switch button in the exterior lighting switch 1 is pressed;
II – left turn indicators are on (non-fixed position); III – left turn indicators are on (fixed position); IV – right turn indicators are on (non-fixed position); V – right direction indicators are on (fixed position); VI – the main beam of the headlights is turned on (towards you) regardless of the position of the external lighting switch (non-fixed position); VII – the main beam of the headlights is on (pushed away) if the headlight switch button in the exterior lighting switch 1 is pressed (fixed position). 3
– Niva sound signal switch: To turn on the sound signal, press anywhere on the central pad of the steering wheel.
4
- dashboard
5
– the switch for windshield wipers and washers of the Chevrolet Niva turns on the electrical circuits when the ignition is on and has the following lever positions 2:
I – the windshield wipers and washers are turned off;
II – intermittent operation of the windshield wiper is turned on (non-fixed position); III – intermittent operation of the windshield wiper is switched on (fixed position); IV – low speed windshield wiper is on; V – high speed windshield wiper is on; VI – (self-assisted) the windshield washer is turned on (non-fixed position); VII – tailgate glass cleaner is switched on (fixed position); VIII – the tailgate glass washer is additionally switched on (non-fixed position). 6
– Niva Chevrolet hazard warning switch: When you press the switch button, all the direction indicators and the warning lamp installed in the switch light up with a flashing light. When you press the button again, the alarm is turned off.
7
– the Chevy Niva push-button switch block consists of: switch 1 for heating the rear door glass. When you press the switch button, the glass heating is turned on, and at the same time the indicator lamp in the button lights up. When you press the button again, the heating turns off; switch 2 front fog lights (if equipped on the car). The fog lights are turned on by pressing the switch button while the side light switch button is pressed (see point 1), at the same time the indicator lamp in the button lights up. When you press the button again, the fog lights turn off; switch 3 rear fog lights. When you press the switch button, the rear fog lights turn on, if the headlight switch button is pressed (see point 1), the indicator lamp in the button lights up at the same time. When you press the button again, the rear fog lights turn off. When the ignition is turned off, the lights turn off automatically; switch 4 for headlight cleaner and headlight washer (if equipped on the vehicle). The switch button is not fixed; when pressed, if the headlights are on, the headlight cleaners and headlight washers are turned on. When the button is released, these devices turn off; reserve socket for a switch, closed with a plug 5.
8
– block of warning lamps Niva Chevrolet.
The following indicator lamps are installed in the block: 1 – reserve;
2 – the indicator lamp for turning on the center differential lock lights up when the center differential is locked in the transfer case; 3 – the immobilizer status indicator lamp displays the state of the electronic anti-theft alarm unit; 4 – indicator lamp for the status of the anti-lock brake system (if equipped on the vehicle). When the ignition is turned on, the system goes into self-test mode for 3 seconds and the lamp lights up with a constant light. After the self-test mode ends, the lamp goes out and lights up while the system is operating; 5–7 – reserve; 9
– plug for the reserve socket for the switch.
10
– plug for the socket for installing the passenger airbag.
11
– glove box Niva Chevrolet. When you pull the lock handle towards you, the glove box lid opens.
12
– control unit for the interior ventilation and heating system.
13
– socket for installing radio equipment.
14
– container for small items.
15
– Niva Chevrolet gear shift lever. The gear shift diagram is printed on the lever handle.
16
– transfer case control lever. On the lever handle there is a diagram for switching operating modes of the transfer case.
17
– control unit for exterior mirrors of Niva Chevrolet (if electric mirrors are installed).
18
– block of switches for heating the front seats of the Niva Chevrolet (if heating is installed on the car). The left and right buttons in the block turn on the heating of the driver's and front passenger's seats, respectively. When you press the switch button, the seat heating is turned on, and the indicator lamp in the button lights up. The built-in thermostat automatically maintains the temperature of the backrest and seat cushion heating elements in the range from +25 to +31 °C. When you press the switch again or turn off the ignition, the seat heating is switched off.
19
– ashtray for rear passengers (depending on the version, it may not be installed).
20
– parking brake lever. To brake the vehicle with the parking brake, lift the lever all the way up. At the same time, the indicator lamp in the instrument cluster will light up red. To release the brakes of the car, pull the lever up a little, press the button at the end of the lever handle and lower it all the way down. The indicator lamp should go out.
21
– niche for small items.
22
– Chevrolet Niva ashtray. When you flip the ashtray lid, you have simultaneous access to the ashtray and the cigarette lighter. To use the cigarette lighter, press the socket button until it locks into place. After about 20 seconds, the cartridge clicks back to its original position, ready for use. To clean the ashtray, press the cigarette extinguishing plate and remove the ashtray from its slot. When the exterior lighting is turned on, the inside of the ashtray and the cigarette lighter are illuminated with special lights.
23
– accelerator – gas pedal.
24
– the Niva Chevrolet ignition switch, combined with an anti-theft device, is located on the right side of the steering column.
The key in the lock can be in one of three positions: 0 – “off”. All consumers are turned off, the key is removed. When the key is removed, the locking mechanism of the anti-theft device is activated. To ensure that the steering shaft is locked, turn the steering wheel to the right or left until it clicks. To turn off the anti-theft device, you need to insert the key into the ignition switch and, turning the steering wheel slightly left and right, turn the key to position “I”; I – “ignition”.
The ignition is on, the key is not removed, the steering is unlocked; II – “starter”. The key cannot be removed and the steering is unlocked. This is achieved by turning the key clockwise to overcome the spring force. In this position, the key is not fixed; for the starter to operate, it must be held by hand. The ignition switch is equipped with a starter lock when the engine is running. To re-engage the starter after an unsuccessful start attempt, move the key from position “I” to position “0”, and then again to position “II”. 25
– brake pedal.
26
– clutch pedal.
27
– cover of the Chevy Niva mounting block. When the cover is tilted down, access to the fuses and relays of the vehicle's electrical system opens.
28
– Niva Chevrolet regulator block.
There are two regulators installed in the control unit: electric headlight corrector (left). By rotating the control knob, depending on the vehicle load, the angle of the headlight beam is changed in such a way as to prevent dazzling of oncoming drivers. The combination of a fixed mark and a number on the regulator handle ensures appropriate adjustment of the headlight position for the following vehicle loading options: 1 – one driver or a driver with a passenger in the front seat;
2 – all places are occupied; 3 – all seats are occupied and the cargo in the trunk is no more than 75 kg; 4 – one driver and cargo in the trunk no more than 100 kg. Chevy Niva instrument lighting control: (right). When the external lighting is turned on, rotating the control knob changes the brightness of the instrument lighting, the symbols of the switch keys and the scale of the interior ventilation and heating control unit.
29
– hood lock drive lever. By turning the lever towards yourself, the hood lock is unlocked.
Instrument panel Niva Chevrolet
Chevrolet Niva instrument cluster and lamps:
1
– Chevy Niva coolant temperature indicator in the engine cooling system. The indicator scale has divisions corresponding to temperatures of 50, 90 and 130 °C. The red zone warns of engine overheating. If the arrow moves into the red zone, you should stop, let the engine cool and eliminate the cause of overheating.
2
– an electronic tachometer shows the engine speed. The scale has divisions from 0 to 80, the division value is 5. To find out the crankshaft rotation speed in min -1, you need to multiply the tachometer readings by 100. The shaded yellow zone of the scale means the engine is operating at a high speed, the solid red zone is dangerous for the engine modes.
3
– the indicator lamp for turning on the left turn signal (with a green filter in the form of an arrow) lights up with a flashing light when the left turn signal is turned on synchronously with it. Flashing of the warning lamp at double frequency indicates a burnt-out lamp in any direction indicator.
4
– control lamp for turning on the right turn signal
5
– an induction speedometer shows how fast the car is currently moving. The scale has divisions from 0 to 200 km/h, the division value is 10 km/h. The speedometer is driven electrically by a sensor mounted on the transfer case housing.
6
– the fuel level indicator, based on the electromagnetic operating principle, only works when the ignition is on. When the ignition is turned off, the needle is located at the beginning of the scale. The scale has divisions: 0 – empty tank, 1/2 – half tank, 1 – full tank.
7
– the indicator lamp for the minimum fuel reserve in the tank (with an orange filter) is constantly on when the remaining fuel in the tank is 4–6.5 liters.
8
– the indicator lamp for turning on the side lights of the Niva Chevrolet (with a green filter) indicates that the side lights in the headlights and rear lights are turned on.
9
– the brake system emergency warning lamp (with a red filter) lights up when the brake fluid level drops below the “min” mark on the reservoir of the brake master cylinder.
10
– the indicator lamp for turning on the high beam headlights (with a blue filter) indicates that the high beam headlights are on.
11
– button for resetting the daily trip meter, switching the time and ambient temperature display and setting the time.
12
– electronic mileage indicator. The top line of the indicator shows the total mileage of the car, and the bottom line shows the daily mileage. Reset the daily trip meter by holding button 11 pressed for more than 5 s with the car stopped.
13
– control lamp of the engine management system (with an orange filter) “CHECK ENGINE”. If the control system is working properly, it lights up after turning on the ignition and goes out immediately after starting the engine.
14
– indicator lamp for turning on the Chevrolet Niva hazard warning lights (with a red light filter). Lights up with a flashing light when the hazard warning lights are turned on.
15
– time and temperature indicator. The time and temperature display is switched by briefly pressing button 11. After turning on the ignition at an ambient temperature above +2 °C, the time display always appears. When the ambient temperature drops below +2 °C, the indicator shows the time for 3 s, and then switches to the temperature indicator mode, which operates in a flashing mode for the first 10 s. When the outside temperature rises above +3 °C and drops again to +2 °C: in the case of time display, it automatically switches to temperature display in flashing mode in the first 10 s; In the case of temperature display, the constant mode is interrupted by a ten-second flashing mode. Set the hours and minutes in the time display mode by rotating button 11 in the direction of the “h” (“hours”) and “min” (“minutes”) signs.
16
– the Chevy Niva battery low warning light (with a red filter) lights up when the ignition is turned on. Immediately after starting the engine, the lamp should go out. The lamp burning or glowing at full intensity while the engine is running indicates a lack of charging current caused by a malfunction of the generator or voltage regulator, as well as weak tension (or breakage) of the generator drive belt.
17
– the parking brake indicator lamp (with a red filter) lights up when the ignition is on, if the car is braked with the parking brake.
18
– the emergency oil pressure drop warning lamp (with a red filter) lights up when the ignition is turned on and warns that the pressure in the engine lubrication system is below normal.
Description and location of indicators and instruments on the panel
The instrument cluster includes many elements.
In accordance with the diagram above, the shield structure is as follows:
- The coolant temperature control sensor, the arrow on it rises as the engine warms up. The controller needle should not be allowed to move into the red zone, as this will indicate overheating of the power unit.
- A tachometer is a device that measures the number of revolutions of the engine crankshaft.
- The left turn signal activation symbol, made in the form of a green arrow, appears when the corresponding indicator on the steering column switch is turned on. If the light blinks faster than usual, this may indicate a burnt out bulb.
- Right turn signal.
- Speedometer, this device allows the driver to know how fast the vehicle is moving. The speedometer is connected to the transfer case via an electric drive.
- Gasoline fuel level controller; the Chevy Niva uses an electromagnetic device that functions only when the ignition is activated. When the ignition is turned off, the controller needle moves down the scale.
- The fuel reserve indicator in the gas tank appears on the dashboard when the fuel level in the system is about 4-6.5 liters.
- The side light activation lamp appears on the dashboard when the corresponding optics are turned on.
- The brake system emergency symbol appears if the brake fluid level in the expansion tank has dropped to a critical level.
- High beam indicator.
- A key that allows you to reset the daily mileage readings. You can also use this button to switch to the clock or outside temperature sensor.
- A screen that displays the total and daily mileage of the vehicle.
- The Check Engine indicator indicates the need for engine diagnostics. It should always appear when the ignition is turned on, and disappear after starting the engine. If this light remains on while driving, the engine management system needs to be checked.
- Light alarm activation lamp.
- Symbol of time and temperature; you can switch from one mode to another using button 11.
- Battery low indicator, this light should always appear when the ignition is turned on and disappear after the engine is started. If the indicator is always on, this indicates that there is no charging current in the on-board network. This may be due to a failure of the voltage regulator or generator unit, or the lamp may light up if the tension of the generator strap is insufficient or breaks.
- Handbrake activation symbol. If your Niva Chevy is on the handbrake, the indicator will light up when you turn on the ignition and start the engine.
- Indicator of emergency low pressure of engine fluid. It should always appear when the ignition is activated. If it lights up after turning on the engine, this indicates low pressure in the system or a lack of engine fluid.
- Reserve indicator (video author - Artem S).
"Niva-Chevrolet": instrument panel, designations
Now let's look at the “screen” itself. What indicators does the instrument panel combine? Chevrolet Niva is not original in this regard. The largest indicators are the tachometer and speedometer. Their round scales are located in the center of the shield. The hands of these devices are driven by small, separate stepper motors.
Below the tachometer there is a liquid crystal screen, which displays information about the ambient temperature, as well as the time. At the bottom of the speedometer scale is the same display informing the driver about the total and daily mileage.
To the left of the tachometer there is a scale to the right of the speedometer - the fuel level indicator in the tank. Both devices have a magnetic-electric design.
In the lower left corner there are warning lamps for the battery discharge indicator, parking brake engagement, emergency engine oil pressure, as well as another backup lamp. The lower right corner is occupied by indicators for turning on the headlights, high beam headlights and a low brake fluid level indicator.
At the top, between the tachometer and speedometer scales, there are arrows for activating the turn signals (right and left). At the bottom center of the dashboard there is an indicator for turning on the hazard warning lights, and below it is a “CHECK” indicator lamp.
Possible faults
If you understand the designations of the light bulbs in the Niva Chevrolet instrument panel, let's look at the next point - possible malfunctions of the device:
- The instrument cluster does not work, but the engine starts normally. Most likely, the problem is caused by either a failure of the shield itself or a lack of power.
- The lights on the instrument cluster do not light up. If all the indicators stop working at once, this may indicate a break or fraying of the wire responsible for the lighting. If only some of the lamps do not work, then most likely they are simply burnt out.
- Devices not working - speedometer or tachometer. Most likely this is an electrical type problem; you need to disassemble the panel and look for the fault.
- Sensors do not work - fuel level, antifreeze temperature. As practice shows, this usually indicates poor contact in the electrical circuit. Usually this problem is solved by disconnecting and cleaning the plug contacts (the author of the video is the Ig K channel).
DIY diagnostics
In accordance with the service manual for the car, the control panel has its own diagnostic system, which allows you to check the device without removing it.
The sequence of actions for diagnosis is as follows:
- The ignition must be turned off and the daily mileage reset button must be pressed. Next, the ignition is turned on and the key is released. The arrows on the tidy devices must pass through the entire scale several times - this is a tidy test.
- Then hold down the reset button for five seconds - this will clear the processor memory.
- Now press the odometer reset button; the version of the software used should appear on the display. When you press the button again, numbers should appear on the display. The number 0 indicates that there are no malfunctions in the operation of the device, 1 - the microprocessor has failed, 2 - the fuel controller circuit has broken, 4 or 8 - increased or decreased voltage in the on-board network. If there are several breakdowns, the sum of codes will appear on the screen. For example, 14 is errors 2, 4 and 8, fault 10 is errors 8 and 2, etc.
Dashboard faults
The instrument panel, like any other electronic component, is susceptible to harmful factors such as a short circuit, broken wires in the power or information circuit, or a malfunction of one of the main components of the device. If you have encountered a similar problem, first of all, determine what signs of failure the shield is showing:
- the panel does not function at all, but the engine starts and runs normally;
- The Niva-Chevrolet instrument panel does not light up, but all indicators work (no backlight);
- The speedometer and tachometer do not work;
- Temperature and fuel level sensors are not functioning.
In the first case, contact on the device connectors is most likely lost. It is enough to disconnect the pads, clean the contacts, and everything will work again. A similar malfunction can overtake you in the fall or winter, when the level of moisture in the air is high.
If on a Niva-Chevrolet car the instrument panel lamps do not light up, but all its elements are operating normally, the reason must be sought in the power wires of the lighting bulbs, or in the lamps themselves.
Failure of the tachometer or speedometer also indicates a break in the power circuit. The same can be said if there are problems with the fuel level and temperature sensors.
Tuning options
The choice of options for tuning is not particularly large:
- Install a device from another car. In this case, you will need the services of a qualified electrician, since the connectors will have to be redone. You can also install a digital version of the tidy - it will be more than original.
- As a tuning option, you can install LED bulbs instead of regular ones. Many car owners choose this option because it is less expensive and the easiest to implement.
- Another tuning method is to install original instrument scales on the speedometer, tachometer and other sensors. Moreover, you can buy such scales either ready-made or make them yourself in accordance with your preferences.