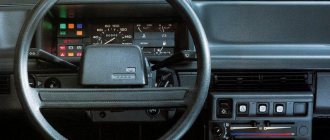
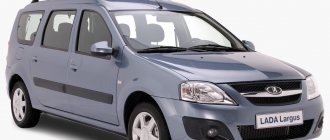
The dashboard allows the driver to monitor the main operating parameters of the car, read the readings of various sensors, indicators and instruments.
Over the past few years, instrument panels have changed from analog to digital, and instrument panel lighting has also changed to make information easier to read and improve overall information content.
For this reason, many drivers are replacing conventional dashboard lighting bulbs with more modern solutions:
- to improve the appearance of the interior;
- in order to improve the quality of information reading.
At the same time, replacing the light bulbs in the dashboard can be done independently on almost any car. Read more in our article.
When to change the instrument panel lighting
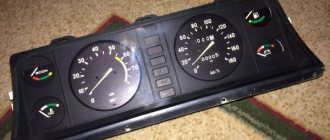
Modern cars today are equipped with LED backlighting or have a combined circuit (digital panels and LED backlighting of individual buttons). As for older machines, in this case, conventional light bulbs and analogue devices are used.
As a rule, the burnout of standard dashboard lamps serves as the basis for their replacement. In this case, replacement can be made either with similar instrument panel bulbs or with more modern analogues. Often diode lamps or LEDs are used for replacement (similar to modern cars).
Installation of modern diode backlight lamps allows:
- change the appearance of the instrument panel;
- change the overall color of the instrument panel lighting;
- Get high-quality dashboard lighting.
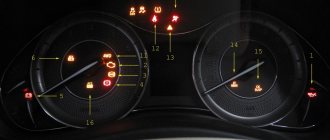
As a result, you can count on overall modernization and increased driving safety (improved backlighting allows you to quickly and accurately read information in the dark and during daylight hours).
Also, subject to proper installation, the driver can count on an increase in the level of comfort (the ability to adjust the brightness of the backlight, select the optimal color, etc.). This helps reduce fatigue and eye strain, especially at night.
Which lamps are best to install in the dashboard?
First of all, when choosing lamps for your tidy, the optimal solution would be to use LEDs. This solution is the most effective, since the diodes shine brightly and evenly, and also have a long service life.
- LEDs are small in size but still shine brightly. Thanks to this feature, they can be installed almost anywhere (in the dashboard area, used for hanging buttons, regulators and other elements).
- Diodes are not difficult to solder, and even a small number of them allows you to obtain uniform and effective illumination.
Using diodes, you can implement both single-color and combined lighting of the instrument panel. To do this, use red, green, blue or white LEDs for the dashboard, and also use them in various combinations. - Diode lamps have low power consumption, which means less battery discharge when the backlight is turned on, ease of starting the engine when the backlight is on, etc.
LED lighting of the instrument panel can be done as follows:
- Using separate LED elements. This method allows you to organize high-quality lighting; if necessary, you can make tuning (diodes of different colors are installed).
- Using diode strip. In this case, you can change the overall color scheme more easily and quickly (the tape has a self-adhesive base), however, in terms of originality, the tape is inferior to individual diodes. Another disadvantage is the frequent need to replace the entire tape if the diodes in the circuit burn out.
Film keyboards and front panels.
Keyboards based on conductive pastes
Our company produces film keyboards using polymer films. Flexible film keyboards are manufactured according to the customer’s technical specifications (dimensions, graphic and color scheme, number of keys, pressing force, tactile effect, windows for indicators, electrical circuit, etc.).
Today we manufacture flexible film keyboards of the following modifications:
a) without tactile effect (pressure force 0.2 - 0.6 N);
b) with a tactile effect (membrane keyboard with installed metal membranes, pressing force 2.0 - 4.0 N);
c) with molding of the front panel;
d) with molding and membranes;
All film keyboards can be equipped with LEDs (SMD type): one- and two-color (different color emission and brightness, including side glow).
The keyboard is connected to the rigid board via a flexible cable using connectors (JST) of type FMZ, FDZ or FB.
On the reverse side, film keyboards have a special adhesive layer applied for ease of installation on a device protected with anti-adhesive paper.
Decorative dashboards
Decorative dashboards are printed on polyester or polycarbonate films. All graphic information is printed on the inside of the film, which guarantees durability and makes the panels abrasion-resistant.
Color scheme - at the request of the customer. The selection of colors is made according to the proprietary paint palette, Panton Matching System standards, RAL and customer samples. If necessary, our specialists will give recommendations on selecting the color scheme of the product.
Windows for the display and LEDs on the decorative dashboard can be: cut-out, clear-cut, tinted (coated with transparent colored varnish).
It is possible to make panels with a tactile effect, which is achieved by molding the front film above the key area.
Main types of film forming:
1. along the contour – embossing a “shoulder” along the contour of the key;
2. general lifting - extruding the entire surface of the key and lifting it above the general surface of the keyboard;
3. Punch – extrusion of a sphere over the contact area of the key;
4. Punching + contour – extrusion of a sphere over the contact zone and a “shoulder” around the perimeter;
5. Punching over the LEDs - extruding a sphere over the LED installed in the product, creating an optical lens for a larger angle of dispersion of the light flux;
6. free-form molding – extrusion of a spherical object, the contours of which coincide with the specified contours of the design on the product (convex logos or other elements).
Typically, the height of the molding of the front panel for microswitches is within 0.5–0.7 mm.
The height of the key molding is dictated by the travel of the microswitch. It is not recommended to use microswitches with a stroke >0.6 mm, and the microswitch rod (optimally a hemisphere) should not have sharp edges. Decorative dashboards on the reverse side have a special adhesive layer protected with anti-adhesive paper. This design allows for easy and reliable installation of the front panel on the device.
Instrument panel lighting: how to replace
To install diode bulbs in the dashboard, you need to purchase diodes or an LED strip. It is important to pay attention to color, brightness and other indicators.
It is recommended to buy LEDs from the same batch, since the brightness and color shade of even two similar lamps may differ slightly. Naturally, after installation this may be noticeable.
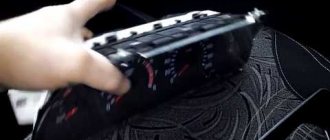
The next step is to install new lamps in the instrument panel. To replace the instrument panel light bulbs, you must:
- remove the negative terminal from the car battery;
- lower the steering wheel (if there are adjustments), move the driver’s seat as far back as possible;
- remove the instrument panel (instrument panel) by unscrewing the bolts and disconnecting the clamps of the wires connected to the panel;
- Please note that depending on the car model, the process of removing the shield may have certain nuances, which will require additional study (it is recommended to review the manual, visit specialized forums or involve third-party specialists);
- the next step is to detach the glass (it can be glued, in this case it is necessary to heat it with a hairdryer around the perimeter of the glass);
- after removing the dashboard glass, standard light bulbs are replaced with LEDs;
We also recommend reading the article about which lamps are best installed in headlights. From this article you will learn about what type of lamps for car headlights is better to choose, xenon, diodes or halogen, as well as what to look for when choosing car lamps.To remove old lamps, they need to be carefully unscrewed or unsoldered using a soldering iron (depending on the type of lamp installation). When working with a soldering iron, it is important not to damage the tracks on the shield.
- after the old dashboard lamp is removed, diode analogues are installed in the same way;
- Having completed the process, before starting reassembly, you need to check all the diodes for functionality (you need to supply power to the panel);
- if all the diodes work, then you can install the glass and mount the shield.
/shields/
Decorative instrument panels /nameplates/ are intended for cladding devices (gluing to the front part of the device), electrical equipment, and control panels. The necessary text or graphic information is applied to the panels; if necessary, transparent windows are left on them for digital indicators, which can be tinted in any color of the customer’s choosing.
It is also possible to produce through holes in the nameplate for various types of rotary switches or protruding mechanical buttons.
The color scheme and shape of the nameplate are entirely determined by the customer. Printing is done using silk-screen printing with a wide range of colors to choose from. Paints can be used not only opaque, but also light-transmitting for tinting windows.
The wide printing capabilities of silk-screen printing allow us to produce such complex products as decorative dashboards for car dashboards.
Transparent windows.
In accordance with the customer's technical specifications, it is often necessary to produce transparent windows on the panel. There are two types of transparent windows - for LED indicators (usually small round windows) and large windows for small digital indicators for displaying text and graphic information.
Since transparent plastic is almost always used for the manufacture of panels and nameplates (matte or glossy, but transparent in both cases), the principle of manufacturing windows is simple - in the right places no paint is printed at all or transparent paint is printed, i.e. The window is “tinted” with the desired color. You can tint it with almost any color.
An example of a window for digital indicators (displays).
These windows are almost always made on glossy plastic and very rarely on matte. If they are done on a matte finish, then almost always with “enlightening” of the windows. By clearing windows we mean that the window area is printed with a clear varnish. From this action, the transparency of the windows becomes close to the transparency of glossy plastic. This type of window is never coated with glue on the back side, unlike simpler windows with LED indicators, where this is possible. These windows can be tinted any color.
Transparent windows can be coated with resin without affecting visibility.
Example of windows for LED indicators
Since this is a simpler type of window, they are often made on matte plastic without coating or on glossy plastic, but coated with matte paste. These windows are also often covered with glue (it is transparent). These windows are almost always tinted in different colors, although they can also be made transparent.
Just as often, such windows are made with convexes to improve visibility and for beauty.
In the photo on the left, a protective transport film is visible on the decorative dashboard; it protects the surface of the plastic before installation on the device (device) from scratches if the plastic is glossy. If the surface of the plastic is matte, then such films are not used, they are not needed.
Nameplates are made of polycarbonate or lavsan plastic, thickness ranges from 175 to 350 microns. Punching of buttons is usually done on plastic up to 250 microns. You can make buttons on 350 micron plastic, but the buttons must be quite large, as they turn out to be very tight. Sometimes panels are made 500 microns thick, but without button holes.
Nameplates using laser cutting.
We can also produce panels from extra thick plastic up to 5 mm thick. (you can watch the video).
Since the plastic is very thick, laser cutting is used; no die cutting or plotter is suitable in this case.
Nameplates on thick plastic are very durable and often do not need to be glued to another surface and may have screw holes in the corners for fastening them.
Naturally, such plastics are cut with a laser; this cannot be done by die-cutting.
The configuration of such nameplates can be quite complex, not necessarily simple rectangular shapes.
Automotive-style dashboards are quite complex products. Sometimes you have to apply paint of the same color to a panel multiple times to achieve different effects. In the bottom panel, black was applied twice. once with a dense layer, the second time with a translucent layer to hide the indicator windows when turned off.
View with the display turned off, the display windows are barely visible.
| View with indicator on | View of the panel from the back side |
It should be especially noted that paint is almost always applied to the inside of the nameplate (the plastic itself is transparent), and therefore it is not subject to abrasion or exposure to the external environment. The exterior of a decorative dashboard is usually printed with a matting paste to prevent light glare. In this case, matpaste is usually not applied to transparent windows for indicators. If the nameplate is made on matte plastic, then it is not additionally matted, because does not glare on its own.
Recommendations
- As a rule, when replacing instrument backlight bulbs, many owners want to obtain high clarity and brightness. Please note that if the lights on the dashboard are too bright, this brightness is sufficient on a sunny day. However, at night the panel may glow too brightly, making it uncomfortable to look at the instruments. The result is high eye fatigue and difficulty reading information in the dark.
- To get maximum comfort, it is better to immediately install an additional brightness control in parallel with the diode lamps. This will make it possible to adjust the brightness of the instrument panel illumination. To change the brightness, you need to connect the backlight through a variable rheostat. This solution will allow you to adjust the intensity of the glow taking into account different conditions. Typically, such regulators are on sale in the same place where the diode backlight bulbs themselves are sold. It is important to determine in advance where these regulators will be installed.
Let us also add that if it is necessary to replace the lighting of other elements (for example, on the center console, in the climate control area, etc.), the procedure for replacing lamps is practically no different. The main thing is to disassemble the panels and gain access to the old lamps to dismantle and replace them.We also recommend reading the article on how to make car soundproofing yourself. From this article you will learn which “Shumka” is better to choose for a car, how to apply sound insulation, etc.
- The price of diode light bulbs today is quite low, and the choice is quite large. The same can be said about diode strip. At the same time, you should not save much; it is better to opt for medium or more expensive options from well-known manufacturers. As a rule, the service life and operating efficiency of high-quality products are much higher than their cheap counterparts.