Problems with the box
The Niva Chevrolet car, and in particular its gearbox element, as they say, is good, but with its own “peculiarities”. Somewhere after the first 50 thousand km, the device begins to show its teeth. There may be a hum or unusual noise. Such features make it clear that the bearings or gears are worn out. If you watch the gearbox for some time, you can determine what exactly needs to be replaced. What other problems can occur with the gearbox?
- Noise, grinding or knocking when the car is moving, and sometimes when warming up.
- Shocks when changing gears.
- The gearbox may refuse to disengage a particular gear.
- Deformation of the lever, which promises complications during the gear shift process.
- Also, transmissions can simply be knocked out.
For each item listed above, there are reasons and ways to solve them. But today we will look at a specific problem - the knocking of the Niva Chevrolet gearbox and we will carry out the repair ourselves.
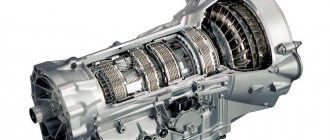
Chevy Niva gearbox
A knocking sound when the car is moving or when warming up indicates that the bearings, gears, shaft (primary) or axial ones in the gearbox have worn out. Actually, determining what exactly was the reason is sometimes very difficult. And if you do not have the opportunity to completely replace the gearbox, then your only option is to remove the device manually, disassemble it and carry out minor repairs.
Malfunctions of VAZ transfer cases
As you know, the main purpose of the transmission is to transmit torque from the engine to the drive wheels. At the same time, the transmission not only transmits, but also converts torque. Most drivers know that a manual transmission has low and high gears. Conventionally, 1,2 and 3 can be considered reduced, 4 is considered to be direct transmission, while 5 and 6 are increased.
Let us immediately note that in relation to SUVs, trucks and various types of equipment, such a conditional division is not enough. The fact is that the gearboxes on such cars have not only “low” and “high” gears, but also so-called downshifts. Next, we'll look at why downshifting is needed, what it is and how it works, and how to use downshifting.
Read in this article
So, let's look at the example of an SUV. In this case, a reduction gear can significantly increase the vehicle's cross-country ability. In simple words, the presence of a downshift allows such a car to drive where cars with a conventional gearbox are not able to overcome the obstacle and continue driving.
To make it clearer, you need to pay attention to the following. Typically, a power unit produces maximum power at a certain number of revolutions. Also, at certain speeds, different from the speed of maximum power, the maximum torque is achieved, which is transmitted through the transmission to the drive wheels.
So, usually gearboxes are designed so that the engine delivers maximum torque and power fairly evenly at different speeds. The first gear allows you to move away, and in this gear the “emphasis” is on maximum torque, while in the 5th gear the car can move at high speed at maximum power speed.
Also interesting: Engine tuning: Niva 4x4 - increasing power using common methods "
The result is that when you press the gas pedal, the car “buries” its wheels in snow or mud, slips and cannot continue moving. If you switch to second speed or higher, the engine will simply stall, since it does not have enough revolutions and power to overcome the difficult section.
It turns out that in a situation where you need high engine power (high speeds), but also need a smooth ride at low speeds and low wheel speeds, a conventional gearbox is powerless. It is with these features in mind that SUVs receive a transfer case with a low gear.
So, active low gear has a high gear ratio. This allows you to reduce the wheel speed and at the same time spin the engine to maximum power speed. As a result, the car is able to move at low speeds at maximum power speeds. This feature is indispensable on off-road terrain, when driving uphill, on steep descents, etc.
Worm, less often cylindrical and planetary gears are used as reduction gears. The worm gear is one of the gearing gears with intersecting shaft axes. Movement in them is carried out according to the principle of a screw pair. Its main properties are low noise level due to the characteristics of the gearing, relatively low efficiency, small dimensions and large gear ratio.
Compared to a helical gearbox, a worm gear provides better running smoothness. This type of transmission has a much greater potential for increasing torque and reducing rotation speed than gearboxes with other types of gears. Spur gears are used in mechanisms with parallel shafts. This type requires increased accuracy due to design features.
Gear drives are distinguished by their reliability and durability while maintaining the permissible load level; the disadvantages include the fact that at high rotation speeds such a mechanism has a high noise level and also cannot flexibly respond to changing loads. Planetary gears are also a type of gear.
They have gears with movable axles. Such gears are lightweight, easy to assemble, produce less noise compared to conventional gears, and also have the ability to obtain large gear ratios. Disadvantages include a large number of parts, increased requirements for installation and manufacturing accuracy.
It is necessary to stop the car, after which the main gearbox lever is moved to the neutral position, and the additional gearbox lever is moved to the “low gear” position. Then we depress the clutch. Not all transmissions have a separate transfer case. In this case, a regular gearbox has a special lever with which this gear is engaged.
The transmission is constantly subjected to high loads while driving, especially off-road. At the same time, the parts, despite the lubrication and the safety margin laid down by the designers, wear out intensively. Therefore, failure of the Chevrolet Niva transmission is not at all uncommon. And the point here is not in the quality of the parts, but in the level of loads and complexity of the mechanism.
Symptoms of malfunction depend on which component is experiencing problems:
- Clutch. In case of breakdowns, jerking occurs when starting to move, slipping under load, or “driving” when trying to stop or change gear. Sometimes the malfunction manifests itself in the form of noise when pressing the clutch pedal or in other conditions.
- Gear box. This unit is more complex, and accordingly, its breakdowns are more varied. They manifest themselves in unclear or difficult gear shifting. Oil leaks, crunching noises and extraneous noises are also possible.
- Cardans and intermediate shaft. Here, malfunctions manifest themselves in the form of knocking during acceleration, squeaking or vibration while driving.
- Main bridge. In the event of a breakdown, the mechanism begins to make noise, knocking noises occur when accelerating and oil leaks.
- Transfer case. Problems make themselves felt in the form of spontaneous shutdown of bridges, noise and knocking. There may also be an oil leak.
- Constant velocity joints. Worn parts begin to crunch and knock while driving. The crunch is especially noticeable when the steering wheel is turned hard.
You can often encounter the following type of misconception: switching the rear handle can increase the power characteristics of the motor. But this is not true. It serves to change the gear ratio between the engine and the wheels. By increasing it, the traction forces on the wheels will increase. There is also a reduction gear in the dispensing mechanism.
DON'T SPEND MONEY ON REPAINTING! Now you can remove any scratch from the body of your car in just 5 seconds.
Its operation can be controlled using the rear handle. When we shift the lever back, we will have a gear ratio of 2.135 - this is a low gear. It is recommended to downshift such a gear only when the car is stationary and the clutch is depressed. Despite the fact that the manual does not contain such a restriction, novice and inexperienced Niva drivers are not recommended to switch while driving, since the Niva transfer mechanism is not equipped with a synchronizer.
The transfer case is not present in all VAZ passenger cars, but only on cars with two drive axles. In the transmission, the transfer case (TC) is installed at the rear of the gearbox; a rear driveshaft is attached to its shank, which connects the transfer case to the rear axle. The front axle is also driven by the steering wheel; it is connected to the transfer case by a front driveshaft.
The reduction gear in the Republic of Kazakhstan is designed to obtain high torque, it is used to overcome difficult sections of the road, and helps to cope with off-road conditions. The VAZ Niva transfer case contains the following main parts:
- the body itself;
- front axle drive shaft;
- intermediate shaft;
- drive shaft;
- gears;
- bearings;
- differential housing;
- satellites;
- differential lock clutch;
- gear shift clutch;
- flanges (for connection to cardan shafts);
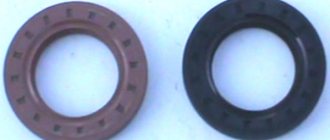
- oil seals;
- control levers.
https://www.youtube.com/watch?v=videoseries
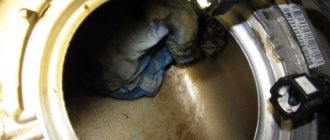
The transfer case on the Niva is a fairly reliable unit; problems with repairs in the mechanism itself arise mainly due to insufficient oil level in the valve - if for some reason the oil leaks out, intensive wear of all parts occurs. Among the frequently occurring malfunctions are:
- vibration in the body at various speeds when the car is moving;
- vibration when the vehicle starts moving;
- noise in the transfer case when the car is slipping or turning;
- difficult upshift or downshift, difficult engagement of the lock.
Correct installation of the transfer case can be done in several ways. Most often in auto repair shops, repairmen use the following method:
- hang the car on a lift;
- loosen the transfer case;
- start the engine;
- engage the gear and accelerate the car according to the speedometer to the speed at which vibration occurs (often it occurs at speeds from 40 to 80 km/h);
- without using the brakes, reduce the engine speed, then turn off the ignition.
The transfer case itself is centered in place, all that remains is to tighten the fastenings of the supports.
You can also adjust the position of the RC using a wire; we do it as follows:
- loosen all four fastenings of the transfer case supports;
- fasten one end of the wire to the rubber coupling of the propeller shaft;
- we attach another piece of wire to the CV joint, bring the other ends of the wire to each other;
- rotate the shaft; if the transfer case is not centered, the ends of the wire will diverge during rotation;
- the task comes down to installing the transfer case using the selection method so that the ends of the wire practically do not diverge from each other in any position when turning the shaft.
And also interesting: Niva 2121, Niva 2131 and Niva Chevrolet. Let's compare? "
To repair the transfer case on a VAZ 21213 (21214), the unit must first be removed. We carry out removal in the following order:
- in the cabin we dismantle the plastic lining of the gearbox and gearbox levers;
- unscrew the knobs of the transfer case shift levers, remove the casing under them;
- disconnect the speedometer cable, for RK 21214 you will need to additionally disconnect the speed sensor;
- we unscrew the bolts with nuts securing the elastic coupling of the front and rear propeller shafts; in order to remove the bolts, the cardan shafts must be turned - they are removed one at a time in one specific position of the shaft;
- We install a jack (or other support) under the transfer case and mark the places where the side supports of the RC were attached. This is done in order to minimize the alignment of the transfer case during installation;
- unscrew the 4 nuts securing the gearbox to the gearbox;
- unscrew the 4 fastenings of the RC supports to the car body;
- Now all that remains is to dismantle the transfer case.
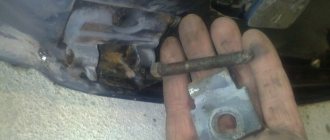
DIY repair
Gearbox knocking is a fairly common disease and not particularly pleasant. Every time you switch to listen to a rattling sound, you won’t get any nerves. But it is still possible to cure the transmission by carrying out appropriate repairs.
In order to remove the knock of the box, you first need to remove it. To repair the box, you need to have keys (10, 13, 19), a 12 hex key, a screwdriver and pliers. So let's get started:
- Place your machine on a hill or in a hole.
- Disconnect the battery terminal and pour out the oil.
- Get inside the car. Remove the handles from the levers, as well as the transfer cases, the element casing and the cover.
- Remove the casing, boot, lock sensor connector. Remove the gearbox lever itself.
- Set up a gear that reverses, remove the locking sleeve.
- Try to mark the cardan flanges and also the transfer case, so that later you can assemble everything in the correct order.
- Remove the cardan (which is the front one) and the washer (which is the oil deflector).
- Did you see the flange (look at the secondary shaft)? Unscrew the nuts of the elastic coupling from it (this is done with a size 19 wrench).
- Unscrew the nuts on the cushions to the very end of the studs and remove the transfer case.
- Now you need to unscrew the bolts from the cylinder and the starter itself, after first removing the cotter pin and the spring next to it. An extension cord is required for this action.
- And move the starter closer to the radiator.
- Disconnect the sensor that controls the lights (reverse), unscrew the muffler clamp, as well as the bolts from the crankcase and the yoke nuts.
- Unscrew the bolts that hold the box closer to the engine. Carefully disconnect it, just try not to let it hang with all its weight on the input shaft.
- Rock it a little from side to side and gradually move it back until you reach the stop.
- Lower the crankcase down and remove the link from the hole.
Installing the car in the inspection hole
Congratulations, you have removed the gearbox! In order to continue the repair, it needs to be disassembled. You should take your time to disassemble it; immediately prepare a work space for yourself. Advice, lay out all the removed parts exactly in the order in which you remove them, this will greatly simplify the reverse process. As you disassemble the device, observe how the bearings, gears, axles behave, whether there are any abrasions, how the input shaft behaves . You may not have to completely disassemble the element, for example, identifying wear on the bearings is very simple, when you remove the bottom cover, move them a little, if any of the bearings move, it means it is worn out and needs to be replaced. So, let's continue the renovation. You need to do the following:
- First, unscrew the shank nut. Carefully remove the helicopter flange and the mechanism that selects the gear. Check the linkage for cracks.
- Now remove the cover from the back. If you suddenly cannot remove it, then push the bearing race down. It is by looking at the races that the condition and nature of the bearings are examined. If you decide to replace them, then you will need to pierce the bearing (now the secondary shaft) down, remove the clutch housing and check the spring washer.
- Now take out the clip, the bushing (which is remote), and the washer. You will have to disassemble the locking mechanism. To do this, unscrew the gear bolts, as well as the bolt (look at the secondary shaft). Lastly, remove the fungus and the ring.
- Remove fifth gear completely. Disassemble the gear. Take out the fixing ball; to do this, you need to push it inside. Unscrew the third and fourth speed fork bolt, extend the rod, remove it and the cracker. Remove the fixing ball and cracker. And by analogy, disassemble the first and second gears.
- Unscrew the fifth speed fork. Remove the rear gear. Don't forget to check the play.
- Take out the middle bearing, remove the front one, move the shaft back, and then pull it forward. The clip that is inside needs to be knocked down with a chisel.
- Remove the first, second, third and fourth gear forks. Also remove the input shaft, the locking ring needs to be removed, use a hammer or puller for this. Take pliers and remove the ring. Carefully inspect the needle bearing.
- Rocking from side to side, remove the bearing. The shaft needs to be removed. Remove the first and second speed gears, as well as the first, second, third and fourth hub couplings. If you find any malfunctions, you need to release the stopper and remove the third and fourth hub of the third speed. Replace the seals.
Let's disassemble the handle and lever in the interior.
Hooray, you're done, you've disassembled the box! In order to eliminate the knocking noise, you need to identify the part that has been damaged or worn out. After you find it, continue repairing the box, replace the damaged part, reassemble the device in the reverse order and put it in place.
Interesting video about the operating principle of the Shnivy transmission
The Chevrolet Niva transmission includes the following components:
- A five-speed manual gearbox allows you to change not only the amount of torque, but also the direction of rotation.
- Split front axle with a gearbox mounted on the power elements of the body.
- Dry single-plate clutch, which, when the pedal is pressed, briefly disconnects the transmission from the engine.
- Solid rear axle, into which the gearbox and differential are integrated. This allows you to increase and distribute torque between the wheels of the same axle.
- The intermediate shaft through which torque is transmitted from the gearbox to the transfer case.
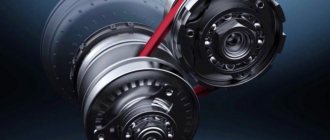
- Transfer case that distributes rotational energy between axles.
- Two cardan shafts transmitting power to the axles (front and rear).
- Constant velocity joints that drive the steering wheels.
It works like this: engine torque is transmitted to the manual transmission through the clutch, then through the intermediate shaft to the transfer case and a pair of drive axles.
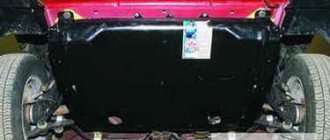
The standard equipment of the Chevrolet Niva includes protection in the form of a curved steel plate. This part prevents damage to the engine crankcase and the most critical elements of the transmission. Below it is a mudguard that prevents road dirt from entering the engine compartment.
However, the protection prevents maintenance of the gearbox and front axle gearbox. Therefore, to change the oil or repair key transmission elements, the plate must be removed. To do this, you will need 8 and 10 socket wrenches.
Removing the protection and mudguard is not difficult:
- Unscrew the four mounting bolts.
- Remove engine and transmission protection.
- Unscrew the five self-tapping mounting screws.
- Remove the mudguard.
Installation of parts is carried out in the reverse order of removal.
The VAZ 2121, in other words, “Niva”, entered mass production in the 70s of the last century. This car belongs to the class of off-road passenger cars. In the history of the domestic automobile industry, Niva became the first car whose design used all-wheel drive. Let's take a closer look at the transmission device.
The transmission in the Niva family (2121, 2131) is designed in such a way that all-wheel drive is supplied to 4 wheels. Also characteristic is the presence of a center differential. The transmission includes a gearbox, a transfer mechanism, a pair of cardan shafts, and both axles. A characteristic feature of the 2131 model is its elongated body.
Then it goes through the cardan shafts to the gearboxes. The front gearbox transmits torque to the wheels through the differential and constant velocity joints. Likewise for the rear, also protruding, driving wheels. It is precisely because the torque is distributed to 4 wheels simultaneously that the drive is called full drive. The designation is as follows – 4WD. Another domestic car, designed on a similar principle to the Niva, is the UAZ.
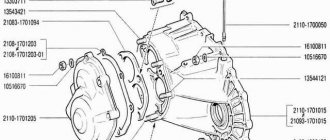
The transfer case mechanism includes more than 60 independent parts, which is confirmed by the presented drawing. Therefore, it is quite prudent to name the main elements and their purpose.
- Housing Differential housing Shafts Couplings Seals Pinions Gears Flanges Levers
A pair of gears are tightly seated on the drive shaft, one of them (large) is intended for high gear, the second (small) is responsible for low gear. They have serrations with straight and oblique profiles. The first ones are in contact with the coupling, the second ones - with the intermediate shaft. The inclusion of one or another row causes the coupling to move along the hub in the horizontal direction, after which it is connected to the gear on the transfer case drive shaft.
The intermediate position turns off the gearbox (the gearbox is open), and the vehicle cannot be moved in this mode. The front helical gear on the intermediate shaft is used to control the differential. The locking is engaged, or the rigid coupling of the drive shafts of both axles, is carried out through a clutch. The design is typical for modifications 21213 and 21214, and the latter is additionally equipped with a speed sensor drive.
In the operating state (with the transfer case reduction gear connected), the gear ratio in the first stage changes from 4.4 to 7.83, the second - from 2.52 to 4.58, the third - from 1.63 to 2.9, in the fourth - from 1.2 to 2.14, fifth - from 0.98 to 1.75, which is expressed in an increase in traction on the wheels.
The normal position for the RK handles, ensuring adequate behavior on the road of good quality:
- Front - away from you Back - towards you
The special operating mode of the transmission is switched on not long before the car begins to overcome an obstacle (rut, mud, ford or rise). The transition to the lowest row must be done while stopping. Returning to top gear is allowed on the go, although it causes problems for beginners due to the lack of the usual synchronizer.
It is somewhat more difficult to properly handle the forced manual locking of the center differential. On the contrary, it turns on when the car moves slightly (up to 20 km/h) due to misalignment of the grooves on the locking clutch, satellites and ring gear. To simplify turning the lever into the desired position, taking into account the Niva 2121 transfer case, pick up a small speed, then, shaking the steering wheel, pull the handle towards you.
Problems can also arise when disengaging the lockout, as the clutch teeth literally catch on the ring gear. Engage reverse and, rocking the steering wheel, push the lever away from you. This action is performed immediately after overcoming a difficult section in order to avoid overloading the gearbox. It is most effective to disable the differential together with the transition to lower stages.
Model VAZ-21213 is an all-terrain passenger car with permanent all-wheel drive and differential lock. Brand 21213 is a restyled version of the first VAZ SUV, VAZ-2121. RK Niva 21213 has three gears:
- the first - with a gear ratio of 1.2;
- the second, lowered – with the number 2.135;
- neutral
21213 is equipped with 4-speed and 5-speed gearboxes, and when the first speed of the transfer case is turned on, the car operates in standard mode, the gear ratios in the transmission are from 5-speed. The checkpoints are as follows:
- 1 – 4,4;
- 2 – 2,52;
- 3 – 1,63;
- 4 – 1,2;
- 5 – 0,98.
On ordinary roads, the transfer case is always in first gear, the transfer case control lever (reduction gear) is pushed forward. The neutral gear of the RK disconnects the transmission, and in this position the car does not drive; there is also a neutral in the gearbox.
Motorists often ask the question: why is neutral gear needed in a transfer case? The neutral is used when connecting additional units to the transmission, for example, a mechanical winch; in this case, a power take-off must also be installed.
On Niva cars (with the exception of Chevrolet Niva) two main types of transfer cases are used:
- 21213 (modifications 21213-1800020-01 and 21213-1800020-02):
- 21214 (modifications 21214-1800020-01, 21214-1800020-02, 21214-1800020-10).
The transfer cases have almost the same design among themselves - the RK 21214 additionally has a speed sensor drive.
The VAZ Niva series was developed as a universal all-terrain vehicle. These cars perform well in both off-road and city roads. One of the components that ensure high cross-country ability is a high-quality multiplier (distributor).
The multiplier is installed only on VAZ models with 2 drive axles. Located behind the gearbox. A driveshaft is mounted on the transfer case itself. Basic elements that are present in all models of Soviet-made demultiplicators:
- frame;
- intermediate and drive shafts;
- set of bearings and gears;
- satellites;
- drive shafts of the front and rear axles;
- oil seals, flanges, couplings;
- differential;
- control and control levers.
The connection between the unit and the gearbox is rigid, which is carried out through a coupling and a shaft. The transfer case of the VAZ 21214 model differs from the classic one only in the presence of a speed sensor drive.
It is necessary to remove the unit not only in cases of its breakdown. Sometimes it is dismantled to gain access to other nodes. To remove the box, you will need the usual set of tools. The sequence of how to remove the transfer case on a Niva 2121 is as follows:
- Raise the car on a lift or drive it onto an overpass (inspection hole).
- In the cabin, remove the decorative tunnel between the front seats, unscrew the fasteners, lift the cover and disconnect the wires of the differential unit lamp.
- Disconnect the speedometer drive cable from the transfer case.
- Disconnect the rear and front universal joints.
- Disconnect the soft clutch from the gearbox flange (unscrew the first set of mounting bolts, turn the clutch and unscrew the remaining ones).
- Compress the coupling with a clamp and remove the bolts.
- Place the adjustable support under the transfer case and unscrew the fasteners.
- Lower the transfer case onto the support.
Also interesting: How to bleed the brakes of a Niva Chevrolet ||
Chevrolet Niva brakes are being pumped (see also on this topic Driving a car and What is all-wheel drive, as well as Niva driving techniques)
TRANSFER CASE SHIFTING
Transfer case levers and their positions