How to check a wheel bearing?
The procedure is quite simple and banal: after a long ride, you need to touch the part of the wheel where the extraneous sound comes from. If it is hotter than the other side, this is the first sign that the bearing needs to be replaced.
It is possible to carry out diagnostics in more detail. Raise the car with a jack, first unscrewing the wheel bolts. Place the wheel chocks and fully raise the side you are checking.
Then you need to take the wheel and rock it with maximum effort. If there is a dull knock, you need to ask a friend to apply the brakes. Carry out the procedure again, if the knocking noise disappears, then the wheel bearing needs to be replaced.
Which bearing is better to choose?
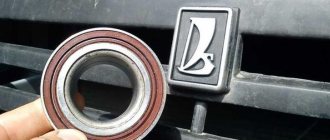
This part can be either Russian or foreign made. Many craftsmen recommend Vologda bearings, which are not of poor quality, and Samara bearings.
The quality is not bad, and the price is much lower. It is not recommended to buy Chinese counterfeits. The wheel bearing measures 64/34/37 millimeters.
As for the tools, if you don’t have a puller for removing the front or rear wheel bearings of VAZ cars, and especially if you don’t have any repair experience at all, then in this case you shouldn’t start work and you need to contact a service station.
Although if you have at least some skills, then the bearing can be knocked out using improvised means.
You will also need a socket wrench (head) for thirty and keys for seventeen and nineteen.
Step-by-step replacement of a VAZ-2114 wheel bearing
As practice shows, the most common cause of wheel bearing failure is the too long service life of this part.
Like other spare parts, bearings have a limited service life, and therefore there comes a time when they require replacement. The wear of this part is indicated by a characteristic sound resembling a hum. If such a symptom is detected, the best solution would be to replace the wheel bearing in a VAZ-2114 car. First make sure that it is the bearing that needs to be replaced. After you have driven your car for a long time, touch the area of the wheel that is making the humming noise with your hand. If this area is much hotter than the other side of the wheel, then the bearing does need to be replaced. Another way to check is as follows. Using a jack, you need to lift the car and unscrew the wheel bolts. You only need to lift the side where the sound is coming from. The raised wheel must be rocked with great effort. If you hear a dull sound, you need to ask someone to press the brake and rock the wheel again. If the noise disappears, then the problem is in the bearing and it needs to be replaced.
Which bearing to choose?
Currently, the automatic transmission is becoming increasingly popular, but there are still quite a lot of adherents of the manual transmission. The most important component of a manual transmission is the clutch release bearing. Thanks to technological progress, this part has undergone large estates. Instead of mechanical bearings that move the clutch discs due to a mechanical connection, hydraulic bearings have come. In these units, the function of the cable is performed by a hydraulic line; they have a more complex design, but at the same time they are highly reliable.
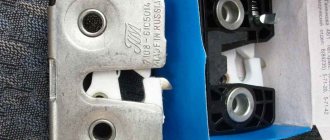
Thus, there are two types of release bearings on the automotive market:
- roller, using a rigid connection of its own rods;
- hydraulic, transmitting force thanks to hydraulics.
The photos show examples.
Price policy
When choosing replacement parts when repairing a clutch, including the release bearing on a VAZ 2114, you need to make sure of the quality of the product, find out its manufacturer, and familiarize yourself with the certificates confirming the quality. This is of great importance, since inexpensive parts break faster, which will require repeated repairs. Experienced drivers have long come to the conclusion that inexpensive analogues cannot withstand the loads provided for the VAZ 2114 car.
Thus, there is no need to save on components
When purchasing new products, you need to pay attention to both price and quality, which must be confirmed by certificates. Quality should come first, as reliable components will ensure safety on the road
The price difference is usually not so high as to risk your life. Below is a table of approximate prices for a release bearing.
Replacement
First, let's set priorities. If you just want to save money, so you do the work yourself without any experience, then this is a wrong decision that can lead to dire consequences. If you have experience and certain knowledge, you can safely do the repairs yourself.
In any case, we recommend watching the training video instructions, where you will be told in detail about all the nuances of such work. This way you will gain additional experience and useful knowledge.
After this, we proceed directly to the work of replacing the wheel bearings. There are several ways. We will tell you about each of them in more detail, and you will decide for yourself which option suits your skills and capabilities.
- The first method involves carrying out work without removing the steering knuckle from the car. But here you will definitely need a special puller to dismantle the bearings. The advantage of the method is that there is no need for subsequent wheel alignment adjustment. But this is the most inconvenient way. To press out and reinstall the wheel bearing, we recommend driving the car into an inspection hole.
Puller
- The second method will require removing the steering knuckle. A workbench will also be useful for removing the bearing. In this case, you will definitely break the collapse. If you don’t want to go to a service station after repairing yourself, use a couple of tricky tricks: Before removing the lower bolt of the strut and steering knuckle, apply marks;
- One mark will allow you to determine the position of the bolt;
- The second mark will be responsible for the position in the steering knuckle strut;
- During the reassembly process, try to ensure that the marks match each other as accurately as possible. This method allows you to simultaneously make adjustments to the chassis and check the condition of the components.
The third method will require removing the bearing along with the stand and dismantling it using a vice. This method is complex compared to others.
It remains to press out the element
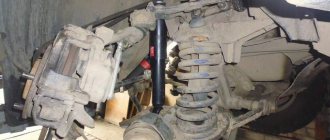
Before work, do not forget to turn on the handbrake and place wheel chocks under the wheels to avoid accidental movement of the vehicle.
- Remove the strut, knock out the tie rod ends and unscrew the fasteners of the upper support to the body of your car.
- Position the jack so that it does not become an obstacle during operation. It all depends on your personal understanding of comfort.
- The wheel bolts are unscrewed, after which the nut of the desired bearing is removed using a 13 mm wrench.
- Using a 17 mm wrench, you dismantle the caliper, which is secured with wire to prevent sagging on the brake hose.
Dismantling works
- After this, the brake disc and ball joint are removed.
- The hub will now be knocked out of the steering knuckle, giving you access to the damaged bearing.
- All that remains now is to press out our problematic element using a puller.
- If you do not have a device such as a puller, use a metal tube whose diameter is slightly smaller than the diameter of the bearing.
- Clean the landing site, treat it with lubricant, after which you can install a new spare part.
- Reassemble in reverse order. Do not forget to simultaneously check the condition of various components, lubricate, change gaskets as necessary.
As you can see, there is a lot of work to do. Do not rush to conclusions regarding the ease or difficulty of such a task. If you want to do everything quickly, efficiently, without having any experience, contact the service station. Otherwise, be prepared to spend a whole day, or even more, on repairs.
Loading …
How to change a bearing yourself
Before starting work, you should carefully study all its stages:
- We jack up the car from the side of the faulty bearing, remove the wheel and, having access to the lock nut of the outer CV joint, unscrew it using a 30 mm socket. It is worth considering that when subjected to high loads, the nut can be heavily tightened; in this case, the wheel is put in place, the car is released from the jack, after which we engage first or second gear in the gearbox and with great force and an elongated wrench, it can be torn off.
- Next, we proceed to dismantling the brake cylinder, for which we need to unscrew the two bolts that secure it from the inside of the hub with a 17 mm wrench, and using a flat-head screwdriver, carefully pressing the pads away from the disc, we remove this unit to the side.
- We unscrew the nut securing the steering tip from the steering knuckle, and using a specialized puller, squeeze it out of its seat, then we perform a similar operation with the tip of the ball joint located at the bottom of the hub
- The upper part of the steering knuckle is attached to the suspension shock absorber strut with two bolts, the lower of which regulates the vehicle's wheel alignment, mark its position and, after unscrewing these bolts, remove the entire hub assembly. We also remove the brake disc secured with two screws.
- Using a specialized puller, we press the front hub out of the inner race of the bearing, then remove the retaining rings on both sides, and with the same puller, we squeeze the old bearing out of its seat.
- Before installing a new wheel bearing, we clean its seat from old contaminants, carefully inspect it for possible damage, small chips and cracks, and if they are found, the steering knuckle must be changed, otherwise there is a possibility of its rapid breakdown.
- We lubricate the bearing seat in the steering knuckle, which will greatly facilitate its pressing, install one retaining ring and mount the new part using a specialized puller until a characteristic click is heard, after which the second retaining ring is inserted.
- We clean, inspect for damage and, if there is none, lubricate the seat of the front hub. Then, using a puller, we carefully press it into the inside of the new bearing and mount the entire assembly into its seat. After that, we carefully insert the splined flange of the drive, install the brake disc, caliper, ball joint and steering end, after which we tighten the new nut securing the outer CV joint, which comes in the repair kit for new parts, roll its edges into the locking grooves and put the wheel in place.
This completes all work on replacing the front wheel bearing. Also watch the video for a detailed analysis of replacing the front wheel bearing on VAZ 2113, 2114, 2115 cars:
As practice shows, the most common cause of wheel bearing failure is the too long service life of this part. Like other spare parts, bearings have a limited service life, and therefore there comes a time when they require replacement. The wear of this part is indicated by a characteristic sound resembling a hum. If such a symptom is detected, the best solution would be to replace the wheel bearing in a VAZ-2114 car.
First make sure that it is the bearing that needs to be replaced. After you have driven your car for a long time, touch the area of the wheel that is making the humming noise with your hand. If this area is much hotter than the other side of the wheel, then the bearing does need to be replaced.
Another way to check is as follows. Using a jack, you need to lift the car and unscrew the wheel bolts. You only need to lift the side where the sound is coming from.
The raised wheel must be rocked with great effort. If you hear a dull sound, you need to ask someone to press the brake and rock the wheel again. If the noise disappears, then the problem is in the bearing and it needs to be replaced.
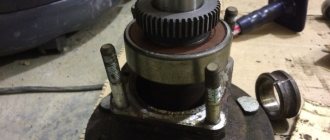
Installing the wheel bearing
- We wash the mounting hole in the steering knuckle from dirt.
- Using a puller, install the retaining ring on the outside of the bearing.
- We press the new bearing into the steering knuckle until it stops against the retaining ring. In this case, the puller force should be applied only to the outer ring of the bearing.
- Using a puller, install the retaining ring from the inside.
- We press the hub into the inner ring of the bearing. In this case, the force should be applied only to the inner ring of the bearing.
- Insert the drive shaft into the hole in the hub.
- We put on the thrust washer and tighten the new hub nut.
- We install all remaining parts in reverse order.
- After installing the wheel, tighten the hub bearing nut to a torque of 225.6–247.2 N·m (23–25.2 kgf·m).
- After this, you need to press the edges of the nut into the grooves of the drive shaft and put the cap in place.
How to change the bearing on the Eltra generator in Lada 2114 - removing and disassembling the unit
- The first step is to remove the negative terminal of the battery;
- Unscrew the bolt at the lower fastening (3);
- Now remove the terminal protection from the mechanism (2), then unscrew the nut at the contact.
- Find and unscrew the upper mounting bolt (1).
- Remove the belt (4) from the pulley (5) and remove the unit from under the hood.
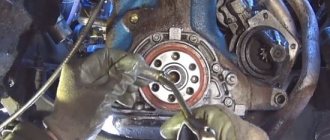
- We clean off the dirt, and then clamp the generator in a vice, using an adjustable wrench with a 24mm socket, unscrew the pulley nut, and first apply WD-40.
- Next, remove the plastic cover using a screwdriver.
- We unscrew the bolts holding the rectifier block using head 8 (10). Next, unscrew the contact bolt.
- We remove the block. Now unscrew the housing coupling nuts. Let's disassemble the body.
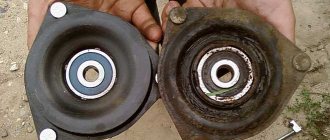
- There are problems with removing the cover, since there is a ball bearing located there, which is mounted on the armature shaft. Disassembly of the case is shown below.
How to press out and remove a bearing without a puller?
After disassembling the electric generator, the front p/sh is pressed off the housing, and the rear one from the rotor armature shaft. Follow the step-by-step instructions.
- Clamp the structure in a vice or place it on a hard surface.
- Using a hammer, through a mandrel selected to the size of the inner ring, carefully knock out the old spare part.
- We dismantle the rear rolling element using a method without a puller (see photo). We use two open-end wrenches 17 or use a puller if available.
How to replace bearings in a VAZ 2114 generator with new ones? Installation and reassembly of the unit
- Lubricate the seating surfaces (in the housing and the rotor armature shaft) with Lithol.
- The front rolling element is pressed in until it stops using a hammer through the head. For reliability, roll the end with a center punch.
- The rear part is pressed onto the rotor shaft using a 27 mm elongated type head or select a piece of steel pipe with an internal diameter of 20 mm and an external diameter of 24-26 mm.
- After installing new spare parts, we assemble the unit using reverse technology according to the diagram. The replacement is completed, we mount the electric generator back.
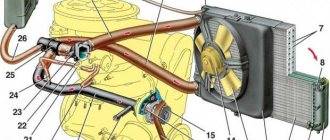
A little about the device and functionality
The main purpose of the part is to ensure uniform rotation of the car wheels. Given the name of the part, it is easy to guess that wheel bearings are the connecting link between the hub and the axle to which the brake disc and wheel are attached.
The design of the part fully corresponds to the classic type of rolling bearings. These are two metal rings into which conical rollers are pressed, protected from the body by a durable rubber insulator.
Unlike foreign competitors, domestic bearings are created using outdated HUB technology. They are quite difficult to install, require very precise tightening torque and require plenty of lubrication.
The operation of the mechanism lasts for several years. It is recommended to change a spare part for a VAZ 2114 approximately once every 100 thousand kilometers. But negative operating factors can accelerate the wear process:
- Bad roads. The entire force of the shock load falls on this mechanism of the system. Over time, the metal gets tired and the bearing begins to fail.
- Aggressive reagents. In Russia, in order to save money in winter, aggressive chemicals are often used to remove ice from roads.
- Sudden temperature changes. In winter, owners of warm garages unknowingly shorten the service life of many metal parts, for which sudden temperature changes when leaving and entering the garage create a large load.
We select the size of wheels for the VAZ 2114. What should you consider when choosing?
Beginner car enthusiasts are not always able to choose the right size of wheels for a VAZ 2114. And such an important part of the car requires constant attention, control and a competent approach. Modern designs are very reliable and quite durable. However, this unit contains pads that require periodic replacement. The duration of operation largely depends on driving style.
Another important factor is the correct selection of all components based on the compatibility of individual parts.
Recommendations from vehicle manufacturers and additional accessories must be taken into account. They are based on many years of experience and scientific developments.
Standard disks are supplied with the appropriate parts, which are best replaced with the same ones. As a last resort, you can use others, but only after consultation with a specialist.
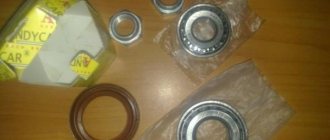
What bearings are on the VAZ 2114 generator - how much, what numbers and sizes
When choosing spare parts, motorists have the following typical questions:
1. What are the numbers for generator bearings? Answer: Marking (numbers): - according to GOST: 6-180303 C17, 6-180203 C17; - according to ISO: 6303.2RS, 6203.2RS.
2. What bearings are on the VAZ 2114 generator? Answer: In the VAZ 2114 generator (injector), the manufacturer provided closed radial single-row ball bearings with lubricant.
3. How much does a generator bearing cost? Answer: The cost of a set of two Russian-made wide bearings will be 300-350 rubles.
4. Dimensions of generator bearings? Answer: For detailed information on the dimensions of parts, read the article “Replacing bearings for a VAZ 2110 generator”
Replacement instructions
Replacing the rear wheel bearing on a VAZ 2114 is carried out as follows:
Loosen the wheel bolts and wheel locknut before jacking up the vehicle.
Raise the car using a jack. Tighten the hub nut completely and remove the wheel. Unscrew the mounting bolts on the drum.
Remove the drum. If it is rusty, pre-treat the joint with WD-40. If after this the drum still does not budge, use long pins. Screw them into the holes and tighten them one by one until the part moves out of place
You can gently help with a hammer by tapping it on the back side.
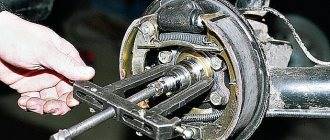
Unbend the stopper and unscrew the locknut. If it is tight, use a wrench extension.
Using a universal puller, press the hub.
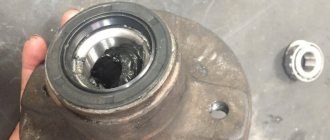
The inner race remains on the shaft, and the outer part of the bearing remains in the housing
If you want to replace the pads at the same time, you need to remove the axle mounts.
Now it's time to demonstrate the entire mechanism.
As a rule, the rear part of the axle is attached to the brake shield. To dismantle you will have to use a hammer.
Remove the wheel bearing race using a universal puller. If the brake system does not need to be changed, this operation can be performed directly on the vehicle's axle shaft.
We place the hub on bricks or bars, as shown in the photo. Use a hammer to knock out the old rear wheel bearing.
Be sure to remove dirt and wash the hub in gasoline. Clean the axle shaft in the same way. Use thick lubricant to treat the seating surface. Place the new bearing in the hub bore. Mounting chamfers will help avoid distortions.
Press the bearing with your hand and press it in about 3 millimeters. Place the old bearing on top.
Using the side of the hammer, carefully hammer the part inward. If the process is difficult, you can cool the bearing in the freezer and warm up the hub.
Once the rear hub bearing is in place, you can install the circlip. For this purpose, round nose pliers are used. Don't forget to lubricate the axle first.
Carefully attach the assembled mechanism to the trunnion. Be careful to avoid distortions. Then place a washer on the threads and screw on the hub locknut.
Using a nut, press the hub onto the axle. Tightening torque: 220 N*M. Place the drum, secure it and screw the chassis.
As you can see, replacing a bearing is a rather complicated and time-consuming task. You need to have a special tool. Sometimes it’s easier to ask a car service for help.
Do-it-yourself technology for replacing the rear wheel bearing of a VAZ 2114
Removing the rear wheel bearing
- We start by loosening the wheel bolts and hub locknut before jacking up the car.
- Now we lift the car with a jack. Screw the hub nut all the way and remove the wheel. Unscrew the drum mounts.
- We remove the drum. Try to loosen it with your hands first.
- If that doesn't work, treat the joints with WD-40.
List of new parts and tools for replacing them
Replacing the front wheel bearing on a VAZ 2114 begins with the purchase by the car owner of the following spare parts:
- front wheel bearing (original art. 11180 – 3103020 – 04);
- front hub retaining rings (usually included in the repair kit under art. 11180 – 3101800 – 86);
- a new front hub (art. 11180 - 3103012 - 00), which will be needed if there is excessive wear of the bearing and rotation in the seat.
It is possible to carry out all the work to eliminate this malfunction without damaging other suspension parts using the following set of tools:
- tire remover;
- a set of open-end spanners from 12 mm to 24 mm;
- socket heads from 12 to 19 mm and wrenches;
- specialized wheel bearing puller;
- specialized steering wheel end remover;
- duckbills for removing retaining rings;
- carriage;
- Screwdriver Set;
- regular pliers.
The cost of work to eliminate this malfunction from official dealers (at the end of autumn 2020) ranges from 4 to 6 thousand rubles. In small private service workshops they will ask for work from 2500 to 3000 rubles. After reading the instructions below, carrying out repairs yourself will not cause big problems for the owner of a VAZ model 2113, 2114 or 2115.
How to lubricate wheel bearings
First of all, let's ask ourselves the question of how to lubricate the wheel bearing without removing it? Of course, this is an option for those who simply do not have the opportunity to remove this part or time does not allow it. An important condition for this procedure is that the lubricant must be the same in the bearing itself and added. Usually, it is very difficult to find out for sure the previous lubrication, so you will still have to remove the hub.
So, how to lubricate the front wheel bearing without pressing it out:
- You need to install the car on the handbrake;
- Raise the car
- Remove the wheel, then the metal cap covering the hub;
- Now you should remove the locking ring using a screwdriver or thin pliers;
- After this, access to the bearing opens; here it is necessary to add lubricant, then rotate the hub.
The process of replacing the rear wheel bearing of a VAZ 2114 (2113, 2115)
Now that we have sorted out the design features, we can move on to the actual replacement process. First you need to collect the tools. What you will need: a jack, a set of open-end and socket wrenches, a wheel wrench, rags, a 30mm socket wrench, round nose pliers for removing retaining rings, VD-40 (as needed), and a new bearing. When everything is assembled, you can consider the step-by-step instructions for replacing the rear wheel bearing on a VAZ-2114 car:
1. Place the car on a flat surface. 2. Set first gear to the gearbox and place wheel chocks (shoes) under the front wheels.
3. Dismantle the protective cap of the hub. 4. Using a 30 mm socket and an extension, we tear off the wheel bearing tightening nut. 5. We tear off the wheel rim mounting bolts. 6. Jack up the car. 7. Dismantle the wheel.
8. Unscrew the rear drum mounts. 9. Remove the front brake drum cover.
10. Remove the hub nut.
11. Install the hub puller and begin dismantling the part.
12. When the hub and bearing are removed, you can proceed directly to dismantling the internal element. 13. Using pliers, remove the retaining rings.
14. There are two ways to remove the bearing from the hub. The first is to knock the product out of its seat. The second, less barbaric, is to use a press to press out the bearings. As practice shows, all motorists use the first one, since the press is not stored in every garage.
15. Now that the old product has been dismantled, you can proceed to installing the new part.
16. Before pressing, it is necessary to lubricate the inner surface of the hub with oil. This is necessary so that the spare part fits better into the seat.
17. Once the bearing is in place, the snap rings can be installed.
18. Now, with light blows of a hammer, install the hub in its place. 19. The rest of the assembly process is carried out in reverse order.
Which bearing to choose for the VAZ 2114 hub
Choosing a spare part is always not an easy task, since there are many factors that influence it. It is worth noting that you must choose a high-quality product and check for certificates, original packaging, and holograms. In addition to the main original product, there are a number of analogues that are recommended for installation. Let's consider all possible options for purchasing a spare part. Original
2108-3104020 and 2108-3104020-02 – original catalog numbers of the VAZ-2114 rear wheel bearing.
The spare part under this article is produced at the AvtoVAZ plant. It's ideal to sit in a seat. The average cost is 2000 rubles. Analogues
In addition to the original, there are a number of substitutes recommended for installation.
As practice shows, they are chosen by most motorists, since the quality of workmanship and service life are much higher. So, let's look at all the options for purchasing a wheel bearing:
| Manufacturer's name | Catalog number | Cost, in rubles |
| Weber | BR 2108-4020 | 500 |
| Master-sport | 2108-3104020-ST-PCS-MS | 500 |
| Finwhale | HB321 | 750 |
| Coram | CR 001 | 750 |
| Hola | NB722 | 750 |
| Meyle | 214 633 0001 | 750 |
| SCT | SCP 1307 | 750 |
| Cx | CX 081 | 750 |
| Kroner | K151208 | 850 |
| Optimal | 802 658 | 1000 |
| Pilenga | PW-P 1307 | 1000 |
| Mapco | 26081 | 1100 |
| Flennor | FR891547 | 1200 |
| Herzog | H10 1206 | 1200 |
| ABS | 200068 | 1300 |
| Patron | PBK1307 | 1300 |
| Moog | LA-WB-11604 | 1400 |
| Trialli | CS 256 | 1500 |
| GKN-Spidan | 26727 | 1500 |
| Torque | DAC 30600037 | 1500 |
| EGT | 554312EGTk | 1500 |
| SNR | R172.04 | 1500 |
List of companies
Well, now we come to the most interesting part. Now I want to introduce several serious manufacturers that you can choose from. I want to say right away that I will not take Chinese and Russian brands, we will take a walk through the famous ones.
1) SNR is a large French company, widely represented in Europe, less so in Russia, but quality is practically in first place.
2) SKF is the world's largest company, ranks with SNR, and is widely represented in Russia. Very high quality manufacturer.
3) FAG is a leading manufacturer in Germany, not as large as the first two, but the quality is at the same level. Recently acquired by INA
4) NSK is the second wheel bearing manufacturer in the world after SKF. The headquarters is in Japan.
5) NTN - Japanese domestic manufacturer, rarely represented in Russia.
6) Koyo - part of the TOYOTA company, the third largest in Japan.
Causes and symptoms of CV joint failure on a VAZ 2115
The most common reasons:
- low quality CV joints, installation of fakes or defective spare parts;
- lack or poor quality of lubricants;
- damage to the boot and entry of abrasive debris or water into the mechanism;
- aggressive driving style and disgusting condition of the road surface.
One of the signs of replacing a VAZ 2114 CV joint is the appearance of a characteristic “crunch”. This sound can only be produced by balls that roll along grooves, because... have too much output. Working in close contact under constant load inevitably leads to changes in the properties of rubbing parts, their sizes, and the formation of wear.
Where there is no close contact of these elements and extraneous noise appears. The sound can appear at any time, but usually it occurs when turning, sharp acceleration, or overcoming obstacles. There are other signs indicating a hinge failure:
- slight jerks when starting the car or changing dynamics;
- play of the shaft located between the CV joints when trying to move it in different planes.
Video “How to change a release bearing”
This video shows how to properly remove and replace a throwout bearing.
The most important element of the clutch is the release bearing of the VAZ 2114. Basically, it performs the work of a thrust mechanism that transmits the pressing force coming from the clutch to the basket, and then to the drive disc. This support bearing makes it possible to break the clutch of the basket with the driven disk. Without it, it is impossible to engage the clutch. The industry produces release bearings in these types.
When problems with the clutch begin, the driver feels this by the appearance of unpleasant sounds when the car moves. It becomes difficult to change gear. Sometimes when overtaking the clutch loses. The car starts to slip. The main cause of such problems is a faulty release bearing.
Replacing the wheel bearing of a VAZ 2114
Based on practical experience, we can conclude that replacing the VAZ 2114 wheel bearing is required as a result of long-term and active use. As a rule, the main sign of wear is the appearance of a specific sound or squeak. In order to correctly install a new part, it is important to obtain the necessary practical knowledge, as well as purchase only high-quality wheel bearings. The future service life and driver safety depend on the correct choice.