A very simple way to replace the internal grenade seal
Grenade seals are divided into left and right, so when changing the seal, be sure to place the left seal on the left side, and the right seal on the right side. The left oil seal is brown (it is on the driver's side), the right oil seal is black (the passenger's side).
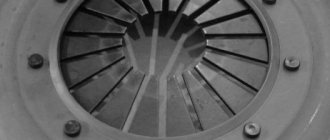
Photo. Internal grenade seals.
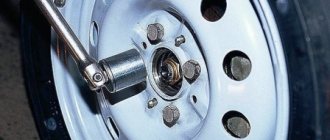
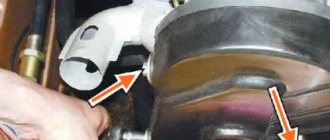
The first thing to do is to lift the front wheel on a jack; on the side on which you are going to change the oil seal, be sure to place a stump or bricks next to the jack for insurance. Remove the wheel and unscrew the hub from the ball.
Photo. The arrow shows which bolts need to be unscrewed to disconnect the hub from the ball, there are two of them with a wrench head, seventeen.
All that remains is to pull the grenade out of the box, here’s the most interesting thing, you can pull directly on the brake disc, trying to pull the grenade out of the box, if the grenade pops out well, or the drive may pop out from the internal or external grenade, then it’s an extra hassle to put the drive in place.
Photo. Removing the internal grenade using a pry bar and tube.
Pulling out the internal grenade from the gearbox. Video
Therefore, it is better not to try to tear the grenade out of the box by pulling the brake disc, but to insert a prybar under the grenade and a tube under the prybar, try to squeeze the grenade out of the box if it was squeezed out perfectly. It happens that a grenade cannot be squeezed out, then it is knocked down with hammer blows.
Photo. Removed grenade from the gearbox.
But before squeezing out the grenade, place a container to collect the oil; it can be made from an old canister by cutting a hole. If the oil in the box is normal, then it will definitely flow out of the box.
Photo. It is shown how you can use a pry bar to squeeze the oil seal out of the gearbox.
The grenade has been removed, squeeze out the old oil seal from the gearbox.
Photo. Grenade seal location.
Remove the old oil seal, wait until the oil is gone, and wipe the oil seal installation area clean with a cloth. For greater confidence, the new oil seal can be coated with sealants, and with light blows of a hammer on the oil seal circle, it can be seated in place.
Photo. Clogging of the oil seal into the gearbox.
The seal was hammered in, all that remained was to insert the grenade into place. Aim the grenade at the box and push it into place. Then assemble in reverse order.
What’s good is that when replacing the grenade oil seal this way, the alignment and camber of the wheel will not be disrupted, so you won’t have to adjust it.
Photo. The arrow shows the oil filler plug bolt into the gearbox.
All that remains is to add oil to the gearbox. To do this, you need to unscrew the bolt plug, which is good, the bolt plug is also the oil level in the gearbox, oil is poured into the gearbox until it flows from the oil filler hole, as little as it starts to flow out means this is the oil level in the gearbox.
Photo. The arrow shows a watering can with a tube for pouring oil into the box.
There are many different methods and devices for pouring oil into a gearbox. I use a simple watering can and a tube, put the watering can on the tube, and insert the tip of the tube into the oil fill hole in the gearbox. But this method is not very fast, since the oil is thick, but if there is no rush, you can wait a little while the oil fills the box. Usually a liter of oil is enough to top up.
We change a grenade on a VAZ 2110 without removing the drive
This is the first, shortest path, which implies the presence of all the specified tools. Everything is quite simple.
- Before jacking up the car, you need to unscrew the grenade nut. To do this, we seat the assistant in the cabin; he must press the brake pedal with all his might and hold the steering wheel. In order to unscrew a grenade after a conscientious tightening, you need a lever of about a meter, sometimes more. The threads are usual everywhere, right-handed.
- Then we remove the wheel bolts, jack it up and remove the wheel.
- We unscrew the two 17mm bolts that hold the ball joint, disengage the splines, and move the hub to the side.
- Now, using a tool for removing clamps or a screwdriver, depending on the type of clamp, remove it. Don't forget about the small clamp.
- Now we screw the reverse hammer with a welded nut onto the grenade. We clamp the drive with a gas key so that it rests against the forged lever (saber). This is necessary in order not to tear the drive out of the box, otherwise you will have to take the second path. With a sharp blow we rip the grenade off the slots.
- We remove the boot; as a rule, the grenade fails precisely because it has broken through.
Important! Under no circumstances should you install the anthers that come with the grenade. They are made from very low-quality rubber, become tanned at the slightest cold snap and burst
Therefore, you will soon have to change the grenade again.
We install a new boot. We do this very carefully, preferably after washing the slots first. The main problem is the thrust ring; carefully throw the boot over it with a screwdriver. Now we tighten the inner clamp, screw the new grenade onto the hammer, and then hammer it into place. Theoretically, this can be done with a hammer through an old nut; knocking a grenade down with a hammer is also possible, but there is a risk of damaging the slots if you are not used to it. We take CV joint lubricant, it is usually included in the kit
We squeeze it out in a circle onto the balls, removing the boot and turning the grenade inside out. Next, tighten the clamp. We put everything back together in reverse order. It is very important to tighten the nut just as tightly and be sure to tighten it.
Replacing the gearbox drive oil seal on a VAZ 2110
The VAZ 2110 gearbox has one “disease” - a deteriorating oil seal. Either the left or the right side suffers. Fortunately, replacing the oil seal is a completely do-it-yourself procedure. And our article will tell you how to replace the gear selector rod seal of a VAZ 2110 without removing the gearbox.
Removing the VAZ 2110 gearbox takes a lot of time and effort. In addition, such a procedure is generally not recommended to be done without the necessary knowledge. Still, tasks of this level of complexity are best left to the service center specialists. But if you are in no hurry to take your car to a service station and want to replace the oil seal yourself, then our detailed repair instructions will be of great help to you.
How often do they need to be replaced and why do they break? This element is a very important part of the car. It needs to be changed every three years, because even the slightest displacement will cause an oil leak. Replacement should be carried out only when the signs are clearly expressed, in our case it is oil leakage.
This procedure and its consequences must be treated carefully, and not negligently. The sooner you notice a breakdown, the less damage will be caused, and the less costly this situation will be for you. So always monitor the condition of this element, as they say, listen and take a closer look.
Diagnostics
Replacing the rocker seal on a VAZ 2110
What symptoms indicate that it is time to change the cuff or gearbox rod? Most often, oil stains and marks remaining on asphalt or other surfaces after the car has been stopped for a long time are the very signs. An experienced driver is obliged to notice them in time and draw the appropriate conclusions. But such spots do not always indicate a problem with the cuff of the drawstring. Often the reason for oil loss is the oil filter, which needs to be checked to avoid errors. Often this same filter is poorly screwed in, resulting in leakage.
Note. Needless to say, noticing an oil leak from the gearbox in a timely manner is an opportunity to save an important vehicle mechanism. Otherwise, the danger associated with the complete loss of oil from the gearbox and the replacement of the gearbox, as a consequence, cannot be avoided.
Replacing the oil seal on the wing of a VAZ 2110
Regular checking will help avoid problems with oil leakage from the gearbox. The gearbox oil level should be easily visible, and a faulty oil seal makes itself felt by a characteristic crunch that occurs when changing gears.
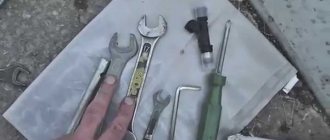
Tools
- Hammer;
- Screw;
- New part;
- Lubrication.
In order to replace the oil seal in a VAZ 2110 gearbox, you need to purchase the correct part. Before purchasing, pay attention to the broken part, where it was located on the left or right. This is the part you need to purchase. The left and right ones differ in the arrow indicators on the inside, the color and different numbers on the ends. You can purchase them at any car market or specialty store.
Instructions
- Place the car on a lift.
- Disconnect the wire from the terminal.
- Remove the flywheel.
- Remove the rear shield of the clutch housing, which is directed towards the bushings.
- Unscrew the bolts (8 pieces).
- Remove the holder from the part.
- Now you need to knock it out of the gearbox; to do this, use a screw and a hammer.
- Now we take the new element and press it into the holder. Outer diameter - (99±0.5) mm.
- The working edge should be on the inside, if anything, turn it over.
- A gasket that is torn must be removed. It will stay in place thanks to the lubricant on the holder.
- Lubricate the edge with engine oil.
- Also lubricate the crankshaft flange with engine oil.
- Place the working edge onto the flange.
- Tighten the bolts.
- Reinsert the crankcase and bushings.
- Replace the flywheel and clutch.
The process of disassembling the gearbox
is ready, the replacement of the VAZ 2110 gearbox seal has been successfully completed.
Let your machine run for a long time and not leak. A good owner's car is always in excellent condition. So it all depends on you! Monitor and check, take it for diagnostics on time if necessary. And try not to spend a lot of money on service centers, but also don’t try to do everything yourself if you don’t understand this area!
Repair and restoration work
Regardless of the repair, adjustment or replacement of the link, the need to disassemble this unit does not disappear.
The parsing process includes the following procedure:
- First, you need to remove the casing from the gearshift lever, or, more precisely, from its handle.
- The front of the car needs to be raised with a jack or placed on a pit.
- Unscrew the mounting bolts that hold the front console, and then remove it.
- Now you need to unscrew the six bolts that hold the rocker and also remove it.
- When dismantling, you should be extremely careful, paying attention to the condition of each part and element, so that if their condition is unsatisfactory, replace it with a working analogue.
- To gain direct access to the cardan shaft, oil seal and support, you need to bend the boot.
Now let's get back to the repair itself. In fact, depending on the condition of the components and the unit itself, several recommendations can be made:
- It is practically impossible to do without a special repair kit for repairing the backstage, fortunately it is inexpensive.
- If the bushing is deformed during the repair work, it will have to be replaced with a new one.
- If the driveshaft is loose (which needs to be verified), then the matter will not be limited to just one repair kit, since you will have to dismantle and install a new rocker.
- The hole in the lever axis must be examined in detail, checking for wear.
- The rocker pad is one of the common reasons leading to random gear shifting and the appearance of extraneous noise and vibration. Replacing it is quite simple, so even a beginner can cope with this task.
Changing the oil seal
Many owners of a VAZ 2110 can often observe a situation where, after a long period of parking the car, traces of oil are found underneath it (on the ground). The problem has two causes: wear or damage to the oil filter, or wear to the oil seal.
Interestingly, when replacing the oil seal with a new one, owners will have the opportunity to completely replace the driveshaft, boot or cushion. Very comfortably.
However, before starting repairs, you need to objectively determine the cause of the oil leak. To do this, you need to carefully inspect the oil seal and filter for damage or wear. Once you are finally convinced that the oil seal is faulty, you should begin preparation and direct repair work.
If the filter is fully operational and not damaged, then in this case, you should put the car in a pit or find another way that will make it possible to get to the bottom.
It would be wise to watch videos dedicated to this type of repair, as well as view other useful materials, including information about repairing the VAZ 2110 backstage.
After that, you can get down to the most important thing:
- The boot should be studied in detail and inspected. If oil leaks from the gearbox, then traces of it will certainly remain on the surface of the boot.
- To get to the cardan, you will have to bend the boot. Afterwards, disconnect it, thereby gaining access to the cuff.
- Dismantling the cardan should begin by disconnecting the lever, and only then freeing it from the rocker.
- Let's move on to the oil seal.
- Before removing the cuff, you need to prepare the hook and awl in advance, since it can only be removed thanks to them.
- To install a new oil seal, craftsmen often resort to using a standard plastic bottle cap. This is quite convenient in practice.
- After successful installation, we assemble in the reverse order.
Video “Replacing the oil seal”
Let's take a closer look at how to change the oil seal correctly in our video.
Hello, reader of the blog RtiIvaz.ru. Today we will study how to replace gearbox seals on a VAZ 2109, VAZ 2114 and VAZ 2110. Replacing gearbox seals on a VAZ 2109, VAZ 2114 and VAZ 2110 and on other Lada models is done when oil leaks are detected. Typically, drips occur in the places where they are installed and a sign is a decrease in the oil level in the gearbox.
Sometimes oil leaks appear at the junction of the gearbox and engine. In this case, you need to touch the leak with your finger and by the smell you can determine where the oil is coming from. From the engine or gearbox. Transmission oil has its own specific smell, which differs from engine oil.
Before replacing the gearbox seals, you need to drain the oil from the gearbox. To do this, we need a container for the drained oil and two keys for 17 and 13. First of all, we need to check the gearbox breather, which is designed to ventilate the gearbox. And in the absence of one, excess pressure develops in the crankcase and this can cause oil to be squeezed out through the cuffs.
Transmission seals for VAZ 2109, 2110, 2112, 2114 cars are usually sold in a set of 4 pieces:
- Primary shaft oil seal.
- Drive seals, there are two of them, left and right, we will look at the differences later.
- Gear selector rod seal.
When does it become necessary to replace the VAZ 2110 gearbox oil seal?
Used oil seal
The VAZ 2110 transmission system includes reliable components that, when interacting, ensure smooth running and decent power performance of the vehicle. Among the consumables that periodically have to be changed on a car are oil seals. These components are located on the front wheel drives and the gearbox input shaft. Among the reasons for their deformation are:
- natural wear and tear;
- factory defect of the product;
- mechanical damage as a result of external influence.
The result of this is an oil leak from the gearbox. The failure of a spare part can be indicated by the presence of an oil slick under the car or the appearance of a characteristic crunch when changing gears. An independent inspection often reveals fuel leaks at the junction of the gearbox and the power unit. In case of these manifestations, vehicles must be sent for diagnostics.
REPLACING THE INPUT SHAFT SEAL
To replace the gearbox seals, especially the input shaft, the gearbox must be removed from the engine. Having removed the gearbox, carefully inspect the installation locations of the cuffs. And first of all, you need to dismantle the release bearing and remove its guide. Under it you will find the input shaft oil seal.
To remove the seals we need a flat-head screwdriver. By prying it from the inside, you can remove the cuff from its seat. The input shaft oil seal has dimensions 25x45x9. Catalog number 2110-2301043Р. It is better to install it with sealant. The outer race of the oil seal must first be degreased, and then a thin layer of sealant must be applied.
When installing, you must ensure that the inner race of the oil seal does not turn outward and the cuff spring does not jump out of its place. We install it in its place and carefully, using a pipe, lightly tapping, hammer the cuff into place. In this case, it is necessary to ensure that the plane of the input shaft oil seal lies exactly in relation to its seat.
Then we install the release bearing guide in place. It is secured with three bolts, which should be tightened evenly so that it fits into place without distortion.
Next, we immediately install the release bearing. When installing it, you must immediately put on the wire springs, which are placed on the legs of the release bearing and fix it in place.
Now it's time for the drive seals. There are two of these seals, the left one is red and the right one is black. They also differ in the direction of rotation. This direction is shown by arrows on the seal housing. These arrows are located on the inside of the oil seals, on the right oil seal the arrow points to the left, and on the left oil seal the arrow points to the right. This can also be determined by the oil removal notches applied to the inside of the cuff.
They act to deflect oil away from the cuff. They are applied at opposite angles, in the direction of shaft rotation. Typically, the manufacturer labels it in three ways:
- Catalog numbers. The number of the right oil seal ends in an even number 2110-2301034Р, and the number of the left one ends in an odd number 2110-2301035Р.
- Arrows, left arrow on the right, right arrow on the left.
- Color. The left one is red. The right one is black.
Replacing the front-wheel drive oil seal on VAZ-2108, VAZ-2109, VAZ-2110, VAZ-2115 cars
Is the front wheel drive seal leaking? Thoughts like: How expensive is it to replace an oil seal? Is it possible to replace the oil seal with your own hands? And how difficult is it to replace it? Yes!? Then you have come to the right place... I can say for sure that it is not difficult, and you can easily carry out the work yourself. Of course, only if you have the desire, the necessary tools and precise instructions for correctly replacing the front wheel drive oil seal on VAZ-2108, VAZ-2109, VAZ-2110, VAZ-2115 from the Auto Repair School website! ))) Well, as they say, from words to deeds! Let's move on to the description of the main thing - a list of tools, purchasing spare parts and the process of replacing the drive seal with photographs