Bottom repair - patching holes, making sound insulation
Contents
Bottom repair - patching holes, making sound insulation
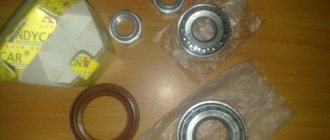
Selecting replacement parts
UNDERBODY REPAIR
Do-it-yourself: Processing the bottom of the outside of a VAZ-2107
Hi all! Last year, I accidentally discovered wet noise and cracked vibration insulation under the front seats; winter was coming, so there was only enough time to replace the wet felt. This year I decided to completely inspect the bottom, and at the same time replace the standard Shumka with vibration and add noise to the engine shield, which should have been done when purchasing the car. Since I had already noticed one rotten area in one place on the bottom, I bought in advance at the car market a sheet of metal for patches, 1.4 mm thick, according to the seller. There was also standard 0.8 mm metal, but it seemed a little thin, and the difference in price was small. The sheet was immediately degreased, matted with P280 sandpaper, primed with epoxy primer, then insulated with regular primer and finally coated with 3in1 rust-resistant enamel.
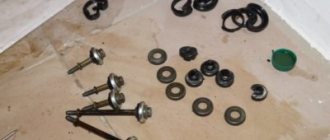
To get to the Shumka, you need to dismantle the front seats and the sofa, remove the shelf under the glove compartment, the console, the sill panels and the seat belt bobbins with locks.
The new felt also turned out to be soaked through, it’s unclear where the water came from again?
The factory Shumka at the rear was also partially wet and had already begun to rot.
The vibration is cracked and peeling in places, especially at the front, there is water and rust underneath.
I scraped it off with a dull chisel and a sharpened spatula, since it had already hardened, so it came off quite well, and I finished it in a couple of hours. The floor underneath appeared to be primed, unlike the doors where it was molded onto bare metal, and was in good condition, especially at the rear, with only a little surface rust in places.
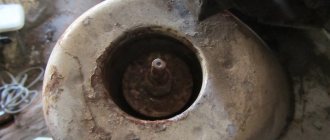
When checking the bottom with an awl, as it turned out, not everything was good. It has rotted over both underbody reinforcements and the jack on the right front, there is sand and rust inside, although the amplifiers are still intact.
At the rear, the floor above the jacks also rotted, and on the left, the threshold was specifically grabbed, in the place where rot was initially discovered on the bottom. The threshold amplifier is completely rotten.
I cut out the rotten metal with a grinder, cleaned out the cavities and coated the inside with heated pushsal, since it couldn’t really be treated afterwards.
Then, I cut out templates from wrapping paper, calculating the overlap on the healthy metal, and then cut out patches from painted sheets using them. Before welding, I removed the controller and battery so as not to burn anything.
First, I grabbed a patch around the perimeter, and then, tapping with a hammer, I welded the seam and, after beating off the slag and cleaning it, covered it with seam sealant, which I used in the anti-corrosion test. Although, of course, it would be better to paint it first.
Read, it might come in handy: Do-it-yourself acoustic shelf for a VAZ 2107 (photo and video)
I used a 2 mm electrode, since I couldn’t find a smaller one on sale. In principle, it cooks normally, there were burns only in those places where the metal was rotten and was a bit thin. I tried the 3rd one - it’s already burning through.
At the rear left we had to install two patches from the inside and outside; the threshold amplifier, one might say, was absent there, but I think the patches will serve as something of an amplifier.
Then, I completely removed the remaining vibrations with white spirit, cleaned the rusty areas with a flap wheel, etched the rust with a converter and painted it with 3in1 paint with a roller in two layers with intermediate drying.
Just wait until it all dries well.
Modifications of VAZ-2101
Mass production of VAZ-2101:
VAZ-2101 “Zhiguli” - initial version, 1.2 liter engine. (1970-1983);
VAZ-21011 “Zhiguli-1300” - the so-called “zero eleven” - the main changes occurred in the modification of the body. This car was equipped with an excellent radiator grille with more frequent vertical bars; four additional slots appeared in the lower part of the front panel for better air flow to the radiator of the cooling system. The bumpers lost their “fangs” and were replaced with rubber pads around the perimeter. On the rear pillars of the VAZ-21011, special exhaust ventilation holes for the interior began to be located, which were covered with original grilles; brake lights and turn indicators received reflectors. They began to install a reversing light on the car (1974-1983). The interior has also undergone changes, which have become more comfortable, as well as ashtrays, for which they found a new place on the door panels. The corrugated silver inserts on the dashboard have given way to woodgrain inserts, and the steering wheel has lost its chrome ring. In addition to this, the modification received a more powerful 69-horsepower engine with a displacement of 1.3 liters.
VAZ-21013 “Lada-1200s” - differs from the VAZ-21011 with a VAZ-2101 engine of lower power (displacement 1.2 l) (1977-1988);
Right-hand drive VAZ-2101:
For export to countries with left-hand traffic, the Volga Automobile Plant has mastered the production of two versions of the Zhiguli - VAZ-21012 and VAZ-21014 (based on the VAZ-2101 and VAZ-21011). They were distinguished by a reinforced suspension spring for the right front wheel, since when the controls were moved to the right side, the distribution of the vehicle’s weight turned out to be uneven. The car was produced during 1974-1982.
Low-volume VAZ-2101:
VAZ-21015 “Karat” is a modification for special services, equipped with an engine.
VAZ-2106, additional gas tank, rear suspension springs from VAZ-2102, points for installing special equipment.
VAZ-21018 - VAZ-311 rotary engine (single-section), 70 hp. With.;
VAZ-21019 - VAZ-411 rotary engine (two-section), 120 hp. With.;
VAZ-2101 pickup - a variant with a pickup body, which had a load capacity of 250-300 kg.
Special VAZ-2101:
VAZ-2101-94 - this modification was a VAZ-2101, equipped with a 1.5 liter engine from the VAZ-2103. The car was primarily intended for the police and special services.
VAZ-21016 is a VAZ-2101 body with a 1.3 liter VAZ-21011 engine.
The export version of the car was called Lada 1200. More than 57,000 cars were sent to the countries of the Socialist Commonwealth. Production of the VAZ-2101 and VAZ-21011 cars was discontinued in 1983, due to increased production of the new VAZ-2105 model. Then they began to produce only a modification of the VAZ-21013, the production of which was completed only in 1988.
| Engine | 1.2l, 8-cl. | 1.2l, 8-cl. | 1.3l, 8-cl. |
| Length, mm | 4073 | 4043 | 4043 |
| Width, mm | 1611 | 1611 | 1611 |
| Height, mm | 1440 | 1440 | 1440 |
| Wheelbase, mm | 2424 | 2424 | 2424 |
| Front track, mm | 1349 | 1349 | 1349 |
| Rear track, mm | 1305 | 1305 | 1305 |
| Ground clearance, mm | 170 | 170 | 170 |
| Minimum trunk volume, l | 325 | 325 | 325 |
| Body type/number of doors | Sedan/4 | ||
| Engine location | Front, longitudinal | ||
| Engine capacity, cm 3 | 1198 | 1198 | 1300 |
| Cylinder type | Row | ||
| Number of cylinders | 4 | 4 | 4 |
| Piston stroke, mm | 66 | 66 | 66 |
| Cylinder diameter, mm | 76 | 76 | 79 |
| Compression ratio | 8,5 | 8,5 | 8,5 |
| Number of valves per cylinder | 2 | 2 | 2 |
| Supply system | Carburetor | ||
| Power, hp/rev. min. | 64/5600 | 64/5600 | 70/5600 |
| Torque | 89/3400 | 89/3400 | 96/3400 |
| Fuel type | AI-92 | AI-92 | AI-92 |
| Drive unit | Rear | Rear | Rear |
| Gearbox type / number of gears | Manual/4 | Manual/4 | Manual/4 |
| Gear ratio of the main pair | 4,3 | 4,1 | 4,1 |
| Front suspension type | Double wishbone | ||
| Rear suspension type | Helical spring | ||
| Steering type | Worm gear | ||
| Fuel tank volume, l | 39 | 39 | 39 |
| Maximum speed, km/h | 140 | 142 | 145 |
| Vehicle curb weight, kg | 955 | 955 | 955 |
| Permissible total weight, kg | 1355 | 1355 | 1355 |
| Tires | 155 SR13 | 165/70 SR13 | 155 SR13 |
| Acceleration time (0-100 km/h), s | 22 | 20 | 18 |
| Fuel consumption in the urban cycle, l | 9,4 | 9,4 | 11 |
| Fuel consumption in the extra-urban cycle, l | 6,9 | 6,9 | 8 |
| Fuel consumption in the combined cycle, l | 9,2 | 9,2 | — |
Selecting replacement parts
The rotten underbody of a car requires painstaking and lengthy repairs. To thoroughly check the condition of the body, it is recommended:
- Free the car interior from the interior, remove the floor.
- Drive the car onto an overpass or turn the car over, in good lighting, tap the bottom with a hammer, having previously cleared it of dirt and dust.
- Carry out a thorough inspection, determine the degree of corrosion and the depth of the lesions.
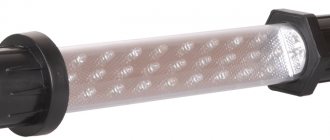
- For inspection, you need to use a powerful lamp or a portable mirror; with this tool you can inspect pockets, sinuses, and other hard-to-reach places.
If significant pockets of corrosion are identified, the bottom is rusted through, then it is necessary to digest the body, strengthening the damaged areas with sheets of metal. The following aspects are taken into account:
- The recommended thickness of the welding sheet is 1-2 mm.
- When working with thin overlays, it is necessary to ensure optimal temperature conditions.
- Thick metal is more difficult to weld, but is harder to damage.
Caring for the underbody of the VAZ 2107
The VAZ 2107 configuration, modification 21074, is distinguished by the high quality of the metal from which the body is made, as well as attachments. Since 1990, parts have not been galvanized using the production method, so the bottom must be additionally strengthened and protected with anti-corrosion agents.
To treat external surfaces, it is enough to take 2 kg of bitumen mastic; for internal work, paraffin or oil anticorrosives are used. After replacing the bottom, side members and other body elements, the parts are treated with special agents to prevent corrosion.
It is recommended to update the mastic for the bottom once every 1.5 years, for any work related to straightening the body.
UNDERBODY REPAIR
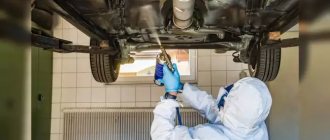
The underbody is more exposed to aggressive environmental influences and mechanical damage than other elements. The poor condition of the roads also has a noticeable impact on its wear and tear. Therefore, the bottom often has to be completely digested. You can do this yourself - all you need is an inspection hole or overpass and good lighting to inspect the bottom. Tools you will need:
- gas welding or semi-automatic welding machine;
- metal scissors;
- Bulgarian;
- straightening hammers.
It is extremely important to find sheet metal of optimal thickness - thin iron is sensitive to temperature (gas welding will be required), and thick iron is difficult to process.
The bottom is restored as follows.
- All problem areas of the floor are cleaned of dirt and rust with a grinder.
- Metal patches are cut out.
- The patches are fixed in the right places and welded.
The metal patch on the underbody of the VAZ 2107 must be welded around the entire perimeter
- The seams are cleaned and coated with an anti-corrosion compound.
Travel the length and breadth of the country
A well-tuned engine starts from the first revolutions of the crankshaft, and along with the engine the entire technical part of the car comes to life. You can hear the shafts spinning in the gearbox, and when the clutch is disengaged, the sound of a rotating release bearing appears. Dear, long-forgotten “melodies”. We traveled with them throughout our youth, conquering the roads and off-road terrain of the once gigantic country. And the Lada, I must say, allowed us to drive long distances. Despite the archaic 1.2 liter engine with a power of only 64 hp. With. (according to the old Soviet GOST), the “kopek” at the time of its appearance was the most dynamic and economical car in the USSR. It was also a success among car-tourism enthusiasts - they drove these cars wherever they went. Only Seagulls and government ZILs accelerated faster than Lada cars, which, of course, were not sold to private individuals.
Photo from the past - VAZ-2101 on Big Almaty Lake. And no jeeps were required
The suspension allowed, and even now does not mind, driving on the road at a cruising speed of 100–120 km/h, and the condition of the road did not have much influence on the pace. Broken, uneven asphalt, rolled primer - it’s all the same. It was not without reason that before the start of production of the “kopek”, Soviet engineers made more than eight hundred changes to the design of the Italian progenitor FIAT-124. The changes also affected the suspension: the front was simply strengthened, and the rear, in fact, was already of our own design - more powerful shock absorbers were removed from the springs, the axle stocking began to be attached with five rods instead of four, and the ground clearance increased. The rear brakes of the Soviet car became drum brakes instead of disc ones, since they are more durable on bad roads, and the size of the clutch disc was increased. The Italians liked some of the changes so much that they began to use the experience accumulated in Togliatti in their homeland. True, the VAZ-2101, after modifications and strengthening of the body, compared to the 124, became 90 kg heavier. More serious changes took place in the engine. The “Italian” had the camshaft located in the cylinder block, while the “Lada” had it moved to the cylinder head. In addition, the distance between the cylinders was increased, which made it possible to increase engine displacement by boring.
Under the hood is a 1.2 liter 2101 engine
By modern standards, the pendant suspension works silently. Swallows any little thing, and the body sways smoothly on soft springs. They don't make things like that now. Modern small cars are harsh and noisy. They may be sophisticated and more stable in turns, but they are soulless.
"Zhiguli" of the first models on the roads of Kazakhstan, although rare, are still found. The vast majority of them are regrettable in their appearance. Our model invariably attracted others. What can I say, only during the filming of the car did two people ask: “How much are you selling it for?”
But the “penny” is not for sale. It really can't be sold. Well, or at least it’s not easy to tear such a memory from your heart. Or pay a lot of money for it. By the way, in 1973, a VAZ-2101 in the USSR cost 5,500 rubles, which at the exchange rate of that time was $6,700. And the average salary in the country was 125 rubles.
The current owner even keeps the service book from the car, which indicates the date of purchase, city and Dynamo store in Pavlodar
How is the replacement made?
Changing a wheel, at first glance, is a completely simple operation. I unscrewed the wheel, took out a new one, and screwed it on. However, there are many nuances, without which it will not be possible to make a correct replacement. Let's take a closer look at how to properly replace a tire on your car.
If an unpleasant situation occurs on the road and the wheel becomes unusable for some reason, don’t worry. By following the procedure for replacing a wheel, the procedure will be successful. A car with a flat or flat tire must be placed on a flat, hard surface. It is important that the surface is hard; a jack placed on the ground or sand will sag under the weight of the car.
Next, put the stopped car on the handbrake and engage first gear, so the car will not move. Also place wheel chocks under your wheels for maximum safety. In order for the stops to hold well, they must be adjusted with a hammer or any other available means.
Remove the spare tire and lower it under the car. If the jack fails, the car will not fall to the ground - this is where the position of the wheel under the car comes in handy.
Then you need to loosen the nuts or bolts on the wheels.
Jacking and towing
To jack up the front of the car, set the parking brake and, for safety, place chocks under the rear wheels.
When jacking up the rear of the car, you must engage the gear and place chocks under the front wheels.
Place reliable supports under the sides of the body. If one side rises first and then the other, you must ensure that the supports are secure.
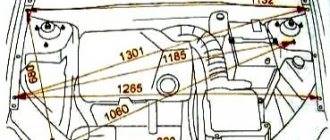
Support points for lifting with a car jack
ATTENTION
Do not start the engine of a lifted car - this is dangerous. If the jack is not installed under the support point of the body, damage to the car body may occur. There is also a risk of injury.
Place a jack under the car
– The jack foot must tightly cover the vertical rib of the side member so that the jack cannot slip when lifting the car.
At the same time, you should level the position of the jack and raise the jack foot until it fits snugly against the vertical rib. ATTENTION
When installing the jack on soft ground, the vehicle may fall off the jack. Therefore, it is necessary to place the jack on solid ground. If necessary, a stable and relatively large support should be used.
To hang the car, you must use a lift.
To avoid damage to the underside of the car, be sure to use appropriate pads made of rubberized material. ATTENTION
Under no circumstances should the vehicle be lifted under the oil pan, under the gearbox, under the rear or front axles, otherwise serious damage to components and assemblies may occur.
The jack support plate must not touch the suspension trailing arm mounting bar, otherwise the steering may be damaged.
Before entering a lift, ensure that there is sufficient clearance between low-lying points on the vehicle and the lift elements.
Support points for lift and garage lift
– At the front, at the vertical stiffener of the lower beam.
– At the rear of the vertical stiffener of the lower beam in the area of the embossed marking. The lower beam stiffener should lie in the middle of the lift support plate. Towing
The vehicle can only be towed using the designated lugs. Securing the tow rope/rod
Caring for the underbody of the VAZ 2107
The VAZ 2107 configuration, modification 21074, is distinguished by the high quality of the metal from which the body is made, as well as attachments. Since 1990, parts have not been galvanized using the production method, so the bottom must be additionally strengthened and protected with anti-corrosion agents.
To treat external surfaces, it is enough to take 2 kg of bitumen mastic; for internal work, paraffin or oil anticorrosives are used. After replacing the bottom, side members and other body elements, the parts are treated with special agents to prevent corrosion.
It is recommended to update the mastic for the bottom once every 1.5 years, for any work related to straightening the body.