October 3, 2020 A car, just like the human body, has its own resource for trouble-free care. The appearance of small, minor breakdowns indicates the preparatory stage. The owner should conduct a more thorough technical inspection and carry out minor replacements. But not all owners are in a hurry to immediately go to the service station and spend money. The preferred second option is selling the vehicle. Modern “Kulibins” are able to disguise minor breakdowns in such a way that you can find out about them several months after purchase. So, what to do if you have acquired such a “Trojan horse”? We'll talk about this and much more below.
Look for a problem in the valve seals
The presence of blue exhaust gases indicates that excess engine oil has entered the combustion chamber. Please note that we are talking only about gasoline engines. Diesel engines typically have black exhaust, and this is the norm. But a gasoline unit can also sometimes produce “soot,” the reader will ask. Absolutely right. Then look for a breakdown in the fuel system. As a rule, this is the ingress of a significant amount of fuel, which does not have time to burn completely. The residue is simply thrown into the exhaust manifold.
So, we decided that the valve stem seals must be removed. The part serves to balance the stroke of the guide sleeve and the axis of the valve stem. Repairing an element for each car has a number of nuances. Thus, for the domestic manufacturer of Zhiguli cars until 2000, the element was made of durable, non-reinforced plastic. Later models have a rubber base with a metal crimp ring around the perimeter. What's new: the service life has been increased to 100 - 130 thousand km. mileage, the risk of rod and bushing imbalance is significantly reduced. Foreign cars have slightly higher mileage, which is 200,000 km. mileage Untimely replacement can cost the owner of a VAZ 1 liter/1000 km. engine oil mileage.
For the knowledge of motorists. On VAZ cars you can install valve stem seals from foreign cars Ford, Opel, Seat. The design and dimensions are identical. It is best to install native ones, those prescribed by the manufacturer. To do this, carefully look at the car’s operating instructions; if it is missing, look through the Internet sites. There is plenty of information. Before purchasing, be sure to check the dimensions of the socket and the width of the hole. The height may be exceeded by 0.5 mm. Otherwise, the mechanism will not be able to fully function.
Repair work
Using the VAZ as an example, it looks like this. The cylinder head (cylinder head) should be removed for convenience. Some auto mechanics have gotten used to carrying out repair work without removing the cylinder head. Tools:
- Solder with a diameter of 0.8 cm;
- Medical tweezers;
- Mandrel for pressing bushings;
- Flat head screwdriver;
- Valve and spring remover;
- Standard set of spanners and open-end wrenches.
If any tool is missing, it can be freely purchased at any auto store. The cost is not high, so the costs will be minimal, but they will last for many years.
Removal instructions
Prevention is best carried out in conditions of free access: a large garage, any flat area. An inspection hole is not necessary, since we will not be doing anything underneath.
- Be sure to disconnect the ground terminal from the battery. If there is a toggle switch, then you can use it.
- The engine is turned off, the rocker is in the first speed position, the handbrake is depressed.
- Unscrew the engine plate, remove the air filter and cylinder head cover.
- Unscrew the toothed pulley located on the camshaft.
- We move the electrical wiring bundle to the side for free access to the rear cover of the head.
- Very carefully remove the O-ring from the valve stems. If they are completely intact, they can be reinstalled.
- Remove the bearing mounts on the camshaft. Don't lose the key. Be careful.
- We turn the crankshaft to the top dead center (TDC) position.
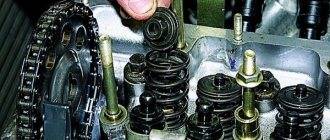
- Use a puller to compress the valve springs.
- Using tweezers we take out the “crackers”. For convenience, you can use a magnetic pointer.
- The spring plates and the springs themselves are removed.
- The valve stem seals are compressed by striking the striker against the bushing.
- New spare parts are lubricated with oil and pressed into the lower plate.
- Reassemble in reverse order.
Be sure to lubricate the head gasket with sealant for tightness. After completing the work, start the engine and conduct a visual inspection for oil leaks. If necessary, tighten bolts and other fasteners. Drive the car at speed around the test track.
The following says about the load that valve stem seals can withstand. When the engine is idling, the crankshaft makes about 500-600 rpm, and when driving, 4000-4500 rpm. Accordingly, each valve makes 160 – 1250 strokes per minute. What frictional force should the seals withstand every minute? The environment plays an important role, namely liquids and gases: motor oil, exhaust gases. Over time, the seal material becomes hard and inelastic, which leads to oil leakage into the combustion chamber and free movement of the piston rod.
The first signs of oil seal malfunction have appeared, start repairs. It is best to change valve stem seals at certified car service stations if you do not have sufficient skills. Preventive maintenance will take no more than 3-4 hours, provided that there are no additional repairs. Install only high-quality, original products. Only in this case can you be sure of long-term work. Be sure to request a warranty from service station workers after repairs. If problems are identified, re-service will be free. Good luck on your journey.
Auto mechanic Maksimenko I.O.
If the engine consumes an increased amount of oil and smokes when you press the gas pedal, then you should prepare to replace the valve stem seals. Let's talk about when they should be changed and what signs of wear are there.
Signs of wear
Let us explain why caps are needed.
Their purpose is to prevent excess engine oil from passing through. They should fit snugly against the valve and allow only the small amount of oil through that is needed for lubrication. Made from special rubber that is not afraid of high temperatures. Over time, the valve stem seal begins to deteriorate, the rubber ages and loses elasticity.
and peels off from the base. It starts leaking oil. Consequently, engine oil consumption increases. As a rule, on domestic cars the replacement interval is 80,000 kilometers. For modern engines, this period can be increased by 2-3 times due to the use of modern materials and good motor oil. These conditions are valid unless there is engine overheating or oil starvation.
Does your car engine have an increased appetite for oil? Does the engine consume more than 1 liter per 1000 kilometers? Is there blue smoke coming from the exhaust pipe? These are the first signs of wear on the valve stem seals.
Of course, you don’t have to think about major repairs if the dynamic characteristics have not decreased and fuel consumption has not increased.
These problems can be solved by replacing the caps and doing it yourself. You will need a garage and a repair tool - the most necessary thing is a valve cotter remover. It can be found at an auto tool store.
Video instruction
We will not go into the procedure for replacing engine caps.
Detailed operation can be found in the technical repair manual. In addition, everything is explained there clearly, thoroughly and with pictures. For example, a video showing the replacement process is the easiest way. To carry out the work, you will need a special tool - a device for “drying out” the valves. Without it, this work cannot be completed. You can find drawings on the Internet and make them yourself. It’s easier to buy a ready-made tool at an auto store. There is a great danger of replacing the caps when trying to “de-dry” the valves. For this purpose, there is a special device, one end of which is fixedly attached, and the other puts pressure on the plate, while compressing the valve return spring. Then you should remove the “crackers” from the valve. It is better to do this with a magnetic screwdriver or long pliers. be careful
, if you lose the “cracker”, then the reassembly process will be impossible. In practice, these little “crackers” can fly out in an unknown direction, and then they are difficult to find.
Also, you need to cover all the holes on the engine with foam rubber so that “crackers” or dirt do not get there. When installing a new cap, do not forget to pre-lubricate it with engine oil.
The operation of changing worn valve stem seals can be done independently, but experience and tools are required. If you don’t have the knowledge, then it’s better not to get down to business. The price is not high, so entrust this operation to the experts.
The combustion chamber of a car must be protected from the entry of foreign substances and elements into it. The valve stem seals are responsible for this, the task of which is to prevent excess oil, chips and other “garbage” from entering the combustion chamber during the movement of the car’s valve stems. If the valve stem seals no longer cope with their tasks, they must be urgently replaced to avoid carbon deposits on the engine elements, as well as increased oil consumption. In this article, we will look at what signs indicate wear of the valve stem seals, why they wear out, and how to replace them without removing the cylinder head.
Replacement
Replacing valve stem seals with your own hands:
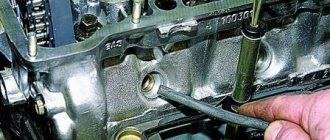
- Remove the timing cover.
- Align the crankshaft and camshaft to the marks. Place the appropriate markings on the parts so that there are no difficulties with their placement after repair. Write down the location of the pipes and connectors to be removed.
- When removing the camshaft, loosen its drive tensioner.
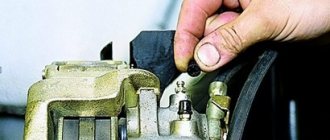
Device for desiccation of valves. The photo shows the process of removing crackers
If the drive is chain, unscrew the drive gear and remove it from the camshaft. To avoid losing it, it is better to remove the key from the shaft groove and tidy it up. If the drive is belt driven, it is easier to remove the belt from the gear.
- Unscrew the camshaft bed fastening and remove it from the head. Determine the size of the keys yourself. While the camshaft is removed, check it for wear on the journals and cams.
- Remove the valve pushers: depending on the design, remove the rocker arms or remove the cups with hydraulic compensators.
- Since the pistons of cylinders I and IV are already at TDC, it is better to start replacing from the edges. Because in order for the valve to dry out, it needs to rest against something; in our case, it will be the bottom of the piston.
- On some models, the intake manifold interferes so much that the desiccant has to be shortened. Because it's easier than removing the manifold.
The correct tool for removing capsTake a desiccant. Fix its bracket, which is attached closer to the edge of the lever, to the bed fastening stud, and attach it closer to the middle with a ring on the plate covering the valve springs. With one hand, press the desiccant lever so that the valve springs are compressed and the plate moves down the rod, and with the other hand, take tweezers and use them to remove the crackers from the plate.
- Place the desiccant aside, remove both springs and the plate from the rod.
- Attach the puller collet to the cap. Moving the weight up along the puller rod, hit the upper stop with it - the removal of the unusable cap is completed.
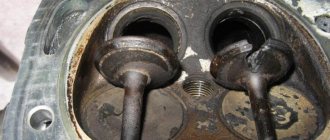
- If you have a mandrel, it's worth using it. If it is missing, for caps on valves with a stem diameter of 8 mm, it can be replaced with a 10mm socket wrench. If the diameter of the rods is 6 mm, then a 8mm wrench will do. Valve seals must be made of fluoride rubber (so called sucking FRM).
While the valve is free, check the valve stem and guide for wear. To do this, grab the top of the rod with your fingers and try to rock it. If the wear is insignificant, then there will be no play and you will not succeed.
Installation process
- Remove the springs from the seals.
- Insert the oil seal into the mandrel and place a drop of oil on the valve stem.
- Place the oil seal together with the mandrel on the valve stem and slide it down to the seating lug of the guide. Lightly tap the mandrel with a hammer to press it into place.
- Do not forget to put the springs on the installed caps before assembly.
- After this, install the valve components and dry using the method used to remove crackers.
- Repeat this sequence as many times as necessary and replacing the caps yourself will be done.
- Reassemble the disassembled components in the reverse order of removal. If your engine does not use hydraulic compensators, adjust the valves.
Now you know how to change valve stem seals with your own hands. No matter how many times you perform all the procedures before, be very careful.
Why are valve stem seals needed?
Engine operation involves non-stop operation of the elements of the vehicle's gas distribution mechanism. To reduce their wear due to friction, oil is supplied to the timing gear, which should not end up in the combustion valve, otherwise the stable operation of the engine will be disrupted. When the valves operate, the oil seals take on the task of removing excess oil and act as an obstacle, preventing oil from entering the combustion chamber.
The valve stem seals are designed quite simply, and we can name 3 main components of which they consist:
- Base. A sleeve made of steel, which is the frame of the cap and gives it strength;
- Spring. Necessary to create the tightest possible fit between the edges of the cap and the stem;
- Cap. The main element of the part, made of rubber or polyethylene resin (older models). Its task is to remove excess lubricant from the valve stem.
It is worth noting that over the last decade, valve stem seals have changed a lot in terms of the materials used. Since their failure can lead to big problems, manufacturers strive to use the most durable and wear-resistant materials that are resistant to aggressive environments.
Service life of valve stem seals
It is easy to guess that valve stem seals need to be changed from time to time. The valve performs more than 1000 strokes per minute, and on each valve, the valve stem seals must remove excess oil to prevent it from entering the combustion chamber. It should also be taken into account that the temperature in the operating area of the valve stem seals is high, and the environment itself is aggressive: oil and exhaust gases.
Due to the influence of a host of factors, valve stem seals begin to deteriorate over time - the rubber of the cap cracks, peels off, and loses elasticity. Over time, the spring begins to press the cap less tightly against the walls, which is why oil begins to enter the combustion chamber.
On average, the service life of good quality valve stem seals is 100,000 kilometers. If the car has been idle for several years, it is recommended to replace the valve stem seals before you start using it, since during inactivity they have time to dry out greatly.
What are valve stem seals used for?
Oil seals or, as they are also called, valve seals are located on the stems of the intake and exhaust valves of the gas distribution mechanism. Their job is to prevent oil from entering the cylinder head into the combustion chamber.
Valve seals are made of high quality rubber that can withstand enormous loads, but if the valve stem seal:
- Worn;
- Cracked;
- Absent;
- Destroyed;
- Incorrectly installed.
This leads to oil starting to flow into the engine cylinders along the guides.
This problem usually occurs in high mileage cars. Unfortunately, with age or due to high temperatures resulting from engine overheating, oil seals lose elasticity and begin to leak oil. In this case, the engine may still have good compression, but will use too much oil, and this leads to serious consequences, which we will discuss a little below.
Most often, the need to replace valve stem seals occurs after 100,000 kilometers. However, valve seals can fail much earlier than this. This can happen for a variety of reasons, but most often due to problems with the clearance between the valve and the guide in the cylinder head. If there is too much gap between them, the valve in the hole, moving from side to side, will quickly damage the cap. And this will happen with any valve stem seal, regardless of the quality of the product.
Signs of wear on valve stem seals
If you recognize the wear of oil seals at an early stage and replace them in time, you will be able to avoid serious engine problems. The primary signs of oil seal failure are as follows:
- Thick blue or white smoke comes out of the car exhaust;
- Oil consumption increases significantly;
- Carbon deposits appear on the spark plugs.
When the signs of wear on the valve stem seals described above occur, you need to urgently inspect them, as well as check the gas distribution mechanism and valves. If there are signs of severe wear on the valve stem seals, they need to be replaced, otherwise:
- Engine power will begin to decrease;
- The car will stall at idle, or the speed will begin to “float”;
- Compression in the engine will decrease;
- Carbon deposits will form on the pistons and cylinders, and the valves will no longer provide a tight seal due to poor closure.
Carbon deposits on engine components are a direct path to a quick overhaul. Timely replacement of valve stem seals with new ones will help avoid this.
Consequences of wear of valve stem seals
As soon as the listed signs of wear on the valve stem seals begin to appear, you should start checking the gas distribution system of the car, and special attention should be paid to the valve stem seals. Experienced car enthusiasts do this on their own, while less experienced ones go to a service station, where diagnostics are carried out by experienced specialists.
It should be noted that operating an engine with worn oil seals is strictly not recommended. As practice shows, if you ignore this defect and do not eliminate it, then it is almost inevitable:
- The power of the power unit will decrease;
- At idle, it will begin to stall periodically;
- The revolutions will begin to “float”;
- Compression will drop significantly;
- Carbon deposits will appear on the cylinders, pistons and valve seats.
As for carbon deposits, its appearance is indeed a very serious “bell”, since its formation may well lead to a very expensive overhaul of the power unit.
How to replace valve stem seals without removing the cylinder head
If the problem with wear of the valve stem seals was detected in a timely manner by the driver, he can replace them without removing the cylinder head. In a situation where the solution to the problem has been delayed, it will be necessary to dismantle the parts to remove carbon deposits from the pistons and valves.
Depending on the car model and engine, the process of replacing valve stem seals will vary. But we can distinguish several main stages common to all machines:
If there is a possibility that the valve stem seals have been faulty for a long time, you will need to remove the cylinder head and carry out a full replacement, including cleaning the engine elements from carbon deposits.
Oil seals are necessary to prevent oil from entering the combustion chamber and are located between the timing valves and guide bushings.
The gas distribution system uses intake and exhaust valves. The upper part of the valve is always exposed to the oily mist generated by the rotation of the camshaft, and the lower part is in the middle of a suspension of gasoline vapor (intake valves) or heated exhaust (exhaust valves).
Normal operation of the camshaft is ensured by lubrication, but its entry into the combustion chamber must be prevented, otherwise the burnt oil will form carbon deposits on the working surface of the valve, cylinder and piston. As a result, the engine will be coked: its performance will deteriorate, and wear will accelerate many times over.
Oil seals prevent the formation of carbon deposits
: They skim the oil off the rod so it doesn't end up in the middle of the flammable mixture. The design of the seal is quite simple: it consists of a rubber cap, inside of which there is a reinforced steel bushing and an expander spring, which ensures high-quality adhesion between the cap and the rod. The material of the seal is of no small importance: modern manufacturers use acrylate rubber or secondary rubber - these materials provide good clamping quality.
avtoexperts.ru
Structurally, an internal combustion engine has several types of oil seals that serve as a seal for various moving joints, among which a special role is given to valve seals or, as they are also called, valve stem seals.
Purpose
Protection of the combustion chamber from oil ingress from the cylinder head. Oil is supplied to the cylinder head under pressure to lubricate the camshafts, during the rotation of which an oil mist is created in the head cavity, consisting of splashes of hot oil that settle on all elements of the cylinder head.
Where are they located?
The cylinder head contains guide bushings for the intake and exhaust valves. A certain thermal gap is left between the bushing and the valve stem, designed to allow the parts to expand when heated. To prevent oil from the block head from entering the combustion chamber through this gap on the bushings, seals are installed in the form of caps, which is why they got their name - “oil scraper caps”.
Device
The oil seal is a steel cylinder for a rigid fit on the head of the guide sleeve. On top of the cylinder, a layer of rubber or rubber (fluorine or acrylate rubber) is vulcanized in the form of a truncated cone to tightly grip the valve stem and remove oil during its operating stroke. A spring ring is installed at the end of the cap to ensure reliable contact of the cap with the valve body.
When should you change?
When the power plant is operating, depending on the engine speed, the valves perform about 200-1200 strokes every minute, which negatively affects the service life of the caps, causing their natural wear. Car manufacturers do not provide any information on the frequency of replacing valve seals and this work is carried out as signs of their malfunction are detected.
Signs of malfunction:
• Oil on the spark plug threads; if the caps are heavily worn, oil is already present on their electrodes;
• Smoke coming from the muffler when warming up a cold engine and when revving;
• Decrease in power, deterioration in dynamics and increase in fuel consumption;
• Unstable starting of a hot engine;
When the engine overheats, it is the caps that are the first to suffer, as they are the highest located in the engine, plus those in contact with the valves, heated in the combustion chamber. In such cases, the seals simply “tan” and are no longer able to do their job, allowing oil to freely enter the combustion chamber.
Faulty seals can also be detected when opening the valve covers to perform adjustment work or replace the gasket. This applies to engines where the caps can be seen. The malfunction will be expressed in the absence of a spring, or an oil seal that has “removed” from the guide sleeve and “sits” on the valve stem.
How does the replacement process work?
On many engines, oil seals are replaced without removing the cylinder head, only partially disassembling it to get to the seals.
However, if the engine has been running for a long time with faulty caps, this will definitely lead to the formation of carbon deposits on the valve plates and seats, which must be removed for reliable engine operation.
Therefore, it is recommended to carry out the replacement by removing the cylinder head, where, if necessary, the valves will be cleaned and ground in to restore compression in the cylinders.
In addition, in most cases, the removed head reveals that its plane is not parallel, which needs to be milled.
In any case, this work is classified as complex and responsible and should be performed in a car service center, or in the garage of an experienced mechanic, where there are all the conditions and the necessary tools to carry it out.
However, there is a nuance here. Replacement will be advisable only if the valve stem bushings are not worn. Otherwise, the service life of the new parts will be extremely limited and repeated repairs will be required.
The fact is that if the valve stem moves in the guide with a large gap, then it will not move in the center of the bushing, but with a skew and constantly put pressure on one edge of the cap, causing its intense wear.
What happens if you don't repair it?
As follows from the theory, the combustion of 1 liter of gasoline requires 14-16 kg of air, and such an air-fuel mixture will be the most favorable for engine operation, both in terms of fuel economy and full power output.
When oil appears in this mixture, this leads to incomplete combustion, unstable engine operation, loss of power and increased fuel consumption.
In addition, when oil burns, carbon deposits form on the valve plates, piston crown and spark plug electrodes. When there is a strong flow of oil, when the caps are no longer able to retain it, misfires occur, or one of the spark plugs stops working altogether.
When to change valve stem seals?
When the engine is running, the seals are subject to a very high load. In addition to purely mechanical impact, valve stem seals also have to withstand the aggressive effects of oil mixed with exhaust gases. Long-term use of oil seals leads to the fact that the rubber begins to harden, resulting in abrasion of the working surface.
Of course, we can always say that valve stem seals are a consumable item, and wear is normal. This is true, but there is one inconvenient circumstance - changing oil seals is quite difficult. To get to them, you will need to perform a lot of unnecessary steps.
However, replacing oil seals is not required very often: on average, one set of valve stem seals “travels” about 100 thousand kilometers.
How to change valve stem seals?
If a car owner discovers that the valve stem seals on his car are worn out, they need to be replaced. This procedure is successfully carried out by car service station technicians.
First, they let the engine cool, after which they remove the timing cover. Next, they make corresponding marks on the camshaft and crankshaft, after which they remove the camshaft. At the next stage, the valves are “desiccated” (that is, the pusher springs are removed from them), and the faulty valve stem seals are removed from them. To do this, specialists most often use either ordinary pliers or a collet specially designed for this purpose. Then the valve stems are lubricated with oil, after which new oil seals are put on them. Next, the assembly of the car’s gas distribution mechanism is carried out in the reverse order.
Valve seals: signs of wear
You can tell that it’s time to change the valve stem seals by the following signs:
1. Excessive oil consumption. This sign in most cases indicates wear of the seals. An increase in oil consumption is also noted when the piston rings wear out, but in this case, oil leaks can be found in the breather pipe.
2. Exhaust that has a clearly visible shade of blue. This symptom manifests itself due to the fact that immediately after starting the engine, oil enters the cylinder and begins to burn, appearing in the form of blue smoke coming from the exhaust pipe.
3. Uniform oil consumption regardless of operating conditions. If oil does not flow into the breather pipe, and the flow rate is high and constant, the seals are clearly not in order and need to be changed.
4. Formation of carbon deposits on spark plugs. Increased wear of the valve stem seals leads to the spark plugs being flooded with oil, leading to the engine stalling.
The detection of one or more signs usually indicates that the seals are worn out. If the symptoms described above have been observed for a long time, then in the near future it is necessary to attend to replacing the oil seals, otherwise further driving can lead to disastrous consequences
Wear of valve stem seals
Like any other part of an internal combustion engine, which regularly experiences a combination of negative influences of various kinds, valve stem seals gradually but steadily wear out. Their most loaded rubber part loses elasticity over time and cracks appear in it. In addition, over time and under the influence of high temperatures, the clamping force of the spring inevitably weakens. As a result, wear of the valve stem seals leads to the fact that oil is not removed from the valve stems and it enters the combustion chamber of the internal combustion engine.
As practice shows, the service life of valve stem seals installed in modern internal combustion engines is approximately 100,000 kilometers. After the car has traveled this distance, they must be replaced. Experts also recommend changing valve stem seals in car engines that have been out of service for a long time.
Replacing valve stem seals without removing the head
The decision to replace oil seals when signs of malfunction are detected is a very correct step
. Sometimes drivers try to solve the problem without “surgical” intervention, using various additives and additives that supposedly soften the rubber and extend the life of the valve stem seals. This decision should not be made: additives either do not have any effect on the seal material, or soften them too much, as a result of which rubber wear only increases.
Replacing oil seals without removing the head is a complex process, so you should devote a lot of time to it, and perform all actions very carefully. How to change valve stem seals? The work algorithm is quite cumbersome, but all these operations must be carried out sequentially and very scrupulously:
1. First of all, you need to wait until the engine cools down and all its elements go into “standby mode”. After this you can start working.
2. The first step is to remove the timing cover. You need to act carefully so as not to damage the gasket (you definitely shouldn’t pick at the cover with a screwdriver).
3. Next, you need to align both shafts (crankshaft and camshaft) according to the marks. Parts should be marked so as not to be confused when assembling the engine, and even better, write down all your actions. When removing the camshaft, you need to loosen its drive. It is advisable to inspect the removed camshaft for the degree of wear - this will help save time and effort during further operation of the car.
4. The next stage is desiccation of the valves. To do this, you should use a special device. The desiccant bracket must be fixed to the bed fastening stud, and its other end is installed with a ring directly on the valve spring plate. While pressing the lever, you must at the same time use tweezers to pull the crackers out of the plate. After this, the valve tappets can be removed.
5. Considering the fact that pistons 1 and 4 are at the top point, it is better to start replacing the oil seals with them. This is due to the need for support for valve expansion - the pistons will provide it.
6. Having finished desiccation, you need to remove the springs and plate. Next you need to take a collet puller and secure it to the cap. By moving the weight up the puller rod, you need to strike the upper stop, thus removing the cap securely and without loss. It is worth refraining from performing this operation using pliers - the fact is that the landing pad for the cap breaks very easily, and even a slight compressive force can cause irreparable damage to it, the elimination of which will cost much more than purchasing a tool with a collet clamp.
7. After removing the seals, it is worth checking the rod and its guide at the same time. The motivation for these actions is the same as when checking the camshaft - taking the opportunity to get the maximum benefit out of the repair.
8. Now that all the previous steps have been completed, you can install new oil seals. To do this, you need to remove the springs from them and insert the seals into the mandrel, after dripping oil onto the rod.
10. The next stage is the reverse sequence of actions to that used during disassembly: all elements are installed and dried. Having completed these operations the required number of times, replacing the valve stem seals can be considered complete. All that remains is to install all the elements in their places and adjust each system.
REPLACING OIL SEALS
REPLACING OIL SEALS
An external sign of wear on the oil seals is the short-term appearance of blue smoke from the exhaust pipe after starting the engine and when braking the engine after prolonged driving under load. In this case, constant smoking is usually not observed. Indirect signs are increased oil consumption in the absence of external leaks and oily spark plug electrodes.
You can replace the valve stem seals without removing the cylinder head from the engine.
Replacing the caps is shown using the example of a SOHC engine (mod. 4G18). The main difference between the cylinder head of a DOHC engine (mod. 4G63) is in the design of the camshafts, which are placed in the bed of the head bearings and secured with removable bearing caps (when replacing the valve stem seals of this engine, the camshafts must be removed). The valve assemblies of both heads are structurally the same and differ only in the size of the parts. Valve seals are replaced using the same techniques.
You will need: all the tools necessary to remove the cylinder head cover (see "Replacing the cylinder head gasket and spark plug well O-rings"); a 12mm wrench, tweezers (or a magnetized screwdriver) for removing crackers from the valve spring retainers...
...device for compressing valve springs...
...inertia oil seal puller. The other end of the puller shown has a mandrel for pressing on the caps. If such a puller is not available, you will need pliers to remove the caps and a mandrel of a suitable diameter to press them onto the valve guides.
1. Disconnect the wire from the negative terminal of the battery.
2. Remove all spark plugs.
3. Set the piston of the 1st cylinder to the TDC position of the compression stroke (see “Installing the piston of the 1st cylinder to the TDC position of the compression stroke”).
With this position of the crankshaft, the pistons of the 1st and 4th cylinders are at TDC. This makes it possible to “drain” the valves of these cylinders without the risk of dropping them into the cylinder.
5. Remove thirteen bolts securing the valve rocker arm axles...
Crackers are installed on the rocker arm axle mounting bolts. Do not lose them and install them in their original places when assembling the cylinder head.
6. ...and remove the axles along with the rocker arms.
If you do not intend to replace the rocker arms, valve axles and camshaft, do not remove the rocker arms from the axles to reinstall them in their original places during reassembly.
After removing the axles along with the rocker arms, do not turn the rocker arms upside down with the hydraulic lash compensators in the valve mechanism. Otherwise, oil will leak out of the hydraulic compensators and before assembly you will have to remove air from them by filling them with diesel fuel (see “Checking, washing and replacing hydraulic clearance compensators in the valve drive mechanism”).
7. Install a device for compressing valve springs by screwing a bolt securing the valve rocker arm axis into one of the holes in the block head and hooking the device onto this bolt.
8. Compress the valve spring with the tool.
9. Remove two crackers from the spring plate using tweezers or a magnetized screwdriver. Then remove the fixture.
10. Remove the spring plate...
11. ...and the valve spring.
The valve spring support washer does not need to be removed, as it does not interfere with replacing the oil seal.
12. Press the valve stem seal off the valve guide. To do this, install tools for removing oil seals on the collet cap and sharply hit the collet bushing with the striker. Then, just as sharply hit the handle of the device with the striker, thereby pressing the cap off the sleeve.
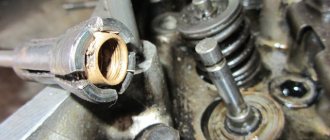
13. If there is no device for removing caps, remove the cap using pliers. In this case, the force must be applied strictly upward and not rotate the cap, so as not to damage the valve guide.
Do not remove the cap by prying it off from both sides with screwdrivers. The guide sleeve on which the cap is placed is made of cermet, and its edge breaks off easily.
14. Before installing new oil seals, we recommend removing the springs from them, otherwise the caps can be damaged when they pass through the grooves under the cracks on the valves. If the kit of new caps includes a plastic installation sleeve, the springs do not need to be removed. In this case, slide the bushing onto the valve stem.
15. Lubricate the inner surface of the valve stem seal with engine oil and slide the cap along the valve stem to the guide sleeve.
Video: replacing valve stem seals
Replacing valve stem seals without removing the head can be done independently without any problems. It is only important to carefully monitor your actions and follow the correct sequence, but quality work done is worth it - an engine with updated oil seals will function normally without causing the slightest inconvenience to its owner.
Oil seals, or valve seals/valve seals as they are also called, primarily prevent excess oil from entering the engine. Just like most engine parts, they are made of special rubber and over time they wear out and work less efficiently: they separate and leak excess oil. And this, in turn, leads to an increase in oil consumption. Today we will try to understand not only what valve stem seals are, but also the reasons and the first signs of their wear.
What are valve stem seals used for?
There are two types of valves:
intake and exhaust.
The top of any valve is positioned so that it is in constant contact with the camshaft, the rotation of which results in a constant oily mist in that area. The reverse, flat part is located in the area where there is a suspension of small drops of gasoline all the time - this is the intake valve; or in the area of hot exhaust gases it is an exhaust valve.
For proper operation of the camshaft, lubrication is simply necessary, but getting the engine oil itself inside the combustion chamber is completely undesirable. And that's what valve seals were created for. So, during reciprocating operation of the valve, oil is removed from the rod by a kind of skirt, which is the valve stem seal.
Principle of operation.
When oil enters the combustion chamber along the valve stem, the oil mixes with the fuel-air mixture.
When the mixture flares up, the oil burns and forms carbon deposits on the top of the “plate” and on the valve seat. And this, in turn, leads to the fact that the valve loses its ability to close. The same carbon deposits remain on the cylinder walls, on the upper plane of the piston and on the piston rings. All this leads to the so-called “smoking”, which increases engine wear and the quality of its operation. In addition, oil entering the combustion chamber worsens the combustion characteristics of the fuel-air mixture.
Therefore, very high demands are placed on the condition of the valve stem seals.
Where is the oil seal located?
As you may have guessed, valve seals operate under very harsh and difficult conditions. It doesn’t take much time or labor to find them in the engine. This cap is located directly on the valves themselves - this is an assembled option; or in the block head - this is if the engine is disassembled. Well, calculating the number of caps is not at all difficult - there are exactly as many caps as there are valves in the engine.
This is interesting!
By pouring synthetics made with Group 4 base oil into PAO (PolyAlphaOlefin) engines, you cause the oil to begin to leak through the gaskets and seals. Despite their advantages, PAO oils, due to the chemical properties of group 4 oils, lead to the fact that gaskets and seals simply “dry out” during operation.
Valve seal design
There are only two design options for valve stem seals. First option
- This is a lip device that fits onto the part of the valve guide that protrudes from the head.
Such caps have become widespread because they are simpler and cheaper. But if you need to replace such caps, it is very difficult, and sometimes impossible, to do this without special tools and skills. Second option
The seal is mounted under the valve spring, the work of which holds the cap on the head and seals its joint with the head.
Valve seals of the second type do not contact the valve guide, heat up less, and therefore are more durable. Another advantage of such valves is that, if necessary, they are quite easy to replace and do not require special tools. But there are also disadvantages. Their price is several times higher, and the length of the guide bushing is shorter, which leads to reduced wear resistance. Fig. 2
The high performance of the valve stem seal depends not only on its design, but also on the material from which it is made. If the cap is made of acrylate or recycled rubber, then it has a higher degree of compaction.
You simply must know which caps are installed in your engine. And also, if you replace them, follow one of the basic rules: install ORIGINAL caps - those that are intended for a specific engine.
How much does it cost to replace valve stem seals?
How much it costs to replace valve stem seals will depend on many parameters. As we noted above, the cost of the valve seals themselves is quite low. On average, car owners will pay about 200-400 rubles for a set of caps for a domestic car. Owners of foreign cars are at least twice as expensive - about 600-1000 rubles. However, replacing valve stem seals is more expensive, since this is a rather complex operation that requires skills and special tools, which most car owners simply do not have.
The procedure for replacing oil caps in a car usually involves completely disassembling the engine. During the work, the cylinder head and timing components are dismantled and only after that the caps are replaced. However, in services this operation can be carried out without removing the cylinder head, of course, if the engine design allows this. If the valves are burnt or do not fit tightly to the surface of the head, then the cylinder head is removed, cleaned, and only then the caps are replaced.
If, for example, you have a VAZ 2109 or Priora in good condition with the only problem being wear of the valve stem seals, then to replace them, the mechanic will need to remove the power system, cylinder head cover, timing shafts and valve springs. This is a relatively minor repair and moderate costs, within 5,000 rubles. However, most drivers won't be so lucky.
Unfortunately, many car owners ask too late how much it costs to replace valve stem seals. As a rule, car owners turn to service when the engine has already suffered serious damage from lubricant getting into the cylinders. Most often, in addition to replacing the MSK, engine decarbonization is also required. In such cases, it will no longer be possible to do without dismantling the “head”. To eliminate all defects, the mechanic will have to dismantle the head and valve mechanism, and this operation is not cheap.
For clarity, we have collected for you approximate prices for replacing valve stem seals of two common car brands.
We will indicate the cost of the operation to replace the caps both with the removal of the cylinder head and without this procedure. Repair prices are for labor only, excluding the cost of caps and other consumables. Cost table for replacing valve stem seals
| car model | Model | Engine | Prices for work in rubles | |
| Without removing the cylinder head | With the “head” removed | |||
| VAZ | 2101-2107 | 8 valves | 3 500 | 7 000 |
| 2110 | 8 valves | 4 000 | 8 000 | |
| Lada | Samara | |||
| Priora | ||||
| Kalina | ||||
| Priora | 16 valves | 8 000 | 16 000 | |
| Granta | ||||
| Kalina | ||||
| Vesta | ||||
| 2110 | ||||
| Samara 2 | ||||
| BMW | E46 | N46 N42 | 16 000 | 25 000 |
| E87 | ||||
| E90 | ||||
| E60 | ||||
| E70 | N52 | 18 000 | 28 000 | |
| F10 | ||||
| X5 E70 | N62 | 28 000 | 56 000 | |
| X5 E53 | ||||
| E46 | M52 M54 | 10 000 | 23 000 | |
| E39 | ||||
| E36 | ||||
| E60 | ||||
| E53 | ||||
| E83 | ||||
According to the data from the table, it is clear that valve stem seals are cheapest to replace on Zhiguli cars, and this is not surprising, because they have the most technically simple 8-valve engines, cheap to maintain and repair. Modern 16-valve engines installed, for example, on Vesta, will require almost the same investments from you as engines of budget or middle-class foreign cars.
For comparison, replacing valve stem seals on Kia Rio and Hyundai Solaris cars will cost only a few thousand rubles more than on a Lada Vesta. And replacing oil seals on Mazda and Toyota engines will cost you about the same as replacing valve stem seals on a BMW. After all, Japanese engines are not inferior in complexity to German ones, so the cost of repairs will be in approximately the same range, which averages 15,000 rubles without removing the cylinder head.
In general, the more cylinders and valves an engine has, the more expensive the repair. Replacing one oil seal on average costs about 500 rubles. The final cost of repairs increases the complexity of the engine, as well as the variable valve timing system. For example, if we compare two engines from BMW: N42 and M52. Despite the fact that the N46 is a 4-cylinder 16 valve engine, and the M54 is a six-cylinder 24 valve engine, the cost of repairing the former will be more expensive due to the presence of the Valvetronic system, designed to change the valve lift height.
As you can see, depending on the make of the car and the model of the internal combustion engine, replacing valve stem seals can cost you from 30 to 500, and sometimes up to 1000 or more dollars. If in your case it is necessary to dismantle the cylinder head, this repair may cost you 2-3 times more than the procedure for replacing the caps without removing the “head”. And this does not even take into account the cost of additional consumables.
The required parts that will need to be replaced in this case are:
- Cylinder head gasket;
- Valve cover gasket or sealant.
Other items that would be wise or may need to be replaced during renovation are:
- Timing belt or chain;
- Camshaft seals;
- Spark plug well seals;
- Rubber pads for nuts;
- O-rings at the junction of the engine and the intake system;
- Various gaskets for Vanos, phase regulator, Valvetronic motor and so on.
In addition, after repairs you will definitely need to change the oil, coolant, and filters.