Installing daytime running lights
After the adoption of the law making the use of daytime running lights (DRLs) mandatory when driving, most motorists began to fuss about having these attributes installed on their vehicles.
The adoption of such a law is a decision to improve road safety on highways and large populated areas. Every motorist should have information about how to install daytime running lights. Performing this procedure is actually not as difficult as it initially seems. The right approach and following the instructions will help you avoid common mistakes and save a lot of time and nerves.
The main task of DRLs is to ensure optimal visibility of the vehicle for other drivers. In addition to the designating function, they play the role of a design element, which frees up the hands of car tuning lovers.
DIY DRLs (daytime running lights)
In general, in connection with the further implementation of the requirement to have DRLs in the car, it was decided to make daytime running lights ourselves. I think it’s no secret to anyone that the document “On Amendments to the Technical Regulations on the Safety of Wheeled Vehicles” contains such paragraph No. 17, namely: daytime running lights, as well as corner lights, if installed, must comply with the established requirements UNECE Regulations. The installation of daytime running lights is mandatory from 1 January 2020; And I want to connect them so that when the ignition switch is turned on, they light up on their own. But more on that later.
By the way, here is a photo of what I did first - etched the board, soldered 60 LEDs (30 for each “headlight”), for every 3 diodes there is a 500 Ohm resistor. All that remains is to assemble the case from plastic and connect it through the lock. So let's see what the etched boards look like:
But we already have LEDs soldered onto them, which were mentioned earlier:
We test the performance of the diodes by connecting them to a power source:
Next, we make a body for our DRLs from scrap materials, here are photos of almost finished lights, I made the body out of plastic, glued everything together. I glued a “frame” of black film onto the front transparent part, all that remains is to seal the whole thing and put it on the bumpers, making holes in them))
Actually, the DRLs themselves are ready, we cut out the glass to the appropriate size for them and seal this entire kitchen well (although there is an opinion that it is necessary to leave holes for ventilation and perhaps this is more correct):
Actually, next we go to “damage” the bumper. We cut out suitable holes in it, attach the DRL lights themselves, and get the result:
Regarding connection to the car's electrical system. There are several options, here are diagrams of the main ones:
You can also connect a meringue relay: + DRL is connected through a switch in the cabin to the + ignition coil, and “-” DRL to the wire going to the + low beam headlights. The resistance of the lamp filament is very small and this will be enough for DRLs; when you turn on the low beam, the DRLs will be + at minus and they go out.
Low beam is 50+50 W in the front + 5+5 in the rear + license plate lights + all the little lights in the instrument panel and other lights. Why the hell with the extra load on the generator. Also, the light intensity of DRLs should not be lower than 400 cd and not higher than 800 cd.
You can use any connection diagram, or come up with your own.
Regarding the location of the DRLs on the car, not everything is so simple here either, and there are regulations:
Here's a little more about DRLs, the basic requirements:
Quote: “GOST R 41.48-2004 (UNECE Rules No. 48) Uniform regulations regarding the certification of vehicles with regard to the installation of lighting and light signaling devices. State standard of the Russian Federation
6.19 Daytime running light 6.19.1 Installation – Optional on vehicles. Prohibited on trailers. 6.19.2 Number – Two. 6.19.3 Installation diagram – No special requirements. 6.19.4 Placement (photo several posts above) 6.19.4.1 Width - the point of the surface visible in the direction of the reference axis that is furthest from the median longitudinal plane of the vehicle must be located at a distance of no more than 400 mm from the edge of the overall width of the vehicle.
The distance between the inner edges of two visible surfaces must be at least 600 mm. This distance may be reduced to 400 mm if the overall width of the vehicle is less than 1300 mm.
6.19.4.2 In height - at a distance from 250 to 1500 mm above ground level.
6.19.4.3 Lengthwise – on the front of the vehicle. This requirement is considered to be satisfied if the emitted light does not interfere with the driver directly or indirectly as a result of reflection from rear-view mirrors and/or other reflective surfaces of the vehicle. 6.19.5 Geometric visibility Horizontal angle beta = 20° outward and inward. Vertical angle alpha = 10° up and down from horizontal. 6.19.6 Direction – Forward. 6.19.7 Functional electrical diagram If installed, daytime running lights should turn on automatically when the engine start/stop control is turned to the “on” position. It must be possible to activate and deactivate the automatic activation of daytime running lamps without the aid of a tool.
Daytime running lights must turn off automatically when the headlights are turned on, except when the headlights are turned on for a short period of time to signal road users. 6.19.8 Pilot signal—Optional as a closed loop. 6.19.9 Other requirements – No.”
To put it simply, PTFs are designed to illuminate the road along the lower edge in order to improve the visibility of the roadway in conditions of limited visibility; the beam of light should not be directed upward and blind oncoming traffic. DRLs are intended to indicate tr. Wed in the daytime, and not for marking the road, the DRL light should be clearly visible to drivers of oncoming traffic. Wed, which means it should be directed above the road surface, it turns out to be in the eyes.
Main advantages
The main colors of LED lights used by drivers are bright blue or white. The advantage of this coloring is good illumination and efficiency.
Types of daytime running lights
Front lamp emitters, unlike ordinary headlights, are special industrial devices. They have many advantages, for example: reducing fuel consumption and saving battery power. Installation of DRLs does not cause any difficulties.
What to do if the reverse lights do not light up? More detailed information can be found here.
DRL control unit
The most reliable and simplest option is to connect DRLs without a relay, but using a special running lights control unit. It ensures that the DRL turns on after starting the engine, guarantees safe operation, protects against overloads and can be installed on cars with any type of lamps, including LEDs.
Unfortunately, among the variety of industrially manufactured DRL units, the vast majority do not comply with GOST and have mediocre build quality.
This applies, first of all, to products from AliExpress, which do not meet the requirements in almost all respects.
Among all the diversity, only 2 options can be noted: the Russian DayLight+ DRL control unit and German products from Philips and Osram. The DayLight+ control unit was developed by Russian radio engineer Fedor Isachenkov, taking into account all the features of the vehicle’s on-board network and has a number of positive aspects:
- there is built-in voltage stabilization;
- full compliance with GOST;
- the maximum long-term load power is 36 Watts (significantly less is required for DRLs);
- simplest connection diagram.
In addition to the points described above, the DayLight+ unit is universal and is suitable for all cars with an on-board 12-volt network, and also has good build quality and a high degree of protection from moisture and dust.
German products from Philips and Osram also have all the above-described advantages of the DayLight+ unit, however, German control units are supplied only together with daytime running lights and are more expensive.
Several requirements
When performing installation, you must comply with some GOST requirements. This will allow you to install daytime lights without unpleasant consequences or problems.
GOST requirements for installing DRLs
What you need to know when installing:
- 60 cm is the minimum distance between lights;
- 25 cm is the minimum height, measuring the distance between the ground and the lowest point of the installed lights;
- 40 cm is the maximum distance from the extreme point of the vehicle body.
Important! The use of DRLs as main headlights or markers is unacceptable, since they serve as an auxiliary lighting device. Installation of more than 2 lights is prohibited.
The main thing is to start
Gorbachev’s famous phrase helps with motivation to achieve a specific goal like nothing else. The beginning of our installation process is to purchase the required running lights from an auto parts store. There are many different manufacturers and even more models, so an inexperienced person can easily get confused. In this case, it is better to contact the seller or consultant. Most of the manufactured lights meet all GOST standards and are ready for subsequent installation.
When approaching the procedure, motorists must take into account certain requirements:
- brightness of LEDs and their rated power;
- technical characteristics and distinctive features of their vehicle model;
- size, shape and type of front bumper.
DRL installation kit The installation
location will depend on the block (meaning its size and shape), but this does not create problems, since regardless of the shape (rectangular or oval), the dimensions of the block are small. When considering the main and “favorite” places to install emitters, one cannot fail to mention the air intake and bumper, where motorists most often install LEDs.
Installing daytime running lights
After the adoption of the law making the use of daytime running lights (DRLs) mandatory when driving, most motorists began to fuss about having these attributes installed on their vehicles. The adoption of such a law is a decision to improve road safety on highways and large populated areas.
Every motorist should have information about how to install daytime running lights. Performing this procedure is actually not as difficult as it initially seems. The right approach and following the instructions will help you avoid common mistakes and save a lot of time and nerves.
The main task of DRLs is to ensure optimal visibility of the vehicle for other drivers. In addition to the designating function, they play the role of a design element, which frees up the hands of car tuning lovers.
Installation process
After purchasing regular or flexible DRLs with a turn signal function, you are faced with the question: how to connect new devices to the VAZ? This requires:
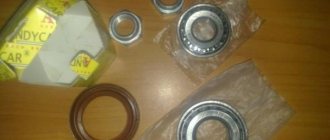
- take a five-pin relay from a domestic manufacturer;
Five-pin relay of a domestic manufacturer
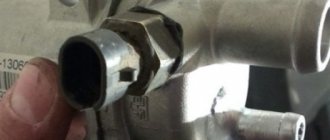
- to contact No. 30, take a positive charge from the ignition (alternatively, a wire from the button responsible for heating the rear window);
- connect connection No. 86 to the low beam using the button for activating the headlights and low beams;
- No. 85 - throw on ground;
- No. 88 - connect to DRL;
- No. 87 is not required during operation and is not connected to anything.
Wiring diagram for daytime running lights on a VAZ 2107
Relay - place it in the cabin. Under the car hood, run only the wiring that goes directly to the lighting fixtures. This connection diagram for the daytime running light on the VAZ 2107 automatically turns on the LEDs when the ignition key is inserted and turns them off when the engine is turned off. In addition, when the vehicle's low beams are on and the engine is running, the lights will go out and turn on again when the daytime running lights are turned off.
Main advantages
The main colors of LED lights used by drivers are bright blue or white. The advantage of this coloring is good illumination and efficiency.
Types of daytime running lights
Front lamp emitters, unlike ordinary headlights, are special industrial devices. They have many advantages, for example: reducing fuel consumption and saving battery power. Installation of DRLs does not cause any difficulties.
What to do if the reverse lights do not light up? More detailed information can be found here.
Installation of DRL 2107 — DRIVE2
First, I want to say that this is a long and tedious job, during the work you will need: Soldering iron, solder, tin... the whole set! (Be sure to have straight hands!) Campers - (to taste), and all the available tools (file, electric jigsaw, etc. etc. if you cut it in like me) I’ll say right away that I won’t describe how I removed the bumper, how I cut in the DRLs! I’ll describe the process of connecting the DRLs (Daytime Running Lights). I’ll say right away that there are similar articles on this site)
ATTENTION BEFORE WORKING WITH ELECTRICITY IN YOUR CAR, DISCONNECT THE BATTERY!
To begin with, in any case, you need DRL (550 rubles in the City of Sarapul, Udm Republic)
1
buy a 5-contact relay (in my case, 52r. Needed for automatic switching between headlights and DRLs) Fig. 1
1
The second thing you need to do is buy a platform for the relay (a platform is required) (costs 40 rubles)
2
Need wires (I took a lot of them at work!)))
(this is what the relay and pad look like)
3
Connection diagram (in my opinion, the best and most convenient option (the diagram is not mine, taken from lada2107spb.my1.ru/publ/t…gnej_na_vaz_2107/20-1-0-6
5
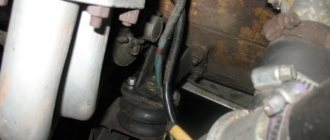
Connection: 1) to the 30th contact we take the plus from the button for heating the ground glass (right (A) platform) (yellow wire) 2) connect the 86th contact to the low beam, headlights (left platform) (B) (red wire) (I personally have this) 3) We throw the 85th contact to ground (black wire under the heated rear window pad) (B) Minus DRL there
4) Pin 88 goes to our DRLs (+ DRL wires (+ red), black (-minus)_
6
Something like this:
8
We isolate everything well (EVERYTHING SHOULD NOT BE ON THE SNOT, DON’T BE LAZY WITH SINGING) - safety is paramount) And that’s it!
7
www.drive2.ru
The main thing is to start
Gorbachev’s famous phrase helps with motivation to achieve a specific goal like nothing else. The beginning of our installation process is to purchase the required running lights from an auto parts store. There are many different manufacturers and even more models, so an inexperienced person can easily get confused. In this case, it is better to contact the seller or consultant. Most of the manufactured lights meet all GOST standards and are ready for subsequent installation.
When approaching the procedure, motorists must take into account certain requirements:
- brightness of LEDs and their rated power;
- technical characteristics and distinctive features of their vehicle model;
- size, shape and type of front bumper.
DRL installation kit The installation
location will depend on the block (meaning its size and shape), but this does not create problems, since regardless of the shape (rectangular or oval), the dimensions of the block are small. When considering the main and “favorite” places to install emitters, one cannot fail to mention the air intake and bumper, where motorists most often install LEDs.
We perform the installation step by step
This guide explains how to install universal LED daytime running lights on any vehicle. Installation is quite simple, you just need to devote a little time to this procedure.
Step 1: Insert the wire into the bracket.
Let's start the installation procedure
Step 2: Install the bracket. Since these are versatile daylight lights, you can install them anywhere you like. The most common location is at the bottom of the bumper.
Most often they choose a place on the bumper
Step 3. After installing the bracket, you can fix the daytime running lights to the bracket.
Carefully attach the lantern
Step 4 . Once you install the DRL using the bracket, connect the wires and route them near the battery/fuse box.
We connect the wires
Step 5: Use plastic zip ties to secure the wire along the bumper. You can choose a different “wired path” if you wish.
Securely secure the wire using clamps
Step 6: Locate ACC on your fuse box, and press the red wire there. You can find the location of the ACC fuse using an electronic meter by clamping the black wire to the battery negative. Insert the tester pen into the fuse box in any unoccupied slot and note the places where the tester pen does not light up. Start the engine and check the slots that do not light up. Find a spot that only lights up when the engine is running. This is the ACC place.
Installing DRL on a VAZ 2107
This product was chosen by 24 customers
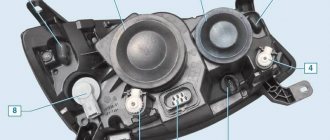
Alternative optics will be an excellent replacement for failed standard headlights. It will help give your car a fresh look and stand out from the crowd.
The headlight housing is painted chrome, the glass remains unchanged to the standard color. Instead of side lights, LED daytime running lights are used.
The headlights are installed in standard seats, without any additional modifications. The connection is made to standard connectors, without changing the wiring.
Manufacture: China.
Set: 2 pcs (left and right)
Weight, kg: 5.2 Dimensions, cm: 37 x 36 x 21 Volume, m3: 0.02797
How to connect DRL correctly
Data-lazy-type=”image” data-src=”https://vazremont.com/wp-content/uploads/2017/09/foto-4-2.jpg” alt=”Connecting DRL VAZ 2114″ width= »805″ height=»1431″ class=»lazy lazy-hidden aligncenter size-full wp-image-3983″ srcset=»» data-srcset=»https://vazremont.com/wp-content/uploads/2017/ 09/foto-4-2..jpg 169w, https://vazremont.com/wp-content/uploads/2017/09/foto-4-2-768×1365..jpg 576w" sizes="(max- width: 805px) 100vw, 805px">
After you have chosen the correct daytime running lights for the VAZ 2114, you need to connect them correctly. The DRL LEDs should light up immediately when the ignition is turned on and turn off if the low beam was turned on. Then the maximum efficiency of using navigation lights will be achieved. .jpg" alt="DRL connection diagram" width="876″ height="743″ class="lazy lazy-hidden aligncenter size-full wp-image-3984″ srcset="" data-srcset="https:// vazremont.com/wp-content/uploads/2017/09/foto-5-1..jpg 300w, https://vazremont.com/wp-content/uploads/2017/09/foto-5-1-768× 651..jpg 660w" sizes="(max-width: 876px) 100vw, 876px">
There are two main connection schemes:
- Through the diode and headlight relay.
- Through an additional relay and headlight switch.
Data-lazy-type=”image” data-src=”https://vazremont.com/wp-content/uploads/2017/09/foto-6-1.jpg” alt=”Connecting DRL VAZ 2114″ width= »739″ height=»1309″ class=»lazy lazy-hidden aligncenter size-full wp-image-3985″ srcset=»» data-srcset=»https://vazremont.com/wp-content/uploads/2017/ 09/foto-6-1..jpg 169w, https://vazremont.com/wp-content/uploads/2017/09/foto-6-1-578×1024.jpg 578w" sizes="(max-width : 739px) 100vw, 739px">
The main task in connecting the DRL is to find the wire on which + appears after turning on the ignition. Also, due to the fact that the running lights use LEDs, you need to be careful about the polarity; if you mix it up, nothing bad will happen, but the LEDs will not light up.
Data-lazy-type=”image” data-src=”https://vazremont.com/wp-content/uploads/2017/09/foto-7-1.jpg” alt=”Self-installation of DRL” width=” 960″ height=”540″ class=”lazy lazy-hidden aligncenter size-full wp-image-3986″ srcset=”” data-srcset=”https://vazremont.com/wp-content/uploads/2017/09 /foto-7-1..jpg 300w, https://vazremont.com/wp-content/uploads/2017/09/foto-7-1-768×432..jpg 660w" sizes="(max-width : 960px) 100vw, 960px">
The running lights of the VAZ 2114 will have to be installed with screws or Velcro, since there is no grille for fastening with ties. .jpg” alt=”DRL in the dark” width=”960″ height=”540″ class=”lazy lazy-hidden aligncenter size-full wp-image-3987″ srcset=”” data-srcset=”https: //vazremont.com/wp-content/uploads/2017/09/foto-8-1..jpg 300w, https://vazremont.com/wp-content/uploads/2017/09/foto-8-1- 768×432..jpg 660w» sizes=»(max-width: 960px) 100vw, 960px»>
In the traffic regulations, the independent installation of DRLs is ambiguously prescribed, that is, if traffic police inspectors want to “get to the bottom”, they may have an extra reason. But DRLs allow you to really save money and are very convenient.