Checking and replacing the hose on the clutch cylinder
The hose on the clutch slave cylinder is an extremely critical part that is exposed to high brake fluid pressure. Therefore, the car owner must monitor its condition especially carefully.
The clutch cylinder hose is a very important part, the condition of which must be carefully monitored
Here are signs that indicate that the hose should be changed urgently:
- cracks and other mechanical damage visible to the naked eye have appeared on the hose;
- the hose looks intact, but there are visible leaks of brake fluid on it (this means that it is still damaged and microcracks have appeared on it, which the driver simply cannot see);
- The threads on the hose ends are partially or completely stripped.
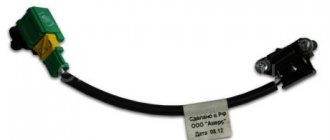
If you notice any of the above, the hose should be replaced immediately. It is better to install standard VAZ clutch hoses, their catalog number is 2101–16–025–90, and the cost is about 80 rubles.
Hose replacement sequence
Before starting work, you should stock up on an empty plastic bottle and two open-end wrenches: 17 and 14 mm.
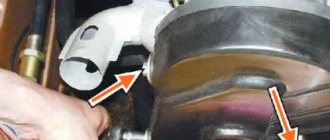
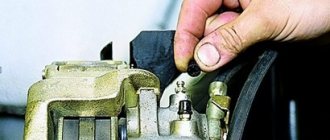
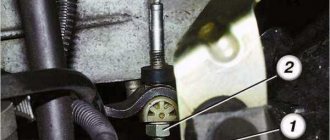
- The car is driven into the pit and secured with wheel chocks. Open the hood and find the place where the slave cylinder hose is screwed to the clutch hydraulic tube.
- The main hose nut is held firmly with a 17 mm wrench, and the fitting on the hydraulic tube is unscrewed with a second wrench - 14 mm. After unscrewing the fitting, brake fluid will flow out of it. Therefore, there should be a container in the inspection hole to collect it (a small basin would be the best option).
- The second end of the hose is unscrewed from the working cylinder body using the same 17 mm wrench. There is a thin O-ring in the cylinder under the hose nut, which is often lost when removing the hose. This ring should also be changed (as a rule, new seals come with new clutch hoses).
- A new hose is installed in place of the old one, after which a new portion of brake fluid is added to the hydraulic system.
So, even a novice driver can change the working cylinder on a six. All you need to do for this is to carefully prepare the necessary tools and strictly follow the above recommendations.
The device of the working cylinder in a VAZ
In classic VAZ 2106, 2101, 2107 models, the clutch consists of two cylinders - the main and the working. Essentially, they do the same job. The clutch slave cylinder in the VAZ 2106, 2101, 2107 is located near the vehicle’s gearbox - in these models there are no significant differences in the structure of the part. It is secured to the box body with several bolts. The location of the part in these VAZ models is designed in such a way that it can only be seen from below the car.
When you press the clutch pedal, a piston moves inside the master cylinder, causing the brake fluid to be pushed out. After this, the brake fluid passes through the entire cylinder and, under the influence of the created pressure, exerts work on the same piston, which in turn presses on the fork in the cylinder. Both clutch cylinders of the car are dependent on the presence of brake fluid.
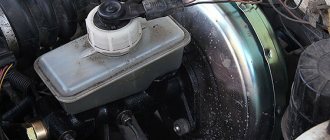
Therefore, it is very important to check the presence of this fluid in the tank, which is located under the hood of the car, and not allow it to drop to a critical level.
It often happens that liquid leaks. This happens due to wear of parts or due to the use of brake fluid that is not intended for VAZ cars. For VAZ 2106, 2101, 2107 models, the DOT-3 brand is used. The use of another type has a bad effect not only on the clutch slave cylinder, but also on the main one.
There are also cases when the master cylinder may also be the result of a clutch failure in a VAZ car - such a failure is very easy to notice. It is enough to open the hood of the car and look at the reservoir into which the brake fluid is poured. There will be noticeable drips at the junction of it with the cylinder. In this case, you need to tighten the bolts. If the fluid continues to leak, then it is necessary to use a repair kit or replace the part completely.
Major clutch failures
Diagnosing clutch malfunctions is quite simple; you need to pay attention to the behavior of the car when driving. If the clutch is slipping, then you can indicate an accurate diagnosis - excessive wear of the friction linings
There are two ways out of this situation. The choice depends on how long ago the clutch disc was installed and what the operating conditions were.
Part replacement
- If the disc is fairly new and the operating conditions are normal (rare off-road trips, in traffic jams), then adjusting the VAZ clutch will help. For this purpose, the VAZ sixth model has a special nut on the rod of the working cylinder.
- If the disc has been changed quite a long time ago, and the operating conditions are on the verge of extreme, then first we adjust the position of the rod. If this does not help, the clutch is repaired and replaced.
Operating a VAZ 2106 with a deteriorated clutch disc is extremely undesirable, as you can get into big trouble. When the friction linings wear out, rivets are exposed, which can ruin the surface not only on the basket, but also on the flywheel. If a layer of metal is removed from the flywheel, it will cause an imbalance in its weight. The result is increased vibration from the engine.
Another problem is related to the release bearing. This small detail can create a lot of problems. Firstly, the noise level will be high, as the bearing makes a strong noise. Secondly, when you press the clutch pedal, grinding and squeaking noises may be heard. It is imperative to change this part when replacing the clutch.
You can make a short list of what should be done when disassembling the clutch:
- replace the disk;
- change cart;
- install a new release bearing;
- Take a quick look at the ring on the flywheel.
The last point is optional. But it’s worth looking at the crown to protect yourself from troubles associated with starting the engine. If there is significant wear on the teeth, you need to either install a new crown, or knock off the old one and, after heating it up a little, put it on the other side.
Basket installation
To repair or replace the clutch basket, you need to unscrew the bolts holding it. If you can see that the basket petals are very worn, it is best to replace the entire part.
To install a new basket, it is necessary to straighten or center the gearbox input shaft, since otherwise the displacement of the disk will not allow the box to be put on. Therefore, the operation of inserting the disk with the mandrel into the flywheel must be performed very carefully.
After putting the basket in place, you need to tighten the clutch bolts. In this case, the bolts are tightened gradually, over 3 or 4 turns of the flywheel.
The final step in replacing the basket is to install the release bearing on a well-lubricated shaft.
The specific technology for removing the clutch basket and replacing it depends on the type of engine and type of clutch mechanism, but for most cars it is similar to that described above.
Installation of all dismantled parts and their adjustment is carried out in the reverse order.
Provided that all operations are carried out in a strictly specified sequence and in compliance with technical regulations, repair and replacement of the basket or other parts of the clutch mechanism is possible with your own hands in your own garage.
Will you be upset or not when you find out that the manufacturer does not indicate specific figures for clutch life
. If, for example, in the brake system, it is clearly stated that the thickness of the brake disc should be such and such, then why is this not applicable to the clutch?
The fact is that clutch wear depends on many reasons.
, and first of all, of course, on how the driver changes gears and in what mode he uses the clutch.
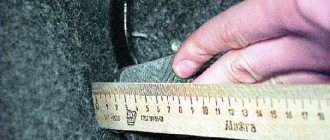
And while clutch disc thickness cannot be measured the same way brake disc thickness can be measured with a caliper, there are ways to measure it. There are two of them. The first way
to measure the thickness of the clutch disc is with a special measuring gauge.
This method does not require dismantling the clutch; it is performed on a lift. But you are unlikely to use it. The second method
is simpler to implement and allows you to determine the wear of the clutch disc in order to replace it.
Replacing the driven disk is a procedure provided by the manufacturer, because The driven disk is a consumable part. The check is carried out as follows: with the engine running, you need to put it in high gear, accelerate it, and if the car does not stall, this means that the driven disk is worn out and requires replacement
.
It must be remembered that such a check of the thickness of the clutch disc is not technologically correct, but it is effective and allows you to determine the condition of the disc extremely accurately. As already mentioned, the life of any clutch is determined by its operating conditions. Without going into technical details of the interaction of clutch parts, you should understand that basically the life of the clutch and the wear rate of the discs depend only on the driver. A clutch of the same quality and manufacturer can last 5,000 km for one driver, and 100,000 for another. Participation in drag racing, frequent slipping, abrupt starting at high speeds, ingress of foreign liquids and objects, unqualified installation and adjustment clutch - all this reduces the life of the clutch. How to check the clutch?
The clutch is checked using already proven and reliable folk methods, and only by them. Naturally, in addition to disassembling the clutch. We are talking about how you can check the clutch of your car yourself, and then decide whether you need a more in-depth diagnostic with dismantling the clutch mechanism.
Clutch repair and replacement
Hydraulic system repair involves identifying and eliminating the malfunction. So, if the working fluid leaks, it is necessary to eliminate the cause of the leak. This reason may be wear on the cuff, wear on the working surface of the cylinder, or a leaky clutch hose. Then you will need to replace the VAZ 2106 cuff, cylinder or clutch hose, which has exhausted its service life, respectively. In any case, after repairing the clutch hydraulic system, it is necessary to remove air from it - bleeding the system.
The situation is more complicated with direct repair of the clutch. This type of work involves partial or complete dismantling of the gearbox, which cannot but affect the duration and labor intensity of the repair work, so it is better to carry it out with an assistant.
Work should begin by installing the car on an inspection hole, overpass or on a lift. After this, to ensure access to the clutch, the following preparatory work is carried out approximately in this order:
- in the cabin, the gear shift lever is disconnected from the gearbox;
- In the engine compartment, remove the terminals from the battery and unscrew the bolts securing the starter.
Further, if the car is on a lift, it rises. Then, in order:
- the terminals are disconnected from the reverse sensor;
- from the resonator - exhaust pipe;
- from the gearbox housing – clutch slave cylinder;
- the driveshaft, traverse and starter are dismantled;
- The bolts of the clutch casing and the mount on the gearbox are unscrewed.
Preparations for removing the gearbox are completed and after that there are two options to choose from: dismantle the gearbox completely (which is more labor-intensive), or simply move it to a distance that allows you to unscrew the bolts securing the clutch basket to the flywheel. It must be said that if there is no need to replace the clutch fork or release bearing of the VAZ 2106, then the option of incomplete dismantling of the gearbox is quite suitable. In this case, after displacement, the box will rest on the receiving pipe.
Following this, after unscrewing the bolts, the basket moves away from the flywheel, the driven clutch disc is removed, and then, again moving the basket towards the engine, it can be removed from the gearbox input shaft. Having removed the basket, in addition to inspecting it and the driven disk for faults, it will be possible to check the condition of the release bearing and clutch fork. You can learn more about replacing the VAZ 2106 clutch by watching a video on the Internet.
Reassembly is done in reverse order
When installing the driven disk, it is important not to make a mistake - its protruding side faces the gearbox. Before tightening the basket bolts, a mandrel, which represents the end of the gearbox input shaft, is used as a guide to facilitate the alignment of the clutch elements.
After completing the assembly, if the repair did not affect the hydraulic clutch system, you will only need to adjust the free play of the clutch slave cylinder pusher. Finally, we can say that when replacing a VAZ 2106 clutch, its service life will be affected by the price of the product, which in most cases indicates quality.
Replacing the VAZ 2107 clutch disc.
Good afternoon, visitors to my site. This article will discuss replacing the clutch disc on VAZ models such as 2101-2107. On classic VAZ models, the clutch is almost the same, which means the method for replacing it is also the same.I will try to explain everything in detail and show it in photographs. I made this replacement on a VAZ 2105 car.
And so, let's look at the methods and specific order of replacing the clutch disc. In life, almost every motorist has encountered such a mechanism as a clutch. There can be many reasons, the study and understanding of the operation of this mechanism or, as in most cases, it is repair and maintenance. There are two ways to replace the clutch disc: remove the engine from the car and calmly carry out repairs, or use the inspection pit and replace the disc by removing the gearbox. The first method requires the use of special devices, for example, such as a small lifting device, to remove the engine from the engine compartment; you will also need to drain the coolant and disconnect the pipes from the radiator, and this makes many motorists nervous. Therefore, I think the second method will suit us better, and it will be discussed in our article. I once saw how the clutch disc of a VAZ 2107 was replaced without removing the gearbox; it was simply moved back a little so that the input shaft came out, and the disc was replaced. I will say on my own behalf that this is such a hemorrhoid that it is better to remove the gearbox.
And so we drive or roll the car into the inspection hole and remove the gearbox. How to properly remove the gearbox, I recommend reading the special article (Removing the gearbox). Once we removed the transmission, we had full access to the clutch.
The next step is to place a mark on the flywheel and basket. This is necessary in order to avoid the possibility of vibration during installation. In fact, this should not happen, since the manufacturer does not provide labels. This may work with a new part, but most likely it won’t with a used part. The fact is that in the process of wear, the factory balancing loses its ability and therefore everyone tries to put marks in order to install the clutch basket in its place.
The mark can be applied with a thin chisel, but personally I don’t see the point in this. If you immediately replace the clutch disc, you can make a mark with regular chalk.
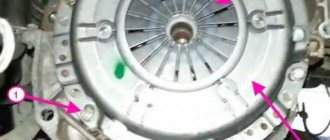
Now unscrew the six bolts around the circumference that secure the basket to the flywheel. Holding the basket with my hand from turning, I easily unscrewed all the bolts.
But it happens that there is not enough strength to keep the flywheel from turning, then you can use this method, which is shown in the photo below. Tighten the fastening bolt and use a wheelbrace wrench or a large screwdriver to secure the flywheel. Then, without much difficulty, unscrew all the bolts.
After unscrewing all six bolts securing the basket to the flywheel, remove it. Grab the basket with both hands and slowly remove it from the guide pins. Be careful, the clutch disc at this moment is not fixed by anything and may fly down when the basket is removed. I held it with my thumb.
After removing the disk, we carefully inspect it. The disk can be replaced or repaired. How to repair a disc, I recommend reading the article (Clutch disc repair). If you don't want to bother, then we buy a new one.
Having bought a new clutch disc, we put it back. It is important to install the disc correctly; it is installed with a large protrusion towards the release bearing.
After all the moments spent, we put everything back together. We install the guide shaft into the flywheel and assemble the clutch onto it. You can use the primary gearbox from your car as a guide shaft, but if you don’t have one, you can make one, as I did.
It is on this guide shaft that we assemble the clutch.
The tighter you make the guide shaft, the easier it will be for you to install the gearbox, but the main thing is that you can then pull out the guide shaft with your hands.
Next, all that remains is to install the clutch basket according to the marks. I think you won't have any problems with this.
In the end, you should have a picture like the one in the top photo.
That's probably all, you can replace the clutch disc yourself.
Until new publications.
To home.
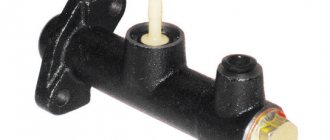
Purpose and operation of the VAZ 2106 clutch slave cylinder
In short, the working cylinder in the VAZ 2106 clutch system performs the function of an ordinary converter. It translates the driver's foot force into high brake fluid pressure in the vehicle's hydraulics.
The clutch slave cylinder for the “six” can be purchased at any spare parts store
However, the clutch slave cylinder should not be confused with the main one, because these devices are located in different places on the machine. The main cylinder is located in the passenger compartment, and the working cylinder is attached to the clutch housing with two bolts. Getting to the working cylinder is easy: just open the car hood.
The clutch slave cylinder is located on the crankcase cover
Working cylinder device
The clutch slave cylinder consists of the following elements:
- cast body;
- hydraulic piston;
- pusher rod;
- working spring;
- a pair of ring-shaped sealing cuffs;
- washer and retaining ring;
- air valves;
- protective cap.
Operating principle
The operation of the cylinder begins the moment the car owner presses the clutch pedal connected to the push rod:
- The rod moves and presses on the piston located in the main clutch cylinder. This cylinder constantly contains brake fluid.
- Under the influence of the piston, the fluid pressure increases; it rushes sharply through the hose system to the clutch working cylinder and begins to put pressure on its rod.
- The rod quickly extends from the cast cylinder body and presses on a special fork, which moves sharply and puts pressure on the release bearing.
- After this, the clutch discs disengage, resulting in a complete disconnection of the transmission from the engine. At this moment the driver has the opportunity to engage the required gear.
- When the driver takes his foot off the pedal, everything happens in reverse. The pressure in all cylinders drops sharply, and the return spring pulls the working cylinder rod back into the cast housing.
- The fork is released and goes down.
- With nothing else in the way of the clutch discs, they engage again, connecting the transmission to the engine. The car then moves further in the new gear.
The slave cylinder presses on the fork and disengages the clutch
Signs of breakdown
Every owner of a VAZ 2106 should know several important signs that indicate that something is wrong with the clutch cylinder:
- the clutch pedal began to be pressed unusually easily;
- the pedal began to fail (this can occur either from time to time or constantly);
- the brake fluid level in the reservoir has dropped significantly;
- noticeable leaks of brake fluid appeared on the bottom of the car in the area where the gearbox was located;
- It has become more difficult to change gears, and moving the gear lever is accompanied by a strong grinding noise in the box.
Fortunately, the clutch cylinder is easy to repair. It is quite rare to change the working cylinder on sixes, and repair kits for them can be found in almost any auto parts store.
Purpose of the clutch on the VAZ 2106
The main task of the clutch is to connect the engine and transmission, thereby transmitting torque from the engine to the drive wheels of the car.
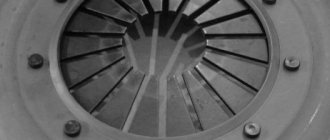
This is what the outer casing of the six clutch disc looks like:
The connection between the engine and transmission occurs when the driver, having started the engine, presses the clutch pedal, then engages first speed, and then smoothly releases the pedal. Without these mandatory actions, the car simply will not move.
How does the clutch work?
The clutch on the VAZ 2106 is of the dry type. The main element of this system is the driven disk, which operates constantly in closed cycle mode. In the center of the driven disk there is a spring pressure device, to which the vibration damping system is attached. All these systems are placed in a non-separable metal case, secured to the engine flywheel using special long pins.
The clutch system on the “six” has always been very complex
Torque from the engine to the transmission is transmitted due to the friction force on the driven disk. Before the driver presses the clutch pedal, this disc in the system is tightly clamped between the flywheel and the pressure plate. After smoothly pressing the pedal, the clutch lever begins to rotate under the influence of hydraulic fluid and displaces the clutch fork, which, in turn, begins to put pressure on the release bearing. This bearing moves closer to the flywheel and presses on a series of plates that push back the pressure plate.
The transmission of torque from the pedal to the wheels consists of several important stages
As a result of all these operations, the driven disk is released, after which the driver is able to turn on the desired speed and release the clutch pedal. As soon as he does this, the driven disk will again be clamped between the flywheel and the pressure plate until the next gear shift.
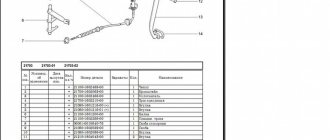
Do-it-yourself replacement and adjustment of the VAZ 2106 clutch
1 - clutch housing, 2 - working cylinder rod, 3 - fork, 4 - adjusting nut, 5 - lock nut, 6 - return spring, 7 - friction linings, 8 - driven clutch disc, 9 - steel casing, 10 - drive disc ( basket).
Today, the article will talk about procedures such as replacing and adjusting the 2106 clutch with your own hands. As we like to repeat, everything can be done without the help of car service specialists; there are no difficulties in repairing VAZ cars and there cannot be any. Often, drivers try to solve all the problems with the car on their own, because the cost of maintenance is absurdly high.
Even despite the fact that the VAZ 2106 has not been produced for ten years. And we will try to help as much as possible with the repair. If you have any questions, leave comments, share your experience, and describe unusual situations. After all, the topic is quite interesting and rich.
Replacing fluid and bleeding the hydraulic clutch of a VAZ 2106 Zhiguli
- Repair manuals
- Repair manual for VAZ 2106 (Zhiguli) 1976-2005.
- Replacing fluid and bleeding the clutch hydraulic drive
| EXECUTION ORDER |
↓ Comments ↓1. General information 1.0 General information 1.1 Safety precautions 2. Diagnosis of faults 2.0 Diagnostics of faults 2.1 diagnostics of faults in the engine and its systems 2.2 Diagnostics of faults in the clutch 2.3 diagnostics of faults in the gearbox 2.4 Diagnostics of faults in the driveline, rear axle, chassis, steering and braking system 2.5 Diagnosis of faults in the body 2.6. Diagnosis of electrical equipment faults 3. Engine 3.0 Engine 3.1 Cylinder head and timing mechanism 3.2 Lubrication system 3.3 Oil change 3.4 Replacing the camshaft drive chain guide 3.5 Replacing the camshaft and valve levers 3.6 Replacing the valve stem seals 3.7 Replacing the intake and exhaust manifold gaskets 3.8 Replacing the cylinder head gasket ov 3.9 Disassembling the head cylinder block, valve grinding 4. Engine power system 4.0 Engine power system 4.1 Replacing the air filter element 4.2 Replacing the fuel pump 4.3 Repairing the fuel pump 4.4 Replacing the fuel tank and its hatch cover 5. Carburetor 5.0 General information about the carburetor 5.1 Cleaning the fuel filter 5.2 Replacing the idle air system solenoid valve 5.3. Adjusting the carburetor 5.4 Replacing the carburetor 5.5. Carburetor repair 6. Engine cooling system 6.0 Engine cooling system 6.1 Replacing the coolant 6.2 Replacing the coolant pump 6.3. Replacing the thermostat 6.4 Replacing the engine radiator 7. Exhaust system 7.0 Exhaust system 7.1 Replacing exhaust system parts 8. Clutch 8.0 Clutch 8.1 Replacing fluid and bleeding the clutch hydraulic drive 8.2 Adjusting the drive 8.3 Replacing the clutch master cylinder 8.4 Repairing the clutch master cylinder 8.5 Replacing the clutch slave cylinder 8.6 Replacing the pressure plate assembly and clutch release bearing 9. Gearbox 9.0 Gearbox 9.1 Checking the level and changing the oil in the gearbox 9.2 Replacing the reverse light switch 9.3 Replacing the secondary shaft cuff 9.4 Replacing the gearbox 9.5 Repairing the gearbox 9.6 Replacing the speedometer drive 9.7 Features of repairing a five-speed gearbox 10. Cardan transmission 10.0 Cardan transmission 10.1. Maintenance 10.2. Replacing the driveshaft 11. Rear axle 11.0 Rear axle 11.1 Checking the serviceability of the rear axle 11.2 Changing the oil 11.3 Replacing the axle shaft and its cuff 11.4 Removing and installing the rear axle 11.5 Replacing the cuff of the drive gear 11.6 Replacing the gearbox 11.7 Repairing the gearbox 12. Front suspension 12.0 Front suspension 12.1. Maintenance 12.2 Replacing the bearings and hub cuff 12.3 Replacing the cushions and stabilizer bar 12.4 Replacing the ball joints 12.5 Replacing the shock absorbers 12.6 Replacing the springs 12.7 Replacing the upper arms and their rubber-metal hinges 12.8 Replacing the rubber-metal joints of the lower arms on a car 12.9 Replacing the lower arms 12.12 . Adjusting wheel alignment angles 13. Rear suspension 13.0 Rear suspension 13.1 Checking technical condition 13.2. Replacement of rear suspension parts 14. Steering 14.0 Steering 14.1 Adding oil 14.2 Checking the condition of the steering 14.3 Adjusting the gear engagement 14.4 Replacing steering rods 14.5 Replacing and repairing the pendulum arm 14.6 Removing and installing the steering wheel 14.7 Removing and installing the steering shaft 14.8 Removing and installing the steering mechanism 14.9 Removing the bipod 15. Brake system 15.0 Brake system 15.1 Checking the condition of the hydraulic drive 15.2 Checking the vacuum brake booster 15.3 Checking the functionality of the pressure regulator 15.4 Replacing brake fluid and bleeding the brake system 15.5 Replacing the brake pads of the front wheels 15.6 Replacing the brake pads of the rear wheels 15.7 Replacing the brake caliper of the front wheel 15.8 Replacing the brake cylinders of the front wheels 15 .9 Repair of front wheel brake cylinders 16. General information 16.0 General information 16.1. Checking electrical circuits 16.2 Fuse blocks 16.3 Replacing fuses 16.4 Replacing the main and additional fuse blocks 16.5. Replacing the relay 16.6 Replacing the ignition switch 16.7 Replacing the contact part of the ignition switch 16.8 Battery 16.9. Generator 16.10. Starter 16.11. Ignition system 16.12. Lighting, light and sound alarms 16.13. Windshield cleaner and washer 16.14. Repair of the electric heater motor 16.15. Control devices 17. Body 17.0 Body 17.1 Replacing the front bumper 17.2 Replacing the radiator grille 17.3 Replacing the hood latch 17.4 Replacing the hood 17.5 Replacing the windshield 17.6 Replacing the interior rear view mirror 17.7 Replacing the sun visor 17.8 Replacing the headliner 17.9 Replacing the ceiling grab handle 18. Heating and ventilation system 18.0 Heating and ventilation system 18.1 Replacing the electric heater fan 18.2 Replacing the heater radiator 18.3 Replacing the radiator casing 18.4 Replacing the heater valve 19. Car body care 19.0 Car body care 19.1 Car washing 19.2 Preservation and protection of paintwork 20. Applications 20.0 Applications 20.1 Tools used in addition to the standard set 20.2 Electrical diagram of VAZ-2106, VAZ-21061, VAZ-21063 cars produced in 1976–1987. 20.4 Tightening torques for threaded connections 20.5 Basic data for adjustments and monitoring 20.6 Characteristics of spark plugs 20.7 Fuel, lubricants and operating fluids used 20.8 Lamps used on the vehicle 20.9 Lip seals (oil seals) |