What you need to know to replace valve stem seals in a VAZ 2106 car
The name “valve seals” most clearly conveys the current function of such rubber products as valve stem seals for the VAZ 2106, which in everyday life among motorists have received the slang name “valve seals”. Indeed, the main task of such components of the vehicle timing valves is to seal the flow of engine oil under pressure and create the necessary technical conditions to prevent it from entering the exhaust manifold system. In practice, they really play the role of valve system seals, and they consist of the same elements: rubber and springs.
Reasons for wear of valve stem seals
During long-term operation, such valve stem seals, due to changes in temperature conditions, lose their physical properties, such as elasticity and softness, become “wooden” and must be replaced.
The required replacement of valve stem seals on a VAZ 2106 among motorists is not considered a job of increased complexity; with a certain degree of dexterity and proficiency in plumbing tools, it can be done by any car enthusiast. Moreover, during such repairs a set of tools is used, the use of which is necessary when replacing the cylinder head gasket. A special “puller” is also used to bring the spring elements of the valves into a compressed state and a special straightening for the caps.
Experienced drivers have it in stock, but if the car enthusiast does not find it in his neighbors’ garages, then it can be bought at a specialized retail outlet that sells spare parts. Also, when performing this type of work, you cannot do without medical tweezers, which will be required to remove the valve elements, a special metal nozzle for installing VAZ 2106 valve stem seals using the pressing method, round pliers, solder for fixing the valve element and some other common plumbing tools.
Procedure for replacing valve stem seals
The necessary preparatory part for replacing valve stem seals is carried out according to the following scenario:
- Remove the cylinder head cover.
- While turning the crankshaft, we combine the marks on the drive sprocket of the engine camshaft with the mark on the bearing cover of the valve mechanism distribution shaft. This will make it possible to set the position of cylinders 1 and 4 at top dead center and eliminate the possibility of valves falling out when removing the installation nuts.
- We remove the body part, the so-called. “bed” of the camshaft bearings together with the product, be sure to fix the sprocket with the chain so that these parts do not fall into the movement department of the chain drive.
- We begin to carry out technological operations to replace the valve stem seals.
- Since the TDC of piston 1 is set, we unscrew the spark plug of cylinder 1, dismantle the drive valve lever, remove the spring element of the lever, for which we move it to the side plane.
- Then we loosen the fasteners of the adjuster bolt, dismantle it, and then place a puller in its place to carry out work on compressing the spring elements of the valves. Not all pullers are structurally the same, therefore each device is adapted to different stop points, to determine which you must first read the instructions for using the device.
- We insert solder with tin and rosin into the seat for the spark plug to hold the valve element while removing the crackers.
- Then, using a compression puller, we bring the spring to the appropriate state, in which the truss elements are released from the fastening. There are times when crackers stick to the surface of the wall. In this case, you need to tap the puller with a hammer to achieve their free position, and then carefully remove them with medical tweezers. At this stage, the desiccation process is complete.
- At the end of dismantling, it is necessary to remove the springs of the internal and external fastenings, free from its disc element and lock washers.
High-quality installation of VAZ 2106 valve stem seals is carried out in the following order:
- We install a collet-type clamp on the valve element and, lightly tapping with a plumber's hammer, remove the used cap from the valve stem. After dismantling the old valve stem seal, we replace it with a new product and install it, having previously lubricated it with engine oil, in its original place using a mandrel, while acting very carefully. We restore the position of the spring elements and other components and carry out similar work with the 4th cylinder.
- Then we rotate the crankshaft to bring cylinders 2 and 3 to TDC and install oil seals on the valves of these cylinders.
After finishing installing the valve stem seals, we again turn the crankshaft to the starting position and put all the timing parts in the original position. We install all engine attachments in the reverse order, check the correct valve clearance and set the chain drive to normal tension.
Adjusting VAZ 2106 engine valves, grinding them in and replacing them: instructions for performing the work
Any four-stroke internal combustion engine contains parts such as valves. This important element of the vehicle’s gas distribution system ensures the timely admission of the fuel-air mixture into the combustion chamber and the release of exhaust gases into the atmosphere. The performance of the engine, its power, efficiency and environmental performance depend on their correct adjustment.
Return to contents
Why do you need valve adjustment?
The valve mechanism on the VAZ 106 is driven by the camshaft cams, pressing the rocker arm or rocker at a given moment. They, in turn, press on the valve stem, ensuring access of the fuel mixture to the combustion chamber. A thermal gap is provided between the rocker and the camshaft cam, since the valve plate heats up above 300°C, causing the rod to elongate and, accordingly, a change in the distance between the cam and the rocker arm.
During operation of the valve mechanism, there is continuous contact between moving parts. This leads to natural wear of all rubbing surfaces, despite the presence of lubrication. When the rocker and camshaft cam wear out, their geometric dimensions change, which in turn leads to an increase in the gap between them. As a result, we have increased engine noise, especially at startup.
Therefore, high wear resistance requirements are imposed on the materials of the friction parts of the gas distribution mechanism. But, taking into account the experience of operating VAZ cars, it is advisable to adjust the gaps regularly, in accordance with the factory regulations. During the work, you must strictly follow the manufacturer's instructions, since over-tightening or installing insufficient gaps leads to unpleasant consequences.
When the engine reaches operating temperature, a small gap can cause the valve to not close completely, which will lead to a decrease in compression and loss of engine power.
In such a situation, in the ignition mode, the burning fuel mixture will rush into the manifold. The temperature of the plates becomes critical, which will cause them and the collector to burn out. But if this burnt-out unit is easy enough to replace or weld, then replacing the VAZ 2106 valves will result in significant time and material costs. And installing a new kit will require grinding the valves on the VAZ 2106 to the seats to ensure the tightness of the combustion chamber.
Return to contents
Signs that adjustment is needed
Adjusting the valves on the VAZ 2106 must be done regularly due to wear of all rubbing timing parts, cams, rockers and the upper part of the valve stem. This is usually done every 40–50 thousand km. However, it happens that there will be a need for adjustment in the early stages. The reason for this will be the use of low-quality materials or violation of the heat treatment regime during their manufacture. An increase in the thermal gap leads to the appearance of a characteristic metallic knock in the upper part of the engine, associated with the impact of the cam on the rocker when pressed. This is especially noticeable when the engine is running cold.
Incorrectly adjusted valves can cause serious consequences
| An excessively large gap gives: | A small thermal gap manifests itself: |
| valve timing shift, | reduction of compression in the working cylinders, |
| engine tuning, | loss of power |
| difficulty starting, | increased gasoline consumption, |
| increased fuel consumption, | poor pickup, |
| decrease in dynamics during acceleration. | At the same time, the engine does not rattle, but is unstable. |
If one of these faults occurs, it is advisable not to delay checking the clearances until the next maintenance.
Return to contents
Preparing the car for adjustment work
Although adjusting the valves on a VAZ 2106 requires certain skills, it can easily be done by a car enthusiast with his own hands. To complete the work you need to stock up on:
- standard operating and maintenance manual for the vehicle;
- branded probe with a thickness of 0.15 mm;
- two open-end wrenches for 17 and 13;
- standard VAZ screwdriver;
- 8x10 socket wrench.
Before starting work, it is advisable to wash the engine, including the engine compartment. This must be done to prevent dirt and dust from entering the timing mechanism. If adjustment work is carried out in winter, then it should be carried out in a closed, warm room and at an engine temperature of about 20°C. This is due not only to comfortable working conditions, but also to the dependence of the thermal gap on the temperature of the engine or timing belt.
If you imagine the change in the gap from temperature in the form of a graph, it becomes clear that the manufacturer’s recommended thermal gap value of 0.15 mm is set at 20 degrees, i.e., on a cold engine, and 0.20 mm at an operating engine temperature of 80 degrees. Celsius. The exhaust valve clearance will be approximately 30% greater than the intake valve clearance.
Dependence of the thermal clearance of the intake valve on the engine temperature
Return to contents
The process of adjusting valves on a VAZ 2106
Having completed the necessary set of preparatory operations, you can begin adjustment work. The order is as follows.
- Place the car on a level surface, put the gear in neutral, disconnect all pipes leading to the air filter housing, remove the air filter housing by unscrewing the four nuts securing it to the carburetor.
- Now you need to remove the accelerator and choke cables, the fuel line hose and the ignition distributor cap. To make it easier to turn the flywheel, it is advisable to unscrew the spark plugs, but it is not necessary. Then you can remove the valve cover by unscrewing the nuts securing it to the cylinder head.
- The next stage of work is setting the top dead center TDC. After making sure that the chain is tensioned in accordance with the regulations, turn the crankshaft pulley with a wrench until the mark on the camshaft sprocket matches the mark on its body. In this case, the mark on the crankshaft pulley must also coincide with the mark on the engine block. This position of the crankshaft will correspond to the compression stroke in the 4th cylinder.
- In this case, it is necessary to adjust the 8th and 6th valves of the fourth and third cylinders, respectively. The adjustment is carried out using the following method: a 0.15 mm thick feeler gauge is inserted into the gap between the cam and the rocker. If the feeler gauge moves freely in the gap or it is impossible to insert it, it is necessary to loosen the locknut of the adjusting bolt. Then, unscrew or screw in the adjusting bolt to achieve the desired clearance value. When the gap is correctly set, the dipstick is inserted with little effort and moves with a characteristic creak. In this position, it is necessary to tighten the locknut, holding the adjusting bolt from turning.
- The next step is to rotate the crankshaft 180 degrees. In this case, valves 7 and 4 are adjusted in accordance with the previous algorithm.
The sequence of adjustment of the remaining valves at different angles of rotation of the crankshaft is carried out according to the diagram shown in the figure.
The sequence of adjusting thermal clearances at different crankshaft rotation angles
Having finished adjusting all the valves, reassemble the dismantled parts in the reverse order. As you can see, a car enthusiast can fix problems on his own, but you need to have certain skills. Try to do this using the method we proposed and the factory regulations.
Thermal clearances of valves significantly affect the efficiency of the engine, its power, dynamics, and economic indicators. Therefore, it is necessary to carefully monitor the functioning of the motor. The occurrence of characteristic metallic knocks, loss of throttle response, increased fuel consumption and other signs must be taken into account and eliminated as soon as possible.
Why do VAZ 2106 valve stem seals wear out?
New valve seals are elastic and soft, elastic, tightly compressing the valve, preventing lubricant from entering the combustion chambers. Depending on how old the engine is, the caps change their properties.
Exposure to different temperatures - for example, when warming up in winter, oil seals can heat up by more than a hundred degrees in a few minutes.
It is this condition that determines the degree of wear of the caps. They become hard, begin to leak oil and do not fulfill their direct duties.
Replacing the valve stem seals of a VAZ 2106 with your own hands is quite simple - you don’t need to have a mechanic’s education, you just need to do all the work carefully. From the special tool you will need:
- Valve depressurizer - for compressing the spring.
- Mandrel for installing oil seals.
- A puller or pliers for removing old caps.
- A soft metal rod for securing valves in engine cylinders.
You should have all this available if you are repairing the VAZ 2106 yourself. Otherwise, you gradually buy all the accessories in stores.
Do-it-yourself adjustment of VAZ 2106 engine valves
Some types of work on the power unit can be done in your garage. Do-it-yourself adjustment of VAZ 2106 valves will improve engine performance.
Removed cylinder head of VAZ 2106.
Before starting work, you need to learn how to properly adjust the valves and write down the adjustment sequence on a piece of paper.
Reasons for adjustment
Interfering with the operation of the Lada 2106 power unit may have a negative effect. There must be good reasons for opening the cylinder head cover and adjusting the thermal clearances.
The obvious reasons for adjustment are:
- characteristic noise from under the hood when the engine is idling;
- an obvious decrease in the power of the power unit and acceleration dynamics.
The condition of the valves has a direct connection with the performance and dynamics, fuel consumption and the degree of wear of timing parts of the Vaz 2106.
Frequency of the procedure
The VAZ 2106 operating manual recommends adjusting the valves after 30,000 km. It is also necessary to perform this procedure after each cylinder head removal. When dismantling the cylinder head, the gasket is changed each time and when installing a new one, adjustment of the valve clearances is required.
Experts recommend checking clearances after 10,000 km.
Adjusting valve clearances on VAZ 2106
Tool
When performing an operation without a service station, you must have the following adjustment kit:
- set of socket wrenches;
- flat screwdriver;
- keys to 17;
- key for turning the crankshaft;
- probe for VAZ engines or micrometer.
It is impossible to make precise adjustments yourself with standard feeler gauges - they are narrower than normal and do not cover the width of the gaps. The thickness of the special feeler gauge for VAZ engines is equal to the optimal clearance norm - 0.15 mm. The cover of such probes usually shows a valve adjustment diagram.
When preparing the tools, it is necessary to decide which device will be used for adjustment - a probe or a micrometer. During engine operation, valves and engine head parts wear out. The error in adjusting the valves with a feeler gauge increases as the parts of the power unit wear out.
When adjusting valves with a feeler gauge on a used engine, there will definitely be an error. The higher the mileage, the greater the error in adjusting the valves with a feeler gauge.
For precise adjustment, experts advise using a micrometer. The adjustment error with this device is zero and does not change due to wear of Lada 2106 engine parts.
Instructions
Before starting work, allow the engine to cool completely. Check the timing marks and chain tension - correct if they do not meet the standards. The instructions will describe the method of adjustment using a micrometer.
Carburetor pan VAZ 2106
Adjustment using the old-fashioned method (with a feeler gauge) is performed in the same sequence, with the exception of the point about measuring gaps.
- Remove the carburetor pan and remove the hose from it.
- Disconnect the accelerator pedal drive.
- Remove the valve cover of the Six power unit.
- Remove the ignition distributor cover.
- Turn the engine by the flywheel. Turning is done with a special key. Removing the spark plugs will make the turning procedure easier. As a result of turning the power unit, the marks on the camshaft sprocket should align with the mark on the bearing housing. For complete reliability, you can check the coincidence of the marks on the crankshaft pulley and the engine.
- Mark the marks on the camshaft sprocket with a marker. Marks are applied on top of the factory ones every 90 degrees.
- Screw the rack onto the camshaft bed mounting. It must be securely fixed.
- Place the indicator on the rack.
- Place the indicator on the edge of the adjustable valve cam.
- Engage the cam using the special grip and pull up. There should be a change in indicators by 52 divisions.
- If there is a deviation in the indicator, the gap needs to be adjusted. Using a size 17 wrench, you need to unscrew the lock nut 1-2 turns and use a size 13 wrench to adjust the gap. After this, carry out another check of the adjustment with a micrometer. If everything is correct, tighten the locknut. After this, you need to re-check the gap - the gap may have decreased after tightening the locknut. When adjusting the gap, you need to leave a margin .
All engine valves are adjusted in this way. To get to the valves you need to crank the engine. There is a clear procedure for adjusting the valves. It is indicated in the adjustment table.
Gap table for correct engine valve adjustment.
At the end of the procedure, it is advisable to crank the engine and check the clearances again. The structure is assembled in the reverse order. Be sure to replace the disposable valve cover gasket.
We repair a VAZ 2106 car ourselves:
Replacement procedure
When replacing valve stem seals on a VAZ 2106, you must adhere to a certain algorithm:
- Remove the cover from the block head by unscrewing all the nuts. And don't lose the washers underneath them.
- Rotate the crankshaft until the marks on the camshaft sprocket and the cover align. In this position of the crankshaft, the pistons of the first and fourth cylinders are at TDC. Therefore, after removing the crackers, the valves will not fall out.
- Remove the pastel of the camshaft bearings, fix the sprocket and chain so that they do not fall down, otherwise it will be very difficult to get them out.
- So, in the first cylinder the piston is at TDC, now you need to unscrew the spark plug and remove the spring, and then move the lever to the side.
- Loosen the adjusting bolt and install the spring puller.
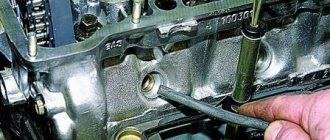
- Insert a soft metal rod (tin is ideal) into the spark plug hole to prevent the valves from falling down.
- Using a desiccant compress the spring until the crackers are released. It is quite possible that you will have to tap them lightly - they often stick.
- Dismantle the springs, remove the plates and washers.
- Now you can install the first valve stem seal of the VAZ 2106 in its place. Place the clamp on the valve and, tapping with a small hammer, remove the old cap. Lubricate the new one with oil and remove the spring from the top. Place it in place and, using a mandrel, press it into the hole. Afterwards you can put on the spring.
- Replacing the VAZ 2106 oil seals on the remaining valves is carried out in the same way, just do not forget to rotate the crankshaft before working on the second and third cylinders.
After completing all work, install the chain and sprocket in place, and tension the drive. Make sure everything is installed before starting the engine. Video on the topic:
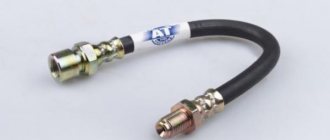
Valve seals for VAZ 2106: replacement, price - what you need to know
Valve seals are designed to remove excess oil that gets onto the valve stems. It is the excess, a certain amount of it that should wash the sleeve with the valve.
If the valve seals (for some reason) stopped working (became unusable) and oil began to get into the combustion chambers, you need to replace the valve seals on the VAZ 2106.
Table of contents
Replacement Price
Replacement
EXECUTION ORDER
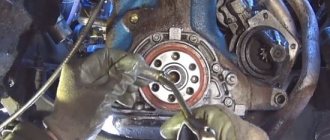
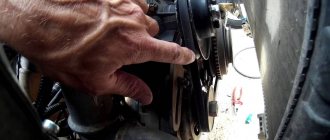
We remove the camshaft assembly with the bed.
Unscrew and remove the spark plugs. We remember the position of the distributor slider. To prevent the valves from falling into the cylinder, we will change the valve seals on those cylinders whose pistons are at TDC, and then bring the pistons to TDC to replace the seals in the remaining cylinders. (first replace the oil seals in the 1st and 4th cylinders, and then, turning the crankshaft 180°, in the 2nd and 3rd). For this…
...through the spark plug socket we insert a soft metal rod with a diameter of about 8 mm or a screwdriver, between the piston and the valve (on which we change the oil seal).
We screw the nut onto the stud securing the camshaft bed and place the desiccant grip under the screwed nut.
By pressing on the desiccant lever, we compress the valve springs and pull out the crackers with tweezers.
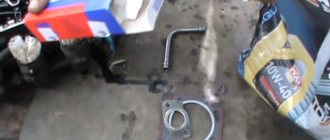
We take off the plate...
...two springs, outer and inner,...
...and then the top one...
...and the lower support washers.
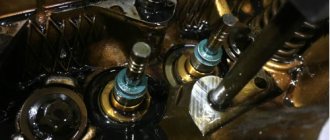
Using a screwdriver, pry and remove the oil seal from the guide sleeve.
It is more convenient to remove valve seals using special pliers.
In order not to damage the working edge of the new oil seal, we put a plastic sleeve on the valve. The bushing usually comes with the valve seals.
Lubricate the working edge of the new oil seal with engine oil and put it on the valve.
Next, using tweezers, remove the plastic sleeve and press the oil seal, using a hammer, through the mandrel, onto the guide sleeve.
After we replace all the valve seals, we assemble the gas distribution mechanism in the reverse order of disassembly.
Before installing the camshaft, turn the crankshaft and return the distributor slider to its original position. In this case, the crankshaft pulley mark will be opposite the long mark on the front engine cover.
After final assembly of the gas distribution mechanism, we will adjust the thermal clearances in the valve drive.
Price
A set of 8 pieces costs about 125 rubles.
vz06-up.ru
Features of repairs
In general, the caps should fit the valve stem as tightly as possible. If the integrity of the seals is compromised, carbon deposits can be seen on the electrodes of the spark plugs, and lubricant consumption will certainly increase. Smoke will appear from the exhaust pipe. Please note that similar symptoms appear when the engine breaks down. Therefore, it is necessary to determine exactly where the fault is.
Replacing valve stem seals on a VAZ-2106 with your own hands is quite simple, you just need to have all the necessary tools on hand. A prerequisite is that all work must be carried out in a clean garage. Dirt and dust must not get inside the cylinder head. In this case, the dust will act as an abrasive, causing all the engine components that come into contact to suffer extreme wear.
Replacing caps without removing the head of a VAZ 2106
The valve stem seals on the VAZ 2106 are replaced after approximately 30,000 kilometers. If it is not there, then it is still better to replace it after 2-3 years, because the caps dry out from old age. Find out how to replace the caps on 2106 in the article.
The content of the article:
At the moment, in stores you can find silicone valve stem seals, which in terms of their characteristics are much better than rubber ones. Nobody talks about their durability, it's all about the elasticity of silicone. This is very important in Russian winter conditions, especially if the motor is not equipped.
. Before we talk about liters, it’s worth paying attention to this. Over time, when the oil seal wears out, it turns into a filler neck, and the valve stem turns into a piston that pushes this oil. Imagine that the engine is running at 1600 rpm. This means that 800 strokes are performed per minute in one cylinder, which means the valve moves back and forth 400 times. What if there are eight such valves? In general, a lot of oil can leak through the valve stem seals.
Further - increased smoke, reduced engine power. You need to remember one simple truth - engine oil does not burn, it cokes. Only the additives burn. We all know motorcycles in which oil is mixed with gasoline. We all remember how much smoke they make. But there the fuel is diluted with oil in proportions of 1:200. Here they are much larger. That is, if you see blue smoke from the exhaust pipe, then you should think about replacing the valve stem seals. Of course, with such a mixture the engine will not develop full power, as with pure gasoline.
Repair tool
You will need the following list of tools:
- The desiccant can be used of any type. If you have a homemade one, then that will do. It should allow the removal of crackers.
- Set of flat and figured screwdrivers.
- Soft wire.
- A piece of tin.
- Socket heads, open-end and ring wrenches.
- Torque wrench.
Be sure to have tools such as pliers, side cutters, and tongs on hand. They can be useful for any work, in particular, when replacing oil seals on a VAZ-2106 engine.
Preparatory work
Before you begin any repairs, you need to wash the entire car as thoroughly as possible. Moreover, most of the attention should be paid to the engine compartment. Be sure to follow safety precautions - do not flood the ignition system, electronic sensors, or wires. Before you start washing, you must completely disconnect the power supply system. To do this, you need to disconnect the battery, preferably completely, and then remove it.
It is necessary to install wheel chocks under the rear wheels, then engage a lower gear and squeeze the handbrake. Since the car has rear-wheel drive, engaging the gear will prevent the car from rolling away. You definitely need to buy a set of valve stem seals. It is advisable to choose only those manufacturers recommended by AvtoVAZ.
Removing the block head
The valve stem seals can be replaced without removing the head. But if the cylinder head is being repaired, then in any case it will need to be removed. Therefore, you disassemble the gas distribution mechanism as follows:
- Unscrew all the spark plugs using a wrench. If the condition of the electrodes is poor, new ones must be installed during assembly.
- Then you need to unscrew all the bolts that secure the cylinder head cover. There are 8 of them in total, arranged in a circle.
- Install the camshaft exactly according to the marks.
- It is necessary to bend the petals on the camshaft lock washer and unscrew the bolt. To unscrew it without problems, you need to turn on the speed.
- Unscrew the nut securing the timing chain tensioner.
- After this, you can dismantle the tensioner and sprocket. Be sure to secure the drive chain to the sprockets with wire.
- Unscrew the nuts securing the camshaft bearing housing.
- Remove the housing and camshaft.
Then you need to completely remove the rocker arms and old caps.
How to adjust valves on a VAZ 2106: step-by-step instructions
Adjusting the valves on the VAZ 2106 will require mandatory adherence to the entire sequence of actions, the use of appropriate simple tools and careful preliminary preparation.
This kind of work is not difficult, so it can be done even without much practical experience in repairing and servicing VAZ engines. You just need to take into account the order of valve adjustment, which depends on the specific engine modification.
The car owner needs to ensure that he has the appropriate tools necessary to open the cylinder head, check and adjust the valves.
To adjust the valves on a VAZ 2106, you will need the following tools:
- crankshaft key;
- micrometer or adjustment probe;
- flat blade screwdrivers;
- socket wrenches;
- valve cover gasket.
In the car tool kit you can find a special probe with a thickness of 0.15 millimeters. On relatively fresh, unworn engines, the use of such meters allows you to set the valve clearance as accurately as possible, significantly simplifying repair work. However, subsequently, as the seats wear out, the distance changes, and it may no longer be possible to ensure the adjustment of the gap using standard feeler gauges that come with the car’s tool kit. Therefore, experts recommend using a micrometer, which guarantees maximum quality of such work.
Preparatory stage
The quality of the work performed and the absence of car engine breakdowns subsequently depend on how correctly the preparatory stage is completed. The easiest way to adjust valve clearance is in a garage or any other enclosed and well-lit room.
The preparatory stage involves the following work:
- Place stops under the rear drive wheels and engage neutral on the gearbox.
- Open the hood and wait for the engine to cool, which usually takes about half an hour.
- Disconnect the battery, which will eliminate the possibility of a short circuit in the electrical wiring.
- Remove the carburetor cover and unwind the gas pedal cable.
- Loosen the cylinder head by using a 10mm wrench.
- Carefully remove the cylinder head, remembering the location of each mounting pin.
It would be useful to additionally check the correct tension of the timing chain. Wear of the gas distribution mechanism drive can lead to extraneous knocking noises when the engine is running. In the worst case, when the chain teeth slip, the piston, moving at high speed, crashes into the valves, completely destroying the engine. Car owners with such breakdowns face expensive and complex engine overhauls.
Step-by-step adjustment of gaps
Having properly prepared the engine for service and checked the timing belt tension, you can begin adjusting the valves.
It will also be interesting: GAZ 24 engine and its features
All work is performed according to the following algorithm:
- Adhering to the position and focusing on the marks on the timing belt, you should use a micrometer to make sure that there are no gaps on valves number 8 and 6.
- To check the clearance you will need to place a feeler gauge on top of the rocker under the camshaft. If the control plate fits freely into the hole, then you need to unscrew the adjusting bolt and unscrew the lock nut.
- In the same way, by aligning the marks on the crankshaft, valves 4 and 7, 1 and 3, 5 and 2 are adjusted. This routine will remain on all 2106 engines.
The rotation angle of the crankshaft during inspection is 0, 180, 360 and 540 degrees. After each rotation of the shaft, you should check the corresponding marks, which will not only allow you to carry out the adjustment correctly, but will also eliminate any problems with the power unit in the future. With a certain amount of skill, this kind of work can be done in literally 15-20 minutes. You just need to be extremely careful, constantly checking that the marks on the crankshaft match. Using a feeler gauge or micrometer, you can ensure accurate valve clearances.
All that remains is to reinstall the valve cover head in reverse order, not forgetting to use a new gasket. The fixing bolts on the cylinder head cover must be tightened in full accordance with the recommendations of the vehicle instructions. The latter will ensure the tightness of the combustion chamber and guarantee a tight fit to the cylinder head and cylinder jacket.
If the work is carried out correctly, extraneous knocks from the engine completely disappear, fuel consumption decreases, and the power of the power unit increases.
How to remove the caps
It is necessary to completely remove the old elements before replacing the valve stem seals on the VAZ-2106. The repair instructions are as follows:
- If the replacement occurs without dismantling the cylinder head, then you need to install a tin rod in the spark plug holes. This will keep the valve in the up position. If you are making a replacement on a removed cylinder head, then you can hold the valves with your hands.
- Install the valve depressurizer.
- Compress the spring.
- Remove the crackers that are located on the groove in the upper part of the valve stem.
- Remove the spring, plate and support washer.
Using a flat-head screwdriver, pry up the oil seal and pull it out. You don’t have to spare the old elements; if it doesn’t work out, then use a sharp awl.
How to solve the problem on VAZs
Let's see how to replace the valve stem seals of a VAZ 2107. We will need:
- wrenches;
- device for compressing valve springs;
- tin solder rod;
- screwdrivers;
- hammer, mandrel;
- pliers, tweezers.
- We remove the air filter housing, as well as the cylinder head cover, by unscrewing the corresponding fasteners.
- We combine the marks so that the pistons of the first and fourth cylinders reach TDC.
- Having loosened the lock washer, we tear off the camshaft sprocket nut.
- Loosen the drive chain tensioner.
- We dismantle the shaft sprocket.
- After unscrewing the fasteners, remove the bearing housing.
- We unscrew the spark plug of the 1st cylinder.
- We remove the lever.
- We unscrew the adjusting bolt and instead screw in the equipment to compress the coils.
- We insert a rod of tin solder into the hole of the candle.
- Having tightened the bolt of the equipment, we take out the crackers using tweezers.
- We remove the equipment, take out the springs, washer and plate.
- Using pliers, carefully remove the worn part.
- We drive the new spare part using a mandrel and carefully hit it with a hammer.
- We reassemble the valve assembly.
- We replace the caps from the VAZ 2107 for the remaining sockets by turning the crankshaft half a turn.
- We assemble the engine.
Replacing valve stem seals on a VAZ 2106 is done in exactly the same way.
Now regarding the front-wheel drive cars of the Volzhsky Automobile Plant. Here the main difference with the described operation can be traced at the initial stage. And after they get to the crackers, they work in exactly the same way. So, when replacing the valve stem seals of a VAZ 2109, the following tools are taken:
- wrenches;
- device for compressing valve springs;
- tin solder rod;
- screwdrivers;
- hammer, mandrel;
- pliers, tweezers.
The first points differ from the previous instructions.
- Remove the camshaft pulley.
- The head cover is also removed.
- Remove the rear casing.
- Remove the ground wires from the studs.
- The bearing housings and the camshaft are unfastened and removed.
- Further steps for changing the caps on a VAZ 2109 are identical to those described in the previous instructions, starting from point 7. In this case, the piston of the cylinder with which they are working must be at TDC.
How to install new caps
On VAZ-2106 cars, the valve stem seals are replaced independently using a simple plastic device. It must be placed on the top of the valve stem to cover the recesses on it. In this case, you will not have to remove the springs from the valve seals. The work is carried out according to the following algorithm:
- Install the plastic bushing on the valve.
- Lubricate the auxiliary bushing and valve stem with engine oil.
- Push the oil seal on until it stops.
- Remove the plastic sleeve.
- Using a “10” tubular wrench or a large mandrel, you need to hammer in the cap.
- Install the support washer, spring and plate.
- Install the valve depressurizer and compress the spring.
- Put the crackers in place, and then release the desiccant.
Replacing valve stem seals for VAZ 2107
Oil seals are installed on the intake and exhaust valves of the engine. The main function of valve stem seals is to prevent excess engine oil from entering the combustion chamber. Failure of several caps leads to increased oil consumption and carbon deposits in the piston group. In this article we will tell you how to replace valve stem seals on a VAZ 2107, as well as a few words about the choice of caps and signs of wear.
Which valve stem seals should I buy?
Take into account that if the cap is selected incorrectly, its functioning will be impaired, that is, oil will leak. A common case of violation is the installation of a longer cap, which will lead to breakage of the part.
Selection rules:
- The cap should not exceed the height of the original part by more than 0.5 mm.
- In terms of diameter, the spare part should not have free movement through the valve spring.
- It is advisable to select an original or an analogue with comparable quality.
- Spare parts that are too cheap and based on rubber or plastic are not suitable, as they wear out faster.
- Authentication verification required. Aftermarket parts are often counterfeited. Poor performance of the caps and the use of cheap materials are considered negative factors.
Additionally, the car owner must take into account the wear resistance of the cap, including the resistance of the material to negative factors. There is a wide range of parts on the market with improved performance that allow the cap to function longer without replacement.
Causes and signs of wear on valve stem seals
The caps are continuously exposed to engine oil and exhaust gases while the engine is running. Over time, the inside of the cap becomes “tanned” and abrasion occurs. Oil seals (valve seals) last approximately 50-100 thousand km. mileage The life of the caps is influenced by the quality of the engine oil used, as well as the frequency of replacement.
There are several main signs of cap wear:
- High consumption of engine oil (more than 1 liter per 1000 km).
- Deposits on spark plugs (simply black plugs).
- Blue smoke from the exhaust pipe (especially noticeable at high speeds).
Also, these symptoms may indicate other problems, for example, wear of the CPG in general.
Replacement process
- Completely dismantle the air filter housing. Immediately remove the cover and pull out the filter, then unscrew the fastening nuts from the carburetor and remove the entire housing.
- We remove the gas pedal linkage, as well as the choke cable on the carburetor.
- We unscrew all the valve cover fastening nuts around the perimeter and remove all the spark plug wires for convenience. You can also remove the distributor cover.
- We dismantle the clamping washers under the nuts and remove the valve cover.
- We install the first cylinder at TDC, aligning the marks. We turn the engine by the crankshaft pulley bolt clockwise.
- Loosen the chain tensioner and unscrew the camshaft sprocket mounting bolt. After unscrewing the bolt, remove the star from the camshaft. The chain must be left directly on the sprocket; you can wrap it with wire so that it does not come off.
- Unscrew the camshaft mounting nuts and remove it.
- We dismantle the rocker with springs. The main thing is not to confuse them during assembly; each rocker must be put in its place.
- Unscrew the spark plugs.
- We have TDC installed, which means the oil seals can be changed on the first and fourth cylinders. The valves on the first and fourth cylinders will not fall into the cylinder after desiccation, because they are supported by the pistons.
- We dry out the valve, for example, you can start with the first cylinder. We squeeze the valve spring, remove the “cracker” with tweezers and the valve is free.
- We remove the valve springs and gain access to the oil seal.
- We put on the puller and remove the cap.
- We put the cap on the valve stem by hand and then use the device to put it in place. You need a device that rests on the inside of the cap so that with a light blow of a hammer you can put it in place.
- We put on the springs and “dry” the valve.
- Using the technology described above, we change the valve caps on the first and fourth cylinders.
- We crank the engine and support the valve pistons on the second and third cylinders. Make sure that the chain does not fly off the sprocket when turning.
- We change the caps on the valves of the second and third cylinders.
- We install the springs and rocker in their places.
- We install the camshaft and align the TDC marks. There are duplicate marks near the crankshaft pulley, make sure that they also line up.
- Install the RV star and tighten the fastening bolt.
- We tighten and tighten the camshaft mounting nuts with a torque of 2.2 kg, according to the diagram below.
To see the process of replacing valve stem seals on a VAZ 2107, see this video:
How to replace caps on a VAZ 2107
Drain approximately two liters of coolant. Remove the air filter housing and throttle linkage if you have a carburetor.
Remove the valve cover.
Place the first cylinder in top dead center mode.
Loosen the chain tension nut. Remove the camshaft gear mounting bolt.
Remove the sprocket and chain and secure them with wire to prevent a possible fall. Remove the bearing housing and rockers.
Remove the candles
To prevent the valve from falling into the cylinder, be sure to plug the spark plug hole with a tin rod.
Using a valve remover, remove the "crackers".
Using a screwdriver, carefully pry and remove the oil seal.
Before installing the new one, do not forget to lubricate the surface of the rod with oil.
Replace the springs and other parts. Repeat all the described operations with each cylinder, installing them at TDC. After completing all the work, return the crankshaft to its original state, install the bearing housing, camshaft gear and chain
The remaining elements are installed in reverse order
After completing all the work, return the crankshaft to its original state, install the bearing housing, camshaft gear and chain. The remaining elements are installed in reverse order.