Signs of replacement
When is it necessary to replace the oil seal on a VAZ-2107? It does not have a specific resource or regulations. But there is a clear sign that will indicate that the VAZ-2107 rear axle gearbox seal has been replaced. These are traces of oil leaks in the area of the gearbox flange. At first they will be minor. But, as you use it, all the oil from the bridge can leak out through this gap. If measures are not taken in time, wear on the gears and differential will increase. As a result, the bridge will hum, especially at speed.
Note! If the bottom of the bridge is simply fogged, the problem is most likely not with the seal. Such symptoms are observed when there is excess oil pressure in the breather, due to which the liquid begins to leak out.
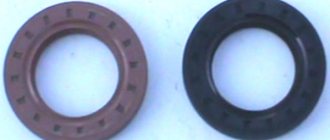
Oil seals VAZ 2107 (dimensions)
| Designation | Dimensions (mm) | Name | ||
| D | d | H | ||
| 2101-3401026 | 37 | 19,3 | 10 | Steering shaft oil seal |
| 2101-1701043 | 47 | 28 | 8 | Gearbox seal VAZ 2107 (primary shaft) |
| 2101-1701210 | 56 | 32 | 10 | Secondary shaft oil seal VAZ 2107 |
| 2101-1005034 | 56 | 40 | 7 | Crankshaft oil seal (front) VAZ 2107 |
| 2101-1005160 | 90 | 70 | 10 | Rear crankshaft oil seal |
| 2101-2402052-01 | 68 | 35,8 | 12 | Rear axle oil seal VAZ 2107 (gearbox) |
| 2101-3401023 | 43 | 28,6 | 10 | Steering bipod shaft oil seal |
| 2101-2401034 | 45 | 29 | 8 | Axle shaft seal VAZ 2107 |
| 2101-1307013 | 36,6 | 15,5 | 20,3 | Oil pump VAZ 2107 (water pump) |
| 2101-1007026 | 10,5 | 8 | 10,2 | Oil cap (oil scraper) |
| 2101-3103038 | 57,15 | 40 | 10 | Hub seal |
You can order a crankshaft oil seal and other parts of the VAZ 2107, find out the exact price and other useful information in our office or by phone.
When is replacement needed?
The rubber reinforced cuff cannot be restored or repaired. Therefore, it is necessary to replace the crankshaft oil seal or other part on a VAZ 2107 as soon as the seal begins to leak or “take” working fluid.
Most often, replacing the axle shaft seal, gearbox, and gearbox on a VAZ 2107 is necessary under the following circumstances:
- wear due to long use;
- various damages;
- deformation;
- purchasing and installing an oil seal of the wrong size;
- low quality of the product;
- non-compliance of the product with AvtoVAZ requirements.
The oil seal of a VAZ 2107 gearbox or other car mechanism has a certain service life. But a rubber product may become unusable before the warranty period.
For example, the crankshaft oil seal on a VAZ 2107 may suffer after:
- untimely replacement of oil and filter;
- engine overheating;
- poor quality repairs.
And here it is important to remove the old cuff in time and replace it with a new one. Otherwise, oil leakage cannot be avoided.
The importance of choosing a reliable manufacturer
It’s very easy to find a VAZ 2107 crankshaft oil seal on the Internet at a low price. But most of the offers are seals from China, which are well disguised as well-known brands. As a result, the car owner soon notices puddles of oil again and is forced to spend money on a new oil seal again.
MP "CREDO" guarantees compliance of rubber reinforced cuffs with GOST 8752-79, subject to compliance with the rules of delivery, installation, operation and storage.
Our company produces two types of oil seals:
- single-edge;
- single-edge with dust collector.
Modern technologies and reliable equipment allow our company to produce axle seals for the VAZ 2107 and other reinforced cuffs for this car model that meet international standards and AvtoVAZ requirements.
The VAZ 2107 axle seal and other reinforced cuffs are tested for:
- strength;
- hardness;
- cyclicality;
- permanent deformation;
- relative extension;
- rigidity.
The role of rubber
The quality of a rubber reinforced cuff, for example, a VAZ 2107 rear axle gearbox seal, will largely depend on the performance of the raw materials. Our company uses exclusively high-quality rubber. All our mixtures are characterized by a high degree of homogenization, a wide range of operating temperatures and good resistance to all aggressive environments.
But all these characteristics suffer if the replacement is carried out incorrectly. Therefore, we advise clients who lack the experience and necessary knowledge to entrust the replacement of the axle shaft seal, gearbox, and crankshaft on a VAZ 2107 to professionals.
Advice! When buying a VAZ 2107 rear gearbox oil seal or another type of reinforced cuff, you need to check the quality. To do this, just hold the product in your hands, bending the working edge. Its surface should be smooth, elastic and sharp. It is the sharpness that largely determines the service life of this type of rubber product.
It is also extremely important for the normal and uninterrupted operation of the machine to buy the spare part that is suitable for your model.
Getting ready for replacement
If all signs of malfunction are confirmed, you should immediately replace the worn oil seal. This way we will save the resource of the gearbox. But first we need to drain the oil from the bridge.
To do this, use a hexagon to unscrew the drain hole and place a container with a volume of at least two liters. It is advisable to drain the oil “while it’s hot,” especially if the temperature outside is below zero. But you don't need to warm up the engine. In order for the oil in the bridge to warm up, you need to drive the car at least 3-5 kilometers. It is quite viscous and difficult to drain in the cold. Having removed all the fluid from the gearbox, you can begin replacing.
Let's get started
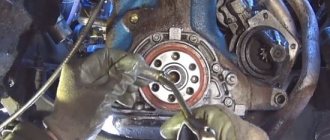
How do you replace the oil seal in the gearbox on a VAZ-2107 car with your own hands? First we need to install a powerful slotted screwdriver between the crosspiece and at the same time unscrew the propeller shaft bolts that go to the flange. Next, we move the cardan to the side. If the shaft rotates, you can put the car in first gear. This will make the dismantling process easier. But periodically you will have to rotate the shaft, since the bolts are located evenly around the perimeter.
At this point, the replacement of the rear axle gearbox seal on the VAZ-2107 has not yet been completed. At the next stage, unscrew the nut that is on the flange. This is done using a socket head with a ratchet. The flange must be locked so that it does not rotate during dismantling. This can be done using a piece of pipe with two bolts installed in it. Next, remove the flange out. This is done using a special puller. If you don't have one, you can use a hammer. Gently tap the flange through a soft spacer (for example, a piece of wood) and remove the element from the gearbox. Next, take a wrench and carefully pry off the old oil seal. How do you then replace the rear axle gearbox seal on a VAZ-2107?
Don't rush to install a new element. In order for it to last a long time after replacement, it is important to exclude the presence of dirt and dust in the hole (it will act as an abrasive). To do this, take a clean rag and wipe the oil seal installation area dry.
Bearing Failure Determination
Some recommendations will help you make sure that you need to replace the wheel bearing on your VAZ 2107:
The easiest way to determine the need to replace the hub unit is to grab the front wheel and shake it in different planes
If you feel the presence of play, then it’s time for a more detailed diagnosis and most likely replacing the bearings. The front wheels of the car should be hung on a jack, while being sure to take precautions: pull the handbrake, install shoes and additional stands under the car. Grasp the top and bottom of the front wheel with your hands and then make movements. It is important to wobble the wheel, not the car as a whole.
Thus, you can accurately determine whether the product in question needs to be replaced. Another way to determine the need for replacement is to listen for humming, knocking, and grinding noises in the wheel as it rotates.
Having decided that you really need to replace the VAZ 2107 wheel bearing, you need to purchase new products and begin the replacement workflow.
Replacement features
The front hub of the VAZ 2107 car has a pair of roller bearings, one of which is called internal, and the second external. The manufacturer recommends replacing these products in pairs, on both front wheels of the car. We will find out further what the replacement of the parts in question is.
Initially, it is necessary to tear off the nuts securing the front wheel of the VAZ 2107 car. After this, install the jack and jack up the front part of the car. At the same time, do not forget to install shoes under the wheels, as well as a special safety stop to prevent the jack from falling.
- Removing the caliper. Changing the front wheel bearing is much more difficult than replacing the rear one, but it can be done even with no experience. First of all, the 2 bolts that secure the caliper are uncoiled, after which they are unscrewed. It is not necessary to disconnect the brake hose; it is enough to tie up the removed caliper so that it does not interfere with further work.
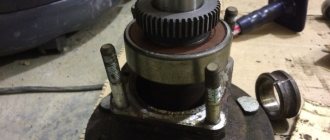
- Removing the outer product. The cap is removed using a screwdriver, behind which there is a hub nut. The nut must be unscrewed, for which you will need to use a chisel and a hammer. Behind the nut there is a lock washer that must be removed. Now you can pull out the outer bearing.
- Removing the hub. To remove the hub, you need to pull it towards you. It is removed along with the brake disc. To disconnect the disk itself after removal, unscrew the two “12” bolts. The brake disc is removed to make replacement easier, but it is not necessary to disconnect it.
- Removing the inner bearing. Using a screwdriver, you need to pry off the oil seal located on the inside and covering the inner bearing, then pick it out and pull out the split spacer ring. The ring may not stand, so we focus on the situation. After this, the inner bearing can be removed.
- Next, the old clips are removed using a special puller or an ordinary steel tube of suitable diameter. The next stage of replacement involves cleaning the inside of the hub from old grease, after which you can begin assembly.
Installation
How do you then replace the rear axle gearbox seal on a VAZ-2107? At the next stage, we treat the installation site with Litol-24. Next, we install a new VAZ-2107 oil seal. He mounts it using a special mandrel. It must match the diameter of the element being installed. Use any round shaped element as a mandrel. Ideally, a faulty bearing or a piece of pipe of the appropriate diameter will do.
It is important to press the element evenly. To do this, gently tap the edges of the seal with a hammer. We press it in until it goes two millimeters deep relative to the end of the gearbox. This distance can be measured with a regular ruler or caliper. After pressing, it is important to lubricate the element again, but from the reverse side.
Next, screw back the central nut securing the gearbox flange. After this, the crankshaft is brought to the flange. The nuts are clamped with the same force. It is important not to overdo it, otherwise you may break the thread. The recommended tightening torque for the propeller shaft bolts is 70 to 80 Nm. And the central nut is tightened with a force of 30 Nm.
What to do with VAZ
Initially, we will discuss these types of repairs in relation to the “classic” Zhiguli. We will tell you how to replace the gearbox seal of the rear axle of a VAZ 2107.
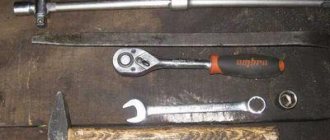
- wrenches;
- screwdriver;
- mounting blade;
- Litol type lubricant;
- sandpaper;
- mandrel and hammer;
- a special key for holding the flange - a tube with two bolts inserted into the holes of the part.
Find out also how to remove the brake drum on a VAZ 2109 and about replacing the coolant on a VAZ 2110. Let's get started.
- First of all, drain the oil from the assembly unit.
- We remove the axle shafts from the beam.
- We use a screwdriver to disconnect the cardan flange from the mating part of the tail gear, having previously unscrewed the bolts. We keep the cardan from turning with a mounting blade.
- We wrap a strong rope around the neck of the counter element of the drive gear and attach a hand scale to it. The force of uniform rotation of the part (kg s) multiplied by the radius of its neck gives the value of the required moment - we write down this value.
- Unscrew the tail gear flange nut, holding the part with a special wrench.
- We remove the detached element and the washer.
- Using a screwdriver, we remove the reinforced rubber product.
- Clean the seat with sandpaper and lubricate it with Litol.
- We press in the new spare part with a mandrel using hammer blows until there is a gap of 2 mm from the end of the crankcase to the part embedded inside. Now the reinstallation of the differential assembly cuff can be considered completed.
- We install and screw the flange element, holding it with a special key. If the initially measured moment of resistance to rotation was at least 6 kg s x m, then the new moment should be greater by 1 kg s x m. In any case, we tighten until the moment reaches 6 kg s x m, but not higher than up to the moment 12 – 26 kg per x m.
- Then we collect everything along the way in reverse.
- Add oil.
This is how a defective oil seal is replaced on a VAZ 2107.
It should be added that the replacement of a defective VAZ 2106 part is carried out exactly according to the same scenario. By the way, as you can see, at the same time we changed the oil in our gearbox.
To completely reinstall the entire assembly unit, immediately after separating the parts according to point 3 of the instructions given, unscrew the bolts securing the beam. This is how the rear axle gearbox of the “classics” – VAZ 2106, 2107 and others like them – is replaced.
Let's also consider replacing the leaking oil seal on the VAZ 21213 Niva. Let's take the same tools as for the “classics”.
- We also drain the oil.
- After hanging the drive, remove the wheels, then the brake drums.
- Having disengaged them from the differential gears, we remove the axle shafts.
- We also disconnect the cardan from the counter element of the tail gear.
- Then we measure the moment.
- Everything else, including the tightening torque values, is followed according to the instructions for the “classics”.
If you need to replace a broken gearbox, say, on a Niva 21214, disconnect its housing from the beam after separating it from the cardan. The same can be said about replacing a defective gearbox on a Chevy Niva.
However, here we must remember that an important rule must be observed: both differential elements of the all-wheel drive must have the same gear ratio. Therefore, when replacing a broken VAZ rear axle gearbox on an all-wheel drive vehicle, you need to know the gear ratio of the second unit.
At the same time, changing a bad oil seal on a Chevrolet Niva is carried out according to the instructions already described.
What to do with Gazelle
Now let’s look at the procedure for carrying out these procedures for popular domestic trucks. Let's study the replacement of the oil seal on the Gazelle. For this we need:
- hammer, mandrel;
- set of wrenches;
- mounting blade;
- Litol lubricant;
- sandpaper.
The final stage
But that's not all. At the end of the work, you need to fill the gearbox with oil. If the old one has turned black, it cannot be reused. It is better to pour new oil into the gearbox. What is the amount of lubricant in the rear axle of the Classic? For all VAZ cars, from the first to the seventh model, this parameter is the same and is 1.3 liters. Oil is poured through the hole at the top of the gearbox. It is unscrewed using an open-end wrench. What oil should I use? Judging by the reviews, the best choice is GL5 with a viscosity of 80w90.
Purpose of the rear axle gearbox
Rear axle gearbox
It is impossible to directly apply torque from the engine to the drive wheels: they will rotate too quickly and it will be impossible to control the car. Some kind of intermediate link is needed between the engine and the wheels. Such an intermediate link is the rear axle gearbox. Its task is to receive torque from the engine and apply it to the drive wheels, having previously distributed it depending on the distance traveled by the wheels.
Reasons for replacing the oil seal and symptoms of malfunction
The seals in the gearbox are changed for one reason: they begin to leak . The oil seal may become old, tear, or be of poor quality from the very beginning, which will inevitably affect its service life. In addition, the tightness of the gearbox may be compromised due to improper installation, as a result of which the seals are compressed too much. The malfunction can be identified by the following signs:
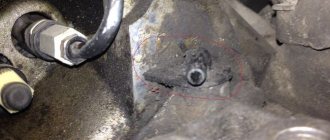
- Small drops of oil appeared on the rear axle, near the gearbox.
- After leaving the parking lot, an oil stain remains on the asphalt.
- A small radial play appeared on the gearbox shank. It is easy to determine: just move the shank up and down with your hands. As a rule, such play indicates not only torn oil seals, but also worn bearings.
It is there that you can detect the backlash
Replacement sequence
- The car is installed above the inspection hole. The plug on the rear axle is unscrewed, and the oil from the gearbox is drained into a previously prepared container. The cylindrical flange of the gearbox is wrapped with nylon thread, which is then attached to the dynamometer. The dynamometer is pulled down until the flange begins to rotate. The value observed on the dynamometer at the moment the rotation begins is stored or recorded.
This force is measured using a dynamometer
For this operation it is convenient to use a 27mm spanner.
The flange has been removed from the shank
This operation requires a tube and a hammer.
The flange is tightened with a torque wrench
Video: How to carry out work on a VAZ 2107
↑ Replacing the VAZ 2106 axle shaft seal video
ATTENTION!
The electronic catalog of spare parts intended for reference purposes only!
Our company does not sell all spare parts presented in this list. If there is a “Cost” link in the right column, these spare parts are on active sale. Availability in warehouses for details and prices, see the product card. If there is no “Cost” link in the right column, we do not sell such parts and do not accept orders for them.
Rear axle cuff
Probably all motorists know that for long-term service of a vehicle, it needs an eye and an eye. You shouldn’t wait until car parts fail at the most inopportune moment. Experienced drivers carry out preventative maintenance in advance, and their car never fails. One of the most common jobs on the VAZ 2106 is replacing the axle seal. Thanks to its periodic replacement, oil will not leak out of the gearbox. Replacing the axle seal on a VAZ 2106 is a simple procedure and you can handle it yourself.
Important nuances
- The dynamometer readings were mentioned above, and this is no coincidence. Tightening the flange is a very responsible process, and it can only be done using a torque wrench. This allows you to avoid excessive squeezing of the oil seal, which leads to a violation of the tightness of the entire gearbox. This is done like this: if at the first measurement the force on the dynamometer was 2.8 - 3 kg, then the force on the torque wrench when tightening should not exceed 6.3 kg. If the dynamometer showed 4.3 kg, then when tightening the key there should be no more than 9 kg, etc. If the dynamometer showed 2.7 kg, and the key when tightened shows 9 kg or more, it means that the gearbox adjusting sleeve is completely worn out and needs for urgent replacement.
- After removal, the flange should be carefully inspected for severe abrasions and cracks. If there are any, the flange must be replaced. If this is not done, the new oil seal will very quickly become unusable.
- Before driving the oil seal with a tube, it is recommended to lubricate it with lithol. This makes it much easier to fit the new oil seal into its original place.
- When striking a pipe with a hammer, there is no need to be too zealous: with a strong blow, the pipe easily cuts the seal.
As you can see, replacing the oil seal itself does not take too much effort, and getting to it is not so difficult: just put the car in an inspection hole with good lighting. But tightening the flange so that it does not crush the new oil seal is a more difficult task. That is why the car owner needs a dynamometer and a special key, without which it is strictly not recommended to open the rear axle gearbox.
The rear axle is a fairly reliable unit of the VAZ 2107, but despite its massive appearance, the mechanism requires regular maintenance, without which it can fail prematurely. This unit can serve for quite a long time if it is operated correctly and carefully, if possible avoiding extreme driving conditions of the vehicle. Calm and careful driving without sharp pressing of the gas and brake pedal, hard clutch engagement and similar overloads will contribute to the serviceability and durability of the rear axle.
Replacing a UAZ loaf axle shaft
Step-by-step instruction:
- Place the UAZ 452 loaf car on a flat horizontal surface. Position the jack and lift one of the front axle wheels. Unscrew the wheel nuts, remove the wheel, and set it aside.
- Unscrew the nuts and remove the hub along with the front wheel bearings on one side. Using a 14 mm socket and a lever, unscrew the six bolts securing the brake shield with a pin to the steering knuckle.
- Carefully remove the brake shield so as not to damage the brake hose. Hang it on the tie rod pin.
- Remove the trunnion , along with the cardboard gasket.
- Pulling forcefully towards you, remove the axle shaft along with the hinge . Clean the internal cavities of the ball joint from old grease, dust, and dirt deposits. Install a new axle shaft with a hinge in its original place. It is first necessary to fill the hinge and cavities of the ball joint with Litol-24 or CV joint grease with a volume of approximately 0.5 kg.
Install all parts removed during dismantling in reverse order. Lubricate the bronze bushing of the axle with the same grease as the hinges. Adjust the hub bearings according to the instructions.
Functions of the rear axle VAZ 2107
The seventh VAZ model completes the line of rear-wheel drive cars produced by the Volga Automobile Plant: all subsequent models, starting with the VAZ 2108, were equipped with front-wheel drive or all-wheel drive. Thus, the torque from the “seven” engine is transmitted to the rear wheels through other transmission elements. The rear axle is one of the components of the transmission, including the differential and final drive . The differential serves to distribute torque between the axle shafts of the rear wheels when the car turns or moves on an uneven road. The main gear amplifies the torque, which is transmitted to the axle axle shafts through the clutch, gearbox and cardan shafts. If the resulting torque is taken as 1, then the differential can distribute it between the axle shafts in a ratio of 0.5 to 0.5 or in any other ratio, for example, 0.6 to 0.4 or 0.7 to 0.3. When this ratio is 1 to 0, one wheel does not rotate (for example, it fell into a hole), and the second one slips (on ice or wet grass).
When is it necessary to replace the VAZ 2107 axle bearing?
Constant loads and driving on uneven roads contribute to rapid wear of the device. In this mode, the rear axle bearing of the VAZ 2107 can fail at any time.
In this case, the signs of its malfunction are as follows:
- Extraneous noise appears while driving a car. It is very difficult not to notice unnecessary sounds - they tend to intensify during acceleration;
- the product jams and stops rotating;
- the bearing is damaged (deformed) and several balls fall out of it.
In the cases mentioned above, it may be necessary to replace the bearing of the VAZ 2107 axle shaft, and sometimes the axle shaft assembly itself.
What is the rear axle made of?
The design of the rear axle of the “seven” includes a fairly large number of elements, including:
- Brake drum mounting bolts.
- Guide pins.
- Axle bearing oil deflector.
- Brake drum.
- Drum ring.
- Rear brake cylinder.
- Brake bleeding fitting.
- Axle bearing.
- Bearing lock ring.
- Bridge beam flange.
- Stuffing box.
- Spring support cup.
- Bridge beam.
- Suspension bracket.
- Axle guide.
- Differential bearing nut.
- Differential bearing.
- Differential bearing cover.
- Breather.
- Satellite.
- Driven gear of the main gear.
- Left axle shaft.
- Axle gear.
- Gearbox housing.
- Drive gear adjusting ring.
- Spacer sleeve.
- Drive gear bearing.
- Stuffing box.
- Mud deflector.
- Flange-fork of the cardan joint.
- Screw.
- Oil deflector.
- Main gear drive gear.
- Axle of satellites.
- Axle gear support washer.
- Differential box.
- Right axle shaft.
- Axle shaft brackets.
- Axle bearing thrust plate.
- Rear brake shield.
- Rear brake pad.
- Friction lining.
- Axle shaft flange.
- Locking plate.
- Bearing cover mounting bolts.
Frame
All working mechanisms of the rear axle are located in the beam, as well as in the gearbox housing. The beam is made of two casings connected by longitudinal welding. The bearings and seals of the axle shafts are located in flanges at the ends of the beam. In addition, the suspension fastening elements are welded to the beam body. In the middle the beam is widened and has an opening in which the gearbox housing is fixed. A breather is installed in its upper part, through which the connection between the bridge cavity and the atmosphere is maintained, so that the pressure in the cavity does not rise above the permissible level and dirt does not get inside the part.
Gearbox
The main gear consists of drive and driven gears that have hypoid gearing, i.e. the axes of the gears do not intersect, but intersect. Thanks to the specific shape of the teeth, simultaneous engagement of several of them is ensured and, as a result, the load on the teeth is reduced and their durability increases . A two-satellite bevel differential, in addition to the satellites located on a common axis, includes a box and two gears, while the satellites are in constant mesh with the gears.
Half shafts
The “Seven” is equipped with so-called semi-balanced axle shafts of the rear axle, which take on bending forces in both the horizontal and vertical planes. The axle shaft, in essence, is a shaft made of 40X steel, with splines on the inner end and a flange on the outer end. The inner end of the axle shaft is connected to the differential gear, the outer end is located in the flange of the beam, to which the brake drum and wheel are attached. The axle shaft is held in place by a thrust plate of the bearing, which is also fixed to the beam.
Rear axle axle seal and its replacement on a UAZ Patriot
Today, dear patriots, together with you we will inspect one of the most important elements of the rear axle - the axle shaft seal. The oil seal is a kind of barrier against oil leakage from the bridge and keeps it in working condition . Replacing the rear axle axle seal is necessary when an oil leak occurs from under the gearbox flange. As in the case of the front axle, we replace the oil seal after we are convinced that the leak is not due to an excess of oil or a clogged breather.
For the Patriot, as an all-wheel drive vehicle, the rear axle is constantly working, and the front axle is auxiliary; accordingly, the constant power load on the rear axle requires increased attention to its condition . Replacing the axle shaft seal of the UAZ Patriot rear axle is considered a minor repair, but very important, because... a displacement of the seal even by 1 mm will lead to the formation of a new leak and everything will have to start all over again.
Replacing the oil seal is recommended after 20 thousand km , and if the car was operated in harsh conditions, then after 15 thousand km. Another symptom for replacing the axle shaft seal of the UAZ Patriot rear axle is abrasion of the brake pads . It is worth going through the entire rear axle assembly and, if necessary, immediately replacing the brake pads, oil seals, anthers, bearings and breathers of the UAZ Patriot.
Let's start with the procedure, and along the way we will take notes from the practical experience of motorists who have already encountered the peculiarities and difficulties of replacing the oil seal.
- The patr needs to be secured in place with a parking brake and, for reliability, secure supports under the front wheels, because the rear part will have to be lifted to remove the wheel.
- Jack up and remove the wheel. It is better to drain the oil from the rear axle, but if it is possible to raise one side, then you don’t have to drain it , because... it will simply flow in the direction opposite to the rise.
- Unscrew the bolts securing the flange to the hub. And now you need to press the axle shaft out of the gear. If you are not particularly lucky and the axle shaft does not give in manually, then there is another forceful method: attach the brake drum with a pair of bolts to the axle shaft . By carefully pulling the drum towards you, you can pull out the axle itself.
- After twisting the lock nut, you can remove the shaped washer. Access to the outer bearing opens - all that remains is to unscrew the main nut and remove the bearing.
- It is recommended to check the integrity of the UAZ Patriot driveshaft for damage and wear . Now you can inspect the bearing itself. By washing the bearing in a special product for cleaning parts, you can see its real condition. It is important that there is no damage in the form of chips, abrasions or loss of rollers.
- The new oil seal must be lubricated . Classic Litol and any refractory synthetic lubricant will do. It would be a good idea to lubricate the fastening joints to protect them from the development of corrosion processes.
- When reassembling in the reverse order, the hub cover can be placed on a sealant that is resistant to high temperatures , which is more reliable than a fit on the gasket.
- The disassembly process when replacing the rear axle axle shaft seal allows you to immediately replace the standard axle shafts with reinforced ones . They are designed to modify the Spicer rear axle installed on the UAZ Patriot and allow you to more confidently overcome off-road conditions.
Symptoms of a problem
As soon as the driver notices any changes in the operation of the rear axle (for example, extraneous sounds appear that were not there before), he must respond to these changes as quickly as possible so as not to aggravate the possible malfunction. The most typical sign of such problems may be increased noise levels:
- coming from the rear wheels;
- during operation of the rear axle;
- when accelerating the car;
- when braking with the engine;
- during engine acceleration and braking;
- while the vehicle is turning.
In addition, a knocking sound when the car starts moving and an oil leak may indicate a malfunction of the rear axle.
Grinding noise when moving
The causes of a grinding noise from the rear axle when the vehicle is moving can be:
- wear or destruction of axle or differential bearings;
- deformation of the beam or axle shafts;
- incorrect adjustment, damage or wear of gears or bearings of the gearbox and differential;
- wear of the spline connection with the semi-axial gears;
- incorrect adjustment of the gear teeth of the main gear;
- insufficient amount of oil.
The cardan spins, but the car does not move
If the driveshaft rotates while the vehicle is stationary, the cause may be a failed axle spline or wear on the teeth of the differential or final drive gears. In any case, if the cardan spins, but the car does not move, this indicates a fairly serious breakdown and, most likely, replacement of the axle shafts, bearings or gears will be required.
Oil leakage from the housing and from the shank side
The most likely causes of oil leakage from the rear axle housing:
- wear or damage to the drive gear seal;
- wear of the axle shaft seal, determined by oiling of the brake shields, drums and pads;
- loosening the bolts securing the rear axle gearbox housing;
- damage to sealing gaskets;
- axial play of the shank;
- breather jamming.
Wheels are stuck and won't rotate
If the rear wheels are jammed, but the drum and pads are in order, the cause of this malfunction may be failure of the bearings or the axle shaft itself. Most likely, in this case, the bearings have crumbled or the axle shaft has become deformed (for example, due to an impact) and the parts need to be replaced.
A little leaked oil from the axle through the axle seal + dust from the pads = good “glue”. Bottom line: remove the drum and look. If all the springs are in place and the block is not torn, then take sandpaper and clean the drum and shoes. Pre-wash them with carburetor cleaner or similar liquid. Sold in cylinders.
underwater snake
https://auto.mail.ru/forum/topic/klassika_zaklinilo_zadnee_koleso_odno/
Causes of failure
Every part on a car tends to become unusable. Rear wheel bearings are no exception, but any part has characteristic operational features. If the operating conditions are met, the part can serve for years, which is confirmed by the driving experience of current older drivers.
The main reasons for bearing failure are:
- careless driving;
- incorrect installation of the product;
- water and dust getting inside the hub;
- leakage of lubricant;
- long service life.
If a VAZ-2107 car is often operated in aggressive conditions close to off-road, then the need to replace the rear wheel bearing will not take long to arrive.
It is especially important to take into account the fact that the famous “seven” is a rear-wheel drive car. But how can you determine that a wheel bearing has failed and needs to be replaced? Let's find out in more detail
Methods for determining whether a wheel bearing is faulty
Timely identification of a malfunction allows you to prevent unpleasant consequences that can provoke an emergency situation on the road. The part in question on the VAZ-2107 car plays an important role, since thanks to this product the wheel rotates easily. The car has 2 rear wheel bearings, one for each rear wheel.
The main way to determine the malfunction of an important part of the hub on a VAZ-2107 is to carry out the following manipulations:
- raise the rear of the car on a jack;
- swing the outer part of the wheel in different directions;
- if a knocking noise occurs and the wheel dangles, then the rear wheel bearing of the VAZ-2107 needs to be replaced.
If the car drives while turning corners and a squeaking noise appears, this also indicates the need for repair work. To replace the wheel bearing, you will need the following tools:
- domktat,
- wrenches and screwdrivers,
- chisel and hammer,
- puller,
- Litol brand lubricant.
After making sure that you have a complete list of tools and materials for the work, you can begin replacement.
Replacing a faulty product
You must begin replacing the product by loosening the wheel bolts. This must be done before the rear of the car is jacked up. At the same time, do not forget to install stops under the front wheels.
- A jack is installed, then the rear side of the car where the bearing needs to be replaced is jacked up. Once the car is raised, you can install a safety stump in case the jack comes off.
- The wheel is removed, and then the drum. It should be remembered that you cannot put the car on the handbrake, otherwise you will not be able to remove the drum. To remove the drum, you need to unscrew two pins and insert them into the technological holes. When the pins are tightened, the drum is pulled out, after which it can be dismantled.
- Using a screwdriver, pry off the steel cap or protective cover. The 4 nuts securing the axle shaft are unscrewed.
- We use a special puller, with the help of which the hub is removed from the drive axle axle. If there is no puller, then you can use a regular chain or cable, attaching it to the axle shaft.
- It is necessary to remove the worn bearing from the axle shaft using a puller or grinder. To remove the bearing using a grinder, you need to cut the outer race on both sides.
- Before pressing in a new product, it is necessary to thoroughly lubricate the seat on the axle shaft and in the hub. The bearing must be pressed in using a locking sleeve.
- The bushing must be heated with a blowtorch, then put on the axle shaft and cooled with water.
Further actions are performed in the reverse order of removal
It is important not to forget that when replacing a bearing, the sealing seals must also be replaced.
The bearing must not be misaligned, which can lead to its failure on the first day of operation. If you operate the car correctly and carefully, then you can forget about replacing the bearing for 2-5 years. You can also read about replacing the front wheel hub bearing.
Rear axle repair
Any repair of the rear axle, as a rule, is quite complex and expensive, so before starting it, you should conduct a thorough diagnosis and make sure that the reason for the malfunction of the car lies here. If, when driving a vehicle, extraneous noises appear that were not there before, you need to try to determine at what moment they appear . If the rear axle makes a hum both under load (when driving with the gearbox engaged) and without it (at neutral speed), then most likely this is not the problem. But when the noise is heard only under load, you need to deal with the rear axle.
Checking the oil in the gearbox
For the rear axle gearbox of the “seven”, semi-synthetics with viscosity parameters 75W-90 are suitable, for example:
- CASTROL Syntrans Transaxle 75W-90 API GL-4;
- "Lukoil 80W90 GL-5" and others.
1.35 liters of oil is poured through a special filler hole on the gearbox housing. If you need to drain the used oil, there is a drain hole in the bottom of the gearbox for this purpose. Before draining the old oil, it is recommended to warm up the car, place it on a flat surface and jack up the right side of the car . If there are metal shavings in the waste, you should rinse the gearbox container with a special liquid or spindle oil.
It is convenient to fill in new oil using a special syringe, which can be purchased at a car store. Both plugs (drain and filler) should be securely tightened, and then check the condition of the breather, which should move freely. If the breather jams, the contact of the container with the atmosphere will be disrupted, which will lead to an increase in internal pressure, damage to the seals and oil leakage. The oil level in the rear axle gearbox is considered normal when the liquid reaches the lower edge of the filler hole.
Video: changing the oil in the gearbox yourself
Repairing and adjusting the most critical components of the rear axle, as a rule, requires some practice, so it is best to perform it under the guidance of an experienced specialist. If you hear extraneous sounds from the rear axle while driving, you should immediately determine the cause of their occurrence. By ignoring such noises, you can “start” a breakdown and subsequently face complex and expensive repairs. Following simple rules for operating and maintaining the rear axle will extend the life of the vehicle for many years.