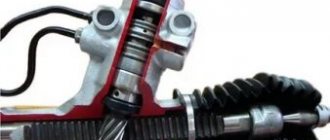
Replacing the steering rack
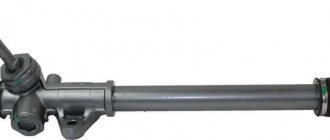
Removed steering rack
To carry out the work you will need: clamps, white spirit, rags, aerosol, bearing lubricant, WD-40 liquid.
You may also need:
- The key is "22".
- Hammer.
- Cardan.
- Chisel.
- Puller for removing tips.
Sequence of work when replacing a VAZ-2112
- Initially, you need to spray WD-40 on all fasteners and bolts so that they can be unscrewed more easily during work. After this, the bolts should be treated with oil and work should begin only a day later. Everything must be done slowly, with order.
We'll definitely pop here
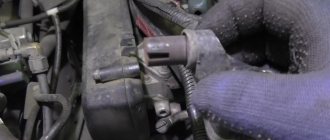
We remove the cotter pin from the mount and dismantle the steering tip
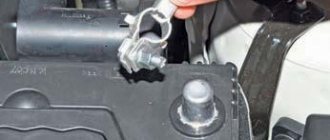
Unscrew the nuts securing the clamps with a wrench
Remove the rack mount to the steering wheel. Unscrew the bolts on the steering shaft.
It is most convenient to drag the rack from the passenger side
After assembly, the steering rack will need to be adjusted. We have already written about this here.
What is the steering rack for?
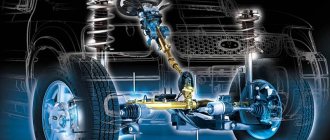
Steering rack diagram (click to enlarge picture)
It transmits force from the steering wheel to the wheels. You can also use it to direct the car in one direction or another. This unit has been constantly improved and updated since its inception. But despite this, the steering rack is also subject to wear.
The rail consists of:
- Slider.
- Sealant.
- Stock.
- Rods with tips.
- Fasteners and turning levers.
All these elements work harmoniously with each other. If at least one of them fails, the entire mechanism ceases to function normally.
Important! It is unsafe to drive with a faulty rack. This may lead to loss of control over the vehicle. Therefore, it is important to initially identify all faults and correct them in a timely manner.
Rack malfunctions
- Most often, seals and rods can fail . In this case, noise and knocking may occur in the front suspension when driving.
- The disease of VAZ slats is crackers .
Steering rack cracker broke
Usually this unit fails because the driver likes to drive fast on a bad road.
A raid on an obstacle, sudden braking, wear of anthers - all this can cause the mechanism elements to fail. To avoid this, it is recommended to treat your car with care.
Monitor the condition of the rack boots
Also, in the cold season, you should not leave your car for a long time with the wheels turned to the side. In this case, the hydraulics can instantly fail.
How to tighten the steering rack on a Ford Focus 2
It is better to pull the steering rack on an overpass
Your actions:
- We drive onto an overpass or inspection hole
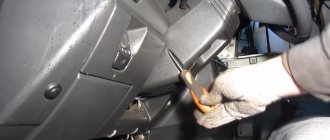
- Removing the plastic engine protection
- We find the intersection of the steering shaft and the rack. There is a nut for adjustment here. It comes with a plastic plug installed from the factory. Remove it using a flathead screwdriver
- Then, using a short 17mm wrench, which should be purchased in advance, we tighten the adjusting nut clockwise. Stretch it 10-15 degrees and check for play
- The check is carried out in the following way. We sharply pull the rack in any direction and, if you cannot hear any noises or knocks, then there is no longer any need to tighten the nut
- There is no point in installing the stopper back - it will no longer be useful.
We will answer your questions for FREE regarding deprivation of rights, road accidents, insurance compensation, driving into the oncoming lane, etc. Daily from 9.00 to 21.00
Moscow and Moscow region
St. Petersburg and Leningrad region
Free call within Russia 8-800-350-23-69 ext.418
Results
As you can see, the work is quite simple and does not require special knowledge and skills. The main thing is to remember the instructions for carrying out the work and use them in the required sequence.
If you do this kind of work yourself once, then there will be no hassle with it in the future.
There are hundreds of different parts on a car, the cost of which can range from several hundred to several thousand rubles. Each of them plays a role in the ability to move along the road.
One of the inexpensive parts of VAZ cars is the steering rack boot. The same protective parts are installed on steering rods. Their failure leads to premature wear of the protected hinge.
Why replacement is necessary
Abrasion of the surface leads to an increase in the gap in the connection, and this worsens the car's handling. If you put off work until “later” and change the torn cover of the steering rack or tip late, then this will require additional costs to restore worn-out components.
It will be much easier and less expensive to change one or more boots than to wait for the tie rods to wear out.
The safety of the driver, passengers and other road users must be paramount. Therefore, pay close attention to the condition of all parts of the car’s steering mechanism.
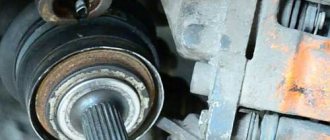
Why is the integrity of the anther so important?
Since the boot is usually a corrugated rubber cover that protects the steering rack from moisture and dirt, and rubber tends to age and lose strength, after some time the integrity of the boot may be compromised. Anther rupture can also occur as a result of mechanical damage. In this case, it is necessary to urgently replace the element that has become unusable.
Why is there such urgency? The answer is simple. To avoid in the future large financial costs associated with repairing or replacing more steering elements. It is easier and cheaper to change one or two boots than to replace the steering rack and related elements, such as a pressure piston, spring, bearings and others.
Moisture and dirt trapped in a torn boot will definitely lead to corrosion and failure of all hinges, and this usually requires their replacement.
If moisture gets to the worm gear of the steering rack, then again corrosion can simply “eat” the teeth of this mechanism. As a result, play in the steering wheel begins to appear. which will only increase. The pressure piston of the worm mechanism may jam. The spring of this piston may also completely rot or burst. All this can lead to loss of control of the car, which will cause an accident when driving on the road. Videos of the disastrous consequences are also easy to find on the Internet.
Preparing for replacement
Replacing the steering rack boot is done differently for different cars. It would be good if it is possible to use a lift or inspection hole. If this is not possible, you will have to be content with a car jack.
Some car models require removal of the engine compartment protection from the bottom of the car. On other machines it will be necessary to dismantle the generator and battery. On VAZ cars with front-wheel drive, you will have to remove the air filter housing and adsorber.
Any work on parts of the steering mechanism of the car leads to violations of the installation angles of the front wheels. If you want to minimize wear on the rubber of the steering wheels, make visible marks for the tip, linkage, and steering rack so that they can be aligned during assembly. Upon completion of work, check the installation angles on the stand.
How to change the boot
First of all, it is necessary to purchase new anthers to replace the failed ones and clamps to secure them. Tools you will need:
- car jack;
- car body stands;
- a set of wrenches, screwdrivers, hammer, pliers;
- joint lubricant.
When the steering rack boot is changed, the clamps securing the protective cover are usually changed. It is advisable to carry out the work on a cold engine, otherwise you can burn your hands.
After jacking up the car, be sure to install stands for safety. This will prevent the machine from lowering inadvertently. VAZ cars with front-wheel drive have a steering rack and two tips, and the VAZ “classic”, for example 2107, already has four tips and a longitudinal rod with protective covers.
For convenient replacement, access to the mechanism should be provided. On a VAZ, this is prevented by the protective cover of the rack from the exhaust manifold. The adsorber, which will have to be removed, will also interfere.
There may be a problem with removing the clamps that secure it. They are not expensive, so many owners simply eat them and install new ones during assembly. The next procedure will be something like this:
- A hammer with a screwdriver and pliers come into play. With their help, the tie rod locking pin is removed;
- after this, use a 22mm wrench or a socket to unscrew the nut on it and remove it from the mechanism;
- The boot is torn and needs to be removed. To do this, remove the steering rack mount from the right side of the mechanism. It is secured with two nuts that are unscrewed;
- Now it is possible to remove the damaged boot for replacement.
It is necessary to pay attention to the correct installation of the boot so that it does not twist.
Sometimes the steering wheel turns, this does not make it possible to install the tip in its place; you should turn it a little and the rods will take their places in the steering rack.
Next, screw a nut onto the screw part, tighten it with a wrench, lock it with a cotter pin, and straighten its antennae with a screwdriver. After the nut is tightened, install the rail in its place, install the fastener and tighten it.
Adjustment methods
Suzuki Grand Vitara 2.4 manual, color ZMA Logbook Replacing the steering rack oil seal, without removing the rack.
And not only Part-1 The steering rack can be adjusted in two ways.
| Adjustment method | Peculiarities |
| Dismantling the device | If the rack is removed and adjusted, we are most often talking about repairing or replacing the unit with a new one. It is recommended to carry out such settings only in these situations |
| Without dismantling the unit | This method of adjustment is relevant if it is necessary to tighten the rack slightly, remove play, and get rid of knocking noises. Here it is quite possible to do without dismantling work, that is, to set up the mechanism directly on the car |
Malfunctions
There are several typical steering rack malfunctions that VAZ 2109 owners encounter. In some situations, simple adjustments can be done, while in others, more detailed intervention in the design of the unit and its components will be required.
Steering rack breakdowns are as follows:
- The steering rack fastenings are loose;
- The rack itself or its gears have worn out;
- Pair engagement is not adjusted properly;
- The bushings at the junction of the rack and steering rods have worn out.
It is not always possible to adjust the rack to eliminate its incorrect operation. This occurs due to the fact that an impressive production of components is formed inside. This can only be determined by dismantling. Therefore, if the adjustment does not bring the expected effect, you will have to remove the rack from the car and check what is wrong with it.
We prepare the car and necessary materials
To replace the boot, you need to prepare the following tools:
In addition to a new boot, you should stock up on clamps for attaching the adsorber, lithol, WD fluid and gloves. We will also need a jack and two supports for the car (“goats”). Replacing the steering rack boot on a VAZ 2110 should be done on a cold engine, as there is little space and there is a chance of getting burned or scratched your hands. Therefore, protective gloves will come in handy. It would be a good idea to wash the car well before repairing. To make it easier to replace the boot, you should use a pit or a pair of stands (“goats”). First, set the car to the parking brake. Be sure to put chocks or blocks under the rear wheels. Then we jack up the car and install supports under the front end so that it is convenient to get to the steering mechanism.
Note: There will be no problems with bolts and nuts if they are pre-treated with WD fluid.
Removing protection
To replace the boot, you must provide access to the steering rack. First, we dismantle the engine protection. Then, using a 10mm wrench or a ratchet with a small wrench, unscrew the fastening of the rack protective screen from the manifold. One nut is at the bottom and two at the top.
Note: To make it easier to remove the screen, you must first rotate it 180 degrees and then pull it out.
Steering rack protective screen
Removing the old boot
To make it easier to continue working, you need to remove the adsorber. The adsorber mounting clamps, as a rule, cannot be removed. Their price is low, so we simply cut off the clamps in passages, then install new ones. After this, remove the steering rods in the following order:
- We flare the tie rod bolts using a screwdriver, hammer and pliers. Then use a 22 mm wrench or a ratchet with a wrench to unscrew them.
- We remove the steering rods from the rack.
Steering rod disconnected from rack
- Using a 13mm wrench, unscrew the steering rack from the right side, which is secured with two nuts at the top and bottom.
- We take out this fastener along with the side rubber of the steering rack.
- Remove the damaged boot.
Note: To make it more convenient to remove the boot, first slightly unscrew the steering rack on the left using a 13mm wrench.
We install a new boot
- Before installing a new boot, the steering rack on the VAZ-2110 must be well cleaned of dirt. Then lubricate it well with lithol. If the surface of the rack is well lubricated, the boot will be easier to install. The rubber cover should be put on carefully so as not to tear it. The boot must not be twisted.
Lada 2109 Kolkhoz cramp Logbook Repair and modification of the steering rack.
The steering rack on my car began to knock, and I began to feel every pebble on the asphalt in my hands through the steering wheel, and it was shaking so much that it seemed like it wanted to break out of my tight embrace. Another 30 thousand/km ago, while doing a wheel alignment, the master said it would be necessary to tighten the rack, but there is nowhere to pull it, it is tightened as far as it will go. In general, I bought what seemed to me everything necessary for repairing the rack on my own: -Rail repair kit, (there are three types: No. 1 is the most expensive half the cost of a new rack with a worm, shaft and bearings, No. 2 is like 1, only without the shaft and worm. No. 3 is like 2 only without bearings. I bought No. 3, with bearings I couldn’t find it and it’s not practical to buy No. 1; it’s easier to just buy a new rack.- BRT boot and 3 cable ties. - Repair kit for rack plugs (I couldn’t find the BRT, I had to take RTIauto, also from Balakovo). - BRT steering rod sales units - Special key for adjusting the rack (in my case, the octagon on it turned out to be 1.5 mm wider than necessary , I had to sharpen it with a grinder to the required size.) - A special key for disassembling the rack (I couldn’t find it, I made it from a piece of rusty pipe). - Sewer pipe 50 mm long 1 m (for the future bushing)
I removed the rail, I won’t describe how to remove and disassemble it, in any book, and there is a lot of information on the Internet.
After disassembly, I saw that the rack worm and shaft were in excellent condition, without scoring or wear. But the rack stop had a hole in it, and the spring pressing it was sagging, 4 mm smaller than the new one, I replaced it with new ones from the repair kit. I installed everything that was in the repair kit instead of the old parts except the stop nut, because the old one had no hole, and the new one had a hole that should be closed with a plug, but it wasn’t included in the kit. Now about the modification, the stock bushing is too small to hold the rack, and even with the new bushing it wobbles a lot, on the 10 the bushing in the rack is already the entire length of the stroke, some people for this reason put it on the 8th family, although it is longer and the fasteners need to be overcooked. I saw the idea of making a solid bushing in the eighth rail in this video
Then, using a construction knife, we cut off the parts sticking out in the window of the case.
And so on with each next piece, until the rail moves closely, but without effort. After inserting all 4 pieces, I cut off the protruding edges from the end,
drilled through the body and plastic
and tightened the screw to secure the pieces of plastic.
I knocked out the steering rod sales blocks with a hammer and pressed in new ones using a bolt, washers and liquid soap as a lubricant.
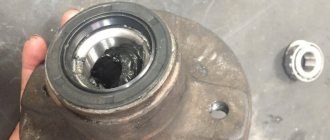
I removed the washers from the old silent blocks using a pull rod puller.
The washers serve to fix the boot, thereby extending its service life. They didn’t fit any washers on the new salenblocks, didn’t heat them with a hairdryer, and walked in like they were coming home.
After all that was done, I decided that the capital rail should look the part, and painted it first with etching primer, then with acrylic.
I put on a new boot,
I filled the body with “fiol” lubricant, and also lubricated the body itself so that the boot would slide over it better, put on the plugs and put it in place.
Since my wheels were removed and the car was standing on bricks, I made the adjustment immediately. I tightened it all the way, turned it back about 45 degrees, and then tightened it until the steering wheel rotated without biting or effort. The tie rod bolts were tightened when the car was standing on the ground, by analogy with the chassis, this is necessary so that the salenblocks do not turn. After the repair, I drove more than 450 km, the beats disappeared, I am satisfied with the result of the work done.
Features of the steering rack with power steering
On a small part of VAZ-2110 cars, the steering rack was equipped with power steering (power steering). Structurally, it is slightly different from a regular rack (without power steering). The photo shows the hoses that ensure the operation of the hydraulic booster.
Steering rack with power steering complete with rods
Therefore, the procedure for replacing the boot on cars that have a steering rack with power steering has its own characteristics.
Preparing tools and materials
In addition to what was stated above, to remove the boot on the power steering racks, additionally prepare the following tools and materials:
- 1 liter of fluid for power steering VAZ;
- container for draining old fluid;
- wooden plugs for closing the hole in the power steering reservoir and the high pressure hose;
- bolt to close the return hose.
In addition, you will need keys for 17, 19 and a hexagon for 6.
Note. When replacing the boot, it is recommended to change the rubber mounts of the steering mechanism, left and right. Therefore, they should also be purchased in advance.
Drain the fluid from the power steering
Replacing the steering rack boot of a VAZ-2110 with power steering is carried out by first draining the fluid from the power steering reservoir. To do this you need:
- use a syringe to pump out fluid from the power steering reservoir;
- remove the fluid supply hose to the pump;
- plug the hole in the tank;
- lower the hose into a previously prepared container;
- turn the steering wheel and wait for the fluid to drain;
Warning! It is strictly prohibited to start the engine to turn on the pump in order to speed up the process of draining the liquid.
- use a screwdriver to remove the clamp securing the return hose and quickly plug it with a bolt, which should be prepared in advance;
- Using keys 17 and 19, unscrew the supply hose (high pressure) and plug it with a wooden plug.
Remove the rack
- in the same order as indicated above, we dismantle the engine and steering rack protection;
- Using a 13mm wrench, unscrew the four bolts securing the rack;
- use a 13mm wrench to unscrew the bolt securing the lower coupling flange, which is located under the steering wheel;
- remove the rack using a screwdriver if it has not fallen on its own;
- We take the rack shaft out of the cabin and turn it over;
Changing the boot
To replace the boot, unscrew the power steering pipes from the rack and remove it through the hole (window) under the car's wing. We change the boot and reassemble in the reverse order.
Note. If you cannot disconnect the pipes, try disconnecting the right link and pulling out the rack from above.
Guided by the advice outlined in this article, replacing the tie rod boot will not be difficult. In addition, you can additionally watch the video, which is easy to find on the Internet today by entering the appropriate query in any search engine.