In what cases is it necessary to replace the inner CV joint?
Replacing the internal CV joint on front-wheel drive VAZ vehicles is required if the following symptoms are present:
- Crunching and knocking noises when driving and accelerating in a straight line;
- Vibration and shock when changing gears;
- Significant play when testing by hand;
- If the “grenade” fails completely, the vehicle cannot move further.
» alt=»»> The main reason for the malfunction of the VAZ “grenade” is the entry of water and dirt through the hole in the torn boot. The second possible cause of failure is a sharp press on the gas with the wheels fully turned, although in this case you risk killing the external rather than the internal grenade.
In addition to the above, replacing the internal CV joint on VAZ-2110 and other models may be necessary if the quality of the previously installed joint is poor.
Types of CV joints
Replacing the CV joint and outer boot on a VAZ 2110 with your own hands video
Before you begin repairs, you need to find out exactly how the unit is designed.
The pair of drives on the VAZ 2109 is equipped with a total of 4 CV joints.
| CV joint type | Peculiarities |
| Interior | There are 2 of them. They transmit torque to the axle shaft from the gearbox |
| Outer | There are also two of them. Installed on the ends of the axle shafts and transmit torque directly to the wheels |
External
This arrangement of grenades ensures the possibility of wheel rotation during turns and constant operation of the suspension system. To put it simply, the outer CV joints are responsible for transmitting torque when cornering, and the inner ones are responsible for the vertical movement of the wheels. These are collisions with bumps, holes, roll in turns, etc.
Interior
Replacing the inner CV joint with your own hands
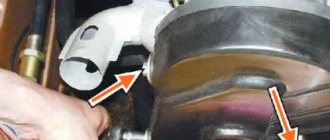
» alt=»»> The procedure for replacing a “grenade” is the same for the entire front-wheel drive VAZ line, starting with 2108 and ending with VAZ-2115, “Kalina”, “Priora”, “Grant”. Before removing the inner CV joint, the oil is drained from the gearbox. Then proceed according to the following algorithm:
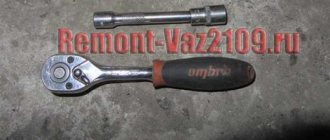
- Unlock and unscrew the hub nut. To make the work easier, a piece of pipe about 1 meter long should be put on the key.
- The desired side of the car is hung on a jack or lift.
- Remove the wheel.
- Remove the washer located under the hub nut installation site.
- Disconnect the steering tip.
- The CV joint is removed from the hub.
- Using a pry bar, remove the drive and internal joint from the gearbox.
Note: when removing both drives at the same time, a suitable mandrel should be installed in their place.
How to change the “grenade” with the drive removed? To do this, clamp the shaft in a vice, loosen the clamps and remove the boot. After this, the hinge is knocked off the splines with hammer blows.
The new CV joint should be hammered by applying light blows to its end with a hammer. For this it is better to use a wooden mallet. The “grenade” is first filled with a special lubricant.
Before installing a new constant velocity joint, it is necessary to clean its seat from old grease and install a new boot. Assembly is carried out in reverse order.
The repair is considered complete after successful sea trials. In this case, there should be no extraneous sounds from the drive side in all modes of vehicle movement.
Boot replacement and repair
The boot can be changed without removing the grenade if you have special equipment. His work is demonstrated on video. » alt=»»> If you do not have such a device, to remove and replace it, you must perform the above-described procedure for removing the drive and dismantling the hinge. The procedure is necessary if there is even minor through damage on the boot.
Temporary repairs to the CV joint boot can be made without removing it from the vehicle. To do this, you need to thoroughly clean and degrease the damage, then seal it with a piece of rubber and cyanoacrylate-based glue (superglue).
An alternative repair method is to seal the holes with silicone caulk. It should be remembered that it takes a day to completely polymerize.
Note: express repair is a temporary measure. Replacing the inner joint boot may be delayed for a short time, but not completely cancelled. Typically, these types of repair methods are used to get to the point of repair.
Signs for replacement
If the filter becomes dirty or clogged, it will no longer be able to protect against dust, dirt, and unpleasant odors inside the car. Plus, a worn filter element negatively affects the heater fan motor; it wears out faster.
All this indicates the need for timely replacement of the device. If this is not done, you risk developing an allergy, as well as soon spending money on repairing other components that directly depend on the condition of the cabin filter.
If, after replacing the filter, unpleasant odors still continue to appear inside the cabin, you can use chemical compounds that are poured into the system and forcefully remove dirt. If this does not help, you will have to completely disassemble the system, manually clean it and put it back together.
Impregnated with activated carbon
VAZ cars: repair, maintenance, tuning
Depending on the manufacturer and quality of the CV joint, its service life ranges from 30 to 60 thousand kilometers. Replacement of the external grenade is usually done more often, especially on the right side. It is more susceptible to stress from bad roads. How to replace the outer CV joint in Grante and which one is better to buy, we will figure it out now.
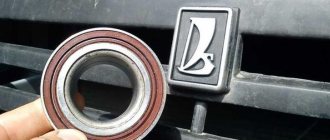
Choosing an outer CV joint for the Lada Granta
There are enough hinges from different manufacturers on sale, it’s bad that sellers treat them like all Zhiguli spare parts - everything is the same. In practice, for the first generation Grants there are two types of external (and internal) CV joints - for cars with manual transmission and for Grants with automatic transmission. In a word, grenade 2215012-00 (21 teeth) .
For Lada Granta with a manual transmission there is a CV joint with catalog number 2215012-86 . In order not to be confused with numbers, let’s look at the differences between CV joints for Grants with automatic transmission and manual transmission:
- The spline connection in the outer hinge has changed in size, the number of teeth is 21 . A CV joint with 22 splines is suitable for a manual transmission.
- The geometric dimensions of the body have also been changed.
- The length of the outer spline part for manual transmission is 76.5 mm , for automatic transmission - 77 mm .
- height (without spline) 55 mm for automatic and 52.2 mm for manual .
- The number of teeth for the ABS ring does not change and remains 43.
Therefore, before purchasing an outer CV joint, we first look at the number of splines on the inside of the joint body. Among the manufacturers on the market, AvtoVAZ, Belmag and Triall dominate. The price of an outer CV joint on a Lada Granta is around $20.
It is important that the kit includes a locking ring, molybdenum disulfide-based lubricant and a neoprene boot. It should not be too hard, but a boot that is too thin will not last long.
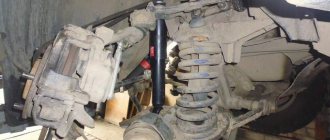
We change the outer CV joint of the Lada Granta with our own hands
There shouldn’t be any difficulties when replacing the CV joint yourself if you use simple instructions and have a basic set of tools. It’s also a good idea to have a puller on hand for side dishes of equal angular velocities. It doesn't seem to have an article number, but that's what it looks like.
Alternatively, you can use a simple impact puller with a welded hub nut, but any extra shock loads on the transmission will not be very useful for it.
- While the car is on the ground, unscrew the hub nut using a 30mm socket with a long wrench.
- Raise the car, remove the wheel and unscrew the hub nut.
- We unscrew the caliper without disassembling it.
- Unscrew the ball joint bolts.
- We remove the hub from the CV joint and at the same time from the ball joint, and move it to the side.
- We loosen the clamps and move the boot further along the drive, closer to the gearbox.
- Using a puller or hammer, we ask the CV joint to leave its location.
- Remove the retaining ring.
- We fill the internal cavity of the CV joint with the lubricant that comes with the kit.
- We put the remaining grease into a new boot and put it in place.
- Screw the nut onto the new CV joint and install it in place.
- With light blows of a hammer on the nut, we move the hinge all the way until the stopper snaps into place.
- We install the boot, check that it is without distortions and tighten the clamps.
We put everything back together in reverse order, core the hub nut and do a test drive.
Selecting a heating tap and cost of the part
A driver faced with a leaking heating tap will inevitably be faced with the question: which tap to buy as a replacement? The question is not as simple as it might seem at first glance. Because there are three types of heating taps, which differ not only in cost, but also in design. Let's list them:
- faucet with membrane. This is exactly the crane that the manufacturer installed on the “nines” that came off the assembly line. Cost - from 400 rubles. This is the cheapest faucet that can be found on the market today. However, the low price should not deceive the car owner: the reliability of membrane taps leaves much to be desired. And you can purchase them only in one case: when you couldn’t find anything else;
- ball valve As the name suggests, the locking element in this device is a massive ball, which is much more reliable than a standard membrane. However, the above ball is made of steel. And therefore susceptible to corrosion. Therefore, a car owner who decides to open the tap with the onset of cold weather may be in for a very unpleasant surprise. The cost of such a crane starts from 550 rubles;
- ceramic faucet. The most reliable and at the same time the most expensive option. Corrosion is not a problem for such devices: their body is made of plastic, and the antifreeze is locked by two tightly pressed ceramic plates. The cost of a ceramic faucet starts from 700 rubles, and if the car owner is not short of money, then ceramics should be purchased.
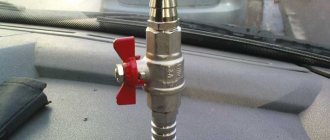
Here we should make one digression and tell a real-life incident. One driver I know experienced first-hand all the delights of domestic heating taps. Once again, having discovered a puddle of antifreeze on the floor of the cabin and remembering the domestic manufacturer with a kind word, he solved the problem radically: he disassembled the console, pulled out the leaking diaphragm valve, and replaced it with an antifreeze hose. He brought the long end of this hose under the hood and screwed it to an ordinary Chinese-made plumbing faucet. He screwed the crane itself to the right wheel arch with a piece of ordinary steel wire. Since then he has had no problems with antifreeze leakage. But such a solution cannot be called convenient: every time you need to open a tap, a person has to stop and climb under the hood. So think for yourself, decide for yourself, as they say.
Some car enthusiasts install plumbing taps under the hoods of their cars.