The Chevrolet Niva lambda probe, together with a sensor system, helps to properly regulate engine operation and use fuel extremely efficiently. This affects the amount of harmful emissions into the atmosphere.
On the Shnivy, the sensor is designed to transmit information to the computer regarding the amount of air coming out after combustion of the fuel. The information helps to adjust the composition of the fuel mixture and unlock the potential of the engine. It also significantly increases the life of the catalytic converter.
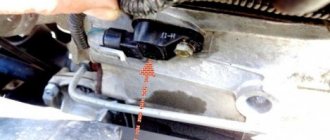
Oxygen sensor Niva Chevrolet: where is it located, photo
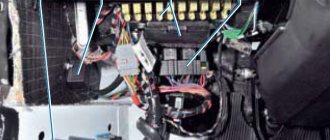
The first lambda is located in the exhaust manifold in front of the catalyst. This location was not chosen by chance. The sensor catches oxygen particles that are not burned in the engine. This improves the quality of the mixture and prevents air from prematurely wearing out the catalyst.
The second sensor is located in front of the muffler and analyzes the exhaust at the exit of the cleaning system, which allows you to diagnose the efficiency of its operation.
Communities › VAZ: Repair and Modification › Blog › Lambda probe (oxygen sensor). Theory.
Article by Alexey Serikov. enc.drom.ru/3216/
Personally, this article helped me figure out what and how this oxygen sensor is. I think it will be useful to someone else. Thanks to the author.
Strict environmental standards have long legalized the use of catalytic converters (in everyday life - catalysts) on cars - devices that help reduce the content of harmful substances in exhaust gases. A catalyst is a good thing, but it only works effectively under certain conditions. Without constant monitoring of the composition of the fuel-air mixture, the catalyst will die very quickly - this is where the oxygen sensor, also known as the O2 sensor, also known as the lambda probe (LZ), comes to the rescue.
The name of the sensor comes from the Greek letter L (lambda), which in the automotive industry denotes the coefficient of excess air in the fuel-air mixture. At the optimal composition of this mixture, when 14.7 parts of air account for 1 part of fuel, L is equal to 1 (graph 1). The “window” for effective catalyst operation is very narrow: L=1±0.01. It is possible to ensure such accuracy only with the help of power systems with electronic (discrete) fuel injection and when using a lambda probe in the feedback circuit.
Dependence of engine power (P) and fuel consumption (Q) on the excess air ratio (L)
Graph 1. Dependence of engine power (P) and fuel consumption (Q) on the excess air coefficient (L)
Excess air in the mixture is measured in a very original way - by determining the residual oxygen content (O2) in the exhaust gases. That's why the lambda probe is located in the exhaust manifold in front of the catalyst. The electrical signal from the sensor is read by the electronic control unit of the fuel injection system (ECU), which in turn optimizes the mixture composition by changing the amount of fuel supplied to the cylinders. Some modern car models have another lambda probe. It is located at the outlet of the catalyst. This achieves greater accuracy in preparing the mixture and controls the efficiency of the catalyst (Fig. 1).
L-correction circuit with one and two engine oxygen sensors
Rice. 1. L-correction scheme with one and two engine oxygen sensors
1 – intake manifold; 2 – engine; 3 – engine control unit; 4 – fuel injector; 5 – main lambda probe; 6 – additional lambda probe; 7 – catalytic converter.
How it works
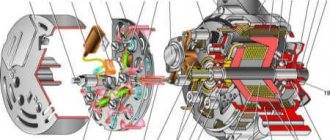
The lambda probe operates on the principle of a galvanic cell with a solid electrolyte in the form of zirconium dioxide (ZrO2) ceramics. The ceramics are doped with yttrium oxide, and conductive porous platinum electrodes are deposited on top of it. One of the electrodes “breathes” exhaust gases, and the second – air from the atmosphere (Fig. 2). The lambda probe provides effective measurement of residual oxygen in exhaust gases after heating to a temperature of 300 - 400 ° C. Only under such conditions does the zirconium electrolyte acquire conductivity, and the difference in the amount of atmospheric oxygen and oxygen in the exhaust pipe leads to the appearance of an output voltage on the electrodes of the lambda probe.
Diagram of a zirconium dioxide oxygen sensor located in the exhaust pipe
Rice. 2. Diagram of an oxygen sensor based on zirconium dioxide located in the exhaust pipe
1 – solid electrolyte ZrO2; 2, 3 – external and internal electrodes; 4 – ground contact; 5 – “signal contact”; 6 – exhaust pipe.
When starting and warming up a cold engine, fuel injection is controlled without the participation of this sensor, and the composition of the fuel-air mixture is adjusted according to signals from other sensors (throttle position, coolant temperature, crankshaft speed, etc.). A feature of the zirconium lambda probe is that with small deviations in the mixture composition from the ideal (0.97
Graph 2. Dependence of lambda probe voltages on the excess air coefficient (L) at a sensor temperature of 500-800 ° C
A – conventional point of average readings (Uout » 0.5 V, at L=1.0). (Enrichment of the mixture (decrease in O2 in the exhaust). Leaning of the mixture (increase in O2 in the exhaust).
In addition to zirconium, there are oxygen sensors based on titanium dioxide (TiO2). When the oxygen (O2) content in the exhaust gases changes, they change their volumetric resistance. Titanium sensors cannot generate EMF; They are structurally complex and more expensive than zirconium ones, therefore, despite their use in some cars (Nissan, BMW, Jaguar), they are not widely used.
Lambda probe Shnivy: device and principle of operation
The essence of the device’s operation lies in changing the resistance of sensors mounted before and after the catalyst. The operating principle of the device is as follows.
- The on-board computer sends a constant electrical pulse at a level of 450 mV to the element.
- If oxygen is present in the escaping gases, a potential difference occurs.
- Depending on the level of gas concentration in the system, the device readings vary from 50 to 900 mV.
- The on-board computer reads the data difference and adjusts the fuel mixture.
Typically, only 1 element is installed on Euro 4 level cars. For EURO 5, the manufacturer already installs two sensors.
Types of sensors and operating principle
The lambda probe is installed in the exhaust system. Sensors are divided into two types: two-point and broadband.
The two-point sensor consists of ceramics, the elements of which are coated with zirconium dioxide on both sides. Installed in front of or behind the catalytic converter.
The principle of operation is to measure the level of oxygen concentration in the environment and exhaust gases. If the level changes and becomes different, a voltage is created at the ends of the sensor elements, from low to high. Low voltage is created if there is excess oxygen in the system.
Otherwise, if the system does not have the required level of oxygen, high voltage will be created. These signals are sent to the engine control unit, which distinguishes them by current strength.
The wideband sensor is a more modern design. It also has two ceramic elements. One of them can be called “pumping”. It is responsible for activating the process of pumping or removing air from the system.
The second element can be conventionally called “two-point”. The principle of operation is based on the fact that as long as there is the required amount of oxygen in the mixture, the current strength on the “pumping” element does not change and is transferred to the “two-point” element.
It, in turn, receiving a constant current from the “pumping” element, maintains a constant voltage between its elements and is inactive.
As soon as the oxygen level changes, the "pumping" element supplies the changed voltage to the "two-point". This, in turn, ensures either pumping air into the system or pumping it back.
Lambda decoy
The sensor itself often fails and is quite expensive. For this reason, some motorists install the so-called DK blende into the system.
There are two ways to eliminate the problem of a constantly “jamming” lambda - mechanical and electronic. Both methods are good in certain conditions.
Mechanical "trick"
A metal tube is welded onto the sensitive area of the sensor, reducing airflow to the sensor. Consequently, the device thinks that less oxygen is coming in and the system is stabilizing.
The downside of the modification is its low efficiency. The device works stably only on old-style machines where the sensitivity of the electronics is not high.
Electric "trick"
To complete such a system, experts suggest increasing the resistance of the device by soldering an additional part into the sensor circuit. The photo shows a drawing of how this is done.
How to determine a faulty oxygen sensor
If everything is bad, then the ECU will display the following errors - P0131, P0134, P0171. More details about them in the video below.
The symptoms are in many ways similar to other breakdowns, so it is important to correctly identify the breakdown at the initial stage.
Typical causes of failure are:
- Use of low quality fuel. This is perhaps the most common reason. Excess harmful impurities, when burned, settle on the working surface of the heating element, which leads to its clogging.
- Natural wear and tear over time. The lambda needs to be changed closer to 150 thousand kilometers. The period can be increased if high-quality fuel is used. A non-original or cheap sensor will last less.
- Wiring problems. To connect the lambda to the ECU, ordinary copper wire is used, which will later begin to oxidize or break.
After the implementation of the project, the car demonstrates good dynamics. However, the effect of over-enrichment of the combustible mixture may occur, which causes the deposition of a layer of soot in the exhaust manifold. In addition, on some models error P0133 appears, indicating a low response rate of the lambda probe.
In addition to the listed elements of the exhaust system, other parts of the exhaust system may be faulty: the exhaust manifold, corrugation and resonator. These elements can burn out, rust, suffer mechanical damage, or fail due to the age of the elements.
But it started from the other side. diagnostics - 350, measure compression - 250 - check module 300 - measure pressure in rail 300 - in short, if it’s half the amount of a new oxygen sensor - well, since there’s no oil gushing in the fence of my house and the artist doesn’t draw colored pieces of paper, I told him That's just diagnostics. The master drove closer to the garage and brought out a wire with a plug that he connected to the Shevik.
The main sign of a faulty lambda probe is a change in engine operation, since after its breakdown the quality of the fuel mixture supplied to the combustion chamber significantly deteriorates. The fuel mixture essentially remains uncontrolled, which is unacceptable.
Symptoms of a problem
Characteristic symptoms of lambda failure are factors.
- Cold and hot starts of the power plant become more difficult. The car starts the second or third time, and the starter has to be turned for a long time. This is a clear sign that the heater is faulty.
- Increased fuel consumption, the system constantly thinks that the mixture is too rich and adds gasoline to the injector.
- Acceleration is greatly reduced.
- Violation of the engine stroke. The electronic control unit incorrectly adjusts the adjustments, which affects the stability of the power plant.
- Shooting and popping noises are heard from the exhaust system. The problem is specific to lambdas 1 and 2.
Signs of a malfunctioning oxygen sensor on a Chevrolet Niva car
I paid 350 rubles for the lecture and went home. I decided to take a new sensor and it doesn’t bother me or my car. stood ...006537 purchased a similar one. I installed it and started it - the result was 0. It was standing and puffing, then it was screaming and standing. STINKING 0130 popped up! 2000 rubles went to no use for Shevik.
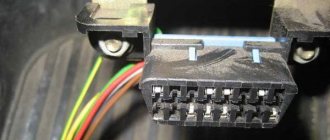
Note. The connection diagram of the regulator to the voltmeter should be based on its pinout: the black wire of the sensor is responsible for the signal (goes to the controller), the white wires are responsible for heating, the gray wire is for grounding.
The oxygen sensor, the symptoms of which are known to most experienced car owners, plays a significant role in the functioning of the car. Despite its inconspicuousness and small size, this regulator adjusts the fuel mixture, thereby assisting the power plant. Press the accelerator pedal sharply and release it; if the multimeter shows a value of 1 V, and then sharply drops to zero, then the lambda probe is ok.
Lambda errors in the vehicle's on-board system
Error codes on Shnivy do not show the exact location of the problem. For diagnostics, you will need to connect a special scanner to the car. The errors described below will indicate where exactly the breakdown is located.
- R-130-132 – the problem lies in incorrect data from the first sensor.
- 0134/135 indicates an open circuit of the sensor with contact to ground/on-board wiring, respectively.
- 136 speaks of a similar problem only with DK2.
- 0140-0141 complete failure of sensor No. 2 or its wiring is damaged.
Methods for diagnosing a lambda probe
You can test the sensor in one of the following ways:
- During a visual inspection
- Checking with a multimeter
Let's start with the first method. First, you need to disconnect the connector from the sensor and inspect the condition of the contacts; the integrity of the wires should not be compromised, and all connections should be held tightly. After this, we inspect the sensor itself. There should be no deposits or damage to the integrity of the structure.
Soot deposits can be cleaned; its formation is caused by the combustion of a too rich fuel mixture, as a result of which the lambda patency is impaired. This leads to the device beginning to function incorrectly. Lead deposits, which have a silvery-shiny color and are caused by the use of low-quality fuel and motor oil, are considered the most destructive for the sensor. There is no way to get rid of them; a complete replacement of the device is recommended.
The process of checking a lambda probe using a multimeter is not particularly difficult. To carry it out, you need to connect the signal wires of the sensor with the probes of the tester, then start the power unit and hold its speed at 2.5 thousand. Next, we drop the accelerator, pull out the choke and look at the multimeter scale.
A complete failure of the oxygen concentration sensor is indicated by the absence of voltage or its low value (less than 0.8V). Since the design features do not allow the lambda probe to fully restore functionality, a complete replacement of the worn-out element will be required.
Replacing the lambda probe Shnivy
To change the first and second oxygen sensors, follow a simple sequence of steps.
- Drive the car onto an overpass or inspection hole.
- Remove the terminals from the battery.
- Get under the car and prepare key No. 22. In some cases, fasteners stick to the metal. Therefore, a loosening compound will also come in handy.
- Unscrew the sensors with a wrench. If the housings do not lend themselves and the device is guaranteed to be replaced, you can cut the wires and use a spanner or socket of the appropriate size.
- After disconnecting the device, you should wipe the sensor seats to remove all dirt and dust.
- Installation of the new part is carried out in the reverse order.
You can see how such repairs are performed in the video.
How to check a lambda probe
If you notice the signs of a malfunctioning lambda probe described above, then you need to check it immediately. It is best to check the lambda probe using professional equipment. Often the test is carried out using an electronic oscilloscope. The process itself occurs while the engine is running, since otherwise the data cannot be obtained. Many service stations will be able to provide you with such a relatively inexpensive service.
Although you can check the sensor with a voltmeter at home, if the sensor is not warmed up, you may get incorrect data.
Do-it-yourself lambda decoy for Shniva
Outdated sensor models are easily deceived, and setting the resistance is quite simple. The resistor connection diagram is shown above. To install the “add-on”, the sensor wire is broken and an additional element is soldered in.
Difficulties arise with cars after 2010 release. The software of such cars has already been updated and such manipulations will not lead to a positive result. Car enthusiasts have come up with a new way to trick the controller. To do this, a special unit is soldered to the sensor, which collects data from the sensitive element and, after processing, sends it to the BC.
A similar device can be found on the Internet; along with the snag, a diagram of its connection and assembly of the entire module is supplied.
Lambda probe on VAZ cars
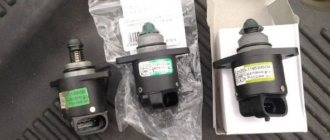
VAZs use several types of sensors:
1. Bosch No. 0 258 005 133, Euro standard – 2. Installed on outdated models with an engine capacity of 1.5 liters. On later models with Euro 3 standard, this sensor was used as the first one, and was installed before the catalyst.
The second sensor was installed, which has a “return connector”. But you can find two identical sensors installed
2. Bosch No. 0 258 006537 was installed on cars manufactured since October 2004. They have a heating element in their structure.
Lambda probes produced are interchangeable with zirconium sensors of similar structure. Please note that a non-heated sensor can be replaced with a heated sensor. Not the other way around.