Diagnostic connector VAZ 2114: purpose, location and preparation for diagnostics
The VAZ 2114 diagnostic connector is required to connect the on-board computer. This device is in high demand among car enthusiasts, because it makes the operation of vehicles more convenient. There are many computers that will suit the VAZ. They can be connected to the car using this connector.
In most cases, there are instructions for using the device and connecting. But drivers often use used products that do not have the appropriate documentation. In this case, you will need information about where exactly the connector is located and how to install it.
Where is the correct connector?
Most often it is located under the torpedo. By the way, it can be located on both the right and left sides. On certain models, the device is located near the steering column. Can be located to the left and below it. For cars that have a Europanel, the connector is located under the cigarette lighter.
It is worth mentioning that two additional contacts, which are located on the diagnostic block of the VAZ 2114, are needed for the external air temperature sensor. After you make the connection, you will need to activate the K-line. It is necessary in order to transfer all important information to the device.
This is done as follows:
- The meter wire is connected to the second contact of the connector block.
- The second end is led to the diagnostic connector.
- The connection is made using the M-socket at the EURO 2 block, or to the seventh socket of the EURO 3 block.
- Connect the on-board computer and install it in the planned location.
Basic steps in diagnosis
When you have found the VAZ 2114 diagnostic connector, you can begin the required diagnostic work.
By the way, before installing the device, think about what exactly it will be used for. When choosing an on-board device, you need to take into account the characteristics of the car, so inexpensive models are suitable for the VAZ 2114. It will be enough to choose a system that has a monitor, a set of wires, and the processor itself.
Next, you will need to find a place where you can mount the monitor. It is necessary to take into account the individual characteristics of the machine; the optimal place is the central part of the console. When there is not enough free space on the dashboard, you should mount the monitor on the dashboard.
Remember that you need to find a place for the processor, and it is important that the ventilation holes must be freely accessible. The case should be fixed in a certain place for greater reliability.
The wires deserve special attention; they must not be damaged during operation. To do this, experts advise passing them through a special tube.
After the connector for diagnosing VAZs has been found, other work has been completed, and the wiring can be connected.
Now you have access to car diagnostics.
What are they?
Diagnostic connector 2114 is the same on almost all models. On injection models since 2002, a 12-pin rectangular connector has been used. It is located in the cabin under the dashboard, and it can be on the driver's side or on the passenger side. But there are also models for which a 16-pin connector is suitable, also since 2002.
VAZ diagnostic connectors
HomeVAZ 2110VAZ diagnostic connectors
The owner of every modern car knows what computer diagnostics are and what goals they serve.
Thanks to this type of checking of all systems and components, the motorist has the opportunity to learn about malfunctions of certain mechanisms in a timely manner.
However, as practice shows, not all owners of the “ten” know where the diagnostic connector is located on a VAZ 2110 car and what it is needed for. Read more about this below.
Connector location
If you decide to perform a computer check on a VAZ 2110, you will need not only all the necessary equipment, but also know which connector to use for diagnostics.
Of course, to find the diagnostic block, you need to know where this element is located. In the case of the “ten”, the output is located at the bottom of the steering column, on the right side of the driver’s seat.
In any version of the VAZ 2110, this connector will be located in this exact location.
This output, located under the steering wheel, is also often referred to as OBD. In accordance with this name, the purchase of a tester is also carried out.
Location of the block on the “ten”
In their reviews, dozens of car owners write that the best option for self-diagnosis is the K-line device. As practice shows, almost any testing equipment can be connected to such a device without any problems. If we talk about the main equipment, then in our case its function will be performed by a computer.
Naturally, in a garage environment it is always easier to work with a laptop than with a stationary PC, since in this case the verification procedure can be carried out directly while driving the car. But if you do not have the opportunity to use a laptop, you can also use a regular PC, only for this you will need an extended cable to connect the computer to the tester.
Instructions for performing diagnostics yourself
When the location of the diagnostic connector is known and all the necessary equipment is prepared, you can begin checking.
According to many Russian car enthusiasts, preparing a laptop and a tester will be quite enough to check all components and systems on the “top ten”.
But you should always remember that successful testing is only possible if the person who conducts it understands something about it and has certain knowledge.
Adapter for testing with cable and driver disk
As for the procedure itself, prepare the necessary software in advance for its implementation. The corresponding software can be found on the Internet without any problems.
There are many programs for testing; in practice, most owners of the “ten” use the Motor-Scan utility. This program allows you to identify all faults as much as possible.
To decipher the received combinations indicating a malfunction, you will also need the Internet.
The testing procedure itself is carried out in the following order:
What do you need to know about pinouts?
Pinout of diagnostic connector contacts in “tens”
Now let's talk about pinout. If you will be testing the car yourself, it will be useful for you to know what components the connector consists of. The pinout of the block includes the designation of all contacts located inside.
In this case we are talking about OBD pinout:
Loading …
Video “Checking VAZ 2110”
How computer testing of components of the domestic “ten” is carried out if the vehicle jerks and stalls (the author of the video is Vyacheslav Kravchenko).
avtozam.com
Diagnostic connector VAZ 2110
The Lada 110-injector is equipped with various electronic devices. This allows you to diagnose faults using computer programs.
Computer diagnostics are performed by connecting through a special diagnostic connector on the VAZ 2110. You will need a computer with software and a specialized adapter.
You can carry out electronic troubleshooting of the Lada without the help of service station workers, with your own hands.
Meaning and decoding of codes
During self-diagnosis of a VAZ 2115 with an injector, only numbers or flashes that code the error will be shown on the instrument panel. When reading trouble codes from an electromechanical instrument cluster, it is necessary to record the number of flashes and calculate error numbers from them. Their purposes can be deciphered using a special list. Most of these faults can be resolved independently by replacing failed sensors.
When performing diagnostics, it is necessary to take into account that the number on the screen may indicate two summed errors. For example, 9 indicates the presence of two faults - numbered 1 and 8.
| Numeric combination | Decoding |
| 1 | ECU problem |
| 2 | Incorrect data from the fuel level sensor |
| 4 or 8 | Network power problems |
| 12 | Malfunction of the error lamp circuit in the instrument cluster |
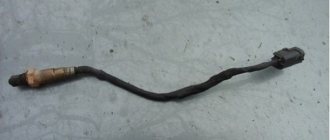
| 13 | No signal from lambda probe |
| 14 or 15 | Incorrect data from temperature sensor |
| 16 or 17 | Problems with the network power supply, it is necessary to check for short circuits |
| 19 | Motor shaft position sensor error |
| 21 or 22 | Throttle sensor error |
| 23 or 25 | Incorrect operation of the intake air temperature sensor |
| 24 | Speed sensor faulty |
| 27 or 28 | No signal from lambda probe |
| 33 or 34 | No air flow data available |
| 35 | Idle speed control sensor is faulty |
| 42 | Ignition control circuit problem |
| 43 | Knock sensor failure |
| 44 or 45 | Violation of the composition of the mixture |
| 51 or 52 | ECU memory errors |
| 53 | Error in CO setting sensor (installed on cars without converter) |
| 54 | Octane corrector sensor (installed on cars without a converter) |
| 55 | Violation of the composition of the mixture |
| 61 | Failure of the lambda probe |
An example of error 14 appearing on the panel
Table of decoding codes for flashes calculated during diagnostics.
| Error code | Flash combination | Decoding |
| 12 | Long-pause-two short | Diagnostic circuit malfunction |
| 14 | Long-pause-four short | Engine temperature sensor malfunction |
| 15 | Long-pause-five short | Likewise |
| 16 | Long-pause-six short | Abnormally high mains voltage |
| 17 | Long-pause-seven short | Abnormally low mains voltage |
| 19 | Long-pause-nine short | Crankshaft position sensor failure |
| 21 | Two long, pause, one short | Incorrect data from the throttle position sensor |
| 22 | Two long, pause, two short | Likewise |
| 24 | Two long, pause, four short | Problem with the speed sensor |
| 27 | Two long, pause, seven short | Lambda probe failure |
| 28 | Two long, pause, eight short | Likewise |
| 33 | Three long, pause, three short | Air flow meter needs to be checked |
| 34 | Three long, pause, four short | Likewise |
| 35 | Three long, pause, five short | Idle speed outside the tolerance range |
| 43 | Four long, pause, three short | No signal from knock sensor |
| 51 | Five long, pause, one short | Memory error in block |
| 52 | Five long, pause, two short | Error in controller |
| 53 | Five long, pause, three short | Memory error in block |
| 61 | Six long-pause-one short | No signal from the immobilizer |
The data obtained allows you to quickly find the faulty element and eliminate the cause of the error.
The video from the Garage channel shows diagnostics on a VAZ 2115 using a scanner and laptop.
Controller errors
The most common controller errors encountered during diagnostics are listed in the table.
| Program error number | Decoding |
| R 0030-0038, 0141 | Malfunction of the lambda probe heating system |
| R 0102 and 0103 | Incorrect signal from the air supply sensor |
| R 0112 and 0113 | Error in data from intake air temperature sensor |
| R 0115-0118 and 0217 | Problems detecting engine temperature or overheating |
| R 2122 and 2123, 0222 and 0223, and 2138 | Incorrect signal from the gas pedal and throttle position sensor |
| R 0171-0172 | Incorrect mixture parameters |
| R 0201-0204 | Faulty injectors (each cylinder has its own code) |
| R 0261-0272 | Problems with injector control |
| R 0130-0134 | Problems with the functioning of the lambda probe before the converter |
| R 0136-0140 | Problems with the functioning of the lambda probe after the converter |
| R 0300 | Multiple misfires |
| R 0301-0304 | Cylinder misfires |
| R 0326-0328 | Knock sensor failure |
| R 0351-0352, 2301 and 2304 | Monitoring the operation of ignition coils |
| R 0422 | Failure of the neutralizer |
| R 0691-0692 and 0693-0694 | Failure of the first and second cooling fan start relays |
| R 0560-0563 | Problems with power supply |
| R 0627-0629 | Indicates incorrect operation of the fuel pump control circuit |
| R 1602 | Malfunction in the engine parameters control controller |
Reset errors
To do this, go to the error viewing menu, press the odometer reset key and wait a few seconds. The number 0 will light up on the screen - the error has been reset. In this case, data about problems is stored in the unit’s memory and must be deleted. If left, the “Check Engine” light will light up in the instrument cluster.
To reset the error, do the following:
- Turn on the ignition.
- Open the hood and remove the negative terminal from the battery. Wait about a minute, connect the wire back and close the hood.
- Turn off the ignition.
- Turn on the ignition again and start the engine. The Check Engine light may come on briefly and then go off.
If the symbol remains illuminated, there is an ongoing problem with some sensor or wiring in the vehicle. It can only be found out using a special scanner. It is necessary to conduct additional diagnostics to determine the problem node. Then carry out repairs and clear any existing errors using a computer diagnostic program for the ECU.
Resetting errors on cars with an electromechanical instrument cluster is carried out by disconnecting the negative terminal of the battery from the on-board network for 10 seconds. The ignition must be turned off.
Read more: How to properly increase the density of battery electrolyte and what it should be after charging
Diagnosis of VAZ yourself?! - It's simple!
Category: Instructions / 154 comments
In this article we will tell you how easy it is to carry out independent computer diagnostics, as well as related repairs of VAZ cars (2105, 2107, 2108, 2109, 2110, 2112, 2114, 2115, Priora, Kalina).
If your car has a check engine light or you are concerned about fuel consumption, read the article, we will teach you how to identify such hidden problems.
If your engine does not pull, there is a hesitation, or the car jerks, the problem may also be in the car's electronics or sensors. Also, you shouldn’t rush off the handle and run to a car service; perhaps the problem can be solved very simply, with minimal material costs. Read our article.
So, let's begin…
No car, especially a Russian-made car, is immune from malfunctions. The most unpleasant thing in this situation is if the problem is not obvious, such as faulty electronics or sensor. The first thought in such a situation is to immediately run to an auto electrician, let him solve these seemingly extremely complex problems.
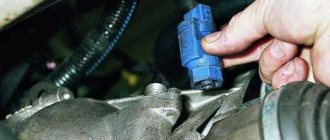
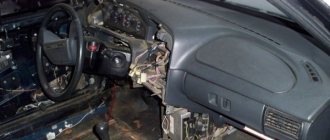
But! ... Is it worth overpaying that kind of money for a job that any car enthusiast can do at home, using a laptop or even using a mobile phone!? Every injection car, without exception, has a diagnostic connector; for VAZ cars after 2004 it looks like this (see photo).
Most often, the connector is located under the steering column of the car.
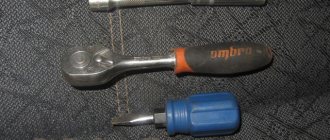
In order to connect the car to the laptop you need a special adapter (see photo).
This adapter is inexpensive when compared with the cost of computer engine diagnostics at a car service center. You can order this adapter on the website www.diagnost7.ru.
The adapter fits all Russian cars without exception and even some foreign-made cars. Complete with the adapter, programs for car diagnostics are supplied.
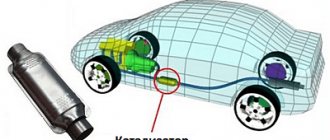
What are the capabilities of the programs? What can you do with this adapter? Diagnostics :
• Engine management system
Bosch M1.5.4 (R83), Itelma VS5.1 (R83), January 5.1 (R83), Bosch M1.5.4 (Euro 2), Itelma VS5.1 (Euro 2), January 5.1 (Euro 2), January 7.2 ( Euro 2), Bosch M7.9.7 (Euro 2), Bosch M7.9.7 (Euro 3/4), Itelma/Avtel M73, Bosch MP7.0 (Euro 2), Bosch MP7.0 (Euro 3), Bosch ME17. 9.7 (Euro 3), Itelma M74, Itelma M75, Itelma M74CAN, Itelma M74CAN MAP
• Car anti-theft system
APS6, APS6.1
• Electrical package module
EP Priora, EP Kalina NORMA, EP Kalina LUX, EP Granta, Granta/Priora instrument cluster
• Electric power steering
Mando (Korea), KEMZ, Autoelectronics, Aircraft unit, North/DAAZ
• Airbags
Autoliv ACU3 (Kalina, Priora), Takata (Granta)
• Anti-lock braking system
Bosch 5.3, Bosch 8.0, Bosch 8.1, Bosch 9.0, Bosch 9.0 CAN
• Heater/climate (Priora, Kalina, Granta)
• Windshield wiper control unit (Priora) • Automatic transmission Jatco AY-K3
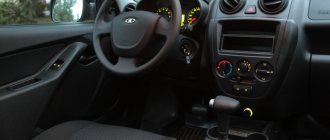
We study and change the controls of a VAZ 2115 passenger car - instrument panel
1 – lever-switch for headlight or turn signal modes.
2 – nozzle for blowing the front door glass.
3 – instrument cluster.
4 – steering wheel.
5 – button to turn off sound signals.
6 – button to turn off the alarm. Pressing the button causes the warning light and direction indicators to flash.
Photo 1. Hazard switch off button
7 – ignition switch combined with an anti-theft device. Never turn off the ignition or remove the key from the lock while driving, otherwise the steering will be blocked and the vehicle will lose control. The ignition key can have three positions:
- 0 – “disabled”. Consumers are disconnected, the key can be easily removed. When the key is removed, the closing mechanism of the anti-theft system is activated. To guarantee the steering shaft block, turn the steering wheel left or right until it clicks. To turn off the anti-theft device, you need to insert the key into the ignition and, turning the steering wheel left and right, turn the key to position “I”;
- I – “ignition”. The ignition is on, the key is not removed, the steering is unlocked;
- II – “starter”. The key cannot be removed, the steering is unlocked. The position is achieved by turning the key to overcome the elastic force of the spring. The key is not locked in this position; it must be held by hand for the starter to operate. The ignition switch is also equipped with a starter activation unit while the engine is running.
To repeat turning on the starter after a failed start attempt, you need to move the ignition key from position “I” to position “0”, and then again to position “II”.
8 – switch lever for windshield washer and windshield wipers.
9 – immobilizer sensor, transmits a special code from the code key through the immobilizer to the engine control unit.
10 – set of signal lights for the on-board control system. The complex contains (Fig. 1.2): 1 – oil level drop signal; 2 – low level signal in the windshield washer tank; 3 – low coolant level signal; 4 – door open signal; 5 – signal of malfunction of the brake light and side lights; 6 – signal of wear of the linings on the brake pads; 7 – the signal indicates that the seat belts are not fastened.
11 – external lighting switch.
12 – block of keys for turning off fog lights, fog lights, heated rear window.
13 – trip computer, installed on some vehicles, designed to display one of the parameters: current fuel consumption (or average total fuel consumption), average speed, distance traveled, current time, time on the road.
14 – plug.
15 – control lamp for anti-lock braking system (ABS). Installed in place of the plug, if equipped with an anti-lock braking system.
16 – airbag control lamp. If the pillow itself is present, it is installed in place of the plug.
17 – central nozzles of the ventilation and heating systems of the cabin.
18 – cover of the glove box (upper). To use the upper glove compartment while the lower glove compartment lid is open, press the upper lid lock lever. The lock lever is located in the niche of the lower glove compartment on top.
19 – side nozzle of the ventilation and heating systems of the cabin.
20 – glove box cover (lower). To open it, you need to press the lock handle to the handle. If the external lighting is turned on, a special illumination of the inside of the box will automatically work.
21 – magazine shelf.
22 – control panel for interior ventilation and heating systems.
23 – socket for audio equipment. It is planned to install audio equipment that meets international standards in size and mounting principle.
24 – ashtray.
The fourteenth is a car whose production lasted for 12 years. Throughout the entire production cycle, Avto-VAZ engineers were constantly improving the main characteristics of the VAZ 2114. The changes also affected the brains of the car. The VAZ 2114 can be equipped with 8 generations of electronic units from different manufacturers.
Let's figure out how to find out which ECU is on the VAZ 2114. To do this, you need to look at the device itself - the numbers of the model number are printed on its body, rewrite these numbers and compare them with the markings given in the tables of this article.
GM-09 AND JAN-4
The first generation of brains of the fourteenth were represented by blocks GM-09 and January-4. Such devices were installed from the very beginning of production of the VAZ 2114 to 2003.
The first units had a wide range of models; the VAZ 2114 electronic controller could be distinguished by the presence of a knock sensor operating on the resonant principle and compliance with the EURO-2 standard.
Today the cost of such a device ranges from 5 to 5.5 thousand rubles.
List of ECU models GM-09 and January-4
The next generation of brains is represented by January 5.1.x devices. (a similar device was also installed on the VAZ 2113 and VAZ 2115).
On VAZ 2114 produced after 2013, 3 variants of the January 5.1.x block can be installed, the difference between which lies in the method of gasoline injection: there are devices with phased, simultaneous and pair-parallel injection.
It is worth noting that this January model line is completely identical to the Itelma 5.1 and Bosch M1.5.4 devices.
List of models January 5.1.x and Itelma 5
List of Bosch M1.5 models
The most common model on the VAZ 2114 produced in 2003-2007 is January 5.1.1, which can now be bought for 7-8 thousand rubles; export cars were most often equipped with Bosch 2111 1411020, which costs similar money.
Which modification of January 7.2 is installed on the fourteenth depends on the displacement of the power unit. Bosch controllers were installed, as a rule, only on export car models that were required to comply with the Euro-3 environmental standard.
List of controllers for VAZ 2114 8 valves 1
List of controllers for VAZ 2114 8 valves 1.6 liters
The cost of a new January 7.2 varies between 7-8 thousand, a used one is about half as much, the same ECU 2111 1411020 81 can be purchased for 3-3.5 thousand rubles..
JANUARY 7.3
This ECU was produced by Itelma and Avtel factories; depending on the modification, it could meet the environmental standard Euro-3 or Euro-4.
Compliance of the VAZ 2114 ECU with environmental standards
The new Itelma 11183 1411020 02 standard EURO-3 now costs about 8 thousand rubles.
It is not surprising that absolutely every modern car is equipped with a dashboard, because it is thanks to it that the driver can monitor the main features of the car. And the instrument panel of the VAZ 2114, 2115 is no exception. Simply put, such a panel plays the role of a link between a person and a vehicle.
As it developed, the dashboard was equipped with additional sensors and indicators that make driving a car more convenient and safe. If you want to know what elements are on the dashboard of the VAZ 2114, 2115, then be sure to read this article.
3 – instrument cluster.
4 – steering wheel.
VAZ diagnostics - It's easy!
Not only owners of imported cars have access to the possibility of self-diagnosis. Many VAZ car models, including the “classic” 2105, 2107, not to mention the more modern models 2108, 2109, 2110, 2112, 2114, 2115, Priora, Kalina, are equipped with electronic control units, and, therefore, we have the opportunity perform their diagnostics yourself.
Why is diagnostics of a VAZ car necessary?
A frequent case that worries a car enthusiast is the “check engine” signal, which notifies about a malfunction of the car system.
This is usually a reason to visit a service station, but today we have the opportunity to identify the cause of the alarm ourselves; for this we will need to buy a diagnostic adapter.
With its help, you can quite simply carry out diagnostic measures - identify malfunctions, determine malfunctions of your car, change settings, and obtain information from sensors. And all this with minimal financial investment.
Which adapter to choose for VAZ
Before you buy a scanner for diagnostics, you need to find out which control unit is installed on your vehicle. Most models are equipped with control units with a K-line for data exchange.
Therefore, the best choice is a VAGCOM diagnostic cable or an improved version of the K-Line diagnostic adapter. These adapters are suitable for diagnosing VAZ vehicles and ensure correct coordination of the vehicle's diagnostic system and computer.
Please note that you will be able to perform full computer diagnostics, just like specialists at a service station.
Difficulty connecting the adapter to the VAZ ECU
VAGCOM, K-Line adapters are designed for direct connection to the ECU via a 16-pin OBD-II connector. It began to be installed on VAZ cars after 2002. Some models are equipped with a 12 pin connector. It is not compatible with the adapter connector. The solution is simple: buy an adapter cord or K-Line adapter in an OBD1 (GM12) housing.
Where is the diagnostic connector located?
The typical location of the diagnostic connector on VAZ cars is in the passenger compartment under the dashboard. But at the same time, its location differs on different models:
- On VAZ 21099i, VAZ 2108i - below the shelf, on the passenger side;
- On VAZ 2115 – below the cigarette lighter;
- VAZ 2112, VAZ 2111, VAZ 2110 – to the right of the steering column;
- Kalina - above the cigarette lighter;
- Priora - the connector is located behind the glove box.
Which computer can be used for diagnostics?
The diagnostic software does not require PC resources; for this reason, you can use any computer with an operating system no lower than Windows XP. It is very convenient to use a laptop or netbook for diagnostics, since the cable length is limited.
A scanner for a VAZ is as necessary a tool in a car enthusiast’s arsenal as a regular wrench.
The advantages of using it are obvious, you can quickly assess the condition of your car’s systems, identify the cause of the malfunction, many of them can be eliminated yourself without contacting a service station.
It is also beneficial economically. The price of a diagnostic k-line adapter is no more than the cost of a one-time visit to a service center or service station.
DIY VAZ 2114 diagnostics: features and subtleties of the process. 2114 engine diagnostics
Home » News
Published: 08/22/2018
Replacing spark plugs
DIY VAZ 2114 diagnostics: features and subtleties of the process
Often, owners of domestic cars are faced with the need to carry out diagnostic work. It is worth saying that you can do such work yourself.
To do this, you need to have a computer, software and knowledge of how diagnostics are carried out. These skills can be useful to you at any time, so it’s worth getting acquainted with the rules for carrying out work.
Engine overhaul as it should be. Boring. Grinding. Honing. Gilzovka.
VAZ 2114 owners know that engine errors occur all the time; the causes of such problems can be very different. Constantly calling for service is an expensive pleasure, especially when you can save money and check the car yourself. Having acquired the necessary skills, you can carry out diagnostics at a time convenient for you, without spending money.
DIY diagnostics of VAZ 2114
Domestic cars are not insured against malfunctions; owners regularly encounter breakdowns. It is worth noting that it is not always possible to determine a breakdown by eye. That is why it is recommended to carry out diagnostic work.
Diagnostics will allow you to quickly identify sensor failure and electronics failure. It is clear that at first the car owner thinks about contacting the service. But is it necessary to overpay money when you can do all the work yourself?
So diagnosing a VAZ 2114 with your own hands is available to everyone. After all, each injection machine has a special connector. It is located on most models under the roulette column of the machine. In order to carry out the necessary work, you will need to purchase a special adapter.
It is worth noting that the adapter is inexpensive, especially if you compare it with the cost of computer diagnostics in the service. You can purchase the product at any auto store, but it is worth considering that it fits almost all Russian cars. In some cases, it can be used to diagnose foreign cars.
What program is needed?
Most often, software that will need to be installed on your laptop is also sold along with the adapter. It should be borne in mind that the power of the computer does not matter. Old models can also be used for work.
Diagnostics of the VAZ 2114 car is carried out taking into account the fact that all domestic cars have the same connectors installed. If you don’t have the software you need, you can easily find it online.
There is nothing difficult about downloading the program; by the way, you can also find free software.
Attention! To carry out additional work, you will need devices such as a multimeter and a compressor.
Diagnosis is easy
In addition to a computer check, it is worth conducting an inspection of the car. This will allow you to see damage to the body and pay attention to other shortcomings.
This is what you need:
Check the level of technical fluids. Inspect the suspension and steering to identify play in time. Measure the compression, it should be between 9.5 and 11. You need to check the condition of the battery, and the voltage should be 12.7 - 13.5 V.
You need to check how well the valves are adjusted. If one or more are jammed, a power supply error to the engine may occur. Do not forget about such important details as spark plugs and high voltages.
Attention! The readings on all cylinders should be approximately the same.
Otherwise, you need to carefully check the motor.
Features of self-diagnosis
If you are diagnosing 2114 yourself, then you should be extremely careful, taking into account all the features of the work. After carrying out additional work, it is worth starting direct diagnostics.
The easiest way to do this is to use a laptop with the appropriate software installed. Before starting the test, you must turn on the ignition.
All work that checks the condition of the engine must be carried out with the ignition on.
Attention! Under no circumstances should you start the engine.
Then you need to connect to the connector and run the program, then everything depends on the features of the software.
On startup you may see:
graphs with numbers; lists of indicators.
Already from these indicators we can draw initial conclusions about the operation of the engine. You should then receive a list of errors that the program found. You will need to decrypt the results using a text file. The text file contains all errors that may be detected.
In the table we have given a breakdown of the most common errors encountered during self-diagnosis of BC.
Code Description of the problem
0102, 0103 Incorrect signal level of the mass air flow sensor.
0115 – 0118 The coolant temperature sensor needs to be replaced.
0130, 0131 Malfunction of the oxygen sensor.
0300 Misfire present. There may be problems starting the car.
0327, 0328 The knock sensor needs to be replaced.
0335, 0336 The crankshaft sensor needs to be replaced.
0342, 0343 The phase sensor needs to be replaced.
0443 – 0445 The adsorber purge valve needs to be replaced.
0480 Cooling fan is damaged.
0500, 0501, 0503, 0504 The speed sensor does not work.
Please note that this is not a complete list of errors encountered. If necessary, it can be found on the Internet.
Then diagnosing the VAZ 2114 involves eliminating detected errors. To do this, start checking the sensor; it may not work at all. It often happens that a sensor failure causes an error to be issued.
This can be said about all the errors that the program produces. If there are any doubts about the test results, it is recommended to carry out additional diagnostic work.
For example, in some cases it is worth checking the pressure in the cylinders.
When all errors have been eliminated, check whether the work was completed correctly. Please note that the error code that was received during diagnostics remains in the microcontroller's memory. For greater convenience, it is recommended to reset old indicators. To do this, you will need to turn off the ignition and disconnect the laptop from the car.
To reset old data, you will need to disconnect the microcontroller, for which you need to remove the terminal from the battery. Then, having installed it in place, connect it back by turning on the ignition. Next, check the car’s condition again using the program. If there are no errors, then the work was done correctly.
Installation and repair instructions
The instrument panel is a rather complex unit, and accordingly it can fail, like any other part of the car. The panel often does not work or stops lighting.
1. The main illumination of the PP has disappeared, but the remaining sensors continue to work or vice versa. Most often, this problem occurs when the panel fuses fail. They are marked F16. In addition to illuminating the panel, such a fuse is also responsible for the turn signals, as well as the hazard warning lights, and the reversing lights. If the hazard lights and turn signals work normally, then most likely the problem is in the electrical circuit, or a short circuit may have occurred.
2. The speedometer and tachometer are not working properly. In this case, it is first recommended to check the crankshaft position sensors, as well as speed sensors. If these sensors work correctly, then the problem may be poor electrical contact or damage to the wiring itself.
3. If some sensors do not work, but other elements work correctly, then the light bulbs may have failed. In this case, you just need to replace them with new ones.
4. If the arrow indicating the fuel level in the tank or the coolant level has dropped to the very bottom, or vice versa is always in the upper position, then most likely the problem is in the sensors or electrical circuit. There is no need to rush to replace sensors. First check the wiring to see if it is working properly and if there is any short circuit. In this case, it is best to turn to professionals.
5. It often happens that in general the dashboard works normally, but from time to time there are interruptions in the operation of some sensors. Often the cause is in the electrical circuit. The reason may also be due to incorrect operation of the processor.
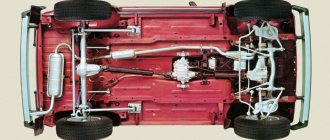
Read more: Flushing the hi gear engine cooling system: instructions, photos and videos
The video shows the result of replacing the backlight in the control panel of the fifteenth VAZ model with a more advanced one (the author of the video is the IgZeL Led channel).