Types of bearings
There are two design versions of the upper part of the rack:
- The support bearing is included in the support design (can be found on a number of VAZ models);
- It is a separate element that is placed between the support and the upper spring cup.
But there are several support bearings themselves that are used in the suspension design:
- WITH BUILT-IN OUTER OR INNER RING. Its peculiarity lies in the possibility of rotation of elements that are in contact with both the outer and inner rings. Additionally, this option provides installation holes, so no pressure flanges are needed during installation;
- WITH DETACHABLE OUTER OR INNER RING. In this embodiment, one of the rings (depending on the design) can be separated, while the second is fixed to the support;
- SINGLE-SPLIT. Structurally, this option is the same bearing with a detachable ring, but has increased rigidity.
In general, there is no particular difference which type of bearing is used, the main thing is that it performs its functions.
Despite the fact that the upper part of the strut is installed inside a special niche in the wheel arch, dirt, sand and dust penetrate the support, and these contaminants are destructive to any bearing.
Additionally, the support bearing is almost constantly subjected to rapidly changing loads, including shock loads (due to the operation of the spring), which, in combination with contamination, leads to intense wear of the bearing components and its failure.
Due to rather difficult operating conditions, the service life of such a bearing is limited. Many manufacturers indicate that it must be replaced every 100 thousand km.
But in reality, due to the poor condition of the roads, they require replacement after 50 thousand km. At the same time, the resource of this node also depends on its quality.
It is not uncommon for a support bearing to be replaced after 10,000 km.
Basic faults
The main sign of a failed “support” is a knocking sound at the top of the support when driving on an uneven road. It may be a consequence of deformation or mechanical damage to the bearing gaskets, as well as a violation of the integrity of the bearing itself.
A malfunction of the “support” can be caused by:
- long service life;
- exceeding permissible dynamic loads;
- moisture or dirt entering the structure.
You can determine that the support bearing has become unusable in the following way. Lift the hood, remove the protective cover on the “glass” of the pillar, place your palm on its support, and rock the car up and down. If the bearing is faulty, you will hear a characteristic knocking sound accompanied by corresponding vibration. In this case, the “support” must be replaced.
The maximum bearing life for the Priora is 100 thousand km, however, given our roads, it wears out much faster. Therefore, the optimal mileage from replacement to replacement is 50 thousand km. In addition, the bearing must be replaced if any of the above faults are detected.
Replacement cost
The minimum price of a “supporter” for a Priora is 300 rubles. This is how much an original VAZ spare part costs (catalog number 2170-2902821). But there are also improved models produced by other manufacturers, such as TRACK, FENOX, SS-20, ASOMI, etc. Their prices can reach 800 rubles apiece.
Replacing struts on a Priora involves using the following tools
- You will need special spring ties to remove the supports from the struts.
- Socket wrenches for 19, 17 and 13.
- Socket wrenches for 22, 19 and 17.
- Steering wheel end remover.
- Hexagon 6.
- Hammer.
- Pliers.
Step-by-step instructions:
Lada Priora Sedan Logbook Replacing valve seals
Replacing the strut support begins with jacking up the right side of the car and removing the wheel. The brake hoses are released from the bracket on the rack. Carefully bend the locking pin of the steering tip pin, remove it and, using a 17mm wrench, unscrew the nut. Next, you need to use the steering wheel end remover. Turn the support and begin to unscrew the soured bolts securing the strut towards the steering knuckle. In this case, you may have to use a hammer. Unscrew the nuts securing the support to the body under the hood using a size 13 wrench. Remove the stand as an assembly from the wheel well. You can begin to disassemble the structure. Install the second coils above and below the spring of the spring tie
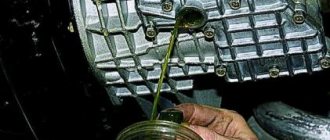
Pay attention to the symmetrical location of the second tie. Until the load is removed from the pore, we compress the spring. Use a 22 mm spanner to unscrew the nut securing the rod towards the support. We remove the limiters. Remove the spring cup, spring and compression buffer with boot. We inspect the removed rack. Before installing new strut supports, the strut must be bled and then kept in an upright position at all times until it is installed in place. We reassemble the new shock absorber, put on a small washer and a support with a pre-installed bearing
Next comes a large washer and a rod securing nut. We remove the spring ties and orient the support so that the arrow points slightly forward into the body. We return the rack assembly to its place. The support bolts are screwed on, a stand is put on the steering knuckle, an eccentric bolt with a washer is placed in the upper hole, there should be a regular bolt at the bottom and then everything is tightened. Next, the steering tip pin is inserted into the rod on the rack, the nut is tightened, a cotter pin is inserted and the antennae are pulled apart to prevent the nut from unscrewing. Carefully thread the brake hoses into the bracket on the rack. So, the rack installation procedure is completed. Next, the wheel is placed, the car is lowered and the nut securing the rod to the support is finally tightened. To additionally pump the stand, the machine can be rocked slightly from the work side. On the opposite side, the entire procedure is repeated in a similar order. Upon completion, be sure to do a wheel alignment.
In general, the procedure under consideration, like replacing the front struts, is not complicated and can be done independently. If you are not sure about certain points, it is recommended to carry out repair work with a partner
As a result of operating the machine for several days after replacing the supports, the following improvements are observed:
- the suspension becomes more elastic;
- the former laxity is absent;
- no swaying of the car on uneven surfaces;
- turns are better;
- gravel road is much smoother;
- the steering wheel returns faster after a turn;
- more comfortable passage of speed bumps;
- at speed the car becomes more controllable;
It is worth noting that if you are carrying out such repair work for the first time, you should familiarize yourself in detail with all the nuances of the procedure and step-by-step instructions that will help you do everything as correctly as possible. Only in this case will car repair be effective.
Self-replacement
- Park the car on a level surface.
- Using a jack, lift it from the desired side and remove the corresponding wheel.
- Pull out the cotter pin of the steering tip nut and unscrew it (19mm wrench).
- If you have a pin remover, use it. If you don't have such a tool, use a small pry bar and a hammer to press it out. Don't damage the pin thread!
- Having pre-treated with anti-rust liquid, unscrew the 2 nuts securing the strut in the steering knuckle (19mm wrench).
- In the engine compartment, remove the “cup” cover and unscrew the 3 nuts securing the upper support to the “cup”.
- Pull out the entire shock absorber from underneath.
- Using a pair of spring clips, compress the shock spring to relieve the load on the upper mount.
- Unscrew the nut securing the support to the rack (22 wrench and 9 wrench).
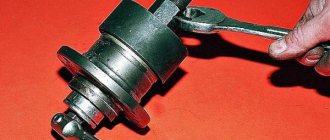
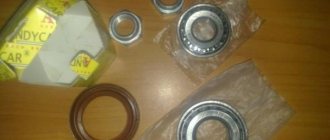
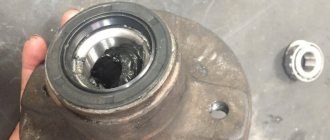
- Remove the support, disassemble it and remove the support bearing.
- Replace the old “support” with a new one, and secure the support to the shock absorber.
- Carry out assembly work in reverse order.
Consequences of bearing wear and signs of damage
Lada Priora Sedan 16kl Kvartsukha Logbook REPLACING THE FUEL FILTER
Since the support bearing can be partially attributed to the steering (without it, rotation of the rack would be impossible), its failure primarily affects the controllability.
But here it should be noted that this depends on the design solution used.
For example, in a VAZ-2110, the inner race of the bearing acts as a bushing through which the shock absorber rod passes.
As a result of critical wear of the bearing, it begins to play and the rod is able to deviate from the axis.
The result of this is a violation of the wheel alignment angles, and consequently a deterioration in the car’s handling, as well as accelerated tire wear.
But on a car, where the bearing only provides rotation of the strut and does not interact with the shock absorber, alignment violation practically does not occur, since the rod is kept from axial displacement by a bushing pressed into the rubber damper.
But even with this design, bearing wear will have a negative impact on handling.
If the bearing has worn out, this will naturally begin to show. In this case, the symptoms of a malfunction depend on the design.
If we take the same VAZ-2110, then bearing wear will manifest itself in the form of knocking noises when driving over potholes and unevenness on the road; in addition, they can be heard when turning
Sounds in the support are caused by play in the support element; it is important not to confuse them with a knock in the shock absorber
In the case of a bearing that does not interact with the shock absorber, its malfunction most often manifests itself in the form of squeaks and squeaks when turning.
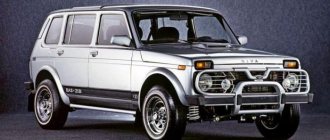
Support bearing Priora purpose, replacement features, PrioraPRO
Lada Priora Sedan constructor, assemble it yourself Logbook Mileage and clutch replacement
The front suspension is an element that allows you to easily overcome road unevenness, eliminating jumps and vibrations. To ensure its normal functioning, many consumable parts are used.
For a Priora car, the support bearing acts as a support and ensures proper operation of the suspension. If it wears out, a number of certain inconveniences arise.
Damage to the element leads to crunching and rattling noises when overcoming uneven roads. Such phenomena partially affect the operation of the suspension itself. Correct replacement of the Priora support bearing should be carried out when one of these problems occurs. The work is done quite easily and even a novice motorist can do it.
What to do if the support bearing on the Priora is worn out?
To complete the work, you will need to purchase a new component. You can find it in any car store.
The most expensive, but also the most reliable, are products from SKF, Koyo and SNR. They have a long service life, so replacing the support bearing on a Priora with one of these components will permanently solve the problem of rattling in the area of the front pillar when driving.
You can also choose a suitable element among offers from domestic manufacturers. The attractive low price of the support bearing for the Priora makes it affordable for many motorists.
You should purchase budget consumables from companies recommended by AvtoVAZ itself. You can consult with the craftsmen and purchase a replacement part from them.
The repair work is quite simple and takes minimal time. For Priora, replacing the support bearing can take about 3 hours. And if you carefully follow the instructions, it will not cause any difficulties. Carrying out the service in the workshop may take longer due to the busyness of the craftsmen.
The support bearing on the Priora is being replaced in a well-equipped garage. To carry out the work you will need a good lift. It is simply not possible to carry out renovations in an ordinary room. Therefore, you should select the location for the repair in advance.
How to replace support bearings on a Priora yourself?
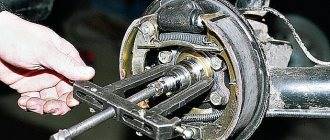
First of all, the motorist will need to remove the assembly, which will allow him to get to the part being replaced. Therefore, you will first have to remove the wheel, and then unscrew the hub nut, the lower caliper bolt and remove the caliper itself.
Further work is carried out using a special puller: it is necessary to disconnect the steering tip. The last preparatory stage will be the removal of the ball joint, then the following tasks are performed:
1. The front pillar is unscrewed from the body.
2. Using zip ties, the spring is removed.
3. The central nut of the rod is unscrewed and the support is removed.
4. The bearing is being replaced.
Assembly of the unit is performed in reverse order. After this, the owner can independently verify the quality of the new element and the disappearance of squeaks. Travel will be much more comfortable. And given the possibility of saving on repair work, the support bearing of the Priora front strut can be replaced at any convenient time.
It is worth remembering that for Lada Priora support bearings may have different service lives. For some motorists it is about 30-40 thousand km, for some it wears out after 15 thousand km. The difference depends on the quality and operating conditions. Therefore, the reliability of the product can only be assessed after long-term use.
Sometimes on Lada Priora, replacement of the support bearing is not required for a long time. Even if the trips are often on rough roads.
Such bearings are the best and indicate the cost-effectiveness and practicality of installation. They should be used during repairs and in the future, which will ensure that there is no extraneous sound in the rack area.
Tips and tricks for motorists
1. Replacing the Priora support bearing without removing the strut is not recommended, in this case the installation of the new product will not occur correctly, which will affect the service life. 2. To prevent dirt and moisture from getting on new products, come up with additional protection for the “supports” under the hood. 3. If you find products in a closed steel case in retail outlets in the price range of 600 rubles - this is a reliable option, feel free to purchase and install. 4. Do not purchase open products where the balls are visible.
ATTENTION!
The electronic catalog of spare parts intended for reference purposes only!
Our company does not sell all spare parts presented in this list. If there is a “Cost” link in the right column, these spare parts are on active sale. Availability in warehouses for details and prices, see the product card. If there is no “Cost” link in the right column, we do not sell such parts and do not accept orders for them.
Bearing replacement
No matter what kind of car the support bearing wears out, but if it uses a MacPherson strut, then the technology for disassembling the unit for replacement is identical, with the exception of some nuances regarding the suspension design.
Therefore, we will consider how replacement is carried out on a VAZ-2110 car, and then we will indicate the features of the operation on other models.
Tool.
So, it has been revealed that the support bearing requires replacement. All work can be done in a garage, but some specialized tools will be required.
In general, you will need:
- Standard set of keys, hexagons, heads with collars and rods;
- Jack;
- Steering wheel end remover;
- Spring ties;
- Rags.
A new support will also be required, since on this car the bearing is included in its design.
Of course, you can disassemble the support itself to replace only the bearing, but most car owners prefer to replace the entire assembly.
Additionally, you can purchase a spring vibration damper that is installed between the upper cup and the spring.
Sequencing.
Below we will consider the sequence of actions, and we will indicate small tricks that will make the work easier.
Disassembly and replacement is done as follows:
- We place the car on a level surface and immobilize it using the hand brake and wheel chocks;
- Take a 30mm socket and loosen the nut securing the drive to the hub. It is better to do this while the car is standing on all wheels (unscrewing this nut with the wheel removed is more difficult, since it will be more difficult to block the hub from turning). It is also worth noting that this nut is pinned, so it is difficult to tear it out of place and you cannot do without extending the wrench;
- We open the hood and, using a spanner wrench and a hexagon, tear off the shock absorber rod nut (the hexagon holds the rod itself, and the wrench loosens the nut. In this case, you only need to loosen it a little; it is strictly forbidden to twist the nut completely, otherwise the unheld spring will “shoot”). It is better to do this operation before removing the rack (it is much more difficult to remove the nut on a removed unit);
- After removing these two nuts from their place, you can continue disassembly. Jack up the required wheel and remove it;
- Unscrew the fastening of the ball joint of the lever to the rack;
- Using a puller, press out the tie rod end;
- Completely unscrew the nut securing the drive to the hub;
- Loosen the brake caliper mount (there is no need to disconnect the tubes from it), remove it from the disc and move it to the side;
- We take hold of the brake disc and pull it towards ourselves, pulling the hub from the splines of the drive shaft end switch;
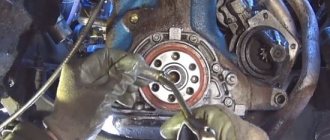
- We go into the engine compartment and unscrew the three nuts securing the support to the car body. At the same time, we ask an assistant to hold the support so that it does not fall to the ground. After this, remove the assembly;
- We install the couplers and tighten the spring until its upper coil moves away from the thrust cup;
- We completely unscrew the nut securing the shock absorber rod and remove the support (after this you can check the performance of the shock absorber, check the condition of the boot and bump stop).
- Before installing a new support, we check the condition of the support cup, clean it of rust and dirt, install vibration dampers under it (if purchased);
- Before installing a new support, we install the spring correctly (the ends of the coils at the top and bottom should fit into special recesses in the cups);
- We install a new support and screw the rod securing nut until it stops;
- We remove the ties, constantly monitoring the position of the ends of the spring;
- We install the assembled rack on the car. After assembly work, it is necessary to additionally tighten the rod fastening nut.
Now about the features of the replacement with Priora, Kalina, X-Trail. Removing and disassembling the strut for these cars is the same as described above.
But it is not necessary to change the support itself on these cars (if the condition is satisfactory); after dismantling, it is enough to remove the bearing from it (installed on the side of the support cup), and put a new one in its place. And then everything comes back together.
Below is a table of the designation of support bearings according to GOST, designations (full, main, foreign analogues), their size and weight.
When carrying out replacement, special attention should be paid to safety precautions. You should not try to disassemble the rack without ties, since a “firing” spring can cause serious injury
Checking VAZ support bearings.
How to replace a support bearing
In modern cars, a faulty support bearing often appears when it is completely destroyed. In order not to go to extremes, we recommend replacing the bearing during any front strut rebuild or spring replacement. Then you won’t have to remove and disassemble the strut again to separately replace the strut support bearing.
The process of replacing the support bearing is simple; the main thing is to remove and disassemble the front strut. To do this you will need a jack, spring ties, a standard set of automotive tools and normal hands.
- Loosen the wheel nuts, jack up the car, and remove the wheel.
- Disconnect the brake caliper and brake disc, disconnect the steering knuckle from the lever and stabilizer link.
- Disconnect the stand and remove the entire assembly.
- Tighten the spring with a tie and disassemble the strut.
- Replace the support bearing, remembering to generously lubricate the rod.
- Do all the manipulations in reverse order.
Along the way, carefully inspect all the elements of the rack. Clean them from dirt and traces of corrosion. Whether it is necessary to change the support bearings in pairs, there is no consensus. After all, only one can fail, for example, due to a strong blow. In any case, there is no harm in carefully inspecting the condition of the second rack.
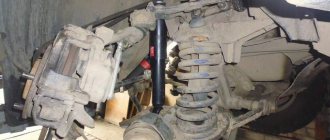
The important role of MacPherson struts
But MacPherson struts have another important function - they also serve as steering knuckles. That is, the stand with the wheel hub attached to it can rotate around an axis, which allows the drive wheels to be steered.
Naturally, where there is rotation, a bearing is used; in the case of this type of suspension, a support bearing.
To figure out where the support bearing is installed, let's briefly look at the car suspension structure.
Its main components are:
- Shock absorber;
- Frame;
- Spring;
- Support.
All these elements are assembled into a single whole, which provides the possibility of compressing and decompressing the spring and moving the shock absorber rod in the body (which is what the suspension is actually for, since vibrations are damped during these movements).
To ensure all this, the rack is assembled like this: a shock absorber is installed in the body and all this is installed in a spring.
To support the spring from below, a cup is used, attached to the body (welded to it).
To ensure that the spring is pressed, another cup is installed at the top, which rests against the support.
The spring extension limiter is the shock absorber rod, the end of which passes through the support and is secured with a nut.
Additionally, the support not only acts as a stop for the spring, it also provides the upper fastening of the strut to the body (it is attached to it with levers from below).
VAZ front strut support bearing - diagnostics and replacement
Car suspension plays a significant role in any vehicle. The car is no exception. It is this that determines the comfort in the cabin when driving, protects the body and many parts from vibration and provides the required stability when cornering. This article will talk about what a front strut support bearing is and how to replace and diagnose it?
Verification methods
Checking the condition of the support bearing is not difficult, but the technology depends on the design features of the rack itself.
It is worth noting here that such a check will not give an accurate result; you can verify that the bearing is faulty only after removing it from the car.
But, nevertheless, by performing a number of simple steps you can determine the condition of the upper support.
If we take the VAZ-2110 model, then its support bearing is installed in the support itself.
To check its condition, you should ask an assistant to rock the car in the transverse direction (not too much), while at this time we place our hand on the protruding part of the pillar in the engine compartment.
If the bearing is worn out, play will be felt by hand. Also, in a damaged element, such rocking is usually accompanied by the appearance of third-party sounds - creaks, clicks.
If all this is found during the inspection, it’s time to inspect the support.
On models such as Lada Priora, Lada Kalina, or, for example, Nissan X-Trail, the bearing is not included in the support structure, so it cannot be checked by rocking it. The only sign of wear for them is the appearance of a knocking sound when moving.
But it is still possible to further verify that the unit is faulty.
To do this, ask an assistant to turn the steering wheel in different directions. At the same time, we put our hand to the spring.
If the bearing is heavily worn, then wedging may appear in it, which will be reflected well into the spring in the form of vibration and mild “shooting”.