Dismantling the VAZ-2107 dashboard
Removing the dashboard on a classic “Seven” is quite simple. This procedure is necessary when replacing lamps or electrical appliances, as well as if you want to tune the VAZ-2107 torpedo. The work is not a difficult process: it does not require special tools or extensive knowledge in the plumbing field.
Step-by-step procedure for dismantling the VAZ-2107 dashboard:
- the ground cable is disconnected from the battery terminal;
- the levers of the heating device are removed using a screwdriver;
- the protective plug is removed from the bolt responsible for fastening the panel;
- the bolt is unscrewed, after which the panel is dismantled;
- the speedometer cable nut is unscrewed, after which the device itself is removed;
- the voltage supply cables are disconnected from the economizer;
- the wire blocks are removed;
- The dashboard is removed.
After the structure is removed, you can begin work on replacing any of its components and elements. You can install the device using the same instructions, the steps of which are performed in reverse order.
Recommendations to avoid problems during the process of removing the torpedo
If you intend to remove the dashboard in a VAZ-2107 car for the first time, be sure to follow the following rules:
- When removing the upper part of the steering column protective cover, be careful not to damage the ignition switch O-ring. This part is made of rather flimsy rubber that cannot withstand strong mechanical stress;
- Mark all connectors, wires and switches that you remove to gain easy access to the dashboard. They will avoid confusion during the installation process;
- When removing the additional dashboard, do not try to use force, as there is a fairly high risk of breaking the plastic clips. Finding a replacement for them will not be so easy.
Dashboard Lada LADA NIVA 4×4-COMFORT-2din for instrument cluster 21213
The instrument panel is designed for installation on a LADA 4×4 car of any year of manufacture, from 1977 to the present, instead of the standard one. Suitable for installing both a regular radio and a 2din radio. Available in two modifications: 1. For vehicles with instrument cluster 21213 (Rectangular shape). 2. For vehicles with instrument cluster 2110 (Trapezoidal shape). The instrument panel modification must be selected based on the instrument cluster available on the vehicle!
The control elements (instrument cluster, buttons, switches, levers, etc.) are not included in the instrument panel package, but are rearranged from the standard ones.
The instrument panel qualitatively improves the interior space of the car, creating additional convenience for the driver and passenger. Ergonomic location of the radio in the upper part of the panel, plus the ability to install a 2DIN radio. — The depth of the socket for the radio is 190mm. When choosing a radio, you must take into account the clearance for the pads and wires! Convenient layout of control keys. Increased volume of the glove box and area of the lower shelf. There is a recess for things on top of the panel and an additional shelf for small things on the heater block. The instrument panel is designed in such a way that no modifications are made during installation and the use of existing controls and instruments is used. High quality materials and components. The outer surface of the instrument panel is soft, black, and has a shagreen texture. The frame is made of ABS plastic with metal reinforcements and brackets, which in turn makes the panel safer during impacts and more durable due to elasticity and uniform thermal expansion when heated. The hinged parts are made of hard, black ABS plastic, the coating is identical to the instrument panel as a whole. Method of installation and fastening - in standard places: on top with studs, four M6 nuts, from below with self-tapping screws into the reinforcing beam. The instrument panel console is fixed from below to the floor tunnel.
The instrument panel has a unique design, developed specifically for the LADA 21213 and subsequent versions. This product is also suitable for earlier versions, provided that the following requirements are met: 1. Due to the fact that the glove box cover is not included in the delivery package, but is rearranged from the car, if it is not on the car or worn out, or does not correspond to the design in earlier versions of the car, it must be purchased independently (Catalogue number 21213-5303016-10 ).2. This instrument panel was developed during the period when exterior mirrors with manual adjustment from the outside of the car were installed on cars. With subsequent upgrades, cars began to be equipped with cable-driven exterior mirrors. To ensure that the joysticks of such mirrors installed on the front door pillar do not rest against the instrument panel, it is necessary to either dismantle the cable drive joysticks or install mirrors equipped with an electric drive.
Packaging dimensions – 1500x400x400mm.
Choosing the right dashboard
Dismantling the old torpedo
If we talk about which car the panel fits the VAZ 2107 from, then auto mechanics recommend installing a torpedo from a BMW or Volga 3110. Often, “Seven” car owners prefer the second option. The main task in this case is to install the oval panel into a square one. A BMW torpedo, unlike its domestic counterpart, does not require the installation of additional plastic.
When deciding which panel is best suited for the VAZ 2107, you need to take into account that the dashboard from the 3110 car model has a different shape. To install it, the corners are removed and additional work is carried out to adjust this structure.
Panel or torpedo?
Which torpedo is suitable for the VAZ 2107? The issue is complex, but completely solvable. Just to begin with, you should determine how radical the alterations will need to be made. Such tuning can be done in two ways:
- Replacing the dashboard;
- Replacement of the entire torpedo.
The first option will allow you to get by with little expense and replace the panel with another one that suits you more. You just have to adjust the socket a little in size. It is somewhat more difficult to install a new panel. At the same time, it must be suitable in size and provide the ability to connect all vehicle systems. The final choice depends on your ultimate goals and capabilities.
Gazelle dashboard
When replacing the instrument panel on a VAZ-2107, the equally popular Gazelle often becomes the donor. Despite the fact that the manufacturer of these two machines is the same, the work will be more complex. The Gazelle panel has large dimensions and also has a completely different configuration, shape and size. You will also have to tinker with the electrical wiring: you will need a number of adapters, as well as knowledge from the field of electrical engineering.
In such work, you will have to use a jigsaw and a soldering station to resolder the adapters. This is a rather painstaking procedure that should be approached with special care.
Read, it may come in handy: We protect from rust and repair the thresholds of the VAZ 2107
Tuning VAZ 2107 with a torpedo from BMW e-34
Also, this appearance has no attractiveness. Therefore, many drivers replace dashboards. The issue is complex, but completely solvable. Just to begin with, you should determine how radical the alterations will need to be made. Such tuning can be done in two ways: Replacing the dashboard; Replacement of the entire torpedo.
The first option will allow you to get by with little expense and replace the panel with another one that suits you more. You just have to adjust the socket a little in size. Feeling upset, I turned on the TV. A few minutes later an idea came. Light bulbs may also not work. And I didn’t check the devices at the time of purchase. 4 light bulbs did not work, I cleaned three, and pulled out one penny from the original instrument panel. It would have cost a little money if there had been a bug in the circuitry of my adapter - it would have been a break of about two months until I recovered my strength.
So the process was completed completely unexpectedly. It was Saturday outside, I got up in the morning and, as always on Saturdays, went to the car market.
Malfunctions of the VAZ 2105 dashboard
The dashboard of the car in question uses a minimal set of indicators, but they can also work intermittently at times. Therefore, you need to know about possible malfunctions and be able to eliminate them, especially since this does not require special tools.
Removing the instrument panel
To dismantle the device in question, you will need a slotted and Phillips screwdriver, and the procedure itself consists of the following steps:
- We de-energize the on-board network.
- Use a screwdriver to pry off the screw caps.
Replacing backlight bulbs
One of the common malfunctions of the tidy is the burnout of the backlight bulbs. Their replacement consists of the following steps:
- We remove the dashboard.
- We remove the faulty light bulb from the device along with the socket.
Video: replacing instrument panel backlight lamps on a VAZ 2105
Diagnostics and replacement of individual devices
Since each of the indicators on the dashboard displays the status of a particular vehicle system, the occurrence of problems causes inconvenience during operation. Therefore, it is advisable to eliminate any malfunctions as quickly as possible.
Fuel level indicator
The “five” uses a BM-150 fuel sensor located in the fuel tank. Structurally, the device consists of a variable resistor, the resistance of which changes depending on the moving lever with a float. Also on the lever there is a contact that turns on a lamp on the tidy, signaling a low amount of fuel in the tank (4–6.5 l). There is a dial indicator on the dashboard that displays the gasoline level.
If there is a suspicion that the fuel sensor is not working correctly (the tank is constantly full or empty), then you need to check its resistance:
- when the tank is empty, the resistance should be in the range of 315–345 Ohms;
- when half filled - 108–128 Ohms;
- at full - 7 Ohms.
If you need to replace the sensor, just remove the wires, unscrew the fasteners and remove it from the gas tank. There are practically no problems with the pointer indicator.
The voltmeter monitors the voltage at the battery terminals when the engine is not running, and while it is running it shows the voltage produced by the generator. When the arrow is in the green zone, this means that the on-board voltage is normal. When the pointer moves into the red zone, this indicates a weak alternator belt tension or a malfunction. The white zone of the indicator indicates an unsteady charge-discharge mode. Problems with voltmeter readings are usually caused by a break in the wiring. Therefore, you need to check the power supply circuit to the device using a multimeter.
Temperature indicator
The VAZ 2105 is equipped with a TM-106 temperature sensor, which is screwed into the cylinder head on the left side. The sensor consists of a resistor, the resistance of which varies depending on the temperature of the antifreeze. The readings are displayed by the temperature indicator on the dashboard.
If the device does not work or there are suspicions about the correctness of the readings, you need to diagnose the sensor. To do this, turn on the ignition, pull the conductor off the sensor and short it to ground. If the arrow deviates to the right, the element being checked is considered inoperative. If there are no indicator deviations, it means there is a break in the wiring, which will require testing with a multimeter. If there are problems with the sensor, we replace it as follows:
- Remove the negative terminal from the battery.
- Drain the coolant from the engine.
- Pull off the rubber cap from the sensor and disconnect the wire.
Changing the torpedo
Some drivers are not satisfied with the appearance of the torpedo on the VAZ 2107. Sometimes this element from the “five” may be installed on the car. In this case, a purely practical inconvenience is added to the unpleasant appearance. You have to close the glove compartment with a universal “lock”, or rather, seal it with tape. Otherwise it will constantly open. Therefore, you can change the torpedo.
Of our models, the best fit is a spare part from a VAZ 2115. You just have to use polyurethane foam to seal small non-joints. Of the foreign cars, the best fit here is a torpedo from a BMW E30
. She will look much more advantageous.
There is another option, install a torpedo from a Toyota Camry
.
It is slightly wider than the standard part. Therefore, for a more accurate installation, you will have to trim the torpedo a little from the bottom on the sides. But even in this case, it will interfere with the window regulators. So get ready to install electric lifts right away. This will be the best option. You will also have to struggle with installing the steering wheel cover.
The standard cover will not fit into the steering wheel opening on the BMW dashboard. Therefore, craftsmen usually perform adjustments. Some people cut the panel, but it is much easier to cut off the excess from the casing. It is better to use standard mounts from the original torpedo, only they are slightly bent. Often the torpedo can sag downwards, so it is advisable to immediately provide support.
Instrument panel VAZ-2108
The instrument panel of the basic version of the G8 was popularly nicknamed “low” because of its appearance. It is a large shelf, the surface of which is located below the level of the windshield. Used in the VAZ-2108 until 1997. And then the panel was replaced with a “high” one for cars with index 21083.
On the left half, the instrument panel of the VAZ-2108 rises above it. To the left of the steering wheel there are control handles for the hydraulic leveling of the headlights and the illumination of the instrument panel.
On both sides of the steering column there are combined control levers for electrical appliances. The left one is designed to turn on the turn signals, constant and short-term high beam headlights. The right one controls the windshield and rear window wipers, as well as the washer pump. Also on the right side is the ignition switch and the carburetor choke lever (choke handle).
Above the central tunnel are:
- heating system deflectors;
- control buttons for the main electrical equipment: side lights, low beam headlights, hazard warning lights, fog lights, heated rear window.
- heater control unit;
- space for a radio;
- cigarette lighter
The heating control unit includes:
- four-position fan switch;
- 2 handles that control the direction of air flow inside the panel (passenger and driver side);
- heater valve control lever.
On the right half of the VAZ-2108 instrument panel there is a glove box (glove compartment) with lighting inside and a small shelf under it.
Installation highlights
Before deciding which panel you can install, you should take into account that the original VAZ 2107 torpedo can be returned at any time. If such a procedure is carried out independently, it is recommended to use a book on repairing classics. It will take a lot of time to complete the work.
When connecting the wires, you need to remember that one goes to ground, and the second goes to the panel to the corresponding contact. It is recommended to label which connector goes where. To operate the speedometer, a speed sensor from model 2110 with 6 pulses is installed. If the “seven” is equipped with an econometer, it is recommended to install a tee from 2106 on 2 sensors, including a pressure sensor from engine 402..
Video: tuning the “Seven” dashboard
Instrument cluster VAZ-2108
The instrument panel of the VAZ-2108 (low panel) is a combination of the following indicators:
- speedometer;
- mileage counters: daily and total;
- voltmeter, econometer, thermometer;
- fuel level.
In addition to indicators in the instrument cluster there is a set of lamps that indicate:
- insufficient battery charge;
- lack of pressure in the oil supply system;
- carburetor choke position;
- current amount of brake fluid and brake pad wear;
- direction of rotation and activation of the hazard warning lights;
- condition of the parking brake (handbrake);
- state of external lighting (side lights, low beam, high beam or fog lights are on).
Devices 2108 (low panel) allow you to carry out basic diagnostics: brakes, coolant, headlights and taillights. If any element is faulty, its lamp will light up red and the word “STOP” will appear. This indication is advisory in nature and does not prevent the engine from starting.
Installation of ready-made tuned devices on a VAZ 2107
The dimensions and connectors of the finished devices, which are intended for upgrading the “tidy”, do not differ from the standard ones. Installing them is not a problem.
It is almost impossible to confuse the connection of connectors to devices - they differ in shape.
The only thing you should pay attention to if you choose this method of tuning a VAZ 2107 torpedo is the speedometer cable. It is installed in a braid so that it can be easily removed towards the interior. In this case, it may become disengaged with the speedometer drive at the gearbox. If this happens, then after tightening the fastening nut on the speedometer, the latter will not work. To avoid having to remove the dashboard again and fix the problem, you should check the position of the cable before installing the nut.
After attaching the cable, all that remains is to tighten the self-tapping screw securing the dashboard and install the decorative trims and the daily mileage reset button in place.
The installation of additional instruments and indicators on the VAZ 2107 dashboard depends only on the tastes and imagination of the car owner.
Read, it may come in handy: If the windshield wipers do not want to work
Instrument panel VAZ 2114 on VAZ 2107 from Auto overhaul
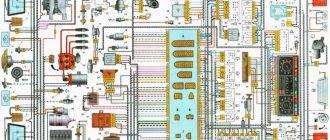
What you need to have for installation: the device itself, narrow female terminals with a lock 30 pieces, a wire of 5 meters (maybe less) with a cross-section of 0.5 mm2, 13-terminal blocks 2 pieces, tools. The sensors are 100% identical. Rear view of the tidy contacts 2114: 1 2 3 4 5 6 \ ………. /151617181920 .. red 13 …… 14 white 7 8 9101112/ ……… \212223242526 It is best to cut off the wires from the terminals from the standard tidy and put narrow terminals on them. Contacts: 1 - checking the brake fluid level indicator. If you apply +, the brake light will light up. You can connect it to the red wire of the ignition switch, then, just like on 2110/2114, the lamp will be checked when the starter is turned on. 2 - alarm lamp, lights up when + is applied. 3 - high beam lamp, connect to the green-black wire. 4 - fuel level indicator, connect to the pink-red wire. 5 - to the speed sensor. 6 — speed signal output to the on-board computer. If it is, then take the speed signal from this contact. 7 - brake fluid level indicator, connect to the pink-blue wire near the lamp above the cigarette lighter. In the VAZ-2107, the lamp works the other way around: the sensor connects the lamp to ground and it lights up. You will have to either leave the lamp where it is, or in the new device, solder the lamp to + and swap the diodes (in this case, to check the lamp, pin 1 must be connected to ground, for example, to the parking brake lamp), or remove the black wire from the sensor on the tank, and connect instead the orange one from the EPHH unit, or the blue one from the ignition coil, while the diode in the wiring (between the beard and the glove compartment) must be disconnected; if this is not done, there will be a short circuit. 8 — left turn lamp, connect the steering column switch pad to the blue-black wire. 9 — right turn lamp, connect the steering column switch pad to the blue wire. 10 — instrument lighting, connect to the white wire. 11 - ground, connect to the black wire. 12 - power supply for devices, connect to the orange wire. 13 - if the tidy is simple (without microcircuits, etc.), then connect to the blue-red wire (fuel reserve lamp), if there is a display under the tachometer, then connect to the temperature sensor (take from VAZ-2114, one contact to the tidy , the other to ground, place it either in the passenger compartment or in the engine compartment, but so far from the engine and so that the wind does not blow). 14 - ground, connect to the white-black wire. 15 - low-voltage tachometer input (from the ECM), connect to the brown-blue wire. 16 - high-voltage tachometer input (from the coil), connect to the brown-blue wire. 17 - if there is a display under the speedometer, then connect it to the red-white wire at the brake light switch. 18 — coolant temperature indicator, connect to the green-white wire. 19 — outdoor lighting lamp, connect to the yellow wire. 20 - lamp for covering the carburetor air damper, connect to the gray-orange wire. 21 and 22 go to the ECM lamp. If the machine is injection, then connect one of the contacts to the orange wire, and the other to the remaining one. 23 - power supply for devices, connect to the orange-blue wire. 24 - handbrake lamp, connect to the brown wire. 25 - battery charge lamp, connect to the brown-white wire. 26 - low oil pressure lamp, connect to the gray-blue wire. The speedometer is electronic, so on carburetor cars you need a 6-pulse speed sensor from the injection Classic or from the Ten or Samara.
Console tuning
Tuning the VAZ-2107 console is an optimization of the front panel, as a result of which many useful features and advantages can appear in the car, such as a new tape recorder, clock or cigarette lighter. Refinement of the beard of the VAZ-2107 allows you to make the vehicle more original and functional. Anyone can, through simple improvements, install a player, a modern clock, a USB socket, devices for monitoring the electrical network and small “pockets” for small items in the car.
Among the main tools, without which tuning the standard beard of a VAZ-2107 is impossible, it is worth noting: an electric jigsaw and drill; "grinder"; locksmith corner; a simple pencil; ruler; glue and stapler for furniture.
Do-it-yourself tuning of the VAZ-2107 beard may involve the manufacture of a new panel, which will initially have special areas for the location of switches and indicators. The easiest way to tune the console is with ordinary plywood with a thickness of about 6 mm. It is advisable to use artificial leather as finishing materials, which perfectly matches the color with the rest of the interior elements. Recently, car owners have even adapted to introducing carbon fiber.
Tuning the VAZ-2107 beard can be done with the help of a comprehensive modernization, which will “radically” change the interior of the car. Replacement on doors and other interior elements can be made using carbon fiber and leatherette. The new console will need to be positioned in place of the factory fixture, which must first be dismantled. By removing a standard beard, the motorist can quickly take measurements to further create drawings.
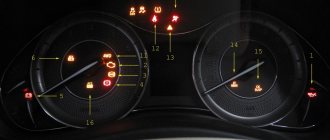
The meaning and location of the main instruments on the VAZ panel
The combinations of all instruments on the most popular brand (VAZ-2110) are located directly on the left side of the panel itself. This part of the dashboard is often called a “dashboard” by drivers. The instrument panel also contains switches of various functions and types and a set of indicator lights. They are responsible for controlling the operation of lighting equipment, heaters and other important units.
Standard instrument panel on a VAZ-2110 car
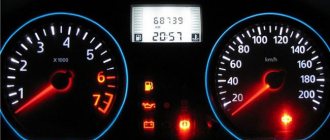
First of all, when examining the dashboard, the eye falls on the variety of dial gauges and indicators under them, which are equipped with a small electronic digital window and a set of signal lights with various functions. The main elements here are:
- Sample induction speedometer;
- Tachometer model;
- Pointer type indicator for adjusting the coolant temperature;
- A device for determining the fuel level in the tank.
Let's look at each of the devices in more detail.
Tip: if light bulbs, indicators and dial gauges do not work, then the problem lies in the wiring. Be sure to check the fuse box on the VAZ-2110.
Symbols in the induction speedometer
Models of induction speedometers receive speed readings from sensors that are located directly in the gearbox structure. It displays the actual speed of the car - the scale ranges from 0 to 200 km/h.
The division value is an indication of 10 km/h. However, the driver must remember that any induction speedometer on the VAZ-2110 will have an acceptable error rate of up to 3-5 km/h.
The lower and central part of the speedometer is equipped with a small window with an electronic display option, which, through 2 lines, transmits the total mileage for the entire period of operation of the vehicle and the current mileage value.
Tachometer symbols
The tachometer is located on the left side of the dashboard. Using this device, the driver receives the current crankshaft speed values. Information enters the tachometer through the on-board computer, which in turn receives these values from sensors on the crankshaft. Often, if the car jerks when you sharply press the gas. The tachometer will show low speed values or will be completely faulty.
On the scale, all divisions are divided into 5 units, and the digitization of values is made into 10 units. The maximum values are limited to 80 units. In order to understand what number of revolutions the car is currently showing, you need to multiply the number on the tachometer by 100. The sector is in the range from 55 to 60 units. shaded in red - this is a signal to the driver that the car will be approaching a critical number of revolutions.
Tuning scales
In the basic version, the background of all scales is black. The marks on them look too faded. This style was relevant about 2 decades ago. Nowadays, this design looks rather poor.
A chic, sporty look is achieved by installing white scales with contrasting black markings. They can be made on a color printer using self-adhesive film.
When making improvements at this stage, do not forget to exercise maximum caution - the mechanisms are extremely fragile.
Expansion of functionality
The VAZ-2107 is equipped with a minimum of instruments, and therefore installing new ones will significantly increase the information content of the panel. Most often they add:
- light and temperature sensors;
- fuel consumption indicator per kilometer;
- ECU;
- TV, etc.
Additional holes are cut for them. It is also necessary to install wiring and make changes to the design of the machine (in particular, to provide it with missing sensors).
Did you like the article? Share with friends:You may also like Tuning