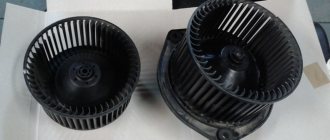
Fuel tank flap with lock - article number, price
The difference between these two elements is in the design - the first opens “like a gate”, and the second - by pressing the lid itself. The hatch with a lock is connected to the central locking of Vesta - that is, it will be closed until you open the car. The blocker will not allow this to be done, but will leave a small gap (1-2 mm), preventing the lid from opening completely. Structurally, it consists of two sets. The first is the new tank hatch itself for Vesta with connections:
- Fuel cap.
- Brace.
- 77030082-24. Screw (2 of them).
- Neck cap body.
- You will also need a bracket (8450031286, about 70 rubles).
Suspension
Shock absorbers, Shock absorber strut, Shock absorber bump stop, Shock absorber boot, Shock absorber bushing, Rear shock absorbers, Shock absorber support, Support bearing, Front shock absorbers, Shock absorber silent block, Springs, Rear springs, Spring support, Front springs, Suspension arms, Control arm silent block, Rear control arm, Bolt Arm, Upper Arm, Left Arm, Lower Arm, Front Arm, Cross Arm, Right Arm, Trailing Arm, Ball Joint, Hub, Hub Bearing, Hub Nut, Hub Bolt, Rear Hub, Hub Cap, Front Hub, Hub Seal, Stud hubs, Stabilizer, Stabilizer bushings, Stabilizer links, Springs, Spring bolt, Spring bushing, Rear spring, Spring bracket, Spring leaf, Spring pin, Front spring, Spring cushion, Spring silent block, Spring shank, Spring stepladder, Air suspension, Air suspension compressor, Air springs, Air suspension unit, Steering knuckle, Swivel bearing, Trunnion, Kingpin, Rear beam, Beam silent block, Subframe, Subframe silent block, Wheel spacers
Several modifications to the hatch
The first requested modification is the replacement of the old version with a new one. For this:
- Be sure to stop the car in place and remove the negative voltage from the battery.
- Make a technical hole for the blocker 13 mm wide and for the pusher 6 mm wide.
- Attach the drive to the bracket. Position the bracket so that the pusher barely comes out of the hole.
- Place the nut and weld the pusher to the arch. For reliability, you can cover it with sealant and paint it over to prevent corrosion.
- Under the technical hole in the trim on the right in the trunk, as well as under the trims of the central pillar and sills, connect the new device.
- Route the included wires to white-black and yellow-blue, secure and insulate the connection.
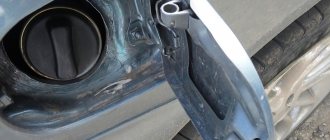
- Returning to modernization, it is important to talk about the gas tank cap. Vesta is equipped with a decorative neck ring, which covers vulnerable parts of the body from corrosion.
- And the lid itself (plug) should be replaced with a lid with a lock - this way the possibility of draining gasoline will be almost completely eliminated, because the swindlers who are involved in this business do not want to “glow” in one place for longer than the prescribed minutes and deal with the lock. It is necessary to do this, if only because the designers do not provide a protective mesh in the fuel hose leading from the cap to the tank, and draining gasoline seems more than a realistic task.
- Finally, for cars of the old version of the gas tank hatch, the problem of loss of the stop will be relevant. You need to push it down a little further, and then it will do its job and not fly out of its place.
New Lada: Fuel consumption of Lada Vesta
- 11.03.2018
- By admin
- 671
Why is the gas tank flap in cars located on different sides?
Admit it, you’ve asked yourself this question too! Let's figure out together what's going on here. At first glance, the location of the gas tank flap on different sides on different car models seems very logical. At least when you stand at a gas station and see that the queue is evenly distributed. It seems that everything is clear - on some cars the gas tank flap is on the left, on others - on the right. But the question inevitably arises: who decides exactly where it will be located on a new car? And why do some manufacturers suddenly decide to change the location of the fuel filler neck? We decided to collect all the known versions that explain why the gas tank flap is located on different sides on different cars.
Version one: conspiracy The simplest and most understandable explanation is, of course, a conspiracy. More precisely, an agreement. At a certain point, representatives of all automakers met and decided: from such and such a year, gas tank flaps on Japanese and American cars will only be on the left, and on European cars - only on the right. Rave? But in the world they agreed on much more complex things! The Vienna and Geneva Conventions on Road Traffic exist quite successfully, standardizing many issues in traffic regulations. However, we sweep the conspiracy theory aside: there are no agreements between the automakers. At least, nothing is known about them, and this version is not confirmed by facts. For example, in most Citroen cars the hatch is located on the left. Are the French really violating “tacit agreements”? No, because there are no agreements themselves either.
Version two: constructive Let's move on to more logical options. How do you like this: the location of the gas tank flap is explained by the design of the vehicle. That is, the hatch is located where it should be from an engineering point of view on a particular model, and it simply cannot be anywhere else. Sounds logical.
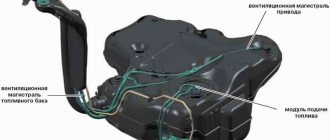
But, alas, this version also fails. It is enough to remember that the hatch serves to ensure that fuel flows through the neck to the gas tank. And it, in turn, is located... in the middle of the car, in front of the rear axle! At least, on modern cars this is usually done - for safety. Firstly, thanks to this arrangement of the tank, better weight distribution is achieved, and secondly, in the event of a rear impact, the likelihood of fuel leakage is much less.
So, based on pure logic, it would make more sense if the gas filler flap was located in the back and center. By the way, this used to be the case on some cars - for example, on the Soviet Moskvich models 408, 412, 2140. But, as we said above, automakers abandoned this tank layout because of safety. And you can remove the hatch with the neck from the tank located in the center either to the left or to the right side. So engineering alone cannot explain everything.
Version three: “comfortable” This version can be considered the most common. It sounds something like this: the gas tank flap is always located on the opposite side of the driver, so that he can drive as close as possible to the pump and open the door, and gasoline vapors would not get into the cabin when refueling.” The explanation is very clear and consistent! True, inconsistencies arise here too. Suffice it to remember American cars. You certainly can’t deny the residents of the United States the desire for comfort! Meanwhile, on cars of American brands, the gas tank flap can be located either on the left or on the right.
motortrend.com And, say, on many Jaguar models sold in the UK, the fuel filler is located on the same side as the steering wheel - on the right. Additionally, if it were just a matter of comfort, what would stop automakers from moving the neck to a certain side depending on the market? Technically it's not that difficult. However, no one does this. Therefore, comfort is clearly not what car companies focus on when deciding which side the gas filler flap will be on in their models.
Version four: cultural and historical This assumption is somewhat similar to the previous one, but is based on the realities of road traffic. For example, in European countries, traffic is on the right, and gas stations in the center of old cities are often a pair of gas pumps located right on the sidewalk. You can only approach them from the right side, so it is logical that the gas tank is also located on the right. And, say, in Japan the situation is exactly the opposite: traffic is on the left, the columns are located on the left. Therefore, the tank should be on the left. Again, everything sounds quite logical, but...
But finding contradictions in this version is not so difficult! For example, in the USA, traffic is on the right, but there are not so few American cars with a left-hand tank. Here it can be argued that in the USA, unlike Europe or Japan, there are no problems with free space, and gas stations could be approached from both the left and right. But what then to do with the above-mentioned Citroen, in which they still like to place the tank on the left? But there is also South Korea! The country is Asian, traffic is on the left, there is not always a lot of space, but the hatch on Hyundai and Kia cars is usually on the left.
Russia can also serve as an example of the inconsistency of this theory. For example, on most Zhiguli cars the hatch is located on the right, on Volgas it was traditionally on the left, and on Moskvich cars it was in the rear center. So the reason is not what side of the road cars drive on in a particular country, or where gas stations are located there.
Version five: the most plausible None of the versions listed above provides a clear and comprehensive explanation of why in some cars the gas tank flap is located on the left, and in others on the right. So, all these versions are wrong? Not certainly in that way. Of course, there is no global conspiracy, but there are certain agreements, or rather logic, in the actions of the companies. For example, for Japanese companies, the most important sales market is the Pacific Ocean region, where, just like in Japan, driving operates on the left. Therefore, the location of the gas tank flap on the left side from the point of view of convenience seems logical. At the same time, in the USA, as we said above, there are no problems with refueling. But European manufacturers still prefer that the gas tank is on the right (with the exception of the same Citroen). In turn, the British are well aware that most of their cars will be sold outside of Foggy Albion and will be left-hand drive. Therefore, it is not surprising that most often they design their cars for European needs, with a hatch on the right.
It turns out that there is some truth in each of these versions. And all the habits and expectations of drivers are carefully studied by marketing departments, whose specialists also strive to make cars as comfortable as possible for drivers. Therefore, the question of why the gas tank flap in cars is located on different sides can hardly be answered otherwise than: “This happened due to a number of circumstances.”
And if you have forgotten which side the gas tank flap of your car is located on, we’ll give you a lifehack: on the dashboard, on the scale indicating the fuel level, there is usually a small arrow that shows which side you need to insert the gas nozzle. Although, of course, it must be noted that this rule works mainly only with modern cars.
LEAVE A COMMENT
How to install a gas tank flap
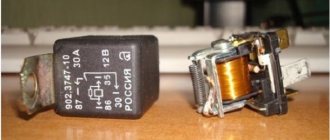
A - lock button; A/1 - view of the legs of the window lifter button for the VAZ 2110; B - central locking; C - M10 brass bolt with through hole and nut; D — rod from the kit from the Central lock; E - aluminum corner; F — gas tank flap cover.
To control the lock, a single button is used to control the window lifter from the VAZ 2110. For it, you need to take the factory block and terminals. The green and blue wires can be connected to the central alarm wires from the alarm instead of the button.
The corner is screwed to the upper edge of the gas tank flap with M3 self-tapping screws. I tried to glue it with “cold welding” - it fell off after a month.
The lock itself is attached to the Niva body using plates from the Ts.Z set. and self-tapping screws.
IMPORTANT REMINDER: To reduce the cost of this design, the electric drive of the lock is connected directly to the control button. Therefore, it is NECESSARY to control the unlocking and locking of the lock only by short presses on the control button (it is not latching). The normal operating mode of the lock is an impulse with a duration of 0.7 seconds. If the pulse duration exceeds the specified time, this may lead to burnout of the drive. To avoid this, you can add a standard central control controller to the circuit. And then the circuit will look like this: the button controls the controller, and it controls the lock. You can also apply a minus to leg No. 5, and a plus to leg No. 4, which appears when the dimensions are turned on (the gray wire from the cigarette lighter or from the dimmer). And then, when you turn on the headlights, the button will be illuminated greenish (built-in LED) in the evening.
On my last Nivka, when I installed a lock on the trunk, I did it differently (obviously after the first lock burned out :)))) I bought a 5-wire lock, which is 15-20 rubles more expensive. The fact is that 3 additional wires go to the built-in microswitch. As a result, I connected the wires in such a way that at one of the extreme positions of the electric rod. When the lock is powered by the mikrik, the power supply to the lock is turned off and the spring returns the rod back, thereby the power appears again and the rod again begins to move in the desired direction until the mikrik is triggered. Etc. until you release the button. This design worked for me for a year, after which the car was sold and is still working for the next owner to this day (another 1.5 years have passed).
Addition from Alex A. Bel.
(original and further down the thread).
Today I drilled a hole in the niche of the tank neck, inserted a hollow bolt, a spoke into it and wound it inside onto the solenoid. I connected the solenoid to the alarm, it turned out like when you open a car - the spoke goes up, like when you close a car - the spoke goes down. All that remains is to attach the eyelet to the hatch with rivets and that’s it, you can throw out the Turkish leaking plug (Turkish ones have a lock from the pioneers, but ours don’t, so we had to be tricky.).
A detailed diagram is here: (link to this article). I just didn't bother making relays and all that.
Happy as an elephant!
The lock works like a Swiss watch. I tried it for strength - whatever, if it suddenly fails, I'll have to break the hatch. But how often do door alarm solenoids fail? Once every 10 years maybe.
Well then. The hardest part was finding a place to attach the bracket - plasticine helped. When, using a riveting tool, I attached the bracket on the hatch cover on top of the bracket with a thin layer of plasticine - I closed everything, the lock worked, I opened the lock - this is the place. Drilled, cleaned, painted - ready, everything works.