LEDs for tail lights: fashionable diodes
February 1, 2013
If you can’t buy a normal LED lamp for headlights yet, maybe the situation is better with the rear lights? The author appreciated their proposal and tried it on the Lada Priora.
Here it is, a scattering of LED replacements for light bulbs in the rear lights.
Here it is, a scattering of LED replacements for light bulbs in the rear lights.
Here it is, a scattering of LED replacements for light bulbs in the rear lights.
Car taillights are not just lighting equipment, but also an important design element. It is enough to stand in an evening traffic jam to appreciate the wealth of imagination of their developers. Most lanterns still use the good old incandescent bulbs, but here, unlike headlights, there is a fair amount of variety: single- and double-filament, base and baseless, 21 and 5 W, with clear or colored glass. But the bulbs themselves, as a rule, are not visible from the outside: the light from their spirals scatters into thousands of lights thanks to the design of the reflector, which resembles crumpled foil. There are other solutions, such as a corrugated diffuser. But the trend of recent years is still transparent smooth glass and a faceted reflector.
Reference sample: lantern with all standard lamps lit. We have recorded the exposure - now it is possible to evaluate the effect of replacing lamps with LEDs.
Reference sample: lantern with all standard lamps lit.
We have recorded the exposure - now it is possible to evaluate the effect of replacing lamps with LEDs. Reference sample: lantern with all standard lamps lit. We have recorded the exposure - now it is possible to evaluate the effect of replacing lamps with LEDs.
At first, looking at the scattering of LED replacement lamps for flashlights, you are amazed at the variety. The number of individual LEDs is sometimes measured in dozens, and they are located in a variety of places: either at the end, then on the sides, or on the drop-down panels of the “space station”. But how to choose the right “lamp” for a particular car? We decided to check the LED lights in the Lada-Priora headlight and were disappointed: somehow it immediately dimmed and lost the look originally intended by the designers.
We especially note: our winner turned out to be the best only in comparison with other participants, but not with standard light bulbs. Moreover, in another
www.zr.ru
Lamps used on Renault Logan
| Name | EEC designation | Power, W | Position in the photo |
| Headlight block: | |||
| high/low beam lamp | H4 | 60/55 | 1 |
| front turn signal lamp | PY21W | 21 | 5 |
| side light lamp | W5W | 5 | 7 |
| Fog lamp | H11 | 55 | 2 |
| Side turn signal lamp: | WY5W | 5 | 6 |
| with white diffuser with orange diffuser | W5W | 5 | 7 |
| Back light: | |||
| turn signal lamp | P21W | 21 | 4 |
| side light and brake light | P21/5W | 21/5 | 3 |
| fog lamp | P21W | 21 | 4 |
| reverse lamp | P21W | 21 | 4 |
| Additional brake signal lamp | P21W | 21 | 4 |
| License plate lamp | W5W | 5 | 7 |
| Trunk light bulb | W5W | 5 | 7 |
| Interior lamp | W5W | 5 | 7 |
| Individual lighting lamp | W5W | 5 | 7 |
| Glove box light bulb | W5W | 5 | 7 |
| Cigarette lighter lamp | W1.2W | 1,2 | 8 |
| Illumination lamp for the ventilation, heating and air conditioning control unit | W1.2W | 1,2 | 8 |
same in the picture
Replacing headlight bulbs - high and low beam
Remove cover A. Disconnect the light bulb connector 1. Disconnect the spring clip 4 and remove the light bulb.
Bulb type: H4.
Replacing the side light bulb
Turn socket 2 a quarter turn to remove the bulb.
Bulb type: W5W.
Replacing turn signal lamps
Turn socket 3 a quarter turn to remove the bulb.
Bulb type: pear-shaped lamp with bayonet base 21W.
Bulb type: PY21W.
Cleaning headlights
The headlights are equipped with polycarbonate glass.
Use a soft cloth or cotton wool for cleaning.
If stains cannot be cleaned dry, lightly dampen a soft cloth (or cotton wool) in soapy water and wipe the dirty areas, then wipe again with a soft, damp cloth or cotton wool.
Finish cleaning by wiping gently with a soft, dry cloth.
The use of detergents containing alcohol is prohibited.
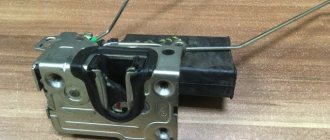
Replacing tail light bulbs
Unscrew screws 1 and remove the rear light unit.
Remove foam 2.
Disconnect the cartridge by pressing lock 3.
LED Reversing Light with LED from CREE
Hi all.
In this review, I will talk about a 5-watt LED lamp in the 1156 base. In this case, the lamp is positioned as a lamp for a reversing light, but I have seen cases of a similar lamp being sold as recommended for turn signals. The lamp is made in an aluminum housing with a plastic diffuser lens. The declared brightness of the lamp is 120 lm, color temperature 6-6.5 t. i.e. cold white. I won’t describe all the characteristics, I’ll give a screenshot, I’ll tell you about the main parameters later in the review in more detail.
Despite the massive aluminum body and thick diffuser lens, the lamp weighs only 25 g.
As for the design itself, the lens is pressed tightly to the lamp radiator and fixed with glue. This is one such lamp whose design inspires confidence. I didn't manage to remove the lens the first time. After that, I finally removed the lens and scraped out all the glue; when installing, the lens snapped in place so tightly and did not dangle. Moreover, it was so tight that when removing it again I again had difficulties.
The height of the lamp is 52 mm, which is 4 mm higher than the height of a standard P21/5W incandescent lamp. I'll tell you more about the installation later.
If in the case of an incandescent lamp the light is distributed almost evenly in all directions, then the situation here is somewhat different. The picture of light propagation can be seen in the following figure.
We see that the light from the lamp is quite directional. If you install it in a standard reflector, then the reflector will be of no use.
Electrical characteristics
The declared power of the lamp is 5W. And the nominal operating voltage of the lamp is 12V; the range of operating voltages in the documentation is not specified.
The lamp has a built-in driver that turns on the lamp when the 7V threshold is reached. I will test the lamp in the voltage range from 7 to 15.5V. We see that the power consumption is on average 2.2 W instead of the declared five Watt. As for the lamp driver, it is located in the lamp base separately from the board with the LED.
I would also like to show a graph of current consumption versus operating voltage.
A little warmth or a little more detail about thermal characteristics
The board on which the LED is mounted is made on an aluminum base, which allows for more efficient heat transfer from the LED to the radiator body. You can see the CREE markings on the board. Unfortunately, I couldn’t remove the board with the LED; it was tightly glued to the radiator with sealant. no matter how I tried to remove it, I only scratched the board (
The rated voltage of the on-board network during generator operation is usually around 14V, and based on the power consumption graph we see that it is this voltage that accounts for the greatest current consumption.
We do not take into account consumption below 12V, because in reality, these values should not be in the on-board network for a long time. The heating of the LED in the following figures is shown specifically for the case of operation at 14 volts.
As you can see from the following heat logs, the maximum case temperature was 62.2 degrees. And heating to the maximum operating temperature of the lamp occurs in 30 minutes. The lamp was tested in a cardboard box with dimensions approximately equal to the internal space in the reversing light.
And on the following thermal diagram and graph you can see the maximum temperature of the LED and the time during which this temperature value was reached.
As we know, the life of an LED is usually declared for the case when the nominal operating temperature of the LED is in the range of 80-85 degrees. In our case, we reached a temperature value of 78.3 degrees. We conclude that the thermal operating mode of the LED is very well chosen.
I would also like to talk a little more about the heat-conducting sealant on which the board with the LED is installed. I don’t even have to tell you here, but share my thoughts. The temperature difference between the LED crystal and the surface of the heatsink was only 16.1 degrees.
If anyone is interested, then a couple of paragraphs about it
You can calculate the thermal resistance of the crystal-radiator Rt = (78.3-62.2)/2.24 = 7.18 C/W. Let me remind you that it consists of thermal resistances: R1 (crystal-LED housing), R2 (housing-radiator (mounting location)), R3 radiator (mounting location)-radiator (surface). For greater clarity, I decomposed the thermal resistance of the radiator to the environment into two thermal resistances: R3 and R4, where R4 is the thermal resistance of the radiator surface to the environment.
I wrote literary symbols below just in case, in case I’m wrong somewhere and someone wants to correct me. Based on the fact that we know the surface temperature, we can calculate the thermal resistance R4, it will turn out to be R4 = (62.2-30.5)/2.24 = 14.1 C/W. In these calculations, I neglected the thermal resistance of the LED lens (R0) when measuring the temperature of the crystal. Due to the extreme smallness of the latter.
We can conclude that the board is not fixed with ordinary silicone sealant, but with something more heat-conducting. Of course, using thermal paste would give better results, but the design would become more complicated, because... it would be necessary to additionally fix the LED connector to the housing.
Exploitation
When buying it for turn signals, you should take into account its size and directional beam of light. The LED is located deep in the lamp, due to which the light is quite directional, despite the diffuse lens.
If this lamp is installed in a turn signal like mine, you can see the following picture. The entire light flux is concentrated in the corner of the turn signal.
Due to the direction of the light, the brightness of the lamp from the side is more than twice as bright as from the front. When installing a standard incandescent lamp, the brightness from the front is 10 times higher than the brightness from the side.
Now let's install the lamp directly into the reversing light. On the left is an LED lamp, on the right is a standard incandescent lamp.
I measured the illumination created by the lamp with a lux meter, placing the sensor close to the headlight to eliminate exposure to sunlight as much as possible, we see that the LED lamp is slightly inferior to the incandescent lamp. Namely, an incandescent lamp is 15% brighter than an LED lamp.
Let's draw conclusions
Pros:
High build quality, low operating temperature, this lamp will probably last quite a long time.
I also note that the consumption of this LED lamp is almost 9 times less than a standard incandescent lamp. Cons:
Directional beam of light and price.
And for those who are too lazy to read, as usual there is a video version in a more simplified form: www.youtube.com/watch?v=inm0byIMqUw
That's all for me. Thank you for your interest in my review)
The product was provided for writing a review by the store. The review was published in accordance with clause 18 of the Site Rules.
mysku.ru
Installing strips in taillights
One of the types of tuning is installing LED strips in the taillights.
VAZs of a wide variety of production years are especially often subjected to such design transformations.
In order to install, you need to remove the lights and carefully peel off the glass. Then you need to clean the reflector and dry it well. The next step is to apply the sealant in a thin line where the tape will be applied. A strip of, for example, 18 LEDs is glued and the glass is installed back. The LED wires are connected to the dimensions.
In a similar way, you can install an LED strip on the rear dimensions in silicone, glued with double-sided tape. With some skills, it can be placed in the rear optics in several rows, creating a pattern in the form of a bright luminous grille. But here you cannot limit yourself to just gluing, and you will have to tinker for much longer.
selection tips, possible problems, replacement procedure, reviews
For a car, optics play a vital role, or rather for the safety of its owner. The comfort of movement day and night depends on its working ability. With the help of rear lights, car owners following each other in a line indicate their intention to move backwards.
When breakdowns occur, the question arises: how to change the reverse lamps on your car? We will reveal the secrets of successful replacement below.
A little about the advisability of installing rear lights
It is impossible to imagine moving in a vehicle without moving backwards. To ensure complete safety in rainy weather, fog or at night, ordinary outdoor devices are indispensable. Reversing lamps must work at maximum efficiency. The main requirement imposed by different weather conditions and drivers is the serviceability of vehicle lighting devices. They are entrusted with a special, responsible mission - to illuminate the road surface brightly and clearly while driving in reverse gear.
In addition, reversing lamps are important for other motorists: they will signal the desire of the vehicle in front to back up. Some vehicle owners have to install additional optics. Why? This is due to the design features of the basic kit, when the devices from the manufacturer do not function well enough.
Why doesn't the reverse lamp work as motorists expect?
Reasons for installing additional light
First, you should understand why you have to raise this topic and learn more about the design of lighting devices.
By engaging reverse gear, the motorist closes the contacts. This occurs due to the release of the switch ball from the rod. When in good condition, the flashlight receives voltage. The result is that the lamps light up. Upon returning to forward gear, everything returns to its original position: the contacts will open. Thus, the electrical network plays an important role in ensuring the operating condition of lighting units. Experts identify several reasons why reverse lamps fail. The most common are the following:
- The contacts on the flashlight films burn out.
- Reverse motion sensor wires break or break.
- Light bulbs burn out.
- Contacts oxidize or fuses fail.
The only way to eliminate defects is to replace the reverse lamp, which can be done at a car repair shop or yourself. If you decide to fix the lamps yourself, keep in mind that working with electrical wiring requires care and attention. A multimeter will become an assistant in this matter: it is used when a light element burns out.
If the contacts are oxidized, they will need to be cleaned. Access to them is provided by removing the headlight unit.
Features of headlight removal
There is nothing complicated about this, beginners should not get lost:
- First, you will have to turn off the exterior lighting of the car.
- Next, open the trunk and disconnect the wiring connectors. It is better to take care in advance of removing the upholstery located behind the headlight.
- Now you need to squeeze the latches on the sides and carefully pull out the panel.
- After cleaning the contacts, you need to put everything back.
If in a car the process of supplying electricity to the main and auxiliary components, which is provided by the body, is disrupted, then they speak of a lack of mass. In this case, car enthusiasts will need some advice: change the broken wires and repair the broken ones.
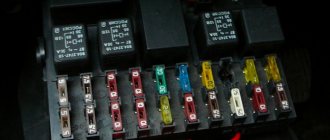
If the fuse is blown, there will be no problems. After all, it is located in a separate block, which can be easily replaced.
Secrets of checking a brake light
This procedure is no more complicated than discussed above:
- The lamp switch switch is removed.
- The ignition turns on.
- The contacts of the reverse gear sensor connector are closed with a small piece of wire.
- If the reverse lights come on, the problem is a faulty “frog”.
Many people begin to analyze switches and think about contact protection. These methods are effective, but there are nuances. It all depends on the make of the car. On some models, the limit switch is located below the lubricant level in the transmission. Therefore, experts still advise replacing the power sensor.
There are machines on which the optics do not work due to insufficient strength of the limit switch used for activation. A thinner washer will be the right solution for mounting under the “frog”. A multimeter will show the operating capabilities of the switch. To do this, you need to put it in ohmmeter mode. It also doesn’t hurt to check the base of the reverse lamp; sometimes the problem lies there.
How to check the chain?
Diagnostics will help determine the causes of problems with the reversing lights. The main thing is to find an area where there is no tension. This will help identify the control light and ohmmeter:
- The test begins with the limit switch connector.
- The ignition is turned on with one contact of the control lamp. The connection occurs to a metal part connected to the body part, on which there is no paint.
- The second contact is synchronized by the “+” connector:
- If there is power, you should check the reverse sensor.
- Are the lights not on? You will have to fix the problem in a section of the circuit: most likely there is a break somewhere.
To eliminate problems, the motorist is recommended to study the diagrams and instructions, as well as the design features of his car.
What to do if the lamps are constantly on?
Some car enthusiasts are faced with the problem of chaotic starting of lamps that turn on regardless of reverse gear or burn in constant mode. Auto mechanics note several reasons for this situation:
- the connection of the power sensor and the wires from the lamps led to a short circuit;
- frayed wire;
- The sensor is stuck in a closed state.
For cars operating on an automatic transmission system or CVT gearbox, breakdowns can be caused by a number of other reasons. Repairing the lighting here will be a little more difficult. This is due to the presence of a gear controller. Therefore, it is safer to contact a specialist workshop.
Review of heavy-duty lamps in reversing lights
Recently, cars with powerful LEDs installed in reverse have begun to appear. Then, judging by the reviews, it was an excess and luxury. The cost of one lamp was quite high.
But some time passed, the market was filled with cheaper diodes and opinions changed. The Internet is full of positive reviews. The authors are confident that such illumination makes it much easier for the car owner to maneuver in poorly lit areas.
Those who have installed powerful LED lamps in reverse speak extremely positively about them. They just recommend not to overdo it, otherwise the light will blind the driver behind the car.
Conclusion
Optical devices must be in good condition, since failure puts drivers at risk. In addition, for the absence of light, the traffic police will require you to pay a fine. The road does not forgive mistakes and a careless attitude towards the vehicle, requiring the driver to have clear, coordinated functioning of all systems, components, and spare parts in the car. Only in this case can you confidently set off on any route.
fb.ru
LED reverse lamps, base BA15S, ≈5 W
We are talking about lamps for car lights, designed to illuminate the space behind the car when reverse gear is engaged.
I have always been skeptical about LED car lamps, unless they are for interior lighting. And, in principle, there was always enough light from P21W incandescent lamps. However, I was offered to review a couple of LED lamps; apparently, it’s time to check and compare.
Package:
Appearance:
Characteristics from the seller's page:
— Luminous flux: 850 Lm — Water protection: IP67 — Base BA15S — Temperature 6000K — 21 LEDs, type 3535 — Voltage: DC 12V-24V — Glow options: White/red/yellow — Life expectancy: 30,000 hours
The lamp inside has a driver that limits the current to a given limit, regardless of the voltage in the range from 12 to 24V:
Lamp dimensions:
Comparison of LED and halogen lamp dimensions:
Current consumption 0.38A/0.19A (12/24V), really work at 24V, can be used in trucks:
Temperature in different parts after a minute of glow:
Temperature in different parts after two minutes of illumination:
Judging by the datasheet, 3535 LEDs have a heat dissipation of up to 2 W and an operating temperature of -40 to +85 °C
The aluminum housing acts as a heat sink for the lamps under review; it houses three boards with six LEDs.
mysku.me
Options for installing light bulbs on reversing lights
The bright, beautiful light of LED bulbs goes especially well with xenon. If you choose the right color temperature, it will even be difficult to distinguish them, so it is important to correctly install xenon in the reversing lights. The lanterns look stylish and perform their tasks properly. You can also buy LEDs, which emit light similar to that of regular incandescent bulbs.
It all depends on your taste and the effect you want to achieve. It’s no secret that LED reversing lamps not only illuminate the space behind the car, but also act as design elements.
You can find reverse lamps of very different power and configuration.
Some car owners add LEDs to the standard xenon lights in reverse to increase illumination, since xenon does not reach full brightness immediately after switching on. In this case, installation is carried out on a bumper or on a reflector.
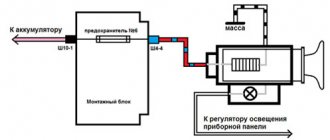
You can install LEDs by including a voltage stabilizer or fuses in the circuit. The power drive can be routed through the vent. Let us remind you that the black wire on the headlight means “minus”.
But this, as they say, is the car owner’s fantasy. The greatest effect will be if you replace the rear lamps directly and make the lights completely new. They are produced by the most famous manufacturers, who have their own developments and technologies, and little-known companies from China. There are also domestic lamps, so the choice is quite large.