With such a sad and drooping look, she rode on the main road for 2 weeks. I was too lazy to get into the headlight, because I knew that in order to remove it I needed to remove the bumper. And if you remove the bumper, you need to immediately replace the lamps in the PTF. Therefore, I simply disconnected the right headlight from the circuit, ripping out the contact block))) But today I decided to correct the jambs of the crooked creators of either the headlight or the car as a whole. I bought some lamps. The moral principles of a xenophobe and respect for people along the way did not allow me to buy xenon. I took these lamps of Korean and Russian production:
I took apart the half of the muzzle and pulled out the headlight.
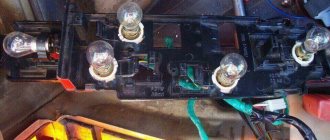
I dug out the block with wires from the old and current headlights. And after spending half an hour at the gynecologist, I installed wiring from an old headlight to replace the melted one.
Well, of course, I had to assemble everything, not forgetting about the PTF lamps. I also cleaned and wired all ground wires. The result was this:
Removal and installation of the headlight unit is carried out in case of its replacement with a new one, or for modification or tuning. The process is not complicated, but it has some features that are best familiarized with in advance so as not to break anything. Let's look at the instructions for replacing a Priora headlight with your own hands.
You will need: flat and Phillips screwdrivers, 10mm wrench. It is not necessary to completely remove the bumper; it is enough to unfasten only the part from which the headlight will be replaced.
Procedure:
- Remove the connector with the headlight wires by prying it up with a screwdriver;
- Remove the upper headlight mounting bolt;
- Remove the lower headlight mounting bolts.
Installation is carried out in reverse order. Watch also the video on how to remove a headlight on a Priora:
Have you ever had to remove the Priora headlight unit yourself? What difficulties did you have to face? Let us remind you that you can install LED DRLs in the headlights yourself, or buy tuning optics.
Installation and connection of bi-lenses with xenon in Priora headlights
| Tuning Lada Priora headlights, on the one hand, can be like decorating a car, on the other hand, it can improve the headlights. The most correct way to improve lighting is to install bi-xenon lenses in the Priora. |
Fifth generation lenses (G5) are excellent for VAZ 2170 headlights. The price of such pleasure starts from 3000 rubles.
Connector connecting the headlight unit (10 terminals) on a VAZ Priora
Dear customers, in order to avoid errors when sending the AX-436 connecting block to the VAZ 2170 headlight unit with wires, in the “Comment” line, indicate for which headlight unit, your car model, year of manufacture.
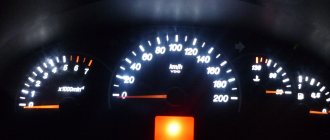
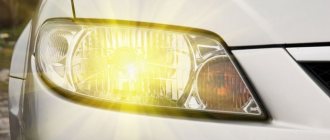
In any car, optics play an important role, since the driver’s safety depends on the quality of road surface lighting at night. Accordingly, because of this, many car enthusiasts periodically check their headlights to ensure better illumination.
Block headlight of a Lada Priora produced before 2013:
1 — low beam lamp cover; 2 — screw for adjusting the headlight beam in the horizontal plane; 3 - ventilation valve; 4 — direction indicator lamp socket; 5 — screw for adjusting the headlight beam in the vertical plane; 6 — cover of high beam and side beam lamps; 7 - electrical connector.
When replacing the headlight unit on VAZ 2170 cars, the car enthusiast usually saw a depressing picture: all the insulation was tanned, the contacts were oxidized and the wire strands broke after replacement, the surface on the headlight unit crumbled and there was no proper contact.
The reason for this is the daily load on the front headlight units: overheating of the contact part due to the small cross-section and long-term operation.
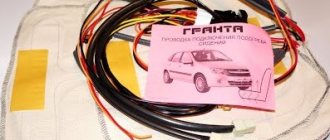
Connector AX-436 with wiring assembly, which is an element of the engine compartment harness, is designed to connect to the wiring harness of the VAZ 2170 / Priora front headlight unit and provide power to the high and low beam lamps, as well as the side light lamp in the front headlight unit of cars of the VAZ 2170 family.
Wiring harness for VAZ 2170 / Priora front headlight unit until 2013. (old model) and wiring harness for VAZ 2170 / Priora front headlight unit after 2013. (new sample) are not interchangeable.
The AX-436 connector with headlight generator harness wires is highly resistant to adverse environmental influences (high humidity, saline solutions, oil, gasoline and their fumes, aggressive detergents). The connector with Cargen wires uses wires with copper cores with a cross-section from 0.5 mm to 6 mm.
The AX-436 connector with wires in VAZ 2170 cars satisfies the needs of consumers and complies with the requirements of GOST R51814.1-2004 (ISO/TU 16949:2002).
Replacing the block with wires AX-436, located in the engine compartment and being an element of the headlight generator harness for connecting the front headlight unit, through connector 2170-3711010РХ in cars of the VAZ 2170 family, can be done independently, without contacting specialized service services.
Since the headlights have different connector assemblies depending on the year of manufacture, we ask you to indicate the model of your car, the year of manufacture of the car in order to avoid errors when ordering “In the cart/in the order comment line” For example, “VAZ 2170, 2014.”
Other article numbers of the product and its analogues in catalogues: AX-436.
VAZ 2170.
Any breakdown is not the end of the world, but a completely solvable problem!
How to independently replace the headlight generator harness connector connecting the headlight unit on a VAZ 2170 family car.
AvtoAzbuka online store, repair costs will be minimal.
Just COMPARE and BE SURE!!!
Don't forget to share the information you find with your friends and acquaintances, because they may also need it - just click one of the social networking buttons located above.
Installation of bilens in Priora
First you need to remove the optics and then disassemble them (see the article “Painting headlights”). Depending on the size and design of the lens, it may be necessary to modify the headlights locally, for example:
- Use a rasp to slightly bore the lamp socket, because... The diameter of the lens base may be slightly larger.
- Trim the headlight reflector a little so that nothing interferes with the corrector’s operation.
- grind off the edges that do not allow you to install the adapter washer directly from the H7 to H1 lamp.
- etc.
When nothing prevents the installation of the bi-lens, we put a rubber seal on the lens body and insert it into the hole on the headlight. On the other side, we also install a sealing rubber and on it an adapter washer under H7 (if any). Press firmly and secure with the nut included in the kit. We pass the wiring from the bi-lens curtain into the hole that remains from the reflector cap.
We tighten it tightly and check that the lens is well fixed inside the headlight. We install the lamp holder, which is secured with 3 screws, and the lamp fixing spring.
Next is the assembly of the reverse sequence optics:
Work order
- Disconnect the negative cable from the battery.
- Disconnect the two electrical connectors of the headlight unit.
- If there is a fender liner, unscrew it on the side of the bumper, usually 2-3 outer screws.
Using a 10mm wrench, unscrew the two bolts of the upper headlight mounting.
Unscrew the 2 bolts securing the decorative radiator grille.
Lifting it and sticking your fingers into the gap between the grille and the bumper, release 2 latches on each side
We unscrew the bolt of the lower fastening of the headlight unit.
Unscrew or loosen the 2 bolts of the upper bumper mounting and slightly pull the bumper towards you.
Using your fingers or a screwdriver, carefully pull the edge of the decorative trim — the “eyelash” — away from the headlight unit. In the resulting gap we see a plastic tab-latch, with the help of which the edge of the eyelash is attached to the edge of the wing.
CAREFULLY remove the tongue from engagement with the wing, without applying extra effort, it’s easy to do with your fingers!
We move the trim to the center of the car and remove it.
I HIGHLY recommend that before removing the eyelash, lubricate it along the entire arc of attachment to the bumper with silicone grease.
Using a “10” socket, unscrew the nut securing the headlight to the bracket.
Use a screwdriver to pry up the hydraulic corrector cylinder retainer, turn it and remove it from the headlight housing.
We carry out the assembly in the reverse order without using brute physical force. When installing the eyelash in place, we push its lower edge with a screwdriver.
If you work very leisurely, the entire procedure for dismantling and installing the VAZ 2110 front headlight will take 20 minutes.
Tuning optics on domestic cars is a fairly common phenomenon, due to the not-so-perfect design of cars, which includes the Lada Priora. Therefore, many try to independently change the appearance of the car.
Tuning optics is a process that seems simple only at first glance.
Many car enthusiasts who do their own tuning forget that when changing optics, they must comply with technical safety requirements and GOST standards.
The headlights illuminate a specific area of the road and are adjusted on a special stand. Customizing or using more than two additional headlights, especially when it comes to fog lights, may be illegal.
Connecting lenses in Lada Priora headlights
There are a lot of options for connecting bi-xenon lenses:
- The near and far are in a bi-lens, but we refuse the standard light.
- The near one is in a bi-lens, and the far one is standard (we do not connect a curtain in the lens).
- Near and far in the Bi-lens, as well as a standard long-range one.
- Options for connecting 2 lenses into one headlight.
- Etc.
If you proceed according to the first option, then you need to connect the lens shutter: we take “plus” and “ground” from the main beam and connect them to the shutter contacts on the lens, respectively.
If we consider the third method, then in parallel to the standard high beam we connect the curtain to the same contacts.
After installing the optics, all that remains is to check the new Priora xenon, making sure that the light beam is formed in accordance with GOST and does not blind other road users:
An easier way to tune headlights is to install LEDs in the headlights. Don’t forget about the harsh fines for xenon, and to legalize xenon you need to install automatic headlight leveling and headlight washers, but that’s another story.
source
Lada Priora headlight tuning - installation of lenses, eyelashes, substrates
The Lada Priora car has different options for tuning headlights. This could be: replacing the substrate with a different color, due to which the Priora headlights will acquire a new tinted color. Installation of lenses. Painting or decorating with eyelashes. Tuning headlights on a Priora is not just decoration. Good optics will illuminate the road so that at night visibility conditions will be much better. People complain about the Lada Priora family that the standard one is “dim.” Owners take care of the optics so that the front headlights shine well, and the rear ones look beautiful, but are safe - after all, these are brake lights.
Tuning headlights on a Priora with your own hands is not a fairy tale. You can change the optics on your car yourself without contacting a service center. For example, installed LEDs in the angel eyes style will highlight the elements of the car, and this operation is no more difficult than assembling a construction set.
A good solution for the Priora is to install a brighter lamp and be sure to adjust it. Previously, it was “customary” to completely change the headlight unit, which changed the appearance of the car very much. Tuning the front and rear lights on a Priora is not so complicated, but it will create its own highlight for your favorite car.
You should know moderation in everything - if the desire is too strong, car owners neglect the technical inspection standards, and therefore the lighting fixtures either become dimmer or become so bright that they blind other road users, and this is, at the very least, impolite. Read the article to the end and find out all the details of this topic!
Frames (masks) and tuning LASERLIGHT headlights
LASERLIGHT frames are made on the basis of standard factory Priora headlight masks. LED DRLs and LED turn signal modules are installed on them like angel eyes. These modified masks are designed for installation in headlights instead of standard ones. Suitable for any optics (Kirzhach, Bosch, China) and any year (restyling and pre-restyling). See how to disassemble the headlights.
LASERLIGHT frames can be manufactured in two versions:
- chrome (price 10,000 rubles);
- black (price 11,500 rubles).
For Priora owners who do not want to disassemble the headlight and install frames themselves, there are lens block headlights (one lens in each headlight) assembled with such frames.
Cilia
Tuning Priora headlights, for many, ends precisely at the “eyelashes”. These are ordinary covers that follow the shape of the top of the headlight and are painted in body color. They are sold ready-made in auto parts stores, but eyelashes can be made. They can be made from a piece of vinyl film, the shape of which will have to be changed in order to be applied to the headlight - this is done with a soap solution (in the same way as with applying tint). The trims from the store are attached to the body either with sealant or double-sided tape. Remember that eyelashes limit the height of the illuminated space. In addition to them, there are other worthy ideas for tuning the Lada Priora.
Main differences
At first glance, it is not clear that these headlights are completely different, but if you are faced with the need to replace any of the headlights, you run the risk of purchasing a model that is completely unsuitable and will differ from the second headlight.
BOSCH or Kirzhach
Difference between Bosch and Kirzhach headlights:
- To replace the light bulb in the main lighting, you need to disconnect the black circle-shaped housing under the hood on the Bosch headlight. In the Kirzhach headlight, the casing is rectangular and secured with two screws.
- The headlights differ in the glass pattern; in addition, each of them has a manufacturer's mark. The Bosch package includes a glass frame; replacing it does not require complete disassembly of the headlight.
- There are also differences in the mounting of the turn signals. The Kirzhach turn signal is equipped with two fasteners, has a central latch and a spring tensioner. The Bosch turn signal is also equipped with two fasteners and a spring tensioner, but does not have a latch. This indicates that the turn signal from one company cannot be replaced with a model from another company; interchangeability is completely excluded.
- The reflector also has significant differences. The Kirzhach company has a narrow and long reflector with an internal partition that divides the light beam in half. Moreover, there is no upper wall in the reflector. The Boshevsky reflector is shorter and wider in shape; all walls of the model are equipped with it.
Considering the more balanced and high-quality Bosch reflector, the light of the model is brighter and more saturated, unlike the opponent’s model. Also, to achieve a greater effect, it is possible to replace the lamp with a better one, and it is necessary to carry out an adjustment procedure.
Installing lensed headlights
Installing lenses will change the illumination - after the modification, there will be no standard optics left inside the unit. First of all, a reflector will appear that will redirect the light rays forward into the space in front of the car. Instead of standard light bulbs, optics with lenses are installed, which creates a spectacular glow.
This option is considered the most expensive, and the effect will be noticeable. Separately, you can change the color of the substrates if you can’t spend money on optics.
How to install angel eyes
Angel eyes on the Priora are LEDs that are installed inside the front unit, along the perimeter of the lenses and in the rear light. To do this you need to purchase:
- Electric wire of moon-white color. Type SH; diameter 2.6 mm;
- Receiver (Operating voltage – 12 Volts).
After everything is ready, you can begin active actions:
- Raise the hood, remove the battery (this will make it easier to work).
- Dismantle the block, remove the substrates.
- First secure the wires in place with tape (lightly) or clothespins - this is done to fix their position. Then fix them with epoxy resin.
- Wait for the resin to dry, secure the substrates and seal all the gaps with sealant so that the glass does not fog up. We carry out the installation.
Painting headlights
Tuning the front and rear lights on a Priora is not limited to increasing the aperture ratio. They can be tinted. But this does not mean that you need to paint the glass - the light will simply become cloudy. The tinting effect is obtained due to a change in the color of the substrate. This is done using high temperature paint.
This is done in the following order:
- The entire block is removed and the backing is removed;
- Wipe off the chrome from the substrate (zero polish will help). Cover the substrate with two or three layers of primer and wait about an hour;
- Apply 4-5 layers of paint over the primer, wait for each layer to dry;
- Assemble the block lights, close all the cracks to prevent fogging;
- After painting, all that remains is to adjust them. The main thing is that the light is not too dim and does not cause inconvenience when driving.
Adjustment after any modification of the optics is performed as follows:
- Place the car at a distance of 5 m from a flat wall (for example, opposite the garage);
- Set the adjusting screws under the hood to “0”. Put a person of similar height behind the wheel;
- The headlights are adjusted one by one; while one is being adjusted, the second one is closed;
- The clear edge of the light should be 10 mm below the top edge of the headlight.
Adjustment is not a useless requirement of technical inspection standards. This must be done for comfortable driving at night - you won’t need to peer and look for obstacles on the road, they will be illuminated if adjusted correctly.
Features of headlight adjustment
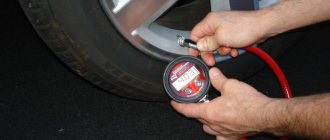
It is advisable to place an assistant in the driver's seat or place a load weighing about 75 kg. The vehicle's tires should be well inflated and the tank at least half full to bring its weight closer to the weight at which it is driven daily.
The adjustment is carried out on a vertical wall or stand on which markings are applied. To correctly adjust the optics, it should be possible to move away from the wall at a distance of 5-10 meters. This makes it possible to create an imitation of lighting on the road.
Wall marking scheme
To apply markings, you need to place the machine closer to the wall and. Then you need to alternately mark the center of the trace from each headlight and the centers of their symmetry. By connecting these points, we get a horizontal line. Then, below, two more lines should be drawn in parallel. The second is at a distance of 5-12 cm, and the third is at a distance of 22 cm from the first. In addition, you need to draw vertical lines through the center points of the car and the lights.
After turning on the light, you need to ensure that the top point of the light is on the second line. The adjustment is made using an electric headlight adjuster. The adjusted light will illuminate the road well and will not blind oncoming drivers.
Installation of LED DRLs
LEDs for replacing daytime running light bulbs must comply with GOST. They provide excellent light during daylight hours, and if connected correctly, light up when the ignition is turned on.
The connection is made through a five-pin relay; plastic corrugations can be used to insulate the wires. Each LED block will have a black and a red wire coming from it. It is advisable to connect the black one to the windshield wiper fuse F11 (20), and the red one to the left side light fuse F14(5).
The use of LED DRLs instead of factory ones after the first week will change the Priora owner’s view of his own car. Such a small part can cost about 500 rubles for two lights, but its appearance on the road will be noticeable to everyone.
source
Communities › Lada Priora Club › Blog › Lenses for headlights
I'm about to install lenses and have a few questions:
1) Which lens body material is better? (plastic or metal), the question came to a head after people wrote that metal ones were heavy and dangling.
2) I want to install Bi-lenses in the FAR compartment; in the near compartment it looks ugly, like the car is “skewed”. Will a 3 inch lens fit?
3) Will the corrector work in the Far compartment with a 3-inch lens?
4) Should I take a lens with angel eyes (only for the lens) or buy them separately for the entire headlight (diodes for the near and far sections)?
Kinds
To change the appearance of a car, they often use minor types of headlight tuning on a Priora that are accessible to literally everyone:
- visual change in design, for which “eyelashes” are actively used;
- creating LED lighting or “angel eyes”;
- painting the headlights black (it is the surface of the headlight reflector that is painted);
- tinting the glass of a lighting fixture.
Installation of bilens on Priora
Nowadays there is a tendency to improve car light; on our website there are already many articles about installing xenon and fog lights. The most correct way to improve lighting is to install bi-xenon lenses on the Lada Priora.
Fifth generation lenses (G5) are excellent for Priora headlights. The price of such pleasure starts from $80.
Do-it-yourself installation of bilens on Priora
The first step is to remove the optics from the car, then disassemble the housing. Depending on the size and design of the lens, it may be necessary to modify the headlights locally, for example:
1. Slightly bore the lamp socket with a rasp, because The diameter of the lens base may be slightly larger.
2. Trim the headlight reflector a little so that nothing interferes with the corrector’s operation.
3. Grind off the edges that do not allow direct installation of the adapter washer from lamp H7 to H1.
When nothing prevents the installation of the bi-lens, we put a rubber seal on the lens body and insert it into the hole on the headlight. On the other side, we also install a sealing rubber and on it an adapter washer under H7 (if any). Press firmly and secure with the nut included in the kit. We pass the wiring from the bi-lens curtain into the hole that remains from the reflector cap.
It is worth noting that when disassembling the headlight, you can paint the headlight mask on the Priora. The black mat together with the bilens will look fantastic.
We tighten it tightly and check that the lens is well fixed inside the headlight. We install the lamp holder, which is secured with 3 screws, and the lamp fixing spring.
Next is the assembly of the reverse sequence optics:
How to connect bi-xenon lenses to Lada Priora
1. Near and far in a bi-lens, but we refuse the standard light.
2. The near one is in a bi-lens, and the far one is standard (we do not connect the shutter in the lens).
3. Near and far in the Bi-lens, as well as a standard long-range one.
4. Options for connecting 2 lenses into one headlight.
If you proceed according to the first option, then you need to connect the lens shutter: we take “plus” and “ground” from the main beam and connect them to the shutter contacts on the lens, respectively.
If we consider the third method, then in parallel to the standard high beam we connect the curtain to the same contacts.
After installing the optics, all that remains is to check the new xenon on the car, making sure that the light beam is formed in accordance with GOST and does not blind other road users:
Don’t forget about the harsh fines for xenon, and to legalize xenon you need to install automatic headlight leveling and headlight washers, but that’s a completely different story...
How to remove a headlight on a Priora - photo report
To get to all the headlight mounts, you need to remove the front bumper completely, or partially, moving aside the part that will interfere with repairs. The ideal option is partial removal, so as not to twist unnecessary nuts and bolts.
After the bumper is removed, unscrew the top mounting bolt, which is clearly visible in the photo below.
Then you can unscrew the bottom bolt.
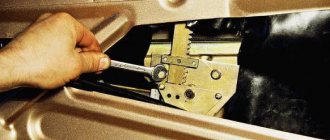
The third fastening is located on the side and to unscrew it you will need a Phillips screwdriver:
Now all that remains is to disconnect the block with the wiring harness from the Priora headlight unit, after first prying up the latch with a thin screwdriver.
We end up with the following result:
Now the headlight can be removed without any problems, since nothing else is holding it!
To more clearly show the entire process, you can provide a video report on this repair.