Functional purpose of a car hood
The usual purpose of a car hood is to protect the engine compartment of the vehicle in which the engine is located.
Similar protection is needed from the negative effects of external causes. Car owners refer to the cover of the car's engine compartment as the hood. It is made from various materials of the highest strength, for example, steel, aluminum, etc. Thanks to this, in addition to its protective functions, its special shape increases the aerodynamic properties of the vehicle and absorbs the noise produced by the engine.
Why won't the hood open?
The hood of a car may not open for several reasons. For example, his lock may become damaged. In addition, due to mechanical damage, for example during an accident, the hood and engine compartment are deformed. This may also make it impossible to open.
If we talk about the most common reason for this phenomenon, it is a banal break in the metal cable that drives the hood locking mechanism.
A cable can break for various reasons, the main ones being: wear, corrosion on the surface of the cable, or excessive force applied to it.
In the case when the cable is broken, the owner of a VAZ car can open the hood on his own, as this is a relatively easy procedure. In all other cases, it is quite possible that you will have to involve professionals in the repair work.
Replacing the hood lock on a VAZ 2110, 2111, 2112
An article with photos and video materials for everyone who is faced with the need to independently replace the hood latch on cars of the tenth LADA family
1. Before you begin replacing the hood lock, you must remove the radiator trim.
2. Before you start replacing the lock, you need to mark the position of the bolts relative to the car body, this will make it easier to adjust the position of the new lock.
3.Now you can unscrew the two bolts securing the lock. There should be spring washers underneath them.
4. Then we turn the lock 180 degrees and remove it from behind the amplifier with a spacer (
1 ). This is necessary in order to be able to gain access to the place where the rod is attached ( 2 ) to the lever of the lock itself.
And disconnect the rod. 5. Now that the lock has been removed, you can replace stretched or broken springs. To do this, use a screwdriver to remove the spring first from the lever and then from the hinge on the lock body. The new spring is installed in the reverse order. The most convenient way to do this is with pliers. 6. Install the lock in the reverse order of removal. After this, check the ease of opening and the reliability of locking the hood lock and, if necessary, adjust the position of the lock (see subsection 8.7.3.2).
6. Reinstall the lock in the reverse order. After installation, check the ease of opening and closing the lock. Adjust it if necessary.
7. If it is necessary to replace the hood safety hook, then before removing it, you must also mark its position relative to the hood itself. After replacement, the hook will be adjusted according to this marking. First, unscrew the two bolts securing the hook itself and remove the spring washers with the hook. The position of the new hook is adjusted by enlarging the bolt holes on the bracket. The hook fastening bolts are finally tightened after checking the ease of opening the hood and the reliability of its closure.
How to protect the hood of a VAZ 2110?
Any car enthusiast in our country appreciates a car like the VAZ 2110. Back in 1983, it was decided to design a sedan based on the VAZ 2108 hatchback. Only the design engineers made many changes.
The car has become not only more powerful and interesting, but also more expensive. Therefore, it was decided in 1984 to create a completely new sedan model. The hood of the VAZ 2110 differs in appearance.
There are many distinctive features and first you need to figure out what this element on the car is.
General concept
This is a body part whose task is to protect the engine and other elements of the engine compartment of the car from any negative influences of external factors.
In simple terms, this is a cover on the engine compartment of a car. Drivers often define it this way: “Refers to the protruding part of the body, located together with the engine.”
The car dictionary states that this is a cover that covers the compartment of any vehicle.
No matter how the interpretation of the hood sounds, its purpose is as follows:
- Protect the engine;
- Increase the aerodynamic properties of the car;
- Absorb engine noise.
Device and installation
The hood of the VAZ 2110 consists of the following components:
- Loops;
- Gas-filled stop;
- Stop fingers;
- Hook;
- Lock retainer;
- Hood fastening nuts;
- Castle;
- Lock fastening nuts.
Drivers often have to remove and install many elements themselves while on the road. This is not difficult to do. The hood of the VAZ 2110 is hung along the rear edge in front of the body on special hinges. There should be a lock installed on the front, and a hook and latch on the hood itself. The hook serves as protection against inadvertent opening of the hood while the car is moving. Even if the hood is open, it is always held in place thanks to gas-filled stops.
If you need to remove the cover on the engine compartment (that is, the hood of a VAZ 2112 or 2110), you need to remove the hood and hold it in this position. Next, you need to unscrew the stop pins from the fastening nut and unscrew the nuts securing the cover itself to the hinges. Then the stops are removed from the body and finally the hood itself.
Before you begin installation, you must finally tighten the fastening nuts and adjust the position of the cover in the opening. They must be installed so that the gaps with the left and right wings are the same. Everything is adjusted by enlarging the holes in the hinges.
Adjusting the lock and hood
The lock plays a big role in the lid. It should close the hood securely. If the lid opens with force, then you need to do the following:
- Open the cover and loosen the housing fastening nuts;
- Move the hood lock under the mounting studs to the required position (while the holes are slightly enlarged);
- Screw the nuts back;
- Check the operation of the lock.
When work with the lock is completed, you need to adjust the hood itself. First, inspect it closed. When it is closed, both wings should be at the same distance from it, approximately 3 mm. At the leading edge it should be in the same plane as both wings. It is important that the height adjustment is carried out correctly.
The adjustment is made as follows:
- At the top, loosen the bolts between the hinge and the hood;
- To carry out lateral adjustment, you need to loosen the bolts between the body and the hinge;
- Move the cover in the desired direction and tighten the bolts;
- Screw the thrust shock absorbers along the front edge both on the left and on the right to the edge of the metal;
- Loosen the fastening bolts of the lock and move it up or down to the desired location;
- Check the height setting with the lid closed. It is important that the top edge of the hood is flush with the fenders;
- Tighten the hood lock mounting bolts;
- The locking clip must fit into the hole in the lock. If not, then you need to move the locking plate to the side, but only after loosening the fastening bolts;
- It is necessary to screw in the thrust shock absorber until the hood swings in the closed position.
Usually the adjustment is carried out several times. It is not always possible to do everything correctly on the first try.
It is important to monitor the condition of the cable on the hood. If it fails, it must be replaced. The work is done like this:
- Open the hood.
- Hang the nipple located at the end of the cable out of the lock.
- Hang out the cable sheath.
- Remove the cable sheath from the bracket; it is usually placed in the groove of the gasket.
Next, all that remains is to dismantle the receiving pocket, which is located under the dashboard on the left.
The pocket is dismantled like this:
- The release handle is unscrewed (it is located at the driver’s feet).
- The hood cable is pulled into the interior.
- Pull the prepared new cable through the rubber nozzle.
- Screw the release handle.
- Place the cable sheath into the recess of the hood gasket and into the brackets located on the front of the machine.
- Pull the cable through the counter support of the lock and hang the sheath.
- Attach the nipple to the lock at the end of the cable.
This is interesting: We remove the front and rear head restraints of the Octavia A7.
Only after all this work has been carried out, we can consider that the adjustment has been carried out successfully.
Painting
Nothing lasts forever on Earth and over time, scratches appear on the hood and rust forms. Therefore, many motorists specially order it in plastic. But for those who have it made of metal, there is only one thing left to do - paint it.
Can't do the job without:
- Boards;
- Cotton gloves;
- Paints;
- Air compressor;
- Spray gun;
- Acidic soil;
- Degreaser.
Painting is carried out as follows:
- The car must be thoroughly washed with a special shampoo. Remove dust and dirt from all hard-to-reach places and it is advisable to use different brushes for this work. Wash the floor well and blow through all the walls with a compressor. It is important that there is no dust left anywhere. Before painting, douse the floor with water.
- Remove the hood. First you need to unscrew the bolts that hold the gas stops. Support the hood with a wooden stick. When the gas stops are removed, remove the hinges.
- Carefully inspect the places where stops and hinges are attached. Usually this is where corrosion always starts. If you come across places where the metal has rotted, then such pieces need to be cut out. Make a patch and weld it.
- Install the hood. To do this you need to use special sawhorses. You can do it yourself. You need to take several boards and nail them crosswise. All old paint from the surface of the hood is carefully removed. This work should be done using sandpaper or coarse sandpaper.
- Degrease the surface with a special solution and apply a thin layer of acidic primer. After drying, putty is applied. Let the hood dry again.
- The surface is degreased again. Then the paint is applied with a spray gun. The paint is applied in several thin layers. It is important to remember that each new layer of paint is applied after the previous one has completely dried.
- The dried paint is sanded. The surface is degreased. A layer of varnish is applied.
If the painting process was even slightly disrupted, the entire work should be done again.
Methods of protection
It is always important for car enthusiasts that their “favorite child” always remains in good, original condition. The same hood, and it doesn’t matter much, whether it’s plastic or metal, you can always protect it and extend its service life.
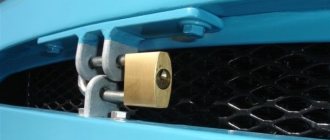
In past times, regular masking tape was used for this purpose. But it's a bit silly and makes the car itself unattractive. Today there is a slightly different way - protection using anti-gravel film.
Most modern drivers use a special hood deflector. It is often called a “wind blower” or a “fly swatter”. This is a small plastic strip. It is attached to the front edge of the hood. With its help, good protection against stones is formed. There is another important fact. The deflector not only protects from stones, it directs flying stones above the roof of the car. This will also protect the windshield.
It is noted that thanks to this simple device, less dirt will get on the windshield. To make sure of this, you need to pay attention at stops at intersections. While the car is stationary, much more snow falls on the glass than when it is moving. The deflector not only changes the aerodynamics of the car, it is capable of changing the air flow. While driving, dirt flies past the car.
This is a small drawback of this device. Any changes always lead to increased fuel consumption.
There is another minus. The device must be fastened very well. Adhesive tape, even the thickest one, is not able to withstand it; it is not advisable to use self-tapping screws. The load will increase, vibration will appear, and the mounting points will quickly wear out.
There is another way to protect yourself. Use of anti-gravel and decorative films. It adheres in much the same way as window tint. In this case, the work is much easier. With its help, the hood will be reliably protected, and the appearance will not be spoiled.
It is better to choose a transparent film, even if it has a small pattern or texture. This solution will immediately protect the car and slightly change the appearance of the vehicle. The film can be used on both metal and plastic hoods. Many people have heard about “vinylography”. That is, this is a drawing that is printed on vinyl. The only advantage of a special film is that the pattern can be constantly changed, although this is not a cheap pleasure.
Another way to protect your hood is with a protective polish. You should always use polish after washing. Let it wash off quickly, but as long as it is on the car, it is protected. Although the polish will not protect you from pebbles, it will fill the microcracks, which means there will be no corrosion. You just need to touch up the chips from time to time.
Adjusting the lock and hood
The lock plays a big role in the lid. It should close the hood securely. If the lid opens with force, then you need to do the following:
- Open the cover and loosen the housing fastening nuts;
- Move the hood lock under the mounting studs to the required position (while the holes are slightly enlarged);
- Screw the nuts back;
- Check the operation of the lock.
When work with the lock is completed, you need to adjust the hood itself. First, inspect it closed. When it is closed, both wings should be at the same distance from it, approximately 3 mm. At the leading edge it should be in the same plane as both wings. It is important that the height adjustment is carried out correctly.
The adjustment is made as follows:
- At the top, loosen the bolts between the hinge and the hood;
- To carry out lateral adjustment, you need to loosen the bolts between the body and the hinge;
- Move the cover in the desired direction and tighten the bolts;
- Screw the thrust shock absorbers along the front edge both on the left and on the right to the edge of the metal;
- Loosen the fastening bolts of the lock and move it up or down to the desired location;
- Check the height setting with the lid closed. It is important that the top edge of the hood is flush with the fenders;
- Tighten the hood lock mounting bolts;
- The locking clip must fit into the hole in the lock. If not, then you need to move the locking plate to the side, but only after loosening the fastening bolts;
- It is necessary to screw in the thrust shock absorber until the hood swings in the closed position.
Usually the adjustment is carried out several times. It is not always possible to do everything correctly on the first try.
It is important to monitor the condition of the cable on the hood. If it fails, it must be replaced. The work is done like this:
- Open the hood.
- Hang the nipple located at the end of the cable out of the lock.
- Hang out the cable sheath.
- Remove the cable sheath from the bracket; it is usually placed in the groove of the gasket.
Next, all that remains is to dismantle the receiving pocket, which is located under the dashboard on the left.
The pocket is dismantled like this:
- The release handle is unscrewed (it is located at the driver’s feet).
- The hood cable is pulled into the interior.
- Pull the prepared new cable through the rubber nozzle.
- Screw the release handle.
- Place the cable sheath into the recess of the hood gasket and into the brackets located on the front of the machine.
- Pull the cable through the counter support of the lock and hang the sheath.
- Attach the nipple to the lock at the end of the cable.
How to open the hood
Quite often, drivers have a question: how to open the hood? Most often, this structural element jams due to the fact that the cable breaks. The reason for this is wear of the cable or lack of lubricant in the moving mechanism. This seemingly simple detail plays a very big role. It is thanks to the cable that the hood of the car can open and close. Therefore, when it breaks, it brings significant trouble to the driver.
The most unpleasant thing is that a cable break usually occurs precisely when it is urgently necessary to go somewhere. Therefore, any driver must be able to open the hood of the car in the event of a malfunction. There are two ways to do this, which depend on where exactly the cable broke.
Most often, the rope breaks in the place where the driver pulls the lever. Less often it breaks off under the hood itself. The second case is much more complicated, but we know how to solve this problem.
If the cable breaks where the lever is located
First, you must clearly understand where the cable broke. To do this, you need to move your hand around the lever and make sure that the rope does not fit into it. In most cases the cable is attached to the back of the lever. Carefully examine the area around the handle to clearly see where the rope broke.
Having determined the location, take the pliers and hook the edge of the cable with them. Then pull it towards you, that is, towards the cabin. We recommend that you make a hook at the end of the cable using the same tool. Then the pliers will not slip off the single-strand cable. If you do everything correctly, the hood will soon open.
This is interesting: Mazda 6: replacing brake pads or discs on your own
If the cable breaks on the drive
As we have already noted, such a breakdown is much more complicated, so you will have to tinker with it. If you are not particularly knowledgeable about the structure of a car, it is better to seek help from specialists. But if you feel strong enough to deal with the problem on your own, follow our recommendations.
The hood opens forward
The hood can open forward or backward (as the car moves). If it opens forward, you will have to remove the decorative grille from the front of the car in order to be able to get to its lock. Inspect the grate and try to understand whether you are able to remove it yourself, or whether it is better to turn to professionals. Handle this part carefully as it is not cheap. If you manage to remove the grille, you will see the hood lock right behind it.
How to open the hood of a VAZ 2110 from the outside?
I. For cases when the hood lock simply jams:
- To open the hood of a VAZ 2110, you need to ask an assistant to press the hood. You can sit on the front part of the hood, which is immediately above the lock. If this does not help, then you need to loosen the hood with intermittent movements (press and release).
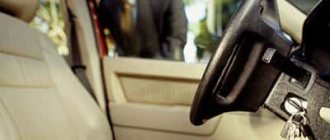
- The driver pulls the hood lift cable.
- When the hood is opened, it is necessary to carefully lubricate the lock.
Material on the topic: What is the real fuel consumption of the Lada Kalina?
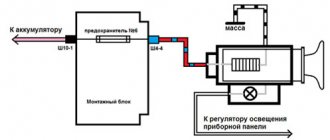
II. Annotation for cases when there is an electric lock on the hood and the battery is dead:
- To open the hood of a VAZ 2110, we disassemble the light located above the driver or passenger seat.
- We light + and – from another car.
- We start our car and open the hood to take out the dead battery and charge it.
* Experienced drivers, in order to open the hood of a VAZ 2110 from the outside , provide for this case a hidden wire that goes to the battery. If the battery is low, you can connect the wiring to the charger and charge the battery.
Related material: VAZ 2109 cooling fan does not turn on
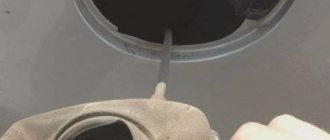
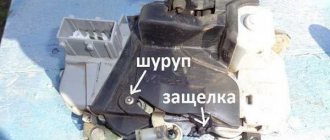
III. For cases where the hood opening cable is broken:
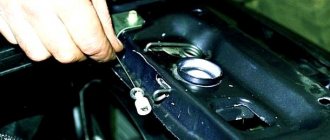
- To open the hood of the VAZ 2110, we put our hand into the air intake (between the bumper and the heat exchanger).
- We are trying to feel the lock tongue, which should be pulled by a cable (pictured).
- We grab the tongue with pliers and pull it down until the lock strap opens.
*Some experts claim that they have come across a hidden cable that helps open the hood on a VAZ 2110. To find it, you need to jack up the front of the car on the driver’s side. It can be securely hidden behind a protective cover in the area of the front wheel. You need to pull the cable down sharply and the hood will open.
I hope the tips helped you cope with this breakdown yourself.
For clarity, here is a video on how to open the hood of a dozen in the field:
It is necessary to figure out where the hood release cable broke.
Carefully inspect the place where the hood release cable is attached to the handle inside the car, lift the handle and try to find the cable attachment to the hood release lever or handle.
If you see that the cable has come off the fastening, or the fastening is broken, but the cable itself is visible, this is the simplest situation. In this case, in order to open the hood with a torn (torn from the fastening) cable, you need to grab the edge of the cable with pliers and pull it towards you, i.e. towards the car interior (as shown in the photo with the hood cable). To prevent the hood cable from slipping out, you can make a loop at the end of the cable and wrap it around the jaws of the pliers. That. you can open the hood if the cable inside the car breaks.
If you examined the hood lock handle in the cabin and did not find a torn or broken cable fastening, then the most likely cause is related to a broken cable in the area of the hood lock. Such a breakdown is quite complicated, because in order to open the hood, you need to get from the outside to the hood lock and force it open. We recommend that you seek the help of specialists who can open the hood and call a car mechanic from our technical assistance service.
Most often on modern cars the hood opens from the front, but there are exceptions when the hood opens forward and the hood lock is installed at the rear, near the windshield on all VAZs of the classic family (VAZ 2101 - 2107) and Nivas, see the video of opening the hood on a VAZ below.
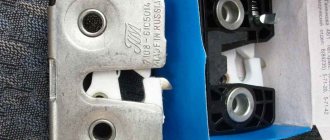
Hood lock of a VAZ 2110 car.
The hood lock is
of a non-demountable design. Only two return springs can be replaced. The lock springs are the same.
You will need a key "10".
1.Remove the radiator trim.
2.Mark the position of the washers relative to the body. This will make it easier to further adjust the lock position.
3.Unscrew the two bolts securing the lock. Spring washers are installed under the bolts.
4. Rotate the lock 180° and remove it from behind amplifier 1 with a spacer to gain access to the place where the rod is attached to lever 2 of the lock. Disconnect the rod from the lever.
5.Replace broken, cracked or stretched springs. To do this, use a screwdriver to disconnect the spring first from the lever and then from the hinge on the lock body. Install the new spring in the reverse order of removal. In this case, it is more convenient to connect the spring to the lever with pliers.
6.Install the lock
in the reverse order of removal. After this, check the ease of opening and the reliability of locking the hood lock and, if necessary, adjust the position of the lock.
7. To replace the hood safety hook, mark the position of its bracket relative to the hood. This will make it easier to further adjust the hook position. Unscrew the two hook mounting bolts (there are spring washers underneath them) and remove the safety hook. When installing the hook, adjust the position of the hook using the enlarged holes in the bracket before final tightening the bolts. Finally tighten the bolts after making sure that the hook holds the hood securely in the closed position and that the hood opens freely when the hook handle is pressed.
Adjusting the position of the hood lock of the VAZ 2110.
1.The position of the hood lock is adjusted due to enlarged holes for mounting bolts in the bracket on the body. To adjust, loosen both mounting bolts.
2.If there is a hard impact when closing the hood and it is difficult to open, move the lock across the car.
3.If there is a lot of force when closing the hood or there is vertical play in the hood in the closed position, move the lock vertically (up or down, respectively). After adjustment, tighten the lock bolts.
If you liked it?! Share with a friend or girlfriend or a plus from the heart. Thank you so much, friends. (Social networks connected in August 2013)
Ways to open the hood in different car models
In different situations, different methods are used to cope with the described malfunction. Among the most common cases are the following:
- cable breakage directly next to the remote lock opening drive lever. In that case, it will be enough to grab its end sticking out in the cabin using ordinary pliers and pull it hard. In this case, it is necessary to pull on the cable itself, and not on its braid.
- a cable breaks in the cabin when it is impossible to grab it with pliers. In this case, you will need bent wire. With its help, you can open the hood, for example, in order to change the oil, even when pliers do not help. To do this, you will need to bend a hook out of wire, insert it into the gap in the air duct or between the body and the hood, hook it onto the damaged cable and pull it until the hood lock opens.
- The cable breaks far from the lock drive lever. In this case, you can try to perform the operation through the air duct. Here you will also need a hook bent from hard wire. It is inserted into the left air duct and a cable is hooked with it.
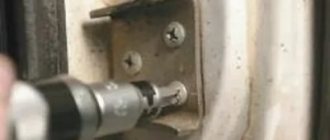
- cable breakage directly in the area where the lock mechanism is installed. Typically, such a lock is installed in front of the hood, and therefore it is useless to pull on it. As a result, the engine compartment lock can only be opened from below, by driving the car into a pit. To do this, you need to pay attention to the crankcase protection by removing it. For this purpose, unscrew its fastenings and pull down the engine boot. Next, insert a long screwdriver into the hole next to the radiator and try to open the lock with it. If it is mounted next to the windshield, try using a loop bent from wire to hook the lock mechanism at the place where the cable is attached and pull it.
VAZ 2107 models
In the case when the engine compartment does not open on a VAZ 2020 car, this circumstance should not be a reason for panic. The fact is that the hood itself, the air intake cover and the place where the cable exits into the cabin are placed in an accessible manner. This circumstance allows you to open the hood of the VAZ 2107 yourself using one of the methods described above.
Difficulties can only arise if, for example, the air intakes here are equipped with decorative trims. In this case, you will have to first remove them and then try to open the hood. It is worth noting that due to the design features of the hinges, the hood of the VAZ 2107, even in good condition, opens poorly and therefore it is worth first making physical efforts, and then starting to open it.
VAZ 2109 models
It will be more difficult to open the hood of the VAZ 21099, since to do this you will have to crawl under the car. In addition, you will need to remove the crankcase protection, as well as the tin boot of the engine. This is done so that you can stick your hand to the radiator. After this, we feel for the torn cable and the ring to which it is attached. We press the lock and ask the assistant, who is on top, to press the hood from above, as well as in the direction of the driver’s seat. You can also hook the lock with a wire hook, but not everyone can do this.
VAZ 2110 models
In order to open the hood of a VAZ 2110 when the cable breaks, it is enough to use one of the methods already described for opening it. At the same time, there are some subtleties of opening it with your own hands. For example, some configurations of this model provide for the installation of an electric lock on the hood.
As a result, the car's battery may simply run out and the hood cannot be opened. To cope with this situation, it will be necessary to disassemble the light located above the passenger or driver’s seat, and also connect the “plus” and “minus” terminals from the battery of another car to its terminals. Next, you will need to start the car, and if there are no other faults, the lock will open.
This is interesting: How to adjust headlights with your own hands - a detailed explanation of popular adjustment methods
Experienced car owners, in order to prevent such situations from occurring, perform hidden wiring to the battery. In this case, it will be enough to simply connect a charger to it and charge the dead VAZ 2110 battery.
Solving the cable problem
The hood lock of a VAZ can jam only after the cable breaks. This breakdown can be discovered suddenly when inspecting the car.
At the moment of realizing that the hood can no longer be opened the old fashioned way, the driver begins to panic, not knowing what to do. One of the first thoughts will be to go to a car service center, but this is not only expensive, but also time-consuming.
How to fix the problem yourself? There are several ways, but before starting any work you need to understand where exactly the break occurred.
Inside, feel under the dashboard for the lever to which the cable was connected. You will be lucky if the break occurred from the interior side and you can reach the torn part with a tool. We feel for the remaining part of the cable, grab it tightly with pliers, then pull it towards ourselves, but very carefully.
You need to grab the core of the cable, and not its braid, otherwise it will slip out after the first try. Make a loop so that the tool can be sure to tighten the piece of wire inside the cabin. If you jerk, another rupture may occur in a different place.
If everything is done correctly, the hood release mechanism will work.
Cliff from the castle
It is much more difficult to open the hood if the cable breaks somewhere on the side of the lock. In this case, we also arm ourselves with a tool: pliers. It is advisable to have a pit, overpass or structure that can imitate it.
- We wait for the engine to cool down and only after that we begin work. We fix the car with a jack.
- We place ourselves under the bottom of the car, remove the crankcase protection and the tin boot. To do this you will need tools: a screwdriver and a ratchet.
- We put our hand between the engine compartment and the radiator. You need to reach the hood lock.
- Under the hood lock there is a retaining ring to which the cable is attached. Pull the ring toward you or to the side.
- If it doesn’t budge after the first time, call an assistant; you may need to press on the hood from above for the mechanism to work.
THIS IS INTERESTING: How to remove air from the Priora cooling system
The second option involves using a thin wire to open the locking mechanism. This is very difficult and not always possible to do, so focus on the first and third points.
Third option. If a piece of cable remains near the lock, simply pull it using pliers. After opening the hood, change the cable.
Replacing the cable and hood
Often the opening mechanism can jam after a frontal collision. Due to damage, the entire front end of the vehicle may have to be replaced. Replacing the hood, for example, is done in this way:
- Remove the two persistent telescopic struts on the sides of the hood.
- Next, unscrew the hinged fasteners on both sides.
- We move the metal sheet to the side and carefully remove the hood.
- Installing the new one is done in reverse order.
We replace the cable in the following sequence:
- We need to extract the cable cuttings using any available method. We start with the handle in the cabin, then move on to the engine compartment.
- It is advisable to take with you one assistant who will hold the locking spring near the lock.
- There are rubber plugs inside the spring that need to be pulled out. Along the way, feel this place; there could be pieces of the cable left there.
- We stretch the new cable from the engine side, then fasten it in the cabin. The spring should be bent.
The instructions for the VAZ-2110 will tell you how to secure the mechanism and check its functionality. Don't make the tension too tight, otherwise it will break again!
VAZ 2114 models
Opening the hood of a VAZ 2114 is carried out in the same way as a similar operation on a VAZ 2109. Moreover, taking into account that the VAZ 2115 is equipped with equipment in the engine compartment similar to the equipment of the “fourteenth” model, having studied this procedure once, it will be possible, in that case, when the cable breaks, open the hood independently on three models of cars produced by VAZ.
If we talk about the peculiarities of performing this operation on this particular model, then professionals advise opening the engine compartment of the Lada as carefully as possible, so trying to insert a hook through it in order to pick up a broken cable or reach the hood opening lever can easily break it. As a result, you will have to buy two structural elements of the car at once to replace it, costing quite a lot of money. In addition, the opened hood will need to be carefully inspected and all its moving parts will need to be lubricated. These are the hinges and the lock mechanism. Such simple actions can prevent an emergency from occurring in the future.
How to open the hood of a VAZ 2110 - 2112 when the cable breaks
Do-it-yourself car repair - Video
A fairly common and unexpected breakdown for most owners of “iron” horses is a broken hood cable, and many do not know how to open the hood of their vehicle in this case. This training video will help you find the answer to this question, in which the author of the video will clearly show how to find a way out of this unpleasant situation.
In order to open the hood of a VAZ 2110 - 2112 car, you just need to have pliers on hand and put in a little effort. Well, best of all, watch the video to the end and you will learn all the secrets of this procedure.
Installing the cable
If the cable breaks, it will have to be replaced after opening the hood. For this:
- in an auto parts store they select a new spare part, and from the available products it is worth choosing multi-strand cables as the most durable.
- a hook is made from wire. The hook must be inserted into the hole under the hood release handle. They will need to hook a strong cord and pull it inside the cabin.
- A new cable is tied to the cord and pulled into the cabin.
- Next, the new spare part is connected to the hood opening handle and the mechanism for opening its lock.
- The entire system assembly is checked for functionality.
Breakage Prevention
To avoid damage to the hood cable, you should adhere to the following preventive recommendations:
- A problem with damage to the hood opening mechanism can arise due to insufficient care or simply after the service life has expired. If your car is several years old, check all parts every six months to avoid sudden breakdowns.
- To replace it, it is worth buying a multi-core cable, since it has a greater strength margin, wears out more slowly and practically does not stretch.
- The cable outlets and attachment points should be lubricated from time to time with lithol, this will help avoid rapid wear from friction.
- Even after light frontal collisions of the car with any obstacle, check all components and parts of the front part of the car. Short circuits, jamming and damage often occur, which can lead to very serious consequences. If you do not have experience with such checks, it is better to contact the service for professional help.
Sources
- https://autogearspb.ru/uhod-za-avtomobilem/kak-otkryt-kapot-vaz-2110.html
- https://InfoKuzov.ru/kuzov/otkryt-kapot-na-vaz
- https://www.drive2.ru/l/474255924895154566/
- https://auto-kruto.ru/kak-otkryit-kapot-vaz-2110/
- https://myducato.ru/vaz/kak-otkryt-kapot-vaz-2110.html
- https://video-repair.info/otkryvaem-kapot-vaz-2110-snaruzhi/
- https://www.nn.ru/community/auto/vaz/?do=read&thread=663550&topic_id=12920449
[collapse]