Lada Kalina door lock repair
Lada Kalina Station wagon PORT WINE NOT LIKE EVERYONE Logbook Rear door lock
We disassemble Kalina locks
Tools and materials: (for torture and attempts to restore the castle) - grinder
- set of screwdrivers - soldering iron - welding
1) One of the experimental samples on the operating stool. Let's start disassembling. You will need a set of “stars”.
Unscrew
2) We gradually disassemble it into details. And we remember what and where it was installed. This is an important point. Otherwise, you'll get tired later.
And here is the first bummer. Rivet installed. Many people stop at this point and do not dare to further dismantle the non-removable lock. What a tautology
3) The lock is already faulty, there is nothing to lose. We grind the rivet with a grinder.
The rivet was removed with a grinder. We continue to disassemble
4) We get to the insides. The plastic parts (gray and black) are sealed together in several places around the perimeter, approximately 10 points. Either pick them out with a knife, or, as I did later, use a soldering iron.
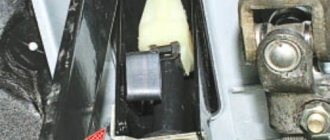
5) remove the power contacts and limit switches, simply pull them up.
6) Between the covers there is a rubber gasket for sealing.
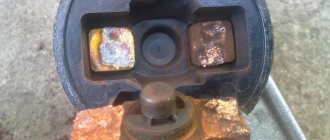
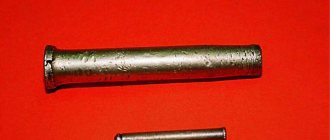
7) A copper (and most likely brass) ribbed tip is rigidly fixed to the motor shaft. From the factory it has a plastic tip sealed on top. Due to frequent use, the connection was destroyed and the motor did not open or close the lock.
 Using a soldering iron, I carefully soldered the plastic tip as best I could. The motor power contacts are simply inserted into the motor from above. There are two limit switches inside
9) I disassembled the front and rear locks and compared the internal actuating part. Inside the plastic box, the only difference is the limiter. When opening the front door, it does not allow closing the door “latch” (door lock lock)
10) I also disassembled the mechanical part of the lock. We carefully remember what and where it came from. I didn't do this and had to lose a lot of time during assembly. I had to select parts using intuition and direct poke. I noted the location of the spring, which you can’t just install, it still gets in the way of slipping out.
Lock assembly
11) The locking tab is pushed back by this tension spring. When disassembled, it flies out and can be installed back through a special hole that the designers have provided.
the spring is simply inserted into the hole and fixed at the end in the seat.
12) We clamp the metal clips to fix the structure on the plastic case. There are only four of them, one from each corner
13) Put the plastic white lever in place.
14) We try on the actuator levers, the clamps of which were previously ground off with a grinder. There is nothing left to rivet there, so nothing else came to mind other than welding it. perform
15) There is no semi-automatic machine, so we cook with an electric arc. There was a syringe with water for cooling.
16) I’m not much of a welder, it turned out what happened. The plastic got a little hot, but not scary.
17) I made another “rivet”. The spring is marked - the one that is installed from inside the mechanical part. If you forget her
installing and welding rivets will turn out very funny...
18) Lock assembly. Can be installed in place.
The design of the rear lock is different from the front one. This also made me look for the missing parts that were right under my nose.
And now some conclusions:
1) One new lock costs about 1500-1660 rubles. The savings are obvious. 2) It is quite possible to disassemble something that is not collapsible, if it is really necessary. 3) Assembling what has been disassembled and making it work is also possible, you just need to be very careful.
next article:
Replacing the larva in Kalina
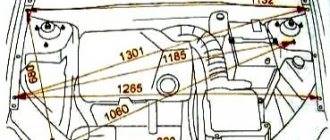
First of all, replacing the lock elements means that the door trim will be completely missing. Therefore, first we will figure out how to dismantle the trim on Lada Kalina cars. The second chapter is devoted to how to remove the larva and install a new one in its place. The last step will actually be the simplest.
Removing the door trim yourself
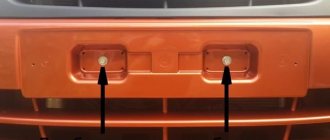
The casing is attached not only to screws, but also to plastic pistons. The number of screws holding the part in question is four:
Numbers here indicate all fastening elements. But to get to them, you need to remove the screw cap “3”, as well as the inner door handle. The pawl handle also needs to be unscrewed.
If these actions are completed successfully, the casing begins to be dismantled, moving it away from the metal. Dismantling is carried out starting from any of the corners, but care must be taken: the pistons holding the plastic are fragile.
If the package includes power windows, you will need to disconnect the connector connected to the button block. Also, another similar connector is present in most trim levels - where there is a central lock. Both connectors must be disconnected.
All the steps described here involve electronics in any case.
Therefore, at the stage before dismantling the trim, you need to open the hood, take the “10” key and unscrew the negative terminal. We are talking about the battery terminal, which can be connected last (when the last screw is screwed in). Anyone who breaks this rule will look for blown fuses. Draw a conclusion.
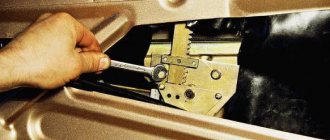
How to get to the door mechanism
According to the recommendation of the magazine "Behind the Wheel", in the absence of casing, access to the lock is always available. Simply put, there will be no need to remove the inner lining made of metal. The steel sheet is simply bent to the side.
The rotating part with the protrusion is called the “drive”, and this is what you will need next.
Replacing the larva will be easy:
- The key in the cylinder currently fixed in the door is turned 90 degrees;
- Using a steel ruler, knife or thin screwdriver, you need to press the locking tongue located opposite the slot in the body of the cylinder. You need to place a screwdriver between the rotating and stationary parts of the mechanism. Know that in the driver's door the slot is made from the bottom (looks “to the floor”), in the passenger doors - from the top!
- By pulling the key towards you, the larva is pulled out;
- The new cylinder is installed like this: with the key inserted, it is pushed into the lock until it stops. The locking tab will need to be pushed inward.
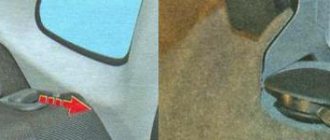
The following photo illustrates the “second step”.
The slot itself, when the mechanism is assembled, is located between the drive and the lock body (at least that is how it is designed). You need to manage to squeeze a screwdriver into the space between these parts. Sometimes this action does not lead to a positive result, and then the lock has to be removed as an assembly.
Lada Kalina rear door repair
Removing the rear door trim
| Lada Kalina Universal Logbook Replacement of ball joints 1. Unscrew the lock button by hand | 2. Having turned the inner handle so that the screw securing it to the lever is accessible, use a Phillips screwdriver to unscrew the screw and remove the handle. |
| 3. Using a screwdriver with a thin blade, pry up two decorative plugs and remove them from the holes in the armrest handle. | 4. Using a Phillips screwdriver, unscrew the two screws securing the armrest handle |
| 5. Remove the handle | 6. Use a screwdriver to press out the power window handle socket. |
| 7. Pull out the latch and remove it. | 8. Remove the handle and socket from the shaft. |
| 9. Using a screwdriver, placing soft material under it, press the lower edge of the upholstery away from the inner door panel, overcoming the resistance of the pistons. It’s better to start from the bottom, gradually moving the screwdriver around the entire perimeter of the upholstery. | 10. Remove the rear door trim |
| 11. Location of ten pistons on the inside of the upholstery | Install the rear door trim in the reverse order. |
Replacing rear door glass
Remove the rear door trim. We lower the glass so that we can unscrew the screw securing the decorative glass trim.
| 1. Use a flat-head screwdriver to pry up the edge of the inner glass seal. | 2. Lift the seal up, applying the necessary force, and remove the inner glass seal from the inner door panel. |
| 3. Bend over the edge of the seal and use a Phillips screwdriver to remove the self-tapping screw securing the decorative glass trim. | 4. Using a slotted screwdriver, press out the upper corner of the decorative trim and remove it. |
| 5. Remove the lower part of the seal from the door. Raise the glass. | 6. Using a 8mm socket, unscrew the bolt securing the glass guide at the end of the door |
| 7. Take out the guide. Roll down the window | 8. From the outside of the door, use a slotted screwdriver to pry up the decorative retainer of the glass seal. To avoid damaging the paint, place a soft material under the screwdriver, for example, a piece of fabric folded several times. |
| 9. Pull out the retainer from the outer seal and remove it. | 10. Remove the outer glass seal by pulling it off the front decorative clamp and lifting it up. |
| 11. Using a 8mm head, unscrew the two bolts securing the glass holder to the window lifter slider. | 12. Remove the glass from the door. Install the rear door glass in the reverse order. |
Design of VAZ-2109 locks and disadvantages
The lock cylinder is a cylinder that is equipped with a secret mechanism. In all locks with a flat key, the cylinder is replaceable. For example, on VAZ-2109 cars it is replaced like this.
The rotating part that is connected to the rod is called the “drive”. As we can see, this drive has a hole for removing the cylinder. By applying pressure with a thin axle or an awl, the larva is pulled out.
There is only one drawback - it is hardly possible to complete the steps indicated here without first removing the lock completely.
It should be noted that even when the mechanism is removed, it will not be easy to pull the larva out of it.
Therefore, before dismantling, be sure to insert a key into the cylinder and turn it left or right 90 degrees. The purpose of this action is to be able to dismantle the larva. This action is performed effortlessly, and the key is then simply pulled towards you.
Read more: Is the Datsun body galvanized?
Features of standard locks
Getting to know the car begins with opening the doors. The first impression can be spoiled by careless adjustments, the use of low-quality materials or imperfect design. The entire Lada Kalina family (sedan, station wagon and hatchback) to one degree or another has these disadvantages. These disadvantages appear even with slight wear of parts, especially the rear doors of the car.
On modifications of the new generation of Kalina, including the “Lux” package, silent locks are installed. Instead of a metal locking device, they use wear-resistant plastics, which significantly improve the operation of the mechanism and provide more comfortable operation. But complaints about poor adjustment of moving body parts persisted in relation to new models. Car owners are also unhappy with the difficulty of opening the rear doors.
Read more: How to connect an iPhone to a car via Bluetooth