Mechanical problem
After checking all sections of the electrical circuit and being convinced that everything is working, but the VAZ 2110 window lifter motor is not functioning, this may be the problem.
Turn on the ignition and press the window down button. Without letting go, knock on the door. If the window moves, change the brushes in the motor. The malfunction can be corrected after removing the motor and pulling the rotor out of it. You will notice carbon deposits that need to be cleaned off with fine sandpaper.
The next problem with the VAZ 2110 power window, related to mechanics, manifests itself as follows: if you hear a buzzing sound after pressing the window open button, but the glass remains in place or lowers jerkily, the problem is the gear of the gearbox is worn out. It must be replaced by selecting a similar part.
Another mechanical malfunction of the window regulator is this: the mechanism works, but makes extraneous noise. We will tell you what to do in this case below.
If the VAZ 2110 window regulator does not work, but you hear the sound of the motor running, check the cable - it could have burst or frayed.
Sometimes the window in a domestic car goes down, but does not go up, but you can close it with your hands. In this case, the problem is again in the cable, which could have slipped off the guide.
If the glass jumps or moves jerkily when closing, it may be warped or there may be some debris caught in the rails. You can also try simply lubricating all moving parts, especially the guides, and then adjusting the mechanism.
Replacing gears yourself
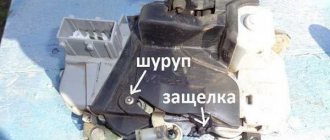
The next step is to unscrew the 4 nuts securing the right side of the mechanism and the 2 bolts securing the glass. The wiring harness block is disconnected. If the right side of the window regulator is turned away, then the corresponding pillar is tilted to the left. The gear motor is dismantled. The screws of the gearbox cover are unscrewed and the cover is dismantled. Using a screwdriver, remove the gear. The housing is cleaned of dirt and previous grease. The bearing, worm and gear will need to be lubricated. The new assembled structure is installed in place. In this case, you need to install 2 gaskets between the gear and the window regulator housing.
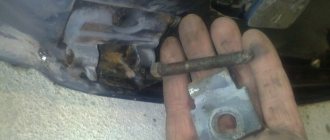
In this article I will talk about disassembling and repairing the window lift motor on a Lada Kalina car. Initially, the window regulator stopped raising the glass , and there was a load on the network ( when you press the window regulator button, the brightness of the interior lamp decreases ). It was decided to replace the window lift motor . My mistake was that I bought a new window regulator without looking at the design of the old one. Purchase result in the photo:
You can see from the photo that the window regulators are different , and the store assured me that it would fit. Due to the fact that at the time of repair all the stores were already closed, I decided to disassemble the motor and identify the cause of the “inoperability”. So, let's start in order: First we need to remove the window lift mechanism , as I already described how to do this in the article - Removing and installing the window lift mechanism on the Lada Kalina. After everything has been pulled out, we disconnect the motor from the entire mechanism by unscrewing the bolts located in the photo.
We have disconnected the motor, we begin to disassemble it: Remove the back cover by unscrewing the bolts.
Under the cover there is a plastic gear . We inspect for damage. In my case - whole.
I lubricated the contact point between the window regulator armature and the gear and put it back together.
Checking the armature and brushes: Unscrew the 3 bolts from the armature casing, you can see the location in the photo.
By unscrewing, we pull out the window regulator armature from the place of its attachment, as well as from the casing (held by a magnet).
Having examined the window lifter brushes, I came up with a verdict - they are worn out, but they will still hold out. I wiped the anchor with a dry cloth and put it back together.
When installing the anchor, problems with the brushes may occur. I did the following: I clamped the brushes , inserted an anchor , and removed the needles. I screwed the casing into place, connected the Lada Kalina window lift motor and... lo and behold, it worked. I put everything back together in reverse order. The problem with the window regulator on my Kalina disappeared by itself.
Useful for car enthusiasts - everything about cars
Electrical problems
Do-it-yourself camouflage on a car
It is better to start diagnosing a malfunction by checking the condition of the fuse, which is responsible for the operation of the power windows in the VAZ 2110. Usually it is numbered F5. If necessary, the fuse must be replaced with a new one. If it is intact, proceed to the next stage. You will need a 12 volt light bulb with two wires going to its positive and negative side.
Connect the wires to the terminals of the window lift motor and press the button. If the light comes on, the wiring is good, but if not, start looking at the wires for breaks. Also don't forget to check the corresponding relay.
Another problem with the electrical wiring circuit is when the window opens when the button is pressed, but when it is released the glass rises again. In some cases, the button does not work until you turn the ignition off and on. These signs indicate a malfunction of the button, so you can try to remove it and clean the contacts, and if necessary, replace it with a new one.
Basic malfunctions and repairs of window regulators
DIY generator repair
Like all types of mechanisms, window regulators are also susceptible to various breakdowns. The problem with this mechanism is that without the ability to lower and raise the glass, it is impossible to ventilate the car interior without opening the door, and this significantly worsens the comfort of the car. To prevent this from happening, you must always maintain your window regulators in good condition.
Before you go in and fix a problem, you need to know its nature and how to repair it accordingly. There are two types of faults: electrical (the same for everyone) and mechanical.
Electrical faults include damage to conductive elements, such as wires, or switching equipment (buttons and relays), you can read more in the article about installing power windows on a VAZ. If the window regulator does not respond at all to pressing the button, you need to start checking by applying voltage. To do this, carefully inspect all wires leading to the system, as well as switching devices. If there are traces of burning or lack of insulation on the wires, it is necessary to urgently replace the electrical conductor. If the condition of the button is unsatisfactory, it must also be replaced or repaired (if possible).
If the external condition of the conductors is satisfactory, then it is necessary to carry out an internal check of them and a check of the electric motor. To do this, a voltmeter is connected to the ends of the motor. In the car, the ignition is turned on and a button is pressed, for example, to lower the window. If the motor does not start, but a voltage of approximately 12 volts appears on the voltmeter, it means that the window lift motor is faulty and needs to be replaced or repaired.
If you do not have a multimeter, you can use improvised materials. A lamp with a wire is also very often used and is almost the main tester “….of all trades.”
Features of connecting power windows
Unlike conventional mechanical devices, power windows are not equipped with traditional gear reducers, but with a special drum. The shaft of a DC electric motor is inserted into its hole located in the center. In this case, the motor is only a component of the gearmotor, on which, as we found out earlier, the speed and quality of raising and lowering the windows depends.
Before installing a new power window, you must select the correct device based on its technical characteristics, and also make sure that the product is in a fully folded state. Otherwise, you are unlikely to be able to install the product efficiently and ensure its flawless operation after connecting it to the vehicle’s on-board network.
Power windows
What is molding on a car? How to glue it yourself
Some cars have electric windows installed at factories, but you can also install them yourself.
Power windows device.
An electric drive differs from a manual drive in that it does not have a gearbox. In its place is a drum, which has a square hole in the center. This hole includes the gear motor shaft, which is attached to the mechanism using racks. The design of the gearmotor is standard, an electric motor with excitation from permanent magnets, the armature shaft of which has a worm gear at the end. This gear is part of the worm gear and meshes with the helical gear. The torque from the gears is transmitted to a drum on which three turns of cable are wound. Closing and opening of the glass is ensured by changing the polarity when power is supplied to the electric motor. The electric window lifter of the VAZ-2109 is controlled using a button. To protect against overloads, the gearmotor has a thermal fuse.
Switching diagrams for electric windows VAZ - 2109
If you want to install additional power window buttons on the driver's side, they are not connected in parallel. The corresponding button contacts are connected in series. Below is the connection diagram.
Electric windows, automatic control.
In addition, some cars may be equipped with automatic window lifters. For this purpose, an electronic control unit is additionally installed. Below is a diagram of the electric window control unit type 1903.3763.
The unit switches on the window lift motor for raising and lowering in manual mode, as well as switches on the gear motor for lifting on command in automatic mode based on a signal from the central locking device. The system also automatically stops the electric motor of the gearbox when the glass is in extreme positions when raising and lowering, or when the glass jams during movement as a result of misalignment or foreign objects or hands getting into the gap between the frame and the glass. This is achieved by increasing the current with increasing force when braking the movement of the glass. In this case, a thermobimetallic switch, a reed switch or a switch with a Hall sensor is triggered and the electric motor stops.
“If you notice an error in the text, please highlight this place with the mouse and press CTRL+ENTER”
How does a window regulator work?
Depending on the type of window regulator, it may contain various elements. The structure of this unit must be known in order to correctly diagnose and troubleshoot the system. There are three types of car window lifts: cable, rack and pinion.
Cable window lifts operate on the manual principle, only a button is used instead of a handle, and the drive, which operates from the handle, rotates on the electric motor shaft. This window regulator includes a set of pulleys and a gear. The entire mechanism is driven by a special cable that supports the glass.
Rack and pinion windows are a continuation of the cable mechanism and a simplification of its design. It is based on a gear wheel, which is driven by an electric motor shaft, and a gear rack, which, interacting with the wheel, raises or lowers the glass.
The lever window lift is the final stage and consists of two levers that raise the glass and are also driven by an electric drive. Compared to others, lever window regulators are the most reliable and fail later than others.
How to fix any broken window regulator
In addition, there may be a variety of minor troubles associated with broken wires or disappearance of contact in those parts of the circuit where it is needed.
Troubleshooting all such faults will seem relatively easy even for a beginner. Almost all of the parts listed above cannot be repaired. Therefore, if one of them fails, it needs to be replaced with a new one.
This is not difficult to do, but you will have to disassemble the entire mechanism. Dismantling is carried out in several main stages:
- First you need to de-energize the battery to prevent a short circuit;
- unscrew the screws and lift the fixing latches to disassemble the door pocket;
- we dismantle the window lifter handle along with the clamp holding it;
- We remove the door trim, thereby getting to the window lift mechanism.
After this, it is already possible to diagnose individual parts and replace those that do not cope with their functions. Using this scheme, you can get to both the front and rear windows on a VAZ-2110 car.
What is the electric window circuit in the VAZ 2110, for what reasons does the engine or the SP control unit not work, how to replace it and how to connect the device? First, let's look at the design features of the joint venture, which may vary depending on which specific doors they are used in.
Despite these differences, joint ventures for the most part consist of identical elements; let’s look at the example of electrical systems:
- Gear motor or drive. Taking into account the electrical circuit, this device provides the signal necessary to raise the glass.
- Grooves. These constituent elements are located on the inner surface of the door frame. The main purpose of the grooves is to hold the glass in a certain position and prevent it from tilting.
- Rails. Rails are used as guide elements used to move glass. These components are installed in the door body.
- Lifting mechanism with gears.
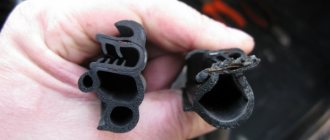
- Seal. The rubber seal allows you to limit the movement of the glass up or down.
- Wiring. Its diagram may differ depending on the type of joint venture, but in any case, it is through wiring that signals are transmitted from the control unit to the gear motor.
- The control unit itself has buttons that transmit an impulse about the need to open or close the glass.
Separately, it is necessary to say about the drives - depending on the type of joint venture, the drives can be different:
- Mechanical type devices. Mechanical devices are structurally composed of ordinary elements, several gears and a handle. In order to move the glass to a certain position, the driver or passenger will have to turn this handle clockwise or counterclockwise. A load will be placed on the drive shaft, which will allow the glass to be raised or lowered.
- The drive can also be electric. An electrical device has a more complex structure compared to a mechanical one. The design of such a joint venture includes a gearbox, drum, control module, etc. As mentioned above, an electrical circuit is used to connect all components, which must always be in working order. Once connected, the system is controlled using the buttons on the unit.
It should be noted that the joint ventures themselves can be subdivided according to the types of the lifting mechanism itself. Cable mechanisms were the first to be used, but over time, due to multiple disadvantages, such as slow operation and low service life, they were replaced by rack and pinion mechanisms. Unlike cable ones, rack and pinion ones work much faster, but louder, and their service life is much longer due to the reliability of the design (the video was shot by Artem Aver).
Photo report on the removal and installation of the VAZ 2110 electric window
So, before you do anything, you will first need to remove the front door trim. Then, lowering the glass to the required height (so that the bolts securing it to the rail become accessible), unscrew everything with a 10mm head, as shown in the photo:
And the glass can be raised as high as possible so that it does not create problems when dismantling the window regulator. After this, unscrew all the nuts securing the VAZ 2110 electric window, which are shown in the photographs below:
Enjoy watching everyone, I hope my video helped someone with their choice or technical issues) Spare parts.
- Top rack mount
- Bottom mount
- Three lift nuts
Now you can stick your hand into the hole in the door and disconnect the plug with wires from the motor:
Now you need to move the rail together with the mechanism (motor) all the way back, that is, to the back of the door. The result of the work done is clearly shown below:
And then we carefully try to remove the entire structure through the upper hole in the door.
When installing, follow the reverse sequence.
In terms of cost, I can only give an approximate price, and it is about 500 rubles for the motor and about another hundred for the rack and cable.
Good material. It’s a pity that I didn’t say so from the very beginning.
And yet, after watching the video, I decided not to go there.
Thanks to the author of the video.
I had to change the electric window lifter motor on a VAZ 2112, right door. After seeing that the window regulator was on a cable, I tried it and got the following:
Without unscrewing the window lift mechanism itself, I unscrewed the 3 nuts securing the electric motor.
Then, moving the electric motor aside so that the pins would come out of the door body, I removed the lower pin along with the plastic base, pulling it down along the motor body. After that, I bent the electric motor to the right, since the cable allows this, and unscrewed the remaining 2 studs by hand. And having pulled the electric motor from the gear on the cables, he took out the electric motor. I reassembled it in reverse order. It may not be very convenient, but there is no need to unscrew and lower the glass too much. It will lower slightly when the studs are aligned when installing the electric motor into the gear.
Replacing the Window Lifter Button on a VAZ 2110
Repair of power windows on VAZ 2110
Now the Russian “ten” continues to confidently remain in the leading positions among the most popular cars in the country. They have already finished producing them, but this does not stop many people from driving a VAZ 2110.
The car is far from ideal, but it has a lot of positive qualities. One of them is the simplicity of the design, which allows you to perform a whole range of repair work with your own hands.
An example of a successful design that combines good reliability and the possibility of self-repair is window regulators.
Window lifters are devices that are used to move glass on windows and hold it in a given position.
.
Today, the VAZ 2110
is available with quite a variety of window lifts, which differ not only in manufacturer, but also in purpose.
If we take into account the purpose, then devices can be divided into four types:
- For front doors;
- For rear doors;
- For left doors;
- For the right.
It is noteworthy that their design may be different, but they have quite a lot of common nuances.
Any of the listed window regulators includes several main components.
Component
Functions
They are installed on the inside of the door frame. Their function is to hold the glass sheet in a given position
They are mounted inside the door frame in a static position. Act as guides for moving glass up and down
Seal and damper
Products made of soft rubber. They ensure that glass movements are limited downwards and upwards.
The design of any window regulator includes two main components - the drive and the lifting mechanism.
As in many other cars, in the case of the VAZ 2110 there are two types of drives.
- Electric A rather complex set of elements, which consists of a drive drum or gear, as well as an electric motor with a worm gear built into it. This design allows you to raise and lower the glass by pressing a button .
- Mechanical The most simplified design, which includes several parts, gears and handles. To raise the glass in a VAZ 2110
using a power window lifter, you need to turn the handle clockwise. The drive roller takes on the required physical effort, so lifting is not difficult.
Window lift motor repair - VAZ 2110 repair
Recently, we have often heard from VAZ 2110 owners about malfunctions of the window lifter mechanism. In one of the articles we have already looked at the FAULTS THAT MAY NOT WORK FOR THE WINDOW LEFT WINDOW, this time we will look specifically at the repair of the VAZ 2110 window lift motor. Before you start repairing the VAZ 2110 ESP engine, it needs to be removed. There is no need to save time and disassemble it at the door. Since this is very inconvenient and you will end up spending more time than if you dismantle it right away.
1. First of all, you need to remove the cover from the gearmotor; for this you will need a 5.5 wrench. After unscrewing the 4 bolts, remove the cover.
2. At this stage, remove the driven gear from the gearmotor. By the way, check it immediately for the integrity of the teeth.
3. Using a Phillips screwdriver, unscrew the bolts that secure the motor to the gearbox.
4. We remove the wires coming from the engine; it is advisable to remember their connection so as not to get confused during assembly.
5. Now, put the disconnected wires inside the motor housing.
6. Now you can undock the electric motor from the gearbox.
7. Next, you need to knock the armature out of the electric motor. We do this this way: we clamp the armature shaft in a vice (it is advisable to wrap it with something to spoil the worm). And through the spacer we hit the end of the engine housing with a hammer.
8. Once the shaft is removed, remove the plastic plug from its base by using tweezers or pliers to pry it open.
9. Now at the same end of the shaft you need to knock out the bushing. Moreover, it is advisable to spray it with WD beforehand. Then, secure the shaft with the bushing so that the stop is on the bushing, and by inserting a thin punch with a hammer, knock the shaft out of the bushing.
10. Next, clean the shaft from rust (you can use sandpaper). In addition, it’s a good idea to treat all parts with gasoline.
11. Take the motor housing and press the rear shaft bushing into place, using a thin spacer and a hammer.
12. Insert the brushes into the brush holders and secure using wires.
13. Insert the shaft inside the gearbox housing.
14. Having released the brushes, check that there is contact between them and the commutator.
15. We install the previously removed plastic tip on the end of the shaft and lubricate that place well, I used CV joint-4, but in principle any waterproof grease will do.
16. Pull the seal that is on the wires away from the terminals by 5 centimeters.
17. Don’t worry, the repair of the VAZ 2110 window regulator is already coming to an end. There are only a couple of points left to complete. We insert the wires inside the window motor housing and install the seal in its place.
18. Insert the driven gear into the window regulator motor housing. And screw the cover to the body with 4 bolts.
19. Now we connect the housings of the gearmotor and the ESP electric motor. During this, use pliers to hold the gearbox shaft so that it does not turn, otherwise the armature will simply fall out of the gearbox. Don't forget to secure them by screwing in 2 bolts.
20. That's all, the repair of the VAZ 2110 window lifter motor is completed. I suggest checking its operation before installation. Connect the wires directly to the battery.
___________________________________________________________________________
The actual process of dismantling VAZ window regulators
First, we disconnect the glass fastening to the rail. To do this, lower it to the required amount and unscrew the fastening bolts. Next, it is recommended to raise the glass higher and fix it so that it does not interfere with the further disassembly process.
The VAZ window lift mechanism is mounted on the metal frame of the door in three places: the rail is held by a pair of bolts in its upper part, as well as in the lower part, and the lift itself is held by three bolts.
By disconnecting the power plug of the electric motor, you can remove the glass control mechanism through the hole in the top of the door. At this point, the short process of dismantling the VAZ 2110 window regulator can be considered completed.
Thus, VAZ window regulators may not work both for mechanical reasons and due to problems in the electrical circuit. The process of disassembling lifts and troubleshooting is not very complicated, and therefore is preferable to repair at a service station.
In order to replace the window lift cable of a VAZ 2110-2112, it is not necessary to go to a service station. This work is quite simple, and the main difficulty when replacing the cable is removing the door card. When working with plastic parts, you need to be careful and consistent so as not to damage or scratch them.
Withdrawing a card.
First of all, you need to remove the handle that lowers the glass. To do this, you need to pry the handle lever itself at the point where it connects with the slot and push it slightly towards you. Underneath there is a plastic locking ring, which we slide to the side and remove, after which you can remove the handle. If it does not give in, you can remove it using two plastic screwdrivers, prying them on the seat from opposite sides.
At the bottom of the armrest there is a plug that needs to be pryed off with a thin but wide flat-head screwdriver and removed. Underneath there are two screws that need to be unscrewed. Now carefully remove the handle, but do not move it to the side - now you need to carefully remove the inner part of the door opening mechanism from its seat. When working with the front door, you need to unscrew the mirror adjustment knob by unscrewing the fastening screw (in some cases it may be closed with a plastic or rubber plug), and remove the triangular plug by prying it off with a flat screwdriver.
Window lifter drive motor
Acting as one of the leading manufacturers of power window drive gearmotors for Russian cars and trucks, Junyuan Auto Parts guarantees the manufacture of auto components in strict accordance with original products. Product quality tests are carried out by reliable Chinese quality control services. The products have also passed mandatory foreign certification.
Characteristics 1. The coating of the motor housing promotes corrosion resistance, characterized by a clean and smooth surface without scratches, deformation, damage or other defects. The connection elements are well tightened, preventing loosening. 2. The operating parameters of the power window drive gearmotor are in accordance with national and international OEM standards. 3. Many years of experience in the production of electric motors and gearmotors. Export of products to the Russian market: 6 years. Annual export volume: 150,000 pcs. 4. Product quality meets the requirements of the Chinese national standard QC/T626-2008 “Technical requirements for power window drive gearmotors”. 5. Certification of products according to the State Standard of Russia (GOST). 6. Cooperation with the Russian OJSC Avtokom, one of AvtoVAZ’s suppliers.
Other features Annual production volume of this series: 500,000 pcs. Guaranteed supply: 40000pcs. Warranty period: 24 months
Technical data of power window drive gearmotors
Window lifter drive motor 1
Motor reducer for window lifter drive VAZ 2108-2115 left (2110-3730611)
| Product number | JY201 |
| Catalog number | |
| OEM number | 2110-3730611 |
| OE number | 2110-3730611 |
| Model | VAZ 2108-2115 left |
| Voltage | 12 V |
| Power | 12 W |
Motor reducer for window lifter drive VAZ 2108-2115 right (2110-3730610)
| Product number | JY202 |
| Catalog number | |
| OEM number | 2110-3730611 |
| OE number | 2110-3730611 |
| Model | VAZ 2108-2115 right |
| Voltage | 12 V |
| Power | 12 W |
Motor reducer for window lifter drive VAZ 1117-1119, VAZ 2123, left (1118-3730611)
| Product number | JY203 |
| Catalog number | |
| OEM number | 1118-3730611 |
| OE number | 1118-3730611 |
| Model | VAZ 1117-1119, VAZ 2123 left |
| Voltage | 12 V |
| Power | 12 W |
Motor reducer for window lifter drive VAZ 1117-1119, VAZ 2123 right (1118-3730610)
| Product number | JY204 |
| Catalog number | |
| OEM number | 1118-3730610 |
| OE number | 1118-3730610 |
| Model | VAZ 1117-1119, VAZ 2123 right |
| Voltage | 12 V |
| Power | 12 W |
Motor reducer for window lifter drive VAZ 2108-2115 left (2110-3730611)
| Product number | JY205 |
| Catalog number | |
| OEM number | 2110-3730611 |
| OE number | 2110-3730611 |
| Model | VAZ 2108-2115 left |
| Voltage | 12 V |
| Power | 12 W |
Motor reducer for window lifter drive VAZ 2108-2115 right (2110-3730610)
| Product number | JY206 |
| Catalog number | |
| OEM number | 2110-3730610 |
| OE number | 2110-3730610 |
| Model | VAZ 2108-2115 right |
| Voltage | 12 V |
| Power | 12 W |
GAZelle window lifter drive motor, left (3110-3730611)
| Product number | JY207 |
| Catalog number | |
| OEM number | 3110-3730611 |
| OE number | 3110-3730611 |
| Model | GAZelle left |
| Voltage | 12 V |
| Power | 12 W |
GAZelle window lifter drive motor, right (3110-3730610)
| Product number | JY208 |
| Catalog number | |
| OEM number | 3110-3730610 |
| OE number | 3110-3730610 |
| Model | GAZelle right |
| Voltage | 12 V |
| Power | 12 W |
DAEWOO LANOS window lifter drive motor, left (96190207)
| Product number | JY209 |
| Catalog number | |
| OEM number | 96190207 |
| OE number | 96190207 |
| Model | DAEWOO LANOS left |
| Voltage | 12 V |
| Power | 12 W |
DAEWOO LANOS window lift motor, left (96430356)
| Product number | JY209A |
| Catalog number | |
| OEM number | 96430356 |
| OE number | 96430356 |
| Model | DAEWOO LANOS left |
| Voltage | 12 V |
| Power | 12 W |
Window lifter drive motor 2
DAEWOO LANOS window lift motor gearbox, right (96190208)
| Product number | JY210 |
| Catalog number | |
| OEM number | 96190208 |
| OE number | 96190208 |
| Model | DAEWOO LANOS right |
| Voltage | 12 V |
| Power | 12 W |
DAEWOO LANOS window lift motor gearbox, right (96430355)
| Product number | JY210A |
| Catalog number | |
| OEM number | 96430355 |
| OE number | 96430355 |
| Model | DAEWOO LANOS right |
| Voltage | 12 V |
| Power | 12 W |
Motor reducer for window lifter drive VAZ 2109, VAZ 2110 left (20.3780, 2110-3730611)
| Product number | JY211 |
| Catalog number | |
| OEM number | 20.3780 |
| OE number | 2110-3730611 |
| Model | VAZ 2109, VAZ 2110 left |
| Voltage | 12 V |
| Power | 24 W |
Motor reducer for window lifter drive VAZ 2109, VAZ 2110 right (20.3780-01, 2110-37306110)
| Product number | JY212 |
| Catalog number | |
| OEM number | 20.3780 |
| OE number | 2110-3730610 |
| Model | VAZ 2109, VAZ 2110 right |
| Voltage | 12 V |
| Power | 24 W |
Feedback
The window regulator does not work on Kalina List of possible breakdowns and their repair
- The window regulator on Kalina does not work, then prepare a car tool kit and we will begin. So, in addition to a toolbox, we will need a tester, which can be purchased at any auto store or market.
- Considering that we will have to run, spin, and twirl near the car, we need a spacious place, for example, an area near a garage or house;
- We clearly determine which glass unit is inoperative;
- We open the hatch on the left side of the steering column, as the fuse box is located there. To do this, just pry off the valve with a screwdriver;
- We find under the marking F2 (30), it is he who is responsible for the operability of the double-glazed window chain and remove it;
- We carry out visual diagnostics and test it with a tester. There are two options: either it is intact or it is burnt out. In the first case, the reason is not in him, in the second - in him;
- Based on the decision in point 5, we carry out further actions. Apparently the fuse is intact. Let's move on to the central control unit for double-glazed windows, which is located on the driver's door;
- Using a screwdriver, we very carefully pry off the polymer cover, since it can be scratched and it will lose its aesthetic appearance, and we take out the entire board assembly. We find the switch we are interested in and check the fit of the wire terminals and the integrity of the wiring itself. Using a tester, we ring the switch to make sure it is working properly; if it shows a short circuit, then it is faulty and should be replaced;
- Once the functionality has been confirmed, we move on to the last stage of the search, namely into the doorway. To do this, we remove the door trim, depending on which side we are looking for the cause. We will see a picture in front of us in the form of: the double-glazed window itself, the release and lifting mechanism and an electric motor with a bundle of wires.
AutoFlit.ru
Installation of electric windows on a VAZ
The procedure is performed in the following sequence:
- temporarily remove the glass seal located on the inside of the door;
- remove the glass, and then dismantle the window regulator fastening mechanism;
- we install devices that will operate from an electric drive;
- connect the negative terminal to the battery and check the operation of the new window regulator;
- We install the glass in place and trim the door.
Unlike conventional mechanical devices, power windows are not equipped with traditional gear reducers, but with a special drum. The shaft of a DC electric motor is inserted into its hole located in the center. In this case, the motor is only a component of the gearmotor, on which, as we found out earlier, the speed and quality of raising and lowering the windows depends.
Installation of the lifting device is quite simple. It starts with disconnecting the battery. After this, use a curved screwdriver to unscrew 3 screws, unfasten the door trim latches and remove the door pocket. Using a thin screwdriver, pry off the handle (latch) of the window lifter - the tip of the tool is inserted into the recess between the latch and the socket.
The handle itself is removed. At the next stage, the car door opening handle is dismantled. To do this, use a screwdriver to pry the handle cover and remove it. Now use a screwdriver to remove the 2 fastening screws that were hidden by the cover plate. After this, the handle can be removed without much difficulty. Using a screwdriver, you can also remove the power window button, which serves to lock the door.
After removing 6 pistons, the trim covering the car mirror adjustment mechanism is also removed. As a result, it remains easy to dismantle the door trim. Armed with a 10mm wrench, unscrew the 2 bolts that hold the auto glass clips. Next, 2 nuts securing the lifting mechanism, nuts of the upper and lower fastenings, and 3 nuts securing the lifting mechanism are unscrewed in sequence.
Upon completion of the described stage, it is time to remove the lower guide pin of the lifting device from the door panel. To facilitate and simplify such an operation, the upper pin of the guide must be bent using a screwdriver. Now the entire lifting mechanism can be safely removed through the resulting opening in the door frame.
Electric windows are very convenient devices that are controlled by a special button and make it possible to lower or raise the side windows without rotating the previously used handles. Unfortunately, this option is provided only in some modifications of the VAZ-2110 car. Therefore, in this article we will tell you how to install it yourself and ensure maximum comfort in controlling the side windows.
TECHNICAL SPECIFICATIONS
PRODUCTION: Italy.
APPLICATION: electric window regulators (ESP) produced by the Italian company SPAL are of a universal type, the design of which allows them to be installed on any car. They are designed for installation in the front and rear doors of cars of any automaker and model.
DELIVERY SET: 2 electric drives, installation kit, instructions.
DECLARED CHARACTERISTICS: nominal voltage - 12 V. Time to raise/lower the glass is no more than 4 seconds. The nominal force when lifting glass on VAZ cars is about 140 N. The torque on the axis of the drive handle created by the electric motor is 14.3 kgcm at 118 rpm. The current consumption in this case is 3 A. At a torque of 86 kgcm, the number of revolutions of the drive handle axis is 22 rpm. The current consumption is 15 A. The noise level is 58 dB. Warranty - 18 months.
Features of connecting power windows
Unlike conventional mechanical devices, power windows are not equipped with traditional gear reducers, but with a special drum. The shaft of a DC electric motor is inserted into its hole located in the center. In this case, the motor is only a component of the gearmotor, on which, as we found out earlier, the speed and quality of raising and lowering the windows depends.
Before installing a new power window, you must select the correct device based on its technical characteristics, and also make sure that the product is in a fully folded state. Otherwise, you are unlikely to be able to install the product efficiently and ensure its flawless operation after connecting it to the vehicle’s on-board network.
Device
This drive - the engine - is a familiar motor, with the help of which we tried to carry out certain experiments in physics lessons at school. The motor is remembered for the fact that its force affects the gear reducer. The basis of the mechanism is the anchor. There is a worm that looks similar to the spiral of the meat grinder. When the rotor rotates, the transmission exerts force on the wheel.
This design and characteristics of the mechanism, including the gearbox and other elements, influence the movement of the glass. The window lifter, depending on its type, has its own motor, but this factor often depends not on the location of the winding, but on how convenient it is to attach it to the door plane. The motor itself is equipped with special stickers.
Replacing the fan and heater motor on a VAZ 2114. Actually, nothing new
- Failure may be caused by a blown fuse. Fuse F7 is responsible for fan operation. It is designed for a current of 30 A. Also connected to it are a headlight washer motor, a glove compartment light, and a heated rear window. If these systems fail at the same time, the problem is in the fuse. Be sure to check all these systems for shorts;
- Poor contact in the mounting block. Sometimes the contacts in the wire block oxidize, in which case it is enough to simply move it. This usually helps;
- Switch failure is a fairly common problem. Check the functionality of this element.
- Disconnect the battery. This will protect you from short circuits and failure of some electronic systems of the machine;
- Remove the side heater casing on the driver's side;
- Under the instrument panel you need to find and disconnect the positive wire going to the fan;
- Unscrew the lowest heater mounting nut. The negative wire of the motor is removed from the stud;
- The hood opens and the seal is removed. Remove both screws securing the fan casing;
- The casing is removed;
- Unscrew the fan mounting screws. There are only 2 of them, for this you will need a Phillips screwdriver;
- Unscrew the 5 screws securing the air intake grilles. They are located in front of the windshield. Next, remove them;
- The fan is slightly lifted and removed from the mounts by sliding it forward (towards you);
- The fan housing is rotated 90° and removed;
- Before installing a new motor, you should thoroughly clean the compartment from any dirt accumulated there;
- Assembly is carried out in reverse order.
- We remove the impeller. She will have to be shot down;
- Remove the cover; to do this, unscrew the screws;
- We inspect the brushes, in most cases the problem is in them;
- To replace them you will need a soldering iron and a screwdriver. First, we unsolder the wiring of the old brush and unscrew the screw that secures it.
- Do this carefully, do not lose the springs. Install a new brush;
- We put everything back together in reverse order.
AutoFlit.ru