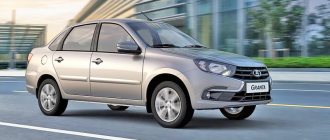
Having mastered the production of the Lada Granta in the liftback body, VAZ began supplying a standard radio (not touchscreen) in the Norma+ car configurations. Let us immediately note that the radio tape recorders intended for Kalina-2 and Granta look the same, but their mounting is different, so these devices are not interchangeable. Looking ahead, let's say that a review made by the owner of a car with a similar radio is presented on video. Now let’s talk about what exactly VAZ is offering today to owners of Kalin and Grant in the Norma+ configuration.
A few words about the radio of the “normal Kalina-2”
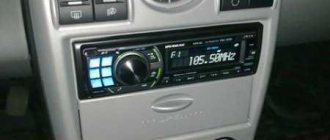
When looking at the “device”, which AvtoVAZ designates with the numbers 2190-7900010-40, it immediately becomes clear that installing such a device in a standard 1DIN compartment will not work. VAZ cars in the “Norma” configuration come from the factory with an empty compartment (its height is 1DIN), and in the “Norma+” radio tape recorder occupies the entire central part of the console. That is, the owner has the following choice: you can install a standard VAZ radio, but then the easy-to-use shelf will disappear, or you can look for and install a unit of standard height. The VAZ radio does not fit into the 1DIN high compartment. There is no touch screen on it, but under the “twist” there is a whole array of plastic buttons.
VAZ push-button radio for Kalina-2
Such a radio, as we see in the photo, can be found in the only configuration of the Kalina Cross. The “device” in question differs from the Granta radio in the presence of a frame with holes. There were rumors about the release of specific units intended only for crossovers, but in the end everything turned out to be simpler - VAZ always ordered radio tape recorders from Itelma, and this tradition was continued. What exactly is offered as part of the “budget” head unit? Let's try to figure it out.
First of all, let's say that the main task of a built-in radio is to play music. To do this, it provides two hardware ports (USB, SD) located on the front panel. Radio stations can be switched using the lower buttons, and the device can also perform the functions of a Bluetooth headset - it’s not for nothing that there are “Receive” and “End End” buttons. The amplifier power is standard, the number of channels is four.
Advice for future and current owners of VAZ push-button radios
The release of standard VAZ “devices”, devoid of an expensive “sensor”, has been expected for a long time. Back in the first half of the year, we were told that such a unit should appear in the fall. As you can see, VAZ was embarrassed to build a graphic display into the radio, and all information on the screen is displayed in standard symbols. The only available backlight color is emerald (there will be more of these colors in crossovers). The device is a “turn on and listen” device, and in standby mode the display displays the time.
The fact that the manufacturer placed the USB port right on the face of the radio is not bad. Now owners have the opportunity to quickly connect a USB drive, or use the standard port as a power source. It will be easy to connect a smartphone or tablet and place it on the dashboard. This is cool! It is recommended to immediately install a short USB flash drive into the USB port to protect it from dust. And it’s also advisable to occupy the port intended for SD cards with something.
Answers (2)
Of course you can, especially if the sizes are the same. Look at the photo for example.
You need to remove the climate control panel (held on by latches) and so on. It’s better to do this at a radio installation service.
MMS from Lada Grants
There is nothing complicated, even if you want to install a single-din radio instead of a double-din or vice versa, buy a special frame and, of course, the radio itself and that’s it)
Which one do you have now and which one do you want to install?
On VAZ cars of an earlier year of production, such as 2101, 2102, 2106, etc., such a concept as a “standard radio” was absolutely alien. But, as they say: time does not stand still, and along with it, the development of the domestic automobile industry does not stand still either. On new models of Lada cars, especially Kalina, Grant, Vesta, etc., the radio came already from the factory, and not just in the form of a music player, but in the form of a device with the ability to play video and photo formats, and of course sound.
The most popular standard radio, which was most often installed on Lada Kalina and Kalina 2 cars, is called “MMC” . You can understand what its advantages are and why it has earned such fame by reading this article.
Installation
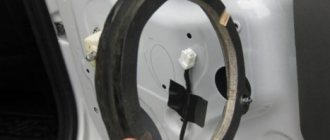
You can use a small lamp as a backlight (for example, from the trunk light), but in order not to spoil the door trim, we recommend taking a 30 cm long LED strip (you can buy it on AliExpress (see catalog)). We remove the door trim (instructions for Lada Granta/Kalina 2 and Lada Prora) and attach the LED strip to its lower part using double-sided tape. The wires from the tape should be carefully insulated and laid under the door trim (through the hole made in the trim).
Types of MMS
The MMS car radio is divided into only 2 types. The first one is called MMC 2 Din. Its characteristic features are that it does not have a CD drive and the Touchscreen function. The second type of radio, also without a CD drive, but with an LCD display and the “Touchscreen” function. Both MMC models are installed on the Lada Kalina car, depending on its configuration - “standard” or “luxury”.
MMS with LCD display
According to its appearance, the MMS radio tape recorder with an LCD display is divided into two types. They differ from each other in their button layout. In order not to confuse them, a special catalog number is provided. The first numbers are the same - 2190 - 7900, indicating the car model on which such a standard radio is installed, as well as the brand of the device manufacturer. And the last numbers directly indicate the type of button arrangement. The numbers “010 – 00” at the end of the index indicate that the buttons are located along with the screen, having a “monoblock” structure. And if at the end there are numbers “200”, then on such a model, the buttons are located separately from the display.
Connecting external devices
Domestic developers made sure that their creation was maximally adapted to work with third-party devices. The 2 din radio allows the use of wireless hands free, mobile phones and external information sources.
In order not to overload the Lada with unnecessary wires and inputs, the connection between the radio and an external device occurs via the Bluetooth protocol. It is enough to set the necessary settings once for the system to remember them.
If you wish, you can download music from external media to the internal memory of the radio or listen directly from a flash drive or phone. If the second is selected, then the sound comes from the speakers installed in the car or wireless headphones. When it comes to connecting memory cards, they must be formatted in a certain way - FAT16/FAT32. The connection connector is located on the back side.
Repair and warranty service are as follows. If the installation of the radio in Kalina was carried out correctly, then once a year it is necessary to do a preventive examination at a service center.
If the service period has passed, then everything can be done at home. All wires must be carefully disconnected. Using a screwdriver, loosen the fastenings and remove the radio. Then it is delivered to the workshop, where the failed element is replaced.
LCD screen
All car radio screens are divided into two types: capacitive and resistive. Capacitive is older, and accordingly, not so hardy. That is why this type of screen is not used on the Lada Kalina 2 car. Instead, the MMS radio has a resistive LCD display that can work stably, regardless of the conditions (in a very cold period of the year, or vice versa, in unbearable heat).
The screen size is 7 inches, which is quite large for a car video player. The brightness is very good, allowing you to see the picture in more detail. The Touchscreen function works flawlessly and does not require any force when pressed. Simply touch it lightly and the device will perform the desired function.
A very significant disadvantage of the MMC is the lack of a visor above the display. In sunny weather, the screen may reflect the sun's rays and glare may appear, which will obviously interfere with viewing the video or image.
Benefits of new technologies
MMC Lada Kalina 2 is characterized by a simplified control system. Now all the necessary options can be obtained with 1-2 taps on the screen. The system is equipped with a more functional resistive screen. Unlike the standard Kalina radio with a capacitive version, the resistant screen has improved performance characteristics. The device is able to operate without failures in any temperature conditions.
Lada owners often complained that in sunny weather it became impossible to use the car radio. This is due to the numerous glares that make the characters on capacitive screens almost unreadable. The designers, when developing the second version of the radio, took this drawback into account.
If desired, the car owner can choose a model with a mini-visor that protects from glare.
The maximum display area of MMS Kalina 2 is 7 inches. Its operation is based on the Windows CE 6 operating system. The version developed specifically for radio tape recorders has characteristics close to optimal. It takes a few seconds to turn on the device. The amount of RAM ranges from 128 to 256 MB. Firmware for the Kalina 2 radio has significantly improved the technical capabilities of the equipment. Now they are as follows:
- support for wav, wma, mp3 formats;
- 6 programmed shades of music playback;
- the display of the Lada Kalina 2 radio shows information about the song and album during playback;
- there is the ability to play video in wmv format;
- the multimedia system supports maximum video resolution at 320*240 pixels;
- it is possible to play video files of other formats, but for this you will have to use a convector;
- availability of FM radio;
- micro SD card support;
- Lada radio firmware makes it possible to view images saved in bmp, gif, jpe, jpg, jpeg formats;
- The maximum photo size is not limited, but if it exceeds 2 MB, then the Kalina multimedia firmware will open it from 2 to 10 seconds.
Operating system and available file formats
The standard radio of the Lada Kalina 2 car can play not only music, but also video. But, unfortunately, not all formats are available for viewing on an MMS device. The most common MP3 format is suitable for playing music. It is standard for any audio player. In addition to it, MMC can read less popular audio formats: WMA and WAV.
MMS playback formats
When playing data in this format, only sound will be produced, and the name of the current musical work, its author, the duration of the track, and in some cases, even the album, cover, and year of release of the song being played will be broadcast on the screen.
For special sound connoisseurs, there is a function such as an equalizer. From the factory, the radio is programmed with 6 factory settings that change the quality and sound of the song. In addition, you can manually adjust the sound, focusing on bass or vocals. The quality of the music played is simply excellent.
Pairing with devices
MMS in the Lada Kalina 2 car also has a pairing function with different devices. This conjugation can be done in two ways: via a USB connector, or using Bluetooth.
You can connect a phone, flash drive, headset, etc. Using pairing, information can not only be broadcast from the connected device to the MMS screen, but vice versa. When you connect any device, the radio saves the entered settings for it. This serves for the convenience and speed of subsequent connections. Of course, there is one drawback. When connecting several different devices, the settings are erased and the pairing process will take the same amount of time.
It is important to know that in order to read information on the radio, the source drive must have a FAT 16 or 32 file system. The memory size of the connected device does not matter.
Common mistakes when installing a standard Granta liftback radio with your own hands
- when connecting additional terminals, manual twisting of wires is used instead of classical soldering;
- regular insulating tape is used on connections instead of heat-resistant sleeves;
- Incorrect connection of a large number of speakers on one branch leads to overload, heating, and short circuit.
Read also: In which city was Blind Man's Bluff filmed?
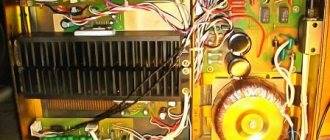
Installing a sound amplifier
By liftback radio amplifier we mean:
- crossover installation;
- subwoofer installation.
The choice is up to the owner of the Lada Grant, as different goals are pursued: cleanliness, sound quality. Obviously, the cost of equipment will also increase. Crossovers are installed in the cavity of the glove box, since their dimensions do not exceed 100 x 150 mm and are rectangular in shape. Subwoofers are fixed in the luggage compartment. Equipment requires more space.
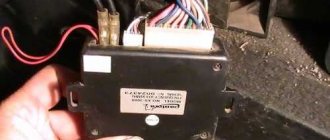
Connection of an external device is carried out strictly in accordance with the operating instructions:
- brown wire color: responsible for the operation of the system;
- black: power supply to equipment;
- yellow: audio module activation;
- red: settings and programming.
At the very end, do not forget to connect a red wire with a pre-installed fuse to the positive terminal of the battery. It directly connects the amplifier (subwoofer) to the current source.
Installing two speakers in the front doors
- dismantle the door card, handle, control unit;
- We compare the standard cutouts for the speakers with the actual dimensions. If necessary, expand with a file or fine sandpaper. It is strictly forbidden to use cutting objects, as there is a high risk of damage to the plastic of the door card;
- we check for the absence of roughness in the hole, install the speaker, fix it, connect the standard terminals with wiring;
- we check the operation of the speaker, install the door card, and fix the metal grille to protect the speaker from mechanical damage.