Stylistic design and features of using a radio in Priora
The appearance of the installation is modern and stylish. The design is black, and as an addition there are white frames.
This style allows the radio to fit perfectly with both the front panel and other controls: heating and ventilation. The front panel of the unit is made of durable and reliable plastic and has a neat frame that allows you to easily install it in a car.
Adjusting the settings is easy and does not require much effort: all buttons and the encoder can be easily reached from the driver's seat. The arrangement of the switches is symmetrical, so the front seat passenger can also control the settings.
An attractive quality that the Priora's standard radio has is the optimal size and highlighting of the buttons. They protrude slightly above the trim, so when changing settings the driver will not accidentally touch the nearby switches.
Audio, video and photo
The radio supports audio formats: MP3, WMA and WAV. While a tune is playing, the display shows information about the album, artist, and cover art (if any). You can adjust the shades of sound using the equalizer (there are 6 pre-programmed settings for Jazz, Rock, Voice, etc.). The sound quality is not bad, quite clear, without audible cuts in the highs or lows.
MMS supports only one video format: WMV with a resolution of 320*240px. To play video files you will have to use a converter, for example, Xilisoft Video Converter Ultimate. It will not be possible to play a video without conversion, for example, in 720p resolution, the picture will slow down, and the sound will lag behind the video, due to the insufficiently powerful processor.
Review of MMC Lada Granta (luxury) and Lada Kalina 2 (standard)
Review of MMC Lada Kalina 2 (luxury) and Lada Priora (luxury)
The radio is capable of opening photos, supported formats: JPEG, .JPG, .JPE, .BMP, GIF, .PNG. For example, a photo with a resolution of 1400x800px and a size of 1MB will open in about 1 second, and a photo of 1978x3456px and a size of 7MB will take as much as 9 seconds.
It is worth noting that after purchasing a car, the antenna comes as a gift. You will have to install it yourself.
Basic functions of the radio in Priora
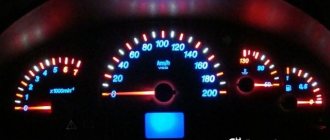
Finding a suitable radio station is done manually or automatically. The search is carried out in the FM and VHF wave bands. You can remember the station you like and go to it by pressing buttons 2-6. Settings data is displayed on a small screen, the backlight of which is designed to match the lighting of the main instruments and sensors of the front panel.
The standard Priora radio is attractive because it allows you to easily adjust the equalizer. To do this, press the EQ button and begin selecting the appropriate sound type. It is possible to connect discs with MP3 audio files. Therefore, the driver and passengers of the car can listen not only to popular stations, but also include their own collections of interesting tracks.
The functionality of individual buttons differs when playing music from a radio station and from a media device. For example, using buttons 2-6, you can not only select a station stored in memory, but also switch to the next folder on the media, select playing tracks in a circle, or switch to playing in a mixed order.
All data on the operating mode, file name and other data will be displayed on the small screen of the radio. This allows you to select optimal system operation settings.
The standard Priora radio is equipped not only with a CD drive, but also with a USB output. This feature allows you to use it to play tracks from both regular flash drives and portable devices.
The uniqueness of the domestic car audio system is the ability to connect both mobile phones and portable hard drives. An external hard drive with a capacity of no more than 120 GB will be easily read by the standard audio system.
How can I set up my radio to receive calls from my phone?
A special feature of the installation is the ability to communicate between the radio and the telephone. This function is available through the existing Bluetooth system. Connecting a mobile phone to the system is not difficult. The work takes about 10 minutes, and it is performed according to the following scheme:
1. Bluetooth is activated on the mobile device.
2. On the radio panel, press the button with the handset (left or right).
3. After the device name is displayed on the radio screen, you need to connect by pressing the confirmation button on the mobile phone itself and entering the code “0000”.
4. The PIN code is changed by pressing the Scan button on the radio, entering a new combination and confirming using button 8.
5. To make a call, enter the subscriber’s name on the numeric keypad, select his number and press the left button with the phone icon.
6. The right button with the image of a handset ends the conversation.
To receive a call when Bluetooth is activated, the driver must press the button on the radio panel with the handset lifted. The connection may take about 5 seconds, but there will be no problems with subsequent communication.
In the improved Lada Priora, the standard radio transmits sound from the phone to standard speakers. Speakerphone allows the driver to be minimally distracted from the driving process, not break the law by talking on a mobile phone while on the road, and at the same time conveniently answer important calls. This system is attractive and is present in most modern foreign cars.
The high-quality equipment of the model allows you to get maximum comfort when buying a domestic car. But the standard Priora 2 radio is installed only on the “Lux” modification.
In other configurations, the owner will have to carry out modifications independently. And instead of a standard audio system, if desired, you can install a more expensive, but also more functional device.
Hello again and welcome to the logbook!
Due to numerous requests from Drayvovites, I hasten to tell you about the standard Priorov tape recorder =). Yes, yes, you heard right =) such a thing exists =)
Installing a radio on a Lada Priora
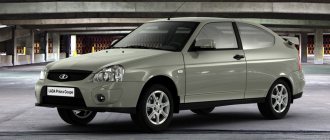
The Lada Priora has a standard radio, but only in the “luxury” configuration. The other trim levels (“standard” and “norm”) do not have it, but there is audio preparation. This means that all the necessary wiring for music is there, you just need to install the radio and speakers. This is exactly what we will do today.
Let us recall that in the previous article we looked at the installation and removal of the ignition switch on the Lada Priora. If you do everything yourself, you can save money and spend it in the right direction.
How to install a radio on a Priora with your own hands
Before starting work, disconnect the negative terminal from the battery.
Procedure:
1. Remove the plastic pocket that is installed in the center console of the panel.
2. To do this, bend the top and bottom edges; when the latches are loosened, pull the plug towards you.
3. There will be 2 ISO connectors attached to the back of the box.
4. The gray connector is the power connector, and the brown connector is for the front and rear speakers.
Installation of the radio in the Priora is carried out instead of a plastic plug, but first the car radio must be connected.
How to connect a radio to a Lada Priora with your own hands
If you buy a radio with an ISO connector, then connecting it to a Lada Priora car will not be difficult. Just insert two blocks with wires into the car radio and that’s it.
If the head unit has a different connection interface (other than ISO), then you will need to connect it through an adapter, which is most often included. Or connect according to the diagram yourself:
Now it's up to the speakers. See here an article about installing speakers on a Priora with your own hands.
vazgarage.ru
Tuning
A large number of domestic motorists appreciated the characteristics and equipment of the Lada Priora 2011, the price of which is affordable for everyone. The national manufacturer literally captured the imagination of potential buyers by adding to the possible configuration options for the Lada Priora (and the price did not increase) the presence of a standard radio and 4 speakers. The audio system with the proud name Ural should play any file formats and support connectivity via USB and Bluetooth. The emergence of such opportunities suggests that the domestic automotive industry, or more precisely the part of it that is responsible for packaging, is gradually reaching the global level. If you wish, you can immediately get a Lada Priora station wagon (the price will pleasantly surprise you), equipped with everything you need, get in and drive off. As practice shows, most car owners still prefer to buy speaker systems from well-known world manufacturers for their cars. Most often, a cassette player on a Lada Priora is purchased in a store that sells various car gadgets; here they will help you choose not only a cassette player with acoustics, but also GPS navigators, parking sensors and other useful car accessories. Audio equipment from Sony and Pioneer is extremely popular among our motorists. These brands constantly compete with each other in both the expensive and budget segments. But the main criterion when choosing a radio is your convenience, because your safety when driving a Lada Priora hatchback 2011 (the price of which is simply pleasing) depends on this. Pay attention to equipment that has convenient remote controls, as well as the ability to connect components and a subwoofer. The price of a standard Lada Priora radio is 6,000 rubles
Firmware for Lada Priora radio
Modern technologies are rapidly moving forward, also improving car gadgets. Firmware for the standard Lada Priora radio allows car enthusiasts to expand the capabilities of the player by adding additional functions that the standard software does not have. The updated radio interface can be supplemented with a convenient touch keyboard, fresh programs and new versions of players with the ability to play all audio and video formats.
Radio set from Priora 2
The firmware of the VAZ 2170 audio player system is carried out using an SD card with a capacity of at least 4 GB, formatted in the FAT system.
Firmware for the Lada 2170 radio is quite simple:
- 1. You need to find a suitable program on the Internet and save it to your PC. As a rule, such programs are shared by car enthusiasts on thematic forums;
- 2. Write downloaded files to a memory card;
- 3. Insert the SD card with the necessary information into the provided slot on the radio;
- 4. Restart the player by pressing the “Reset” button, after which the update program will automatically start. Thus, the firmware goes through to completion, as evidenced by the scale on the radio monitor;
- 5. When the firmware is completed, you should remove the memory card and reboot the player, after which you can use the updated interface.
When choosing a program that will be used to flash the Lada Priora head unit, you should pay special attention to its description. Various options for updating may include redundant and unnecessary functions, which will subsequently overload the device's memory and lead to its slowdown.
You should also select a program to expand the device display, otherwise the firmware will require constant screen calibration. The best solution to updating the radio software is to contact experienced specialists who provide this service. This will help avoid some unexpected difficulties when installing the wrong firmware.
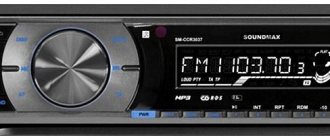
LADA Priora/Lada Priora: Standard audio device (radio tape recorder)
Due to numerous requests, I hasten to tell you about the standard Priora tape recorder Yes, yes, you heard right, such a thing exists
I’ll say right away that this 1Din device with a false panel has the following characteristics: reads CD/MP3, is equipped with USB, two-channel output, has built-in BlueTooth and is equipped with an LCD display
By the way, one of the advantages of this device is that it fits well into the overall interior of the car.
First, let's go over the quick buttons: ST - stereo/mono switching. BAND - switching bands. AF—turn on/off the mode for receiving alternative frequencies when receiving RDS stations. TA—turn on the traffic information standby mode. PTY—select the program type when receiving RDS stations. SCN - scanning during playback. RPT - repeat song/disc (folder) SHF - shuffle =) MODE - switch modes. AS/PS - auto scanning and memorization of memorized stations, selection of tracks. SCAN - scanning stations. DISP - options for displaying information on the display. EQ—switch equalizer presets.
Manual for the Priora head unit
For those who are still trying to approach the discussion of the standard head units of cars produced by AVTOVAZ without bias, we are posting the manual on the radio of the Priora car. And along the way, we would like to note the fairly high quality of the device and great functionality. Of all the complaints against it on all kinds of forums (often completely unfounded, according to the principle - they can’t do anything good here, because everyone can’t.), only one can really be presented - the weak power of the built-in amplifier, but all manufacturers are guilty of this, except perhaps Pioneer and JVS. But you can't please everyone! For those who need louder volume, please install an amplifier, since there are linear outputs on the device. Otherwise, it's an excellent device. There are not enough settings, namely sound settings, so excuse me, it is not tailored for music lovers, but for ordinary users. For now, we are posting the instructions in the form of scans.
To enlarge the photo, click on the picture.
Removing the car's standard radio
Before you begin the removal procedure itself, you need all the tools that you will need during the work. You can use removable keys or two plates from frame wipers. Next, the selected instruments must be inserted at a slight angle into the spaces under the TA and Scan keys until you hear a characteristic click. Afterwards, you should move the keys slightly apart and take out the tape recorder.
If you use plates for this purpose, then they also need to be moved apart and brought back to the center, and only then pulled towards you.
Before installing a new device, it is important to disconnect the negative contact from the battery. Next, you need to remove the plastic pocket-plug from the opening for this device. On the reverse side there are two special connectors - brown - for the rear and front speakers, and gray for power connections. If the connectors of the transport and receiver match, then they can simply be connected using adapters, or according to the diagram. Then the box with the device is reinserted into the panel and the “Reset” button is pressed.
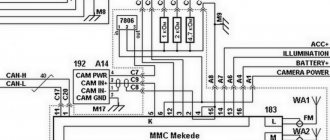
The diagram for connecting a new radio to the car:
- the terminal is yellow, pin A4 constantly gives 12 V;
- blue cord, contact A5, output to the car antenna +12 V;
- red wire, pin A6, gives +12 V when connecting ACC;
- black cord, A8, ground;
- purple terminal, pin B1, + from the right rear speaker;
- black-violet cord, B2, - from the right rear speaker;
- gray wire, B3, + front right speaker;
- black-blue cord, contact B4, – front right speaker;
- white wire, pin B5, + speaker left front;
- black and white cord, B6, – speaker left front;
- green wire, pin B7, + rear speaker on the left;
- black and green cord, B8, – rear speaker on the left.
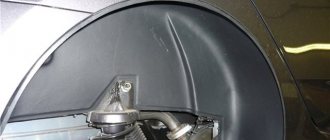
At the same time, in order to fully form the entire acoustic system, speakers should be installed. In order to install the rear ones, you need to remove the mesh cover using a screwdriver and connect the contacts through adapters. Next, you need to insert metal eyes into these holes, which are secured with self-tapping screws, and then install the speakers into the corresponding connectors, putting decorative covers on them.