I really scolded myself that I didn’t come to this and didn’t come across articles about modifications earlier, when I overexposed the standard radio, I wouldn’t have had to disassemble it twice and pull the plastic once again. Okay, the radio has been removed, I’m taking it home and disassembling it. The initial disassembly process is described in the link above, I will not repeat it. But after removing the top cover we proceed a little differently. We need a green board.
It is necessary to replace the TDA 7388 microcircuit and the capacitor at the power input 2200uF 25V. In MMC Lux and MMC Grants you can also replace operational amplifiers of type 4558 (they affect the sound when an external amplifier is connected to the line outputs and sound via Bluetooth), I did not find them in my circuit.
As a replacement, you need to purchase: TDA7560 amplifier chip; electrolytic capacitor 10000 μF (theoretically it can be smaller, for example 6800) 25V and definitely 105C, it’s hot inside; film capacitor 0.47 µF.
The capacitor is soldered without problems, but with an amplifier it is more difficult. There are a lot of legs, you need them one at a time. Before doing this, remove the protective cover; to do this, bend two tabs at the bottom and two at the edges. At first I wanted to keep the amplifier, the inner row fell out with tweezers, then a third of the outer row, and then it was hard to crawl up to stretch my legs, so I decided to just bite out the remaining ones, I still don’t know where to adapt them). The solder, as they say everywhere, is refractory, the 25 Watt soldering iron only made it thick, but could not warm it up, 40 Watt came to the rescue, things went quickly with it.
After that, I first soldered the amplifier, then the capacitors. The film is soldered parallel to the electrolyte; remember to maintain polarity with the latter. Since the electrolyte is larger in height than the original one, it only fits while lying down, so it was additionally wrapped in heat shrink, after which it was laid down and fixed with hot glue.
Before assembly, it is necessary to update the thermal paste in the places where it was (on the replaced amplifier and DC/DC converter). We assemble, test first at home, then for final installation in the car.
I didn’t expect anything extra special from this replacement, I just wanted to squeeze the maximum juice out of the stock radio. Of course, it is inferior in sound quality, settings variations, and additional options to budget models (up to 10tr), but it fits perfectly into the interior. Of course I want to change it, but I haven’t yet found something that looked organic in its original place and sounded good. But there are changes! Of course, they are not as obvious as from switching to 16e speakers or adding a high-frequency link, but you can notice them without problems when comparing the same tracks. The electric guitar began to sound more interesting and lively, the squeaking and hissing sounds somehow became cleaner and more natural, the “bass” acquired density, and in general the sound became cleaner and quite a bit louder, the volume threshold increased, when the music turns into some kind of cacaphony) In the end, I will say that I am absolutely satisfied with this alteration! But I sit and dream further: an amplifier that is not very large in size, a PG with the appearance of a staff, the functionality of a Pioneer 80 and a 7-inch retractable screen (it’s not harmful to dream!)!
Also, the second 12-5V converter finally arrived, which was missing here, it was immediately installed, now both sockets are working!
At prices: electrolytic capacitor 10000uF 25V 105C - 80r film capacitor 0.47uF 250V - 20r microcircuit TDA 7560 - 90r
The factory multimedia system (MMS) of Lada cars has proven itself well; the sound quality suits the majority of owners of these cars. We'll tell you how, with a simple modification to your audio system, you can significantly improve its sound.
The meaning of refining the MMS
Modification of the radio for Lada models (Vesta, Granta, Kalina or Priora) is similar and consists in:
- replace the standard TDA7388 amplifier chip with a more powerful analogue.
- increase the capacity of the amplifier power capacitor by adding a film capacitor.
Additionally, you can also replace preamplifiers (operational amplifiers) of the “4558” type (which are found on MMC Kalina, Grants and Priora) with the best analogue of OPA 2134 or OPA 2132 (in a small case). This modification will improve the sound quality on the line outputs and filter out a large amount of interference.
Attention! You perform further actions at your own peril and risk; the author of the article does not bear responsibility. In addition, during such modifications to the radio, you lose the warranty!
Using a more powerful ULF may lead to overheating of the board.
MMS revision process
We remove the radio and unscrew the cover, turning the screws out into view. Next, we take out the audio system board and find on it the amplifier chip (circled in red) and the amplifier power capacitor (circled in yellow), which is located nearby.
1. Solder the microcircuit by first removing the metal casing and bending the lower ears. It is more convenient to do this using a hair dryer (25 legs in total, which are soldered with lead-free, refractory solder). Next, we clean the holes in the board and solder the purchased microcircuit and install the metal casing. Apply thermal paste.
2. Solder the capacitor (don’t forget that it is polar). We install the new one in a lying position, because its dimensions are much larger than the standard one. We solder a film capacitor on the back of the board.
Additionally: We change preamplifiers in a similar way.
As a result, the radio/MMC has a huge power reserve. Now you can listen to music at higher volume levels with virtually no distortion. In addition, the sound became cleaner.
Let us remind you that there is an easier way to improve the sound quality of music, for example, install an amplifier or flash MMC with a different version of the menu and equalizer.
The standard radio for the Lada Granta model is an improved device, the design basis of which is the “Sirf Atlas” processor, supplied by the well-known. In addition to the presence of a radio receiver, the device is equipped with a large touch screen and has the ability to connect an external source via a video input by replacing the software and performing firmware. However, in the basic configuration of a domestic car there is only a push-button radio. Many owners are not happy with this fact and want to connect a more modern radio. This article will tell you how to install a radio.
How to remove a radio on a Grant Luxury
In general, everything was seen from the video HERE. He told it there in detail and well. I advise you to take a look.
So, SIX simple steps
.
1. Unclip the glove compartment and lower it down. So as not to interfere
2. Disconnect the antenna from the MMC, otherwise it will not allow you to pull it out. (the wire will be pulled in)
3. Pull out the USB socket from the socket. (otherwise the wire will also be pulled in when we pull the MMC outward)
4. Now the important step of accuracy! Without fanaticism! We do not remove the plastic edging completely (first we inserted 2 plastic cards, and then carefully pulled it towards ourselves)
5. On the right side, press a little with a screwdriver and as soon as you push it a little, use it (a screwdriver) to squeeze out the MMS itself. Same thing with the left.
6. We pull ourselves and...
Well, now you can move to the next level! Connect amplifiers, rear view cameras, hide your GPS behind it and much more
Actually figured it out. I had to remove it to find out the size in depth in order to install a 2din radio. About 12-13 cm to the back wall.
To remove the radio, you will need a screwdriver and something to pry off the climate control. I used plastic to disassemble the interior of the upper left corner and pulled it towards me. The photo shows 5 clips that hold it in place. Then two screws under the radio, and pull it towards you in the same way, there are also clips there. You can see it in the photo. Don't break the main thing!
Now let's look for a radio with these dimensions.
Ps. I’m quite happy with my family, everyone. I even bought a mini ISO to install the installation. But I decided that I wanted a ZX Camera.
It's no secret that the standard MMS (multimedia system 2190) or a simpler radio for Lada cars can be modified in various ways. In some cases, this requires dismantling it. Let's look at a simple instruction that allows you to remove a Granta radio in 1 minute.
- Unclip the upper part of the center console trim by prying it up with a screwdriver or plastic spatula;
- Press the radio latches on both sides with a screwdriver, moving the upper part of the plastic cover to the side;
- Pull the radio out of its seat.
What is the functionality of the radio?
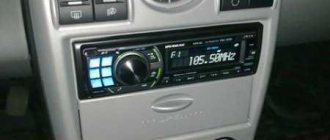
The fact that there is a standard radio in the domestic car Lada Granta Lux and in Kalina-2, and the devices are constantly being improved. A special feature of the radio is that it fits deep into the standard place, which is accompanied by minor difficulties when removing it. The large monochrome display displays a user-friendly interface.
Reviews from owners indicate that the software has an operating system based on the legendary Windows, the potential capabilities of which are increased by firmware. It is possible to create a desktop in the image of a household computer and connect to the Internet. To do this, you should use a 3g modem.
If you need to enter data, manipulation can be done using the on-screen keyboard. Own memory is not enough, so to meet the ever-growing demands of owners, it is recommended to use an SD card as a storage medium. This drawback is included in the list of reasons, due to the relevance of which, most motorists prefer choosing a foreign vehicle.
How to install a head unit on a car with basic equipment?
Since the Lada Granta base is not equipped with musical equipment, and only a push-button radio is installed on board, the question justifiably arises: how is the standard radio installed in the cabin? In reality, this is a simpler procedure than it might seem at first. The occurrence of problems during installation is excluded, since a seat is already provided for the standard device on the Lada Granta panel, regardless of the level of equipment.
You can purchase the device in a retail chain or on an Internet site, where you can actually find an improved version, equipped with a navigation system with a detailed map of the Russian Federation. Don't forget to buy an additional luxury panel. Although multimedia will fit into the standard panel without any problems, the appearance will not be so beautiful. The price for this device reaches 2.5 thousand rubles.
Next comes the installation of the radio. The design feature of the landing niche in the Grants panel does not provide for the need for additional wiring.
- The first step is to remove the plastic pocket in the audio system opening. This is done using a flat-profile screwdriver. There is access to several connectors that involve connecting a radio.
- We remove the frame from the head unit and fix it at the location of the pocket.
- Next we move on to the connection. To do this, connect a couple of connectors and install the device in the landing niche.
- After this, you can install the speakers in the front door cards. The procedure involves the need to dismantle door trims with unlocking handles and adjust the position of the glass. Using a special template, we begin cutting out the mounting holes.
We attach the speakers to the cards using self-tapping screws. We insert the cables from the speakers into the input connectors intended for this on the rear panel of the car radio. We install the decorative door panels in their original places and evaluate the sound provided by the standard head unit. Thus, the radio is connected.
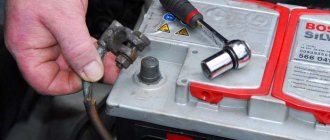
Attention! We carry out all manipulations with the battery disconnected from the on-board network!
Let's start installation
To install the radio, you need to remove the center console. It can be removed easily, just pry it from below and apply a little pressure. Then you should disconnect all wires connected to additional equipment. To ensure that the new audio device is recessed into the panel during installation, you need to remove the partition with a hacksaw. After all, the standard seat sizes in Granta are usually designed for 1 DIN size. Sometimes it is also necessary to slightly shorten the adapter flange leading to the central nozzles of the ventilation system. It won't harm her work in any way.
Center console disassembled
When installing, you should follow the recommendations from the instructions and use the wires and adapters supplied with the gadget. Sometimes it may be necessary to purchase additional items. This will be clear from the radio connection diagram. Usually the connection takes very little time.
After connecting and checking the functionality of the device, you should assemble the central console. To do this, install all the buttons and nozzles of the ventilation system, as well as the heater control unit from the old console. The nozzles and buttons must be secured with latches until they click, and the unit must be secured with two screws.
The console is secured to the dashboard with four clamping clips. They can be included in the kit or purchased separately. During installation, the frame is fixed from the inside with latches.
The console must be locked until it clicks. You should also secure it with screws. After this, the decorative frame snaps onto it. The radio is installed!
Installation completed
How to perform a flashing?
The stock firmware for the Lada Granta radio has become very popular among car enthusiasts. This does not require installation of a new type of radio. This function does not have any effect on the sound quality, but it allows you to provide the interface with additional options that are not available for the standard version of the radio. For example, you can generate a convenient touch keyboard that allows you to communicate with the Internet.
To flash stock multimedia, you should get an SD card formatted in “FAT” or “exFAT”.
- First, download the firmware from the network. It’s easier to find her among the “Grantavod” members of the forum.
- After downloading, we copy the necessary files to the root directory of the card itself, having previously saved them on a flash drive.
- We insert the card into the corresponding slot of the car radio and reboot it.
- After filling out the download status scale, we use the updated interface with expanded capabilities.
To resume options: “Radio” and “Bluetooth”, remove the SD card and reboot the system again.
How to connect an amplifier and subwoofer?
In addition to the need to connect a radio, many people want to connect a subwoofer and amplifier. Not every Lada Granta owner will be able to enjoy the sound generated by the standard radio. This fact forces car audiophiles to lean toward the additional installation of high-quality audio amplifiers and subwoofers. The goal is known - great sound.
To install the indicated devices yourself, we resort to the following simple manipulations.
- First, we dismantle the lower part of the center console.
- We remove the panel and find mini ISO connectors.
- We insert the plug of the previously purchased adapter into one of these sockets (indicated in yellow). We do not touch the blue and green cables. Owners who have already performed this procedure note the following - we can no longer use standard wires, so we resort to the “mini iso” connector.
- Next, we connect a special fuse to the battery, having previously connected the cable from the amplifier (marked in red) to it.
- The subwoofer in combination with the loudspeakers is connected to the amplifier. We connect the battery ground wire (black) to the LADA Granta body and the corresponding terminal on the amplifier.
- After the measures have been taken, we return the panel and radio to their place.
- Enjoy the updated and high-quality sound.
Preparing MMC for connecting an amplifier for Lada Granta
Installation of a speaker system for Lada Granta
Components of the future audio system:
Front: Morel Tempo 6 component. Before them there were coaxial Morel (Morel Tempo 6 Coax). I didn’t buy the Dins, I had them installed on the seven. I just swapped them.
Amplifier: Blaupunkt GTA-470. This system has been tested by me and time - far and wide.
I was looking for exactly this on the market, and a new one. It was hard to find it, because this model is no longer produced. But after a long search, I finally came across one copy. Here he is handsome:
Here it is, packed
Blaupunkt GTA 470
Blaupunkt GTA 470
Blaupunkt GTA 470 for installation on Granta
Wires: Mystery MAC 4.04. I immediately ask you not to throw tomatoes, I know that the wires are not very good))) But I took them with a large margin in cross-section (Naturally for my system).
Wires MYSTERY MAK 4.04
Power cable - 4 Ga (25 mm2).
Positive cable with a cross section of 25 mm2
Negative cable with a cross-section of 25 mm2 and control cable 0.75 mm2
Speaker cable - 12 Ga (3.5 mm2).
Speaker cable with a cross section of 3.5 mm2
I really liked the interconnects in this kit! Made with high quality, unlike a similar MAC 8.04 kit.
Interblockers
A 60 A fuse is standard. Well, the terminals.
60A fuse and terminals
I haven’t bought a sub yet, I’m still looking around and saving money. For now I've settled on the Audio System MX-15. There will be 25 liters in ZYa. The box drawings for it and the material are already there.
Subwoofer audio system mx-15 plus for Lada Granta
There won't be a candy bar, that's for sure. I'll power it with a sub bridge.
Well, now I want to tell you about my non-standard method of connecting an amplifier to a standard MMC. Anyone who has already been interested in the topic of connecting an amplifier to an MMC knows that a mini-ISO connector is needed for connection. I couldn't find it. I didn’t want to wait a month from China. I decided to simply bring the tulips out with separate wires. I bought the wires at an electronics store. They look like this:
So, I immediately decided to output the video input for the rear view camera. I bought this wire for it:
The radio is easy to disassemble. I won’t describe it for a long time, because the disassembly process is quite simple. After disassembly, we see the central board:
We need connector contacts:
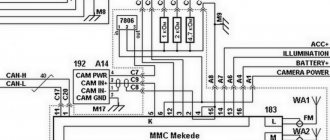
To pin out the contacts, I used a diagram downloaded from the Internet.
After soldering, I carefully laid the wires into a bundle. In addition to the tulips and video input, I also brought out a wire for turning on the amplifier, a wire for the reverse sensor, CAN-H and CAN-L for displaying additional information on the screen. information.
In order to pass the wires through the case, I made a small recess in it.
After assembly it turned out like this:
This way I didn't have to look for a mini-ISO connector.
Amplifier connection.
Simply screwing the screws into the back (as for example on 08-09) will not work in the grant. The frame at the backrest consists of welded wire (cage). I decided to secure the amplifier in the following way: I took a 40 x 4 steel strip. I cut two blanks slightly longer than the length of the amplifier. I marked 4 dots on these strips along the holes in the amplifier. According to the markings, I drilled holes and cut an M5 thread for mounting the amplifier.
Next there was a dilemma - how to attach these strips to the frame of the seat back?! The most ideal option is to weld them to the frame. But to do this you need to completely disassemble the backrest. I made it a little simpler. Along the edges of the strips I made many holes along the entire length on both sides. Next, I pushed these strips through the bars of the back frame (between the foam rubber and the mesh). Having first attached the amplifier to the bolts, I secured the strips to the frame with plastic ties. Next, I unscrewed the amplifier, put on the fabric covering of the seat back (the back side has a zipper, very convenient), made four holes in it with an awl, and screwed the amplifier to the fastenings I made. It turned out very strong. The metal strips were firmly attached to the frame of the seat back.
Next is pulling the wires.
I laid the power cable on the driver's side closer to the central tunnel. The interblocks were laid on the passenger side, also closer to the tunnel. I ran acoustic wires along the thresholds.
To run the speaker wires into the doors, I had to drill out the round plastic door connector to a maximum of 14 mm. This procedure cannot be done with a 14mm drill. You can pull out unsuccessfully and damage the terminals that are located closer to the center. To prevent this from happening, I “drilled” the hole with a 14mm round countersink. When heated, the edges were fused, and quite neat holes were obtained:
door connector
door connector
Next, I pulled all the wiring through the holes made, including the speaker wires.
door connector, stretched wires
door connector, stretched wires
After pulling the wires, I began laying out all the wiring and attaching the crossovers. Result of the work:
driver's door
passenger door
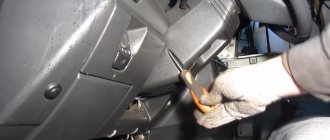
The positive cable was routed through a pre-made hole when installing the PTF in the engine panel.
I mounted the tweeters on stands. I connected the interconnects to the previously removed tulips from the MMC.
The acoustics on the Lada Granta are connected!
next article:
Installing a stealth + front subwoofer in a Lada Granta
We install the “stealth” box on the Lada Granta. I install the tweeters in racks, I use lycra - it is denser than fiberglass
Rating 5.00 [1 Vote]