Let's jam and relax
The idea had been in my head for a long time, but I didn’t want to buy a standard jig for remaking (it sells for about 300 rubles, but it only rolls into a cone, not a barrel) without clear confidence in success.
So what happened (I sculpted from what came to hand).
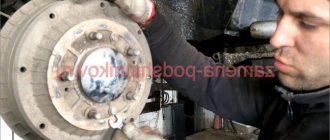
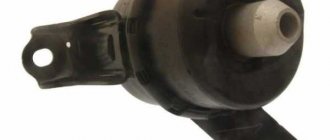
This is a general view; the device was clamped in a vice during flaring.
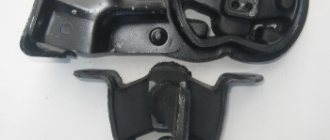
The result of compression and the most important working body
Working body diagram
For the pin I used a 2.5mm drill shank and soldered it into a blind hole.... The chamfers on the corners and the working element were removed with a 7.5mm drill. When I drilled a hole for the tube in the corners, I pressed a piece of cardboard between them (folder “case”) so that the tube would then be squeezed tightly and would not slip.
The angle at the apex is about 100 degrees, but this is not critical - the copper will be crimped. I drilled a hole in the conductor with a drill equal to the diameter of the tube, the fact is that there are 5 mm and 4.8 (the inch size is about that), due to the folder being removed after drilling, the tube is clamped, if you drill 5 mm, you won’t clamp 4.8... so first the tube... It seems like the original is 4.8... but I can’t say for sure, tomorrow I’ll measure the fitting, it seems like 5 mm fits into it very tightly, but it should turn freely.
Now you can buy a device (it’s just more convenient to disassemble and assemble) and make another punch there. As soon as I catch my eye, I’ll buy it, remake it and post it...
PS
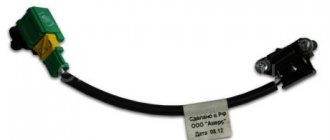
As promised, such a miracle was purchased
A new working element was manufactured
The difference from the first sample is that in the new version it does not rotate relative to the tube.....
The brake system on a friend’s Gazelle was completely redone, not a single leak! Well, little by little, about a dozen rolling pins, everything works without problems...
Purpose of brake pipes
In order to have a clear picture of what brake pipes are needed for and what role they play, you do not need to consider them as a separate element, you need to become familiar with the entire braking system of the car. Thus, having understood the operation of the system as a whole, the task of the tubes will be clear. The braking system, superficially, works in this way: if it is necessary to slow down or brake sharply, the driver presses the corresponding pedal, and the piston located in the master cylinder, under high pressure, begins to drive fluid along special paths.
Braking itself or a complete stop of the car occurs at the moment, at the moment of converting the forces of fluid pressure on the wheel cylinders into the resistance of the brake pads. So, the paths along which the piston drives fluid to the wheels consist of brake pipes and hoses. Failure of any part of the system results in a breakdown of the entire braking system, and consequently, your car becomes unusable.
When is flaring required?
If there is poor transmission of fluid through the pipes, the car brakes late, and the braking distance almost doubles. Also during the operation of the system, especially noticeable when the brake pedal is pressed, extraneous sounds appear, as well as some pulsating movements. The movement of the pedal, while pressing it, will seem a little free to you, this is very typical when the brake system, namely the brake pipes and hoses, is not functioning correctly. Also, one of the reasons for the malfunction of the pipes is the visible leakage of fluid and the brake system. This leak will cause the brake drums to overheat and cause the brake pads to wear unevenly. Another sign may be unusual behavior of the car when you press the pedal, namely, the car moves a little to the side. Of course, this is an indirect reason, but, according to experts, it may indicate a malfunction of the tubes.
The most obvious symptom that the tubes are starting to wear out or have already worn out and it’s time to do flaring is an increase in braking distance.
It is important to know that the main problems due to which tubes break quite often are:
- destruction of the hexagonal head structure;
- the ingress of debris and dirt into the threaded connections or the ingress and coking of liquid in these places.
The above mentioned troubles cause great harm not only to the elements, but to the entire system. If the owner wants to protect the car from this kind of trouble, he should remember that it is necessary to test the car’s brake system at least once a year. If we equate the elements and the system itself with mileage, then diagnostics must be carried out every 50,000 kilometers, and parts, in particular rubber tubes, are changed after 125 thousand kilometers, regardless of their technical condition.
Pros and cons of do-it-yourself tube flaring
There is no doubt that when working for yourself, you will treat all stages of the technological process with the greatest possible responsibility and diligence. Of course, in this case you will not need to go somewhere and pay someone to do such work.
But there are also obvious disadvantages - we have already given approximate deadlines for routine replacement of brake pipes. And since they fail relatively rarely, it is quite possible that you will only have to use the tools you purchased or made yourself once, or at most twice. However, if you own a very worn-out car, it is likely that you will have to replace the tubes much more often.
Flaring brake pipes with your own hands is not a difficult task, but only if you have specialized tools. And what is more profitable - to buy it, make it yourself, or still take the tubes to specialists, you must decide for yourself. The main thing is that the brake system of your car is always in perfect condition.
Independently and will help in repairing the brake system.
In order to make rolling for brake pipes with your own hands, you will need:
* Bench vice * Angle grinder, cutting and grinding wheel * Metal corner measuring 100 mm * Metal plate 6 mm thick * Metal drill with a diameter of 4.5 mm, 6 mm, 10 mm * Bolt from the car hub * Welding machine, leggings, welding machine mask * Safety glasses, gloves, headphones * Copper tube with a diameter of 5 mm * Metal lathe, equipment * Tap with M6 and M12 threads * Matte spray paint * Electric drill
Step one.
Clamp a metal corner measuring 100 mm in a vice and, using a ruler and pencil, make markings along which the workpiece will need to be sawed off.
We mark about 30 mm from the edge of the corner and saw it off using an angle grinder with a cutting wheel installed in it. When working with an angle grinder, follow safety precautions, wear safety glasses, headphones and gloves, and do not forget that the power tool can be pulled out of your hands at any time, so you need to hold it tightly.
Next, we fix the corner in a vice and align the ends using an angle grinder with an emery wheel installed for grinding; we also round the edges a little so as not to get hurt when working with the tool.
After this, we change the position of the workpiece in the vice and also grind it, removing rust and other external defects of the part. The result is a surface like this. Step two.
We place the part on an anvil or a vice and make a core in the middle by lightly hitting the core with a hammer.
In this place we drip a little technical oil and drill a hole using an electric drill, in the chuck of which a metal drill with a diameter of 5 mm is installed, after which we change the drill to 10 mm. During the drilling process, do not forget to add technical oil, as this will reduce the degree of wear on the cutting edge of the drill, which will extend its service life. In the finished hole we cut a thread using a tap, the thread in this case is selected depending on the diameter of the bolt, here an M12 bolt from the car hub is used. It is also important to add lubricant when cutting threads. Step three.
We measure the required length for attaching the tube and saw off part of the corner using an angle grinder.
Next, we clamp two metal blanks, which need to be made from a sheet of metal 6 mm thick, you need to make a hole in them in the middle so that half the diameter falls on one blank, and the rest on the other. In this case, we take a drill with a diameter of 4.5 mm; in the future, we can make various plates with the necessary grooves for any diameter of the tubes. After this, you need to drill holes in two blanks at once for mounting on the corner; to do this, we clamp them together using a hand vice, and only then drill holes, first 4.5 mm, and then 6 mm with a metal drill. Step four.
To be able to roll the tubes, you need to machine the hub bolt.
To do this, we first shorten it using an angle grinder, and then clamp the bolt in the three-jaw chuck of a metal lathe and make a groove to a diameter of 2.5 mm, by the way, it is equal to the internal diameter of the copper tube. For rolling, we make a small recess for the cap. In the end the bolt should look like this. You need to weld a rod to it; for this you will need a welding machine. When working with a welding machine, be careful and also use personal protective equipment, a welding mask and leggings. To ensure that the tube does not bend during the rolling process and is rolled evenly, it is necessary to center it. We take the brake pipe and put it on the tip of the bolt, then we install a workpiece under it with a groove for the pipe, and then fix it using a hand vice and begin to mark the drilling locations. After this, we open the hand vice and drill the holes to the end with a drill whose diameter is 5 mm, and then cut the M6 thread in these holes using a tap. Step five.
Now all that remains is to give the tool a beautiful look; to do this, we paint the parts with a can of hammer paint, having previously protected the threads with masking tape. The tool is completely ready, which means it's time to test it in action.
People who drive a lot quickly become interested in the question of how to flare a brake pipe with their own hands. First of all, this is caused by the understandable desire of manufacturing plants to save money: in the old days, for the manufacture of these parts, as a rule, copper was used, which is much more resistant to aggressive living conditions and temperature changes. Now they are installed in steel, which corrode much faster. The second culprit for unscheduled wear of brake pipes should be considered utility services. Chemical reagents and salt, generously scattered to combat, for example, ice, significantly accelerate the rusting of metal and reduce the factory life expectancy of many parts. And the third factor that forces you to apply the brakes prematurely is the notorious Russian roads. Potholes and potholes create an unreasonable physical load, due to which the tubes become deformed or even burst; in addition, they act as a repository of chemical reagents even when the snow has already melted (in spring). All together leads to the fact that the mentioned parts fail not after 70-100 thousand km, as the manufacturer expected, but after 30-50, and even then - in the best cases. How to flare a brake pipe with your own hands
: the process is quite simple, but it will require purchasing, making it yourself, renting, or borrowing from a neighbor in the garage a special device for carrying out this work.
But if you decide to buy a flaring machine, don't be tempted by the cheapest options available on the market. Yes, you can buy a device for 700-800 rubles, but it will definitely turn out to be completely disposable. It has been experimentally established that a more or less high-quality machine cannot cost less than 1800-2000 rubles or even more. When is it time to change tubes?
Signs you should be looking for a flaring kit include:
- During emergency braking, when you press the pedal, a very characteristic creaking sound is heard;
- Under the same outgoing conditions, a rhythmic vibration is felt;
- The braking distance of your car is noticeably longer;
- The brake pedal travel becomes freer, it seems to be dangling;
- Brake fluid may leak (this is especially noticeable when the car is parked overnight for a sufficiently long time);
- Significant overheating of the brake drums and premature uneven wear of the pads are often observed;
- Indirect symptoms include the car pulling to the side while driving in a straight line.
Flaring and its details
Often the main body in the brake tube remains intact, but the structure of its 6-sided head is destroyed. There may be other options: coking of threaded connections as a result of liquid getting on them, clogging them, etc. In such situations, if the length allows, you can simply cut off the defective part. But it is better to replace the tube completely if you are planning to carry out such a repair. In addition to the flaring machine, you will need pliers, a pipe cutter, a fitting and a drill. Materials: a little acetone. Having figured out how to flare a brake pipe with your own hands, provide yourself with a minimum of such work in the future: place the copper one in the designated place. We assure you: you will have to remember about flaring much less often. Even with very intensive use of the machine, you will not need it before 2-3 years. August 4, 2019
Responsible motorists know that they need to regularly monitor the condition of their car. Especially keep the brake system under control. Brake pipes play a significant role in it. If you notice that they have damage, then it's time to fix them. Often, flaring is sufficient for this. Do not doubt your abilities, but read the article carefully. By following simple instructions, you will cope with the problem without the services of a car service.
Flaring instructions
Not every driver feels good about car repairs. Many people don’t even want to get under the hood and repair a breakdown, let alone repair parts that require getting under the car to repair. Yes, pipe flaring is not a pleasant job, but it is not very difficult either. The most important thing is that you can flare it yourself, and without having to pay some “specialists” at the service station. To perform this work efficiently, you need to purchase a special device, the so-called “flaring machine”. Such a kit for flaring brake pipes, in which you can see a pipe cutter, a fitting, and pliers, can be purchased at any car store, and its price is pennies compared to the price of work at a service station. You also need to prepare some gasoline in a bottle for further lubrication of the pipe and the drill for chamfering.
So, let's look at detailed instructions on how to flare a brake pipe.
The tube is unscrewed by hand from the cylinder or caliper. The damaged area on it is determined, and if possible, we repair it, otherwise the tube is not suitable. So, use a pipe cutter on the damaged area on the tube. After which you need to treat the intact cut edge of the tube with gasoline. Using pliers, we clamp the tube to create a connector for the fitting. We take a drill and a drill bit of the required diameter and remove a little edge from the inside, making a chamfer. Then you need to clean the seat from chips and insert the fitting into the tube. Now the most important thing is flaring. The flaring tool is used as follows.
Flaring machine
Of course, if the pipes are faulty, you can take the car to a service station and entrust the repair to specialists. But why spend money on something you can do yourself? To do this, you need to purchase a flaring tool in specialized stores or order it online. It is available for inch or metric threads. The set includes a pipe cutter, a device, pliers, a clamp, and dies for different diameters of tubes for flaring with a fungus.
When purchasing a tool, you should pay attention to the manufacturer and cost. It is better not to buy the cheapest sets, as their quality is not conducive to long-term use. This repair method is less expensive than in a car repair shop, and relatively easy.
Article on the topic: Why does the generator burn out on a car?
Video “Replacing brake pipes on a car”
The recording shows how you can replace brake pipes on a VAZ car.
The car's braking system is the basis of safety and requires professional maintenance. After all, the safety of driving a car depends on it. Today we will tell you about the most terrible breakdowns of the brake system, we will describe in detail what flaring of brake pipes is, why it is needed and with what tools it is performed.
Preventing brake pipe breakage
Naturally, in order not to waste a lot of time in the future searching for breakdowns and repairs, it is best to treat your vehicle with care. Don't be lazy, just follow these simple tips:
- Periodically inspect the brake lines for rust and defects. Contamination, microcracks, and corrosion lead to incorrect operation of the system.
- Change the brake fluid according to the regulations.
- Check the tightness of the fasteners.
- Treat surfaces with anti-corrosion agents.
- Avoid leaking brake fluid.
- Become an advocate for careful driving. It is not uncommon for tubes to rupture when overcoming obstacles.
- Have your brakes inspected at least once every two years. Motorists who spend a lot of time on the road should do this after every fifty thousand miles.
- Regularly monitor the wear and tear of vehicle parts, and it will take care of your safety.
Brake system malfunctions
Almost all drivers know that the braking system of a car consists of a control drive, distribution systems and actuators (working bodies). All parts of the brake system are connected using brake pipes (lines). Brake fluid under pressure moves through these tubes. In the process of pressing the brake pedal, the pressure on the brake pedal increases and it acts on the working element of the system, which locks the wheel and completely stops the vehicle.
During operation of the brake system, the following malfunctions may occur:
- Violation of the tightness of brake pipes and pistons in which the fluid is under pressure.
- Mechanical failure of working parts . This includes all kinds of jamming of brake cylinders, etc.
- Violation of pedal free play . This malfunction causes discomfort to the driver when operating the vehicle.
In this article we will talk specifically about the first malfunction - a violation of the tightness of the connection of the brake pipes with the working mechanisms.
Flaring brake pipes using a kit and fixture
Flaring is any deformation or change in the shape of the tube, which is subsequently attached to a special product that connects the tube to the working part of the system.
This concept also applies to the braking system of a car. To perform flaring, you must have a special flaring kit. It includes a set of accessories, such as a cutting device, a deforming device and a set of tools for cutting threads on the brake pipe.
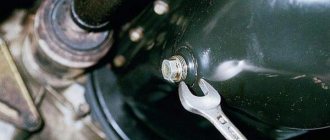
To carry out flaring, it is necessary to place the car on an inspection hole or overpass and immobilize it. The brake fluid is drained from the reservoir and master cylinder. After all the measures have been taken, it is recommended to replace it with a new one, so as not to crawl under the car again in the future. Unscrew the fitting of the damaged brake pipe from its seat, and then remove it from the pipe itself.
Cut off the damaged section of the line by about 5 centimeters. To cut a pipe, you need to install it in a special device and run the blade around the entire circumference. After this, the cut end of the pipe is processed to get rid of irregularities that could disrupt the shape of the pipe, and therefore its tightness.
After this, fix the end of the pipe in a special device and insert a rolling fungus into it. A threaded shaft is placed on top of the fungus, which is attached to another fixing device. By turning the lever, the shape of the cut part of the pipe changes. Then, depending on the presence or absence of a thread, it is cut onto the pipe. In most cases, all brake lines are made without it.
Install the new end of the tube into the fastening device and tighten the fastening nut. Before installing a new tube, it is necessary to clean the sealed part from grease. To do this, it is enough to treat it with acetone or gasoline. After all these measures, the fitting is installed in its place, brake fluid is poured into the system, it is pumped, and after that the car can be used again.
Self-flaring
In industrial conditions, special high-strength shafts are used for pipe flaring, and the profile of the pipe end is formed as a result of repeated rolling. This rolling machine allows you to perform deformation as accurately and evenly as possible.
When flaring yourself, you usually use kits that can be purchased online or in specialized stores. This kit includes a pipe cutter, a clamp, and dies with holes of different diameters (with metric or inch size designations) for flaring using a tapered screw.
Many car owners, in order to flare a brake pipe at home, use a more primitive method that does not require the purchase of the device described above - a conical blank with the desired angle. If the tube is made of copper (you don’t see these often these days - manufacturers are switching to metal en masse in order to save money), it has sufficient ductility to perform such an operation on its own. But you will need not just strength, but precisely measured efforts when pulling the tip of the copper tube onto the cone. Any distortion during an impact - and the result may be unsatisfactory: from a rupture of the rolling surface in the place where a stronger impact occurred, to a jam of a surface that is too thin during such processing. So this method can hardly be recommended as acceptable - it should be resorted to only in cases of extreme necessity.
Much more predictable results are obtained when using an expander. Here you will also need to use physical force, but the process itself is simplified, since the pipe is pulled onto one of the replaceable nozzles using a rotating handle.
The expander allows you to expand the tube to the desired diameter quite quickly, in just one approach, however, even here, a 100% result is not guaranteed. The main key to success is the quality of the tube itself. If it is bad, that is, the walls are not perfectly smooth (they have different thicknesses in a certain area being processed), then in this case, thin walls will stretch more, thick walls less, and as a result the flaring will not be ideal. Attempts to “press” the connection can end in failure - with its breakage or collapse.
The classic tool for flaring brake pipes is a set of rollers made from carbide materials. The rollers are rolled over the surface of the pipe being processed, each time with increasing force. As a result, flaring is carried out smoothly, and all the troubles that are typical for more primitive tools are impossible here. Each new revolution of the rollers increases the diameter of the workpiece by a minimum amount, and such gradual stretching is tolerated by the metal very well.
This method is applicable even to non-ideal workpieces, since if there are areas with thicker walls, they are rolled out to the required size, and the surface of the tube becomes even and smooth, without any defects or roughness.
Another common flaring method is the use of a solid cone, which is pressed with a certain force into a tube previously secured in a vice. The quality of this method is comparable to the use of shafts, but here it is important to focus on the compression depth that corresponds to the desired flaring diameter.
Of course, the ideal solution would be to purchase a ready-made factory-made machine. But if you belong to the category of craftsmen who try to do everything on their own, including rarely used tools, a flarer for copper pipes can also be made at home. Without this tool, it will not be possible to ensure a reliable connection of the brake pipes.
The main condition is that the metal blanks must be durable, this will allow the device to be used for decades. The design of such a flaring machine is quite simple - it consists of a frame made of two equal-sized corners.
We will need the following tools and materials:
- drilling machine;
- sharpening machine;
- Bulgarian;
- corners (100 x 32 x 5 mm., 2 pcs.);
- mandrels (you can make them yourself or ask a familiar turner to turn them);
- M8 bolts (2 pcs.).
The flaring tool itself is very simple to make: both corners are fastened with a bolted connection, after which holes are drilled in the base of the frame, on the edge of which a chamfer is made. Such a tool will allow you to produce almost perfect flaring of brake pipes, regardless of their length.
The algorithm for processing pipes with such a homemade device is practically no different from the flaring method using a purchased factory machine:
- place the workpiece in the holder and fix it so that the outer edge being processed protrudes beyond the edges by about 5-6 millimeters;
- install a cone of suitable diameter on the tube;
- after the fittings are put on, we make sure that the direction of the thread is multidirectional (if viewed from the tip of the workpiece, the threads should be directed away from each other);
- We begin to screw the cone into the workpiece, which will lead to uniform flattening of the edge of the tube. You need to work slowly, making sure that the cone does not go deeper than the required value;
- We take out the part and carefully get rid of the burrs.
As a result, we get a neat, high-quality flared part that can be used for its intended purpose. Your first attempt may not be very successful, but once you get the hang of it, you'll be able to finish the edges of your brake lines just as well as using factory tools.