Solving the problem of airing the engine cooling system on Lada cars
Have you noticed that the heater in your car is blowing cold air?
There may be several reasons for the problem, but most often this occurs due to the formation of an air lock in the engine cooling system. Next, we will tell you how to remove air from the cooling system of Lada cars (Granta, Kalina, Priora, Largus, Niva, Vesta or XRAY) in several ways. Let us remind you that AvtoVAZ installs the same type of power units on its models, so the instructions are similar for all Lada cars.
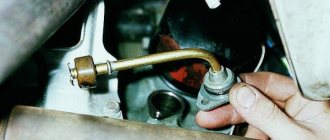
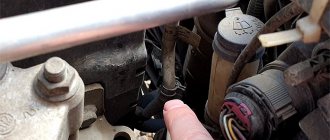
- Remove the hose from the throttle body heating.
- Open the cap of the expansion tank, cover the neck with a clean rag and blow into the tank.
- When antifreeze starts flowing from the removed tube, quickly put the hose back in place and tighten it with a clamp.
Attention! Coolant is a toxic substance, so we recommend that you use other methods to solve the problem.
- Warm up the engine until pressure builds up in the engine cooling system.
- Stop the engine and remove the hose from the throttle body heating. We do not open the expansion tank cap.
- As soon as antifreeze runs out of the hose, quickly put it back on and tighten it with a clamp.
Attention! Antifreeze can be very hot, be careful.
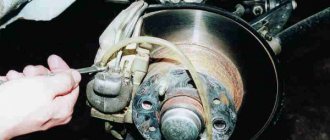
- With the engine cooled down, remove the upper hose from the expansion tank coming from the radiator of the cooling system.
- Fill the reservoir to the maximum with coolant and tighten the cap.
- We place the hose in an empty canister, and put a hose from the air pump (for inflating tires) on the tank nozzle.
- We pump up the pressure in the tank with a pump, and at the same time the antifreeze will pour into the canister.
- We monitor the level of coolant in the expansion tank and add it if necessary.
- After 2-3 additions of liquid, we restore all connections.
If air in the cooling system occurs periodically, then the car’s cooling system is not sealed. Check the connections of all system hoses for leaks, as well as the expansion tank cap. See also other photo reports on DIY Lada repairs.
How to remove air from the cooling system - 4 ways
Method for eliminating air lock No. 1
- We remove the upper pipe (return) from the coolant barrel and lower it into some clean container - antifreeze will flow through it, which can later be returned to the tank.
- Fill the reservoir with antifreeze to the maximum and close the lid.
- A pump or compressor hose is connected to the place where the pipe was attached - you will need to create pressure in the expansion tank.
- We start the pump, the liquid will begin to drain through the disconnected pipe into the prepared container. The main thing here is not to let the liquid in the tank drop below the minimum mark .
- When the liquid has almost reached a minimum, stop the pump and refill the tank with antifreeze discharged through the pipe. Thus, you need to repeat the steps 2-3 more times, starting from step 2. Then all the air will definitely be removed along with the antifreeze.
You can see a little more about this method of getting rid of CO air in the video:
Method for eliminating air lock No. 2
- You need to start the car and warm up the engine for 15-20 minutes, then turn off the engine.
- Remove any parts of the car that would prevent you from reaching and working with the expansion tank.
- In this method there is no need to unscrew the cover; you just need to undo the supply pipe. This must be done prudently and carefully, since there is little pressure in the system, and the temperature of the liquid is quite high - 80-90 degrees Celsius.
- After removing the pipe, you will hear the air being released, wait until it all comes out. At the moment when antifreeze runs through the pipe, attach the tube back. For greater reliability, you need to tighten the pipe with a steel clamp, then you will be sure that the connection is of high quality and will not leak.
- Install all the parts of the car that you disconnected for ease of work.
You can see more about this method of removing air from the cooling system in the video:
Method for eliminating air lock No. 3
- Warm up the engine to approximately 90ºС. Since the liquid will be very hot, it is recommended to use protective equipment, at least wearing protective gloves.
- Unfasten the extra parts of the car that block the space to the expansion tank. These could be high-voltage wires, a protective casing, etc.
- Unplug one of the throttle body pipes, and it doesn’t matter what kind of hose it is.
- Remove the lid of the tank, and then cover the neck with a cotton cloth.
- Place your mouth around the neck and blow a small amount of air into the system - from the created pressure in the system, it will come out of the pipes.
- When antifreeze flows from the hole in the cooling system, throw the tube back with a sharp movement and secure it back; it is recommended to additionally strengthen it with a tie or clamp. If you do not tighten it further with a clamp, air may enter the system again. We must try to do everything as quickly as possible so that the antifreeze does not spill onto other parts of the car. It is better to use an assistant for this action.
- If possible, replace the O-ring on the reservoir cap and screw the cap back on securely. Reinstall all parts that were previously removed.
Method for eliminating air lock No. 4
- Drive the car up a hill (you can use a jack), you need to position it so that the front of the car is significantly higher than the back, and the side with the expansion tank is higher than the other sides. Don’t forget to put the car on the handbrake; we also recommend placing obstacles under the wheels so that the car doesn’t start to roll.
- Start the engine for 10-15 minutes and then turn it off.
- Carefully unscrew the cap from the expansion tank.
- Press the gas pedal occasionally and add coolant cyclically, then over time the air will be removed.
- We also advise you to turn on the heater in the cabin to maximum mode, after which you need to keep an eye on the liquids - you will see how gradually all the air will come out of the CO. When hot air starts coming out of the stove, this will signal you that it is time to end this process.
The latter method of removing air locks is very popular. Modern cars have a system where the fan turns on automatically at a certain temperature, so there is no need to add gas. Therefore, you can wait until the temperature reaches the desired temperature and the fan turns on automatically, just don’t forget to add antifreeze. If fluid is not added at certain intervals, the system may become airy again.
As you already understand, all the methods work and are not so complicated, which is why you can remove the airlock yourself. All of them are based on the law that air is much lighter than liquid and therefore they all have a place. Each way to solve the problem is to create conditions for the system under which the plug itself will come out of the CO. We strongly advise you to carry out various preventive measures that will make it possible not to air the system.
An air lock forms in the engine cooling system.
It would seem that the formation of an air lock in the cooling system of an internal combustion engine is such a simple problem, but its presence seriously affects the current and future operation of the engine. Many drivers have encountered such phenomena as boiling antifreeze, antifreeze and water, failure of various sensors, seething - all this indicates that there is air in the system channels, which is stopping circulation. It also happens that after starting the engine the car does not heat up. When the first signs of air appear in the engine cooling system, prompt elimination of the causes is required.
How to “drive out” a traffic jam?
There are several ways to eliminate a blockage in the cooling circuit of the Lada Kalina power plant.
Next, let's look at their features and how to remove air. Method one
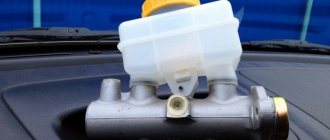
The location of the throttle assembly appears as a design convenience for the LADA Kalina cooling circuit. It is located at the highest point of the system. The procedure for eliminating a traffic jam is as follows.
- We set the heater temperature switch (knob in the cabin) to maximum.
- Under the hood, remove the valve cover protective panel.
- Use a screwdriver (cross-shaped) to loosen the clamp and remove the rubber inlet pipe from the throttle body fitting (you can also resort to removing the outlet hose).
- Unscrew the cap on the expansion tank.
- Now we use our own mouth. With its help and through a sterile cloth, we pump the air accumulated in the lungs into the expansion tank. We do this until antifreeze appears from the specified fitting.
- If this is successful, then return the hose to its place, secure it and screw the cap onto the tank.
However, this is not the only method of removing air.
Error p0504 Granta
Grant's low beam lamp
Front pads Lada Granta
Method two
Its principle closely echoes the manipulations in the first method. There is no need to get your mouth dirty or even open the tank lid. All actions boil down to:
- warm up the engine to operating temperature and turn it off;
- carefully removes the same hose from the throttle assembly;
- We observe liquid flowing out of the fitting: if it appears, then return the hose and tighten the clamp;
- a one-time manipulation may not be successful, so we repeat the procedure again until the liquid appears.
Method three
Let's look at another option for pumping air. Let us immediately note that this method is not particularly effective. The actions do not involve disassembling the system.
- Here you will need to drive your front wheels onto an embankment so that the highest point of the contour is the air plug in the cooling system on the radiator housing.
- It must be removed, as well as the cap on the expansion tank.
- We start the engine and bring the temperature in the circuit to the operating parameter.
- We observe a decrease in the volume of antifreeze in the LADA Kalina tank and immediately replenish it to the required level. During the process, air bubbles will be released from the liquid.
- We carry out the action until the release of air stops, as evidenced by the absence of “foaming” of the liquid inside the tank.
- We return the previously removed plug and cover to their original places.
New Lada: Branding Lada Largus. Effective Advertising in Largus. Enigma Company.
Signs of an air lock in the cooling system
You can determine the presence of air in the engine refrigeration system by conducting independent diagnostics and eliminating the causes. We carry out diagnostics based on the above criteria.
- Checking the system for leaks. Over time, clamps weaken, oxidize, or break completely. The hose also has shock absorption; over time, it bursts and cracks; either heat or cold gradually destroy the rubber.
- Problems with the thermostat. If the engine heats up very quickly after starting, that is, the cooling fan has already turned on, and the temperature sensor shows that it is about to push the needle into the red scale, then this indicates a non-working thermostat or the presence of air in the pump discharge pipe. In this case, the thermostat valve will be in the closed position, the coolant will move in a small circle. The opposite may also happen. The engine takes a very long time to warm up after starting. This means that the thermostat valve is fully open or there is an air lock in the thermostat. In all cases, you will have to remove air from the engine cooling system.
It’s easy to check the thermostat yourself; you need to do the following:
- start the engine;
- after a couple of minutes, touch the radiator pipes (the top one should be warm first, then cold, the bottom one should be cold);
- when the engine temperature reaches operating temperature, 80-90 degrees, the thermostat should open and the lower pipe should heat up.
It's also easy to check functionality. It is determined by the noise level (it is not worth using a noise sensor and determining the level in decibels (dB)), by the sound you can already feel how the pump is working. The vibration of the pump is also checked. The pump bearing may have fallen off.
The main clue is that air has appeared in the engine cooling system in the heater. If the engine is hot and the heater is blowing cold air, then there is an air lock.
Ways to expel air from the cooling system
To solve the problem of air in the cooling system, there is usually no need to resort to the services of a service station or use special equipment. Experienced drivers practice three main ways to bleed air from the cooling system in order to clear the plug themselves.
The first way to bleed air from the system
- The closing casing is removed from the engine. To do this, unscrew the cap on the hole for adding oil. Then the cover is removed (it is better to return it after dismantling the casing to prevent dust from getting into the motor).
- Any of the pipes responsible for heating the throttle assembly is removed. The cap from the opening of the expansion tank is twisted and covered with a cloth.
- Air will come out of the tank if you blow into it. A compressor can be used to remove air. The signal that the air has been removed will be the liquid that comes out of the pipe.
- All dismantled elements are returned to their place.
A faster and easier option for de-airing
- The engine warms up for 15 minutes, then stops.
- The cap cannot be removed from the expansion tank.
- The pipe on the throttle assembly is removed in the same way as the first method.
- The release of coolant is an indication that excess air has been removed from the system.
- The tube is mounted in working position
IMPORTANT! When using the method with a warm engine, it is necessary to carefully monitor the bleeding force, since the coolant can heat up to 90 degrees. If you lower it carelessly, you can get hurt.
Third way
The simplest, but not the most effective way to ventilate the cooling system.
- The car is driven up a steep hill and placed so that the engine is as high as possible.
- After stopping, be sure to apply the handbrake. It’s better to play it safe by installing additional wheel stands.
- The caps from the radiator and expansion tank are removed.
- The car engine warms up for 15 minutes.
- The accelerator pedal is periodically pressed and antifreeze is gradually added to the reservoir. When air bubbles stop appearing, all covers return to their place.
Reasons why air appears in the cooling system
Air appears in the system due to malfunctions, actions or inactions on the part of the driver. The following reasons are identified:
- The tightness of the system is broken. This could be a loose clamp, fitting, or cracks in the hoses.
- Work has been carried out to replace or top up the coolant. This is, as a rule, the most common reason for air getting in, because not everyone knows that it should be poured in a thin stream. If you pour in a thick stream, a funnel is formed that swirls the air.
- The air valve is out of working order. This valve is located in the coolant reservoir cap. During natural heating or by installing and starting an autonomous engine preheater, the volume of liquid increases, the pressure in the tank increases and excess air must be discharged through the valve in the lid. This is also a common reason. This is the first place to look for the reasons for airing in the cooling channels. This cover costs 100 rubles for modern VAZ cars. Whoever changes it, when he has already double-checked all the reasons, even after replacing the cylinder head, it turned out that the reason was precisely the non-working cover.
- Problems with the pump (pump). The seals and fibers in the pump may be faulty, causing air leaks.
- There is a leak through a bolt in the cooling radiator (not available on all models). If there is a leak of antifreeze, antifreeze or water, the lost volume is filled with air.
- Burnt cylinder head gasket. If the engine has already been overheated, then there is a possibility that the cylinder head gasket has burned out. When it burns, coolant is released either into the crankcase or into the exhaust system. Seething and boiling begins when the volume of coolant (coolant) has decreased and the entire void is filled with air. In this case, repairs and replacement of the head gasket will be required; for this you need to know what types of cylinder head gaskets there are.
Signs of air in the engine cooling system
- One of the most noticeable signs of incorrect operation of the cooling system is the unstable functioning of the interior heating stove. This is noticeable in the cold season: in this case the engine is normally warmed up, but the interior heating circuit does not work - no heat flows inside. Usually, along with this, the coolant temperature indicators “jump” and it may boil.
- The main symptom is excessively high engine temperature. In this case, the coolant level in the expansion tank may be within normal limits.
- The main causes of air in the cooling system
- There are 3 main types of reasons for unstable engine cooling: mechanical damage, violations during vehicle maintenance, and wear of parts. Among the most common ones auto mechanics call:
- Loss of seal in the cooling system. This may include damage to hoses, pipes, pipes and similar elements. The cause of depressurization can be either wear of parts or mechanical damage.
- Coolant leak. This is the same depressurization, but in this case it is easier to find the location of the breakdown - drips are visible on the problem parts.
- Violations of the rules when filling antifreeze. Inexperienced drivers often fill it with a wide stream, which causes air to enter the system. It must be filled in such a way that the air has time to leave the container. That is, the thickness of the jet should be less than the diameter of the neck.
- Damage to the air valve, which prevents unnecessary air from entering the system and removes it from the system. A faulty valve sucks in outside air, which enters the cooling jacket of the internal combustion engine. In this case, replacing the cover with the air valve or repairing it will help.
- Pump failure. A worn or defective pump, like an air valve, allows air into the system, disrupting its operation. Often the problem areas of the pump are the fiber or the seal. If the pump does not work correctly, it should be replaced.
- Broken cylinder head gasket. In this case, antifreeze may enter the engine cylinders. The main symptom in this case is white smoke from the exhaust pipe.
In this case, it will be necessary to carry out deaeration to remove air.
How to remove air from the engine cooling system.
The process of removing an air lock on cars is almost the same, be it Kalina, Priora, Granta, Hray, Vesta, VAZ 211(0-5), 2101-2107, Opel, Daewoo Matiz, Nexia, Nissan Almera, Gazelle Business, Audi 80-100 , BMW E39, Peugeot, Chevrolet Cruze, Skoda, Mazda, Mitsubishi Lancer, Suzuki Grand Vitara, Niva, UAZ, Volkswagen, Ford, Renault Duster, on Chinese Lifan and even on premium class cars.
There are several options for removing an air lock from the cooling system:
- Remove the plastic casing from the internal combustion engine. Why do you need to unscrew the filler cap to fill the oil? Remove the trim. After removing the casing, you need to close the neck to avoid the ingress of various kinds of objects.
- Find the pipes that provide heating for the throttle assembly.
- Remove any one pipe.
- Unscrew the cap of the expansion tank.
- Cover the neck with a clean piece of rag or tightly connect the hose and blow into it.
Thanks to this method, air and the general system are bleed. You need to blow until liquid flows out of the disconnected pipe. Then, immediately put the hose back in place.
- Start the engine and let it run for about 15 minutes.
- Turn off the engine.
- Disconnect any pipe on the throttle assembly.
- We do not touch the tank lid; it must be closed.
- Wait until the coolant starts to flow out.
- Place the pipe in place and tighten it tightly with a clamp.
To use this option, it is advisable to wear thick rubber gloves and overalls, because the temperature of the liquid is about 90 degrees.
- Place the car on a steep incline with the front end facing up (the steeper the better).
- Set the handbrake.
- Place wheel chocks (chocks) under the wheels.
- Unscrew the plugs from the expansion tank and the cooling radiator.
- The car should run for about 15 minutes with this setting.
- The antifreeze will gradually descend into the system, and the air will escape.
- Add antifreeze and gas.
- When the bubbles end, all the air has escaped.
How to remove an air lock from an engine cooling system
So, let's start with simple cars (old foreign cars, domestic auto industry). On such cars, air is removed from the cooling system as follows:
- All you have to do is drive the car onto the overpass. This must be done in such a way that the front part is slightly raised.
- Next, you need to unscrew a special cap on the radiator, after which the engine can be started.
- After several minutes of operation at idle, the air is bled from the engine cooling system.
However, this method will not help solve the problem on more modern cars. On such vehicles, the cooling system is of a completely closed type, that is, to de-air the air must be “expelled”. To do this, you can go in two ways.
If this method does not help, then the upper pipe that comes from the stove is weakened. You need to be prepared for the fact that the antifreeze itself will begin to leak. Next, the engine starts, and you need to monitor when air bubbles disappear from the leaking coolant. Their disappearance will indicate that the air lock has been successfully removed from the system. Let's look at this method in more detail using the VAZ Kalina model as an example.
Before starting work, you should prepare the keys for dismantling the plastic protective elements. You will also need a screwdriver to loosen and then tighten the clamps.
- So, the first step is to remove the plastic protection. This protection on the specified vehicle model is attached to the body using studs that have rubber seals.
- Next, you need to remove the clamp from the upper or lower pipe. Now you should unscrew the cap of the expansion tank. If the engine is hot, be careful as hot coolant may splash out of the reservoir!
- Then cover the neck of the tank with a clean rag. Next, a suitable rubber tube should be pulled over the neck. After this, you need to supply some air to the tank by blowing into the tube. It is advisable to do this using a compressor.
- After air is supplied to the tank, antifreeze should begin to flow out of the pipe from which the clamp was previously removed. After this, you need to make sure that there are no air bubbles in the leaking coolant, then quickly put the pipe over the fitting, put the clamp in place and tighten it. At this stage, the deaeration process can be considered complete.
- Next, you will need to bring the coolant level to normal (usually “on cold” it is poured 4-5 mm higher than o, since after warming up the internal combustion engine, the liquid will increase in volume and rise to o).
- After this, the engine can be started and warmed up. In some cases, this procedure requires slightly screwing on the expansion tank cap without tightening it. Then you should let the power plant idle, periodically raising the speed. This method will allow you to remove excess air that could have formed when adding liquid.
- If everything is in order, you can tighten the cap more tightly, but do not try to tighten it too much.
Protection against air lock formation in the cooling system.
In all matters related to malfunctions and subsequent repairs, the easiest way is to prevent the occurrence of breakdowns; in this case, it is necessary to prevent the appearance of an air lock. It is advisable to learn how to fix simple breakdowns and perform preventive maintenance yourself, then you won’t have to contact a car service center.
One of the main preventive measures for the formation of an air lock is not to bring the coolant to a boil (do not overheat the engine). If antifreeze is poured in, it can withstand higher temperatures than antifreeze, and even more so than water. When the coolant boils, steam is formed, which is pressed into the most inaccessible corners of the ignition system. In such cases, certain types of breakdowns appear.
Removing an air lock in the cooling system on a Priora
Welcome! An air lock - it can be created anywhere, namely in the engine cooling system, also sometimes air gets into the braking system and the car starts to brake very, very poorly (If there is a lot of air, the car will not brake at all), but also with with the cooling system, everything is not so clear; when air gets into it, the car’s engine, the first thing that starts to heat up too much and eventually overheats, in addition to this, the heater will still work poorly (the air from it will come out cold, when the car’s engine is warmed up ) and therefore air must be expelled from any system; in the brake system this is done using fittings and a hose with a bottle, but with the cooling system everything is simpler and no bottle or hose will be needed to expel the plug from the system.
Note! To remove the air lock from the system, you just need to find: A slight slope, and you may also need a screwdriver, so stock up on that!
Summary:
When should you remove an air lock in the cooling system? If you have recently begun to notice that the car has begun to heat up very much, and you have recently replaced the coolant with a new one and before that, the car did not heat up so much even with the old coolant, this indicates that air has entered the system and the fluid was replaced incorrectly, in addition, in order to be 100% sure that the system is aired, turn on the heater when the car’s engine is fully warmed up (the heater should be working in this case) and see what kind of air comes out of it, if slightly warmed up then in this case In this case, your heater fan is broken and needs to be replaced, but if cold air comes out when the engine is warm, then this indicates that there is a plug in your cooling system.
How to determine a plug in the cooling system?
First of all, before removing air from the cooling system, you need to understand that you have an air lock there. Its “symptoms” are the following:
- Increased engine temperature.
- Even at low temperatures, the thermostat turns on quickly.
- Antifreeze leak - small puddles accumulate under the car.
- Problems with the operation of the heater (stove).
- Unusual pump noise. Perhaps it has become depressurized or is simply working with increased effort, because the plug is preventing the normal circulation of fluid in the system.
Let’s say right away that these symptoms do not necessarily indicate the presence of an air lock, because both the pump and the stove can fail for another reason. However, the coincidence of these signs indicates that there is a plug in the cooling system. What to do?
How to remove a plug in the cooling system on a VAZ 2170-VAZ 2172?
1. There are only a few ways, each of which we will consider today, firstly, the very first method is very simple and does not require a lot of effort, you will need to find at the beginning any climb or slide and after finding it, drive up it and putting the car in neutral gear (the front should be higher than the rear), after standing for two minutes, let it idle and turn on the heater, make sure that the plug is removed from the system, otherwise let the car sit the same time, but apply gas at the same time, this way the traffic jam will most likely be removed.
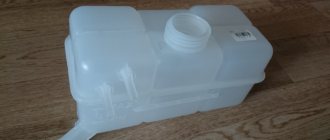
2. The second is also an effective method and it consists of the following: you need to unscrew the cap of the expansion tank (Indicated by the arrow in the photo below) when the car is not warmed up (it will still be cold, to put it simply), then get into the car and start its engine , let the car run for three, four or even five minutes (If necessary), then turn it off and turn on the heater, thereby making sure whether the air lock has left the system or not.
3. Well, the last way is to press all the thick hoses of the cooling system with your hand, there are four hoses in total, as you can see in the diagram just below (these hoses are indicated by numbers 4, 10, 13 and 18), so these are all the hoses that are shown in the diagram and you need to press it, then start the engine and let it warm up, check the result, if one of the methods does not help you, then in this case drain the liquid and fill it (If it is new) again (If it is old, then change it to a new one) , but don’t forget to disconnect the hose from the throttle assembly fitting; by the way, you don’t have to drain the liquid, but at the beginning just try to disconnect the hose itself from the fitting (Which hose needs to be disconnected and from which fitting, read the article: “Replacing the coolant”, in everything is written in paragraph 1) and if liquid does not flow out of it, then feel free to open the cap of the expansion tank and add coolant to the reservoir until it flows out of the hose or until the MAX mark reaches (All this is done on a cold engine ).
Additional video: When air usually appears in the system, it accumulates in the upper part of the entire system, so pay special attention to it, but what of our cooling system is at the top of the engine? Answer: the throttle assembly and both hoses connected to it related to the cooling system, so pay special attention to them, just below as you can see there is a small long video, the car uses a completely different principle for removing air locks on Nivas and Priora is also different, but don’t pay much attention to it, and you won’t do it on a Priora in the same way as shown in the Niva example (Priora simply doesn’t have a radiator cap), so just take this video as a note and delve a little into the words which are said in it, thanks to this you will be able to understand how to remove the air lock on your car, because everything is explained in quite detail in the video.
Removal methods
Now let’s move on directly to how to remove the formed air plug from the cooling system without resorting to the help of specialists.
I can offer 3 methods in total. Each of them has its own characteristics and can be used for certain cars. Therefore, think carefully before settling on one of the methods.
First method
This option is suitable for owners of VAZ cars, including:
- VAZ 2107;
- 2110;
- VAZ 2114;
- 2109;
- VAZ 2115;
- Lada Kalina;
- Priora;
- Lada Granta;
- VAZ 2111;
- VAZ 2108, etc.
If you have just such machines, then you can safely get to work.
The procedure looks like this:
- Access to the tank where the coolant is located opens. It is necessary to remove the security elements;
- Now one of the 2 pipes that go to heating the throttle is turned off. It doesn’t matter which pipe to disconnect;
- Remove the lid from the tank and cover the hole with a low-density rag;
- Blow into the reservoir to create excess pressure. You should blow until air comes out of the nozzle;
- Coolant should leak out soon. At this moment you need to secure the pipe with a clamp. Here it is worth turning to a friend for help;
- If the pipe is not secured, a new plug may appear;
- Return all elements to their place;
- Start the engine and you can drive for a couple of kilometers.
In theory, the symptoms of malfunctions should disappear. Just keep in mind that the method is suitable specifically for domestic cars, since it is possible to disconnect the pipe on them.
Second method
If the first option for removing air pollution does not suit you, I suggest using the second method.
Here the procedure is carried out like this:
- Start the engine at idle;
- Let it run for 10-15 minutes;
- Turn off the engine;
- As in the previous instructions, remove the protective elements;
- Open access to the tank;
- Remove only 1 pipe;
- The coolant will circulate throughout the system;
- The air will begin to escape without your participation;
- When the antifreeze starts to come out, the pipe returns to its place.
The method is frankly not bad. But there is one drawback. It consists in the high temperature of the pipes. It is strongly not recommended to handle them with bare hands.
Turn on the heater and check whether the proper volume of hot air begins to flow into the cabin. If yes, everything went well, and therefore you can enjoy the result of your own repair. The job is no more difficult than bleeding the clutch.
Third method
It is considered the most difficult because you will need a jack or some kind of inclined surface to work.
You need to act in the following sequence.
- The car is placed on a jack to raise the front end higher than the rear of the car;
- It is important that the radiator cap is higher than other system components;
- Be sure to turn on the handbrake;
- Start the engine and let it idle;
- After 15 minutes, turn off the engine;
- The covers are removed from the radiator cap and coolant reservoir;
- Smoothly press the gas pedal, gradually increasing the speed;
- At the same time, the assistant must add coolant to the reservoir;
- If bubbles are visible, the cork is coming out;
- Start the heater and continue pouring coolant;
- When you feel hot air in the cabin and the bubbles run out, the plug is out.
You can’t handle this yourself, so you’ll have to call an assistant. You should also carefully add coolant so as not to provoke the formation of a new plug. Always top up the coolant that is currently in the expansion tank. I have already told you separately about mixing antifreeze.
These three methods are used by the majority of car owners who decide to solve the problem of airing the cooling system with their own hands. If you have alternative options, be sure to write in the comments.
Thank you all for your attention! Subscribe, be sure to ask questions and invite your friends to join us!
( 2 ratings, average: 3.00 out of 5)
Did you like the article?
Subscribe to updates and receive articles by email!
We guarantee: no spam, only new articles once a week!
When the owner purchases a new car, he has an undeniable advantage, because he can feel and remember how each component or unit works, which is in an unworn condition. After some mileage, the happy owner of a new Lada Kalina already has a clear idea of how a good car should function. Over time, almost all components are subject to natural wear and tear and the first breakdowns begin to occur. This is immediately noticed by the owner, and all his efforts are concentrated on eliminating the defect that has manifested itself.
Reasons for air getting into the VAZ cooling system
The most common cause of air getting into the cooling system is leaky connections. Depressurization of connections, in turn, can occur due to the negligence of the car owner himself. Timely diagnosis and replacement of old gaskets significantly reduce the risk of air entering the system through this route. First of all, we are talking about cylinder head gaskets and pumps.
The top most common reasons for the formation of an air lock is also a complete or partial replacement of the coolant. Therefore, after such an operation, it is imperative to make sure that no air has entered the system.
And finally, the third most common reason for the formation of an air lock is considered to be a problem with the air valve located in the expansion tank. Due to wear or malfunction, the valve may “stick”, resulting in a plug.
Whatever the reason for the appearance of an air lock, it should be eliminated as an emergency. Otherwise, you risk getting into at least a major engine overhaul, or even into a much more unpleasant situation of a traffic accident.
Ways to solve the airlock problem
There are many such ways, but you can implement two strategies yourself. Both of them are implemented in an inspection pit and with all the necessary precautions. First of all, you will need protective gloves, otherwise you will be exposed to burns from the coolant. The engine must be preheated for coolant to circulate through the system.
Strategy one. Squeezing out the air plug
We place the car on the inspection hole and secure it with at least a hand brake and neutral gear, and if possible also with the help of wedges. The engine is turned off at the beginning of work.
Prevention of air jams
To keep the engine in order and minimize the risk of airing the system, you must remember the first and most important rule - the car needs the caring attention of its owner. And a manifestation of this attention should be a mandatory monthly technical inspection of the car’s cooling system. However, this requirement only means that you will drive the car into an inspection pit and examine places of possible leaks of coolant, oil and other liquids. Such preventive inspections can and should be done yourself - you will get to know your car better. It will also help you control your maintenance costs and eliminate operations that are not really needed, and learn to distinguish between those that are truly necessary.
In addition, the coolant in your car must meet quality and safety requirements. It’s not worth saving on it, as well as on other consumables for your car. After all, this is an increase in risks not only for the car, but also for you and your loved ones. A complete replacement of the coolant on VAZ vehicles should be carried out at least every five thousand kilometers.