Cars admin26.02.2020
Here we will talk about how to install central locking and alarm systems from scratch. The central locking kit usually includes 4 actuators, as well as a lock control unit. In theory, an alarm system should be connected to this block. Moreover, it is better to use only signal cords so that the power wiring of the actuators is mounted once (when installing a control unit). There are even two such connection options, and there is also a method when the driver’s actuator is connected directly to the signaling system. We present three schemes and compare them with each other.
Operating principle of control unit central locking
Let's look at the diagram attached to the installation instructions for Convoy X400 locks:
The actuator motors are connected “in parallel”. Blue and green wires are power. The black cord is the mass, but the “white” and “brown” cables are the control ones. In secret, let's say that the brown cord is the locking input, that is, closing occurs when it is connected to ground.
If the pawl on the driver's door is forcibly closed, the limit switch in the main actuator is triggered, and the brown cord is on ground. The block immediately supplies voltage to all actuators (locking occurs). To unlock the lock, you need to achieve the following: there is no ground on the “brown” cable, but there is ground on the “white” cable. Then the actuator rods extend. And the wires for “Manual Switch” are additional inputs, but they are controlled in the same way.
One thing needs to be noted. If the cord, white or brown, is shorted to ground for a long time, then everything works as it should. That’s why the “Manual Switch” should be a toggle switch, not a button.
Although, a double button can also serve as a switch, but on the condition that it is pressed for 0.8 seconds (continuously). Based on this property, the alarm can be connected to the control wires of the central locking system. The holding time of the relay in the signaling is set to 0.7-0.8 s, and this turns out to be enough.
Mechanical Differences
Scheme of direct control of door locks.
Related article: Tidying up an old bathtub
All central locks in terms of functioning are reduced to 2 main types:
- mechanical central locking;
- remote door locking.
Mechanical closing of the doors occurs by turning a regular key in the lock; most often this function is located in the driver's door. If you close one, all the others are automatically blocked. The remote control is serviced using a key fob or a button on the ignition key. Of course, the mechanical option is simpler and more reliable. The remote control can sometimes jam for many reasons - from a dead battery and poor-quality mechanism to dead batteries in the key.
Initially, all locks were manufactured with a centralized control unit, however, over time, the appearance of additional functions, such as locking the trunk door or fuel hatch, required decentralization in control.
Today, manufacturers offer the option of a central lock combined with an alarm system. This option is quite practical, since all security systems work synchronously, which increases the level of vehicle safety. In addition, central locking with an alarm system is more convenient to install - you don’t need to go to a car service center several times or disassemble the car yourself.
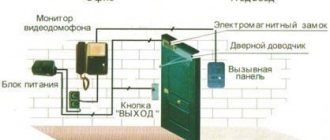
Schemes for connecting the alarm to the central locking system
The first of the possible options has already been considered: two wires are pulled from the central lock control unit to the signaling system, which are control wires.
In this case, it is better to exclude the contact switch shown in the diagram. Its role, as is easy to understand, will be played by the alarm (main unit). Where there are no separate taps, you can make T-shaped connections by connecting to the limit switch wires. This option is standard, but not the only one.
Standard option for connecting blocks
So, we have a lock control unit (CU Central Lock), as well as an alarm unit. The latter is equipped with a pair of relays, the taps of which are located on a separate connector. Where this connector is located, you need to find in the instructions (the wiring is also given there). The connection diagram will look like this:
The upper relay is activated to close the locks, the lower relay is activated to unlock the locks. During the period of contact closure, it is set to the following value: 0.7 s or 0.8 s.
Let us note two important points: a pair of relays is usually equipped with a unit of any modern alarm system. And by default everything is configured as it should. The central locking control unit, in turn, cannot but have control wires, and, as a rule, there will be two of them. Just in case, let's consider another option: there the limit switch is connected only to the signaling device.
When the decision is made by the alarm
Until now, we have used connection to the control wires coming from the limit switches to the control unit. Now they will need to be broken: the role of limit switches will now be performed by relays built into the signaling system, and we will connect one of the limit switch contacts directly to the signaling system.
Principle of operation
There can be many reasons for the breakdown or unsatisfactory operation of the central locking system. Some of them are caused by climatic conditions (high humidity, cold winters, etc.), and some are caused by improper installation and adjustment or wear.
All malfunctions of the central locking system (CL) can be divided into the following categories: complete or partial failure; The lock does not work or malfunctions due to mechanical or electrical defects or damage.
When identifying malfunctions of the central locking system, you should rely on this classification and begin repairs not with any specific actions, but with diagnosing the equipment.
This will save a lot of time, and possibly finances.
The central locking must function regardless of whether the car engine is running or not, and whether the ignition is on or not - the main thing is that the on-board network is not de-energized (the power terminals must be connected to the battery). The entire system consists of connecting wires, switches and:
- electric drives (solenoids or mechanisms with a motor) – electric central locking;
- vacuum drives, tubes, compressor and its control board - pneumatic (vacuum) central locking.
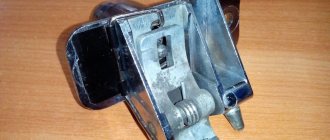
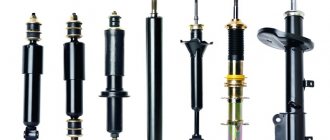
Actuators are usually called actuators or activators. A control drive is installed in the driver's door of the car, and also often in the front passenger door, which, when activated, sends an electrical signal through separate wires to open/close the remaining doors (to the control board or to the power relays of the remaining doors - only in the electric central locking system).
If there is a car alarm, repairs begin with testing it.
If the central locking does not work from its portable remote control, then first of all you should check how it works from the key and the button for opening/closing the driver's door (and the front passenger door, if it also has a control drive).
When the central locking is operated “manually”, you should look for a fault in the electrical and control alarm circuits. First of all, you need to check the battery of the remote control - it may be low.
If the central locking does not work or malfunctions even with “manual” control, then you first need to determine the nature of the malfunction. If the entire system fails completely, the vacuum central locking system will not hear the operation of the compressor, and the electric locking system will have weak clicking sounds of the triggered relays; the manual opening buttons on all doors will remain motionless.
In this case, it is necessary to check and, if necessary, replace the central locking circuit fuse (depending on the electrical circuit of the car, there may be more than one). Perhaps this is where the repairs will end. If, when the central locking is activated, a fuse burns out, it means that a short circuit occurs in the circuit it protects, and we must look for the reason that causes this.
The fuses are intact, but it does not work:
- there is no voltage at the input of the driver's door activator due to a break in the supply wires or poor contact at their terminals as a result of oxidation - the drive cannot transmit a control signal for the remaining doors (nothing);
- The limit switch of the driver's door activator is faulty or there is poor contact at its control terminals or a break in the wires coming from the control terminals - there is no control signal.
The repair should begin by checking the presence of power and control signals (appearance or disappearance of voltage on the corresponding contacts) of the drive when the central locking is activated.
Then they check the quality of the contacts and the integrity of the wires of the corresponding circuits.
The last thing to check is the limit switch, which is repaired or replaced if necessary (in electric central lockers it is always installed inside the drive).
The cause of the failure may also be a malfunction of the vehicle's electronic alarm circuit, and in the case of a vacuum central locking system, it may also be a failure of the compressor control board.
They are checked and repaired at the very end of the diagnosis.
If the central locking shows at least some “signs of life”, then we are talking about its partial failure - you can hear the sounds of the compressor operating in a vacuum central locking system and the clicking of a relay in an electric one.
Door buttons for manual opening may partially or not work on all doors, or they may move from the “closed” to “open” position and immediately back (or vice versa).
One of the reasons for this behavior of the central lock may be a violation of the fixation of the fasteners of the rod going from the drive to the lock mechanism (in the driver’s door, if all the activators are not working well, or in the one in which the unlocking/locking process is disrupted).
Most often, malfunctions occur that are accompanied by prolonged operation of the compressor (for 15–20 s or longer until its protection is triggered):
- The central locking opens and closes the car doors (and vice versa) until the pump turns off.
- All the doors opened/closed or the lock did not work on some (possibly uneven operation of the locks), and the compressor continues to hum until the protection turns it off.
The reason for the 1st case may be: a malfunction or “floating” due to condensation or other reasons; the contact of the driver’s door actuator switch - voltage is supplied from the drive via both control wires to the pump board (“plus” for both opening and closing - in As a result, the compressor either pumps air or pumps it out). It is necessary to inspect the switch and, if necessary, repair or replace it.
In the 2nd case it could be:
- Leakage of vacuum line tubes.
- From the limit switch of the actuator of one (or several) of the doors, the signal that the lock has closed/opened does not reach the compressor operation control board, and the pump continues to circulate air.
- Signals about locking/unlocking the locks come to the compressor board, but it “ignores” them.
Read more: The Volvo XC40 crossover became the European car of 2018
In the first case, first check the line to the door with a non-operating drive. The damaged area can be identified by the hissing of air. Broken tubes are replaced. If all the hoses are intact, then one of the drives is leaking - usually the membrane in them is torn or cracked. If there is no suitable membrane or used actuator, you will have to purchase an assembled door lock.
In the second case, the repair begins with checking the electrical circuits from the door actuators to the control board for the presence of voltage on the corresponding wire. You can simply compare the state of all circuits from all drives.
Most likely, the incorrect signal is coming from only one drive, and the voltage measurements on the wires of the bundle coming from it will be different from the readings on the wires from all the others. Then you should find the open circuit and repair it. Most often, damage occurs in the door corrugations.
If the wires are intact, then the reason lies in a faulty limit switch, which is being repaired or replaced.
In the latter case, it is necessary to disassemble the compressor unit and clean the contacts of the opening/closing alarm pneumatic sensor terminals - most likely, they have oxidized. If this does not help, then you need to check the control board circuit - it needs repairs.
After several years of operation, domestic central locking systems with solenoids begin to be afraid of downward temperature changes, especially in conditions of high humidity and in the autumn-spring period.
The solenoids first begin to jam, and after some time they may completely refuse to open/close the lock. They are usually found on cars with a factory-installed central locking system.
It is better to replace them with drives with a motor, but you can try disassembling them, cleaning them and lubricating them with fresh grease.
Failure to operate or partial activation of the activator of one or more doors can be caused by:
- a break or poor contact in the supply circuit from the driver's door activator switch to the power relay (directly or through the control board) and after it to the inoperative drive;
- relay failure;
- control board malfunction - if any;
- poor contact or broken wires at the terminals of the motor or solenoid inside the activator;
- wear of the activator gears (with motor) or its moving elements (for all drives);
- burnt motor winding or solenoid coil.
Repairs begin with checking the voltage supply to the drive that does not operate as it should. Voltage should be supplied to 1 wire when the “close” function is activated.
When opening, the voltage should disappear on this wire, and appear on the other.
Then, depending on the test results obtained, either the activator itself is checked and the fault in it is eliminated, or the entire circuit before it separately (before the relay, including the control board, if any, then the relay itself and the wiring after the relay) restoring the functionality of the damaged areas . The most common breakdown in the central locking system is a wire break in the corrugation between the door and the car body.
Central locking makes life easier for the driver by locking and unlocking all the car doors at once. That is why failures in its operation are perceived so painfully by the owner.
When you turn the key in the driver's door lock, a microswitch is activated, sending a signal first to the door control unit, and then to the central unit, from where control signals are sent to the control units of the remaining doors (trunk lid and fuel hatch).
The door lock actuator (actuator), having received a signal from the door control unit, turns on the electric motor with the gearbox. The rotational movement of the electric motor is converted into a reciprocating movement of the lock rod.
Thus, when you open the driver's door with the key, the locks of all other doors of the car are unlocked. When you lock the driver's door with the key, everything happens exactly the opposite.
If there is a special button on the ignition key, unlocking and locking the car doors can be done remotely.
- The undeniable convenience of central locking is that simultaneously with remote locking/unlocking of door locks, the car alarm is activated/deactivated.
- By the way, central locking is perfectly compatible with all types of alarm systems.
- If the central locking does not respond to pressing the button on the alarm control key fob, try closing the driver's side door with the key.
- If the central locking works, the cause of the malfunction is the portable remote control.
- The battery in it may simply run out, but the electronic module of the device may also fail.
Installing central locking - making the right choice
When choosing such an important and convenient element of your car, you first of all need to decide on the manufacturer, since if you give preference to a cheap Chinese product, you should not count on its long-term and high-quality work. It’s also worth paying attention to the options so as not to overpay for something you won’t use, and sometimes they will be annoyingly unnecessary. True, the lock controls are programmed during installation, and you may well ask not to configure them at all.
We will also take the liberty of talking about some of the tricks of such mechanisms. The function of pressing car windows is very convenient, but only if there are power windows. After all, there are often cases when, when moving, we slightly open the windows for unobtrusive ventilation, and then forget to close them. The option to lock all doors while the car is accelerating is also useful; this is especially true if you have children.
Installation Guide
How to install and connect a central locking system with an activator and a remote control with your own hands:
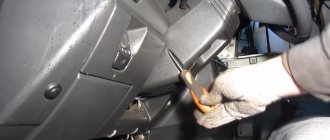
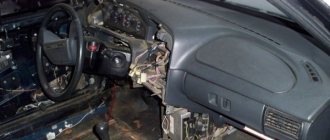
- First of all, the battery is turned off, after which the door trim is removed. Remove all trim, including all screws and fasteners. It is also necessary to unscrew the trim panel under the steering wheel.
- Next, you need to decide on the location where the device will be mounted. According to many experts, the best option would be to install the central locking system in the lower left corner, since even when the glass is lowered, it will not affect the operation of the central locking system in any way.
- The next stage of installing a system with an activator and a remote control will be the installation of lock activators. All these activators are mounted in the corresponding holes in each door. If there are no holes, you will need to drill them yourself. The activators are fixed with self-tapping screws.
- Next, you need to connect the activator to the lock rod. In this case, the most important point is the alignment of the center of travel of the rods. After these actions, the activators are required to place the fixing elements on the rods of the manual unit. Immediately after connection, you should immediately check whether the circuit is operational.
- Then you should lay out the wiring. The chain that comes from the activators must be securely fixed; for this, use clamps. The clamps should not be installed at the bottom of the door, since moisture often collects there. To do everything correctly, it would be more optimal to purchase a special corrugation or rubber pipe that will protect the wiring from the external environment and bends.
- The next step is to dismantle the control panel (instrument), you need to find the place where the wiring runs, usually it is behind the glove box. You need to connect the activator drives, then insulate and route them. The resulting chain must be laid under the control panel, as well as the glove box.
- Now you need to install the pass-through tube into the rack.
- Then you need to connect a fuse to the connector, and then connect it to the central locking unit. Eventually the center console will need to be assembled.
- Next, the wire is connected from the remote control system to the vehicle. The negative output is connected to the car body, and the positive output is connected directly to the fuse.
- When all connection steps are completed, all that remains is to check the functionality. To do this, connect the battery and check how all the doors close. It would also be a good idea to check the wiring. If everything works fine, reassemble the trim and other interior elements in the reverse order.
Gain access to wiring.
Install a lock on the door.
Connect the central locker to the car circuit.
We recommend: Handbrake cable: replacement, adjustment
How to install central locking without outside help?
Installing a central lock will not seem difficult to you, let's try to do it on our own. First, we'll remove the trim and dust curtains from the doors, so don't forget to stock up on plastic clips to attach it back. Disconnect the terminals from the battery; after all, this procedure involves electricity, so do not forget about basic safety precautions.
Next, we select the most suitable place to install the lock; in this case, it is necessary to take into account the location of the insides of the window regulators, as well as the movement of the glass; it is quite possible that it will be necessary to make a special bracket for attaching the lock. We fasten the lock using self-tapping screws. After installing it, it is imperative to pair the lock with the rod, which is responsible for raising and lowering the door lock button. It should happen smoothly and without effort. Next, the electrical circuit of the central locking is configured. From each of the activators there are four wires, two of them go to the body and are responsible for closing or opening the lock, and two - to the activator.
All wires are pulled through a corrugated tube; it can be seen between the body pillars and the door. This tube performs protective functions and prevents chafing of wires and the occurrence of holes in the insulation.
The further path of the wires is laid under the car flooring and reaches the central locking drive. Connect the wires to the unit according to the instructions. Check the operation of all car doors in a closed state in turn, so you can decide how to adjust the clamps relative to the central locking rod. Having received a positive result, do not forget to close the trim and screw the sills back on. Such a central locking connection scheme will take about an hour and a half of your time, but in the future it will increase the level of your protection.
Problems in the operation of the activator electric drive
The central locking actuator is quite fragile and does not tolerate overload. The activator body, made of plastic, can easily melt if the frequency of door closing is excessively high. The duration of the control pulse also plays an equally important role. Try to always remember about the extreme fragility of the activator and not to load it during operation.
We recommend: Alternator belt replacement technology
It is easy to guess that the activator is located in each individual door of the car. If the body of one of them melts due to overheating of the electric drive commutator, this becomes the cause of many problems:
- the activator on individual doors stops functioning;
- Constant overloads in a jammed electric drive cause the fuse to fail.
The actuator mechanism is entirely made of plastic. Gears can easily wear out and break during operation, or melt when the commutator overheats. As a result, when the central locking operates, characteristic creaking sounds are heard - a sure sign of imminent failure of the activators. Likewise, if the gearbox of the mechanism is humming, but the doors do not open or close.
Malfunctions of this kind can also be associated with all sorts of defects in the gearmotor and its traction. If you have recently replaced your central locking system, the reason may be that it was installed incorrectly. The mechanism may also be incorrectly adjusted or the fastening may be damaged. In any case, the door trim should be removed and checked visually.